
How to Manage Dashboard Administrators and Permissions
Click 日本語 for Japanese
Overview
This article explains the updated dashboard Administrators page. It covers the permission levels within the dashboard and how to manage administrative users. These users can log in to the Dashboard and administer Cisco Meraki networks and devices.
For managing users who access a client VPN or wireless network, refer to the article on Managing User Accounts using Meraki Authentication.
The new Administrators table simplifies managing Dashboard administrators and their access. It provides tools to view, filter, and act on admin accounts.
Access in the dashboard is additive. A user receives rights on a page based on their highest level of applicable assigned permissions.

Admin management best practices

By policy, Cisco Meraki's support team does not make Dashboard configuration changes on behalf of the customer. dashboard administrators must make their own configuration and account changes on the Meraki Dashboard. Cisco Meraki also cannot make any adjustments to organization or network permissions. An existing org admin on that Dashboard account must make all changes to dashboard administration. Refer to section 5.2 of the End Customer Agreement for details.
You (not Cisco) are solely responsible for maintaining administrative control over your dashboard account.
This policy protects the owners of the network from malicious intent. Follow these best practices when determining org administration to ensure the security of your Dashboard network:
- Dashboard organizations should always have at least two Full Access admins on the organization level.
- This protects access if one account is locked out or if access to that account's email address is lost.
- Select an appropriate Full Access admin carefully, because the Full Access (organization level) role has the highest level of control in the dashboard organization.
- The active owner of the Cisco Meraki hardware and licenses should be a Full Access admin in the organization.
- Ensure the username or email address of the Full Access admin is associated with a domain under your control.
- This helps when separating relationships with previous org admins for account recovery purposes.
- This allows control of the email alias of the org admin.
- Use two-factor authentication and store backup authentication keys in a safe place.
- For example, DUO Mobile works as a two-factor authentication solution with the Dashboard.
- Grant consultants limited access as needed.
- For technical configuration changes, offering temporary access as a network admin is the best option.
- If the consultant requires higher-level admin permissions, revoke all permissions once the necessary changes are implemented. Ideally, the hardware or license owner should be the only org admin.
- If the current Full Access organization-level admin is leaving the company, revoke or reassign their account permissions early in the off-boarding process.
- Treat an organization Full Access administrator like a domain admin for Active Directory or the primary contact for domain name registration. Only the person in this role can promote other users to this role.
Step-by-step instructions
Search and filter administrators
The Administrators table lets you search and filter admins by key attributes such as status, scope, role, and last activity. You can also sort columns to organize information and customize or rearrange columns to fit your needs.

Perform bulk administrator actions
To manage multiple administrators, select one or more admins from the table and perform the following bulk actions:
- Remove Admin: Select Remove Admin to remove selected administrators from the organization or network.
- Force Logout: Select Force Logout to log administrators out of their active Dashboard sessions.
- Unlock Admins: Select Unlock to unlock administrators currently locked out of their Dashboard accounts.
View and manage the administrator profile
The Administrator Profile provides a comprehensive view of an administrator's account details and settings. This includes their role and scope assignments, API key status, two-factor authentication (2FA) status, and authentication method.
Administrators with Full Access roles can also manage other admins directly from the Administrator Profile. They can modify role and scope assignments, unlock the account, force a logout, or remove the administrator.
This feature simplifies access control. For example, if a network administrator's account locks due to multiple failed login attempts, a Full Access admin can quickly unlock the account and review security settings such as 2FA status and API key usage directly from the Administrator Profile. This keeps disruption to critical network operations minimal.

Add a new administrator
To add a new admin, select + Add admin on the Administrators page. You can do this from either Organization > Configure > Administrators or Network-wide > Configure > Administration. Follow these steps:
Step 1: Enter admin information
Enter the First name, Last name, and Email address of the administrator. The email address always appears in lower-case on the Dashboard and when logging into the Dashboard.
To add multiple administrators, select Add admin. Permissions in the Assign role and scope step apply to all admins added in this step.
Follow these field rules:
- First and Last Name fields:
- Fill out both fields.
- Enter a minimum of 1 character in each field.
- Keep the combined length to a maximum of 255 characters.
- Invalid characters:
- The fields cannot contain the following characters: < and >.

Step 2: Assign role and scope
Assign a role to the administrator based on the access you want them to have on the Dashboard. All roles are listed in the Roles section of this article.
Assign a scope to the administrator:
- If you choose an organization-level role, the organization is preselected as your scope.
- For a network-level role, select the required networks to apply the role.

Step 3: Review
Review the final changes and save.

Roles
View all available roles for your organization or network in the Roles tab.
- Full Access
- (Organization scope): Highest level of access. Gives full administrative access to all networks and organization settings.
- (Network scope): Gives full administrative access to selected networks.
-
Observer
-
(Organization scope): Read-only administrative access to the organization without the ability to make changes.
-
(Network scope): Access to most aspects of a network, including Configure sections, without the ability to make changes.
-
-
End Customer
-
(Organization scope): End Customer (formerly Enterprise Admin) can control aspects of their specific organization without access to Firmware Upgrades, Licensing, SP Branding, SP Admin Users, and other service provider-focused features.
-
-
SM Device Manager
-
(Network scope): The Systems Manager role is limited by the devices it can manage and the features accessible within its Systems Manager network.
-
-
SSID Manager
-
(Network scope): SSID managers can modify SSID settings and view client analytics.
-
-
Switch Port Manager
-
(Network scope): Read-only access to the network combined with access to configuration changes on selected switch ports.
-
-
Client Monitor
-
(Network scope): Monitors and analyzes network client activity and location data to optimize connectivity, troubleshoot issues, and enhance client experience.
-
-
Guest Ambassador
-
(Network scope): Guest ambassadors can see the list of Meraki authentication users, add users, update existing users, and authorize or deauthorize users on an SSID or client VPN. Ambassadors can also remove wireless users if they are an ambassador on all networks.
-
-
Camera Footage & Sensor
-
(Network scope): Camera and sensor access includes four camera footage access levels and three sensor information access levels.
-
Each admin can only have one role per network or tag.
Assign limited access roles
Assign the SSID Manager role
The SSID Manager can modify SSID settings and view client analytics. You can only assign this role in wireless-only networks.
-
Select the SSID manager radio button under Network.
-
Choose the networks to grant access in the scope selection. This role applies to wireless networks only.
-
After you select the networks and choose Next, you see the SSIDs that administrators will have write access to. To change the enabled or disabled state of these SSIDs, refer to the Wireless > SSIDs page on the individual networks.
-
Review the changes and confirm.

Assign the Switch Port Manager role
Assign access at the switch port level to allow lower-tier technicians or external contractors to make basic changes to the network, such as cycling a port. To do this, tag individual switch ports and assign a Switch Port Manager role to an administrator in combination with those tags as a scope.
Add port tags
-
Go to Switching > Monitor > Switch Ports.

-
Select the checkbox next to any switch ports that should be tagged.
-
Select Tag.
-
In the Add box, select an existing tag, or create a new tag by entering the name and selecting Add option.
-
Once the desired tags appear in the box as bubbles, select Add.
-
The selected ports are now tagged as desired.
Tags should not have spaces. You can add the Tags column to the table using the + button on the right side of the header column.
Assign the Switch Port Manager role
-
Select the Switch port manager radio button under Network. Select Allow packet capture if applicable.

-
In the scope selector, select the networks that administrators can access. Combined and switching-only networks are available for selection.

-
In the scope component selector, select the specific port tags that administrators can access.

-
Review the changes and confirm.
Assign the Camera Footage & Sensor role
-
Select the Camera footage and sensor radio button. The card opens automatically, allowing you to select the levels of access you want to grant to camera footage and sensors.
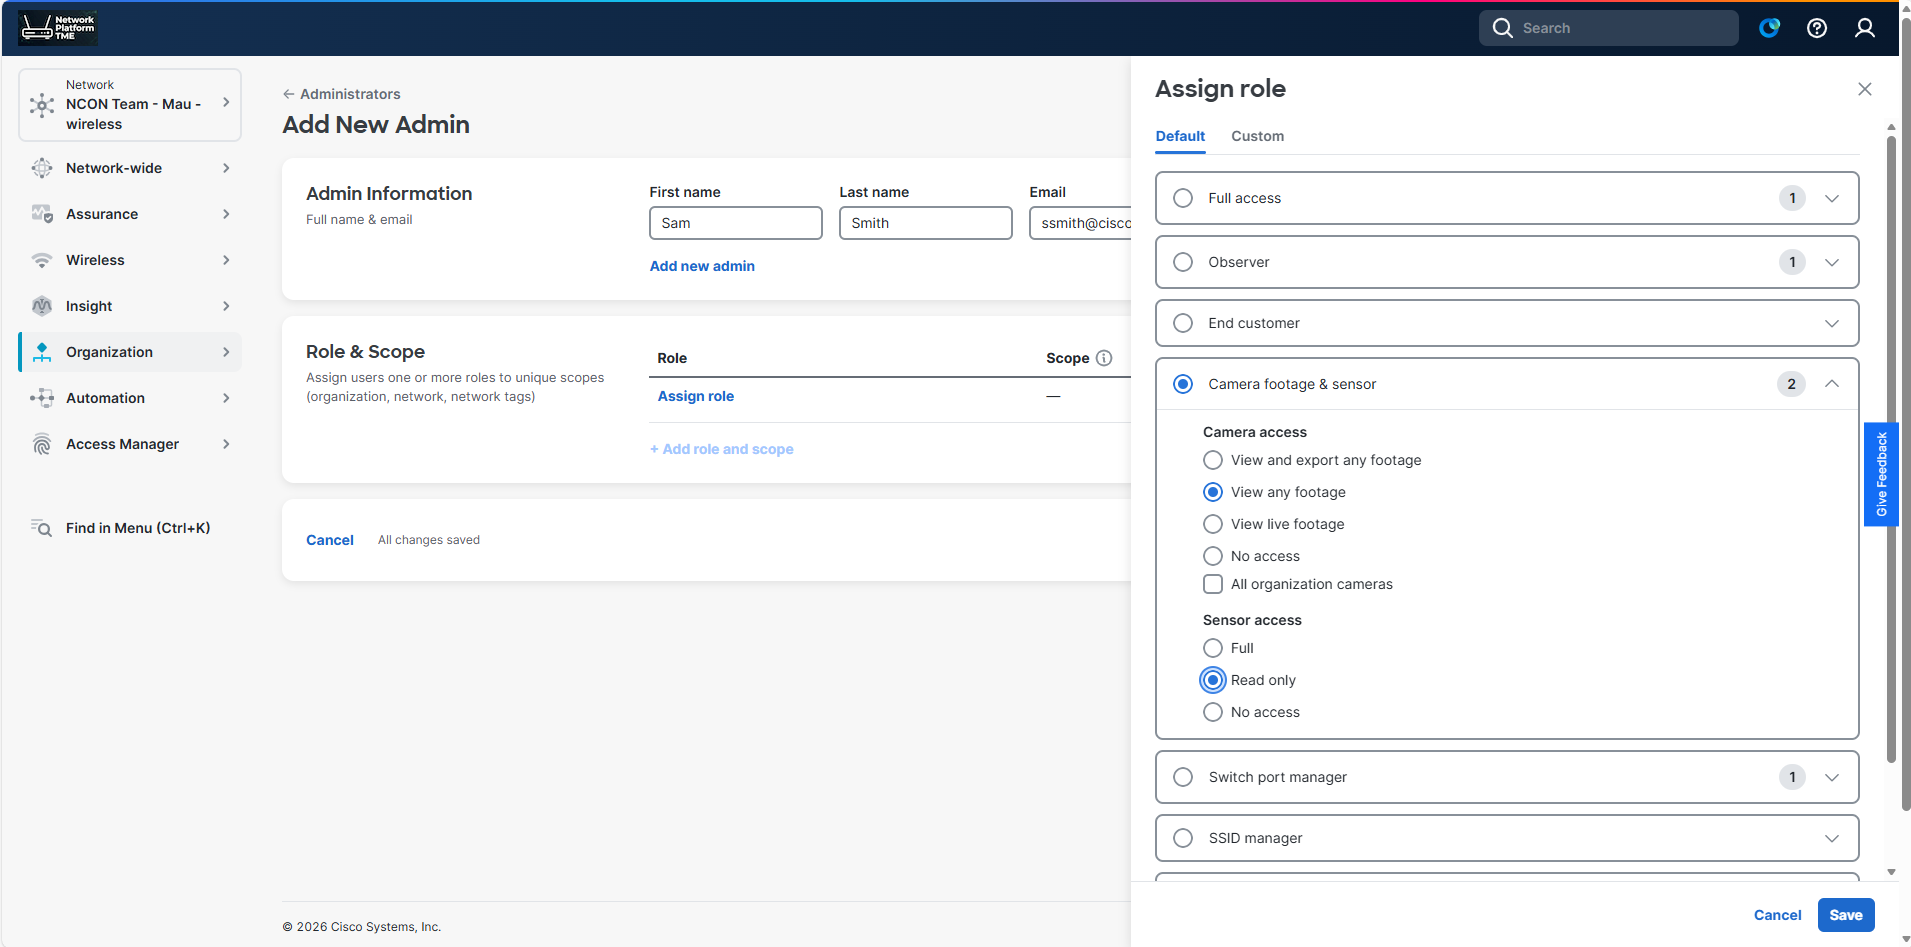
-
In the scope selector, select the networks that administrators can access. Only combined and camera-only networks are available for selection.
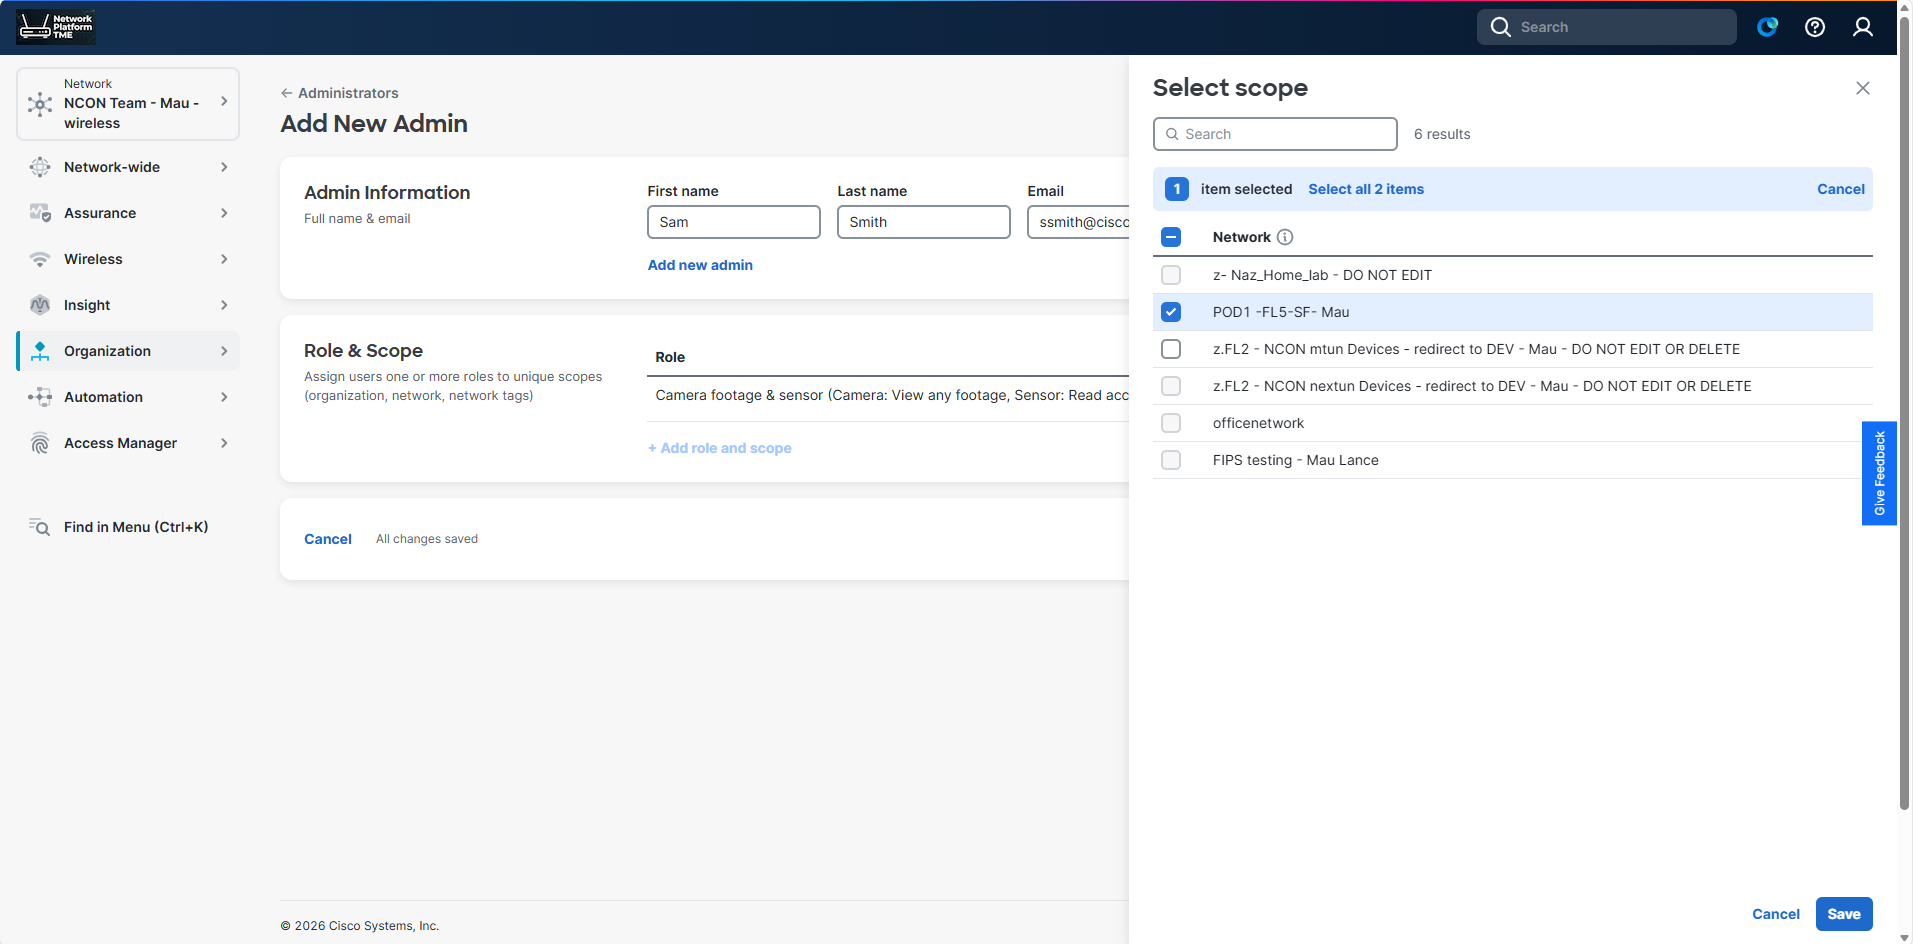
-
In the scope component selector, select whether to grant access to all cameras in the selected networks, individual cameras, or cameras by tag.

-
Select individual cameras or cameras by tag in the next step as preferred.

-
Review the changes and confirm.
Assign the Client Monitor role
The Client Monitor role is restricted to viewing a subset of the Monitor section in the Dashboard, with no ability to make changes. These admins can access summary reports but cannot schedule report emails directly from the Dashboard.
-
Select the Client monitor radio button under Network.

-
In the scope selector, select the networks they should have access to.

-
Review the changes and confirm.
Assign the Guest Ambassador role
Guest Ambassador admins can see the list of Meraki authentication users, add users, update existing users, and authorize or deauthorize users on an SSID or client VPN. Ambassadors can also remove wireless users if they are an ambassador on all networks.
This role is only available if the networks in scope have at least one SSID configured for Sign-on Splash.

Troubleshooting
Use the following behavioral notes when access does not work as expected.
Access precedence with additive permissions
Access in the Dashboard is additive. A user receives rights on a page based on their highest level of applicable assigned permissions. For example, an admin with read-only rights at the organization level (Observer role), but a Full Access role in a particular network, effectively has full access to that network — they can make and save changes to that network.
This also applies with tags. If a user has read-only and full access to a network based on different tags, the user receives full access.
Guest Ambassador limitations with network templates
The existence of network templates anywhere in a Dashboard organization prevents guest ambassadors from deleting wireless users.
Switch Port Manager configuration limits
An administrator assigned the Switch Port Manager role can only perform the following configurations: change the port name, disable or enable a port, configure link negotiation, enable or disable RSTP on a port, configure STP Guard, set a port as access or trunk, change the VLAN ID assigned to the port, assign an access policy, and perform port bounce and cable tests.