OpenRoaming integration with Cisco Spaces
Introduction
Mobile device users across the globe wish to stay constantly connected to the Internet across locations and geographies. Be it when entering an airport, coffee shop, a retail store, hotel, workspaces, or any other location, users wish to be connected to the Internet all the time, quickly, and without tedious onboarding processes. Today this is difficult due to the availability of multiple SSIDs that display poorly designed captive portals, the risks of connecting to a rogue SSID, or entering an insecure shared username and password combination to access the Internet. These annoyances often force users to stay on cellular networks and use up precious data and sometimes having no coverage at all. OpenRoaming provides a solution to these issues.
OpenRoaming provides mobile users with a hassle-free, friction-less, guest Wi-Fi onboarding experience by linking together Access Providers (such as public venues, retailers, airports, and large enterprises) with Identity Providers (such as service provider carriers, devices, and cloud providers). OpenRoaming enables users to get connected online automatically and seamlessly after signing in just once using a trusted identity provider. The service is completely secure and fast, and mobile users need not have to guess which Wi-Fi network to use or use tedious captive portal onboarding processes repeatedly. Mobile users will automatically and seamlessly get connected to the Internet wherever they go, thereby allowing them to download, stream, video chat, play online games, and access the Internet whenever and wherever they are.
By leveraging the power of the Hotspot 2.0 technology and the global, unprecedented reach of Cisco’s network, OpenRoaming will allow any on-premise visitor/ customer to seamlessly and securely get connected to the Internet and roam freely across 4G/5G and Wi-Fi 6 networks. The OpenRoaming Federation consists of Identity Providers such as Service Providers (leveraging your SIM card), device and cloud providers (such as Google and Apple ID), and Internet Wi-Fi providers. Access Providers such as retailers, hotels, and large venues to enable customers to automatically and seamlessly get connected to the Internet. This Wi-Fi connection is secured using industry-standard Wi-Fi Protected Access 2 (WPA2) protocols and encrypted authentication. Every network that users connect to will provide a seamless and secure experience, with a verified quality of experience, to help ensure that they are receiving the best and the most trusted Internet connectivity possible.
For example: If you run a retail or other public-access location, you will have the ability to accelerate your guest Wi-Fi attach rate at the click of a button. The amount of data you can gather about how people use your physical spaces can be leveraged with Cisco Spaces to help you better understand and identify your consumers’ behavior patterns, thereby creating an improved experience at your store and at the same time driving your business outcomes. Your customers will appreciate the better experience and you will be able to better engage with them.
Contact Meraki Support to enable this feature.
Key Benefits
There are several benefits that businesses can gain from leveraging OpenRoaming.
-
Simplify Wi-Fi guest access for your customers on-site
-
Significantly increase your Wi-Fi attach rate on site
-
Increased security for Wi-Fi guest access
-
Provide a better user experience in your venue, by providing seamless connectivity to Wi-Fi and seamless roaming between Wi-Fi and LTE / 5G
-
Take back ownership of your customers’ data through Wi-Fi, and get more valuable analytics
-
Better engage with your customers through Wi-Fi, Cisco Spaces, and your loyalty app
-
Offload traffic from cellular to Wi-Fi, reducing operational expenses.
Common Deployment Scenarios
Scenario 1: Carrier Offload
Carrier Offload is a technology designed to improve indoor coverage at a fraction of the cost by offloading cellular traffic to Wi-Fi.
Key Benefits for Venues:
-
Enhanced Connectivity: Improves overall connectivity for visitors, providing faster and more reliable internet access, especially in crowded environments.
-
Reduced Congestion: Alleviates congestion on cellular networks, ensuring robust voice and data services even during peak usage times.
-
Cost-Effectiveness: It is more cost-effective to utilize existing Wi-Fi infrastructure than to invest in additional cellular network capacity.
Scenario 2: Cisco Spaces SDK
Cisco Spaces SDK transforms how businesses engage with visitors by enabling seamless app-based Wi-Fi onboarding, location-based personalization, and real-world behavioral analytics. It addresses critical challenges, such as MAC randomization, by leveraging loyalty IDs instead of device MAC addresses, ensuring privacy-first, OEM-independent connectivity at scale. App developers can integrate seamless Wi-Fi onboarding for iOS and Android, empowering businesses to drive app downloads, incentivize loyalty program enrollment, and deliver differentiated experiences. With powerful insights into customer behavior and the ability to create targeted, location-driven engagements, Cisco Spaces SDK helps businesses enhance customer satisfaction, increase loyalty, and unlock new monetization opportunities.
Architecture for OpenRoaming
There are two possible architectures for OpenRoaming:
1. RADIUS Proxy Architecture (Default)
In this Architecture, OpenRoaming Authentication requests are processed through a proxy mechanism involving the Meraki Cloud and the Cisco DNA Spaces (DNAS) Cloud.
Authentication Traffic Flow
The OpenRoaming authentication process follows these steps:
-
Request Initiation: Access Points (APs) within the network boundary initiate authentication requests.
-
Meraki Cloud Proxy: These requests are directed to the Meraki Cloud, which acts as a proxy.
-
Secure Forwarding: The Meraki Cloud securely forwards the authentication requests to the Cisco DNA Spaces Cloud via a RADSec proxy.
-
Authentication Completion: The Cisco DNA Spaces Cloud processes the request, and upon successful authentication, the client device is granted network access.
Following successful authentication: User data traffic from the Access Points is routed directly through the Internet to its Wide Area Network (WAN) destination, operating independently of the authentication path.
Minimum firmware version required for feature support is MR 28.0.6 for Radius Proxy Architecture.
2. RADSEC Direct Architecture(Coming Soon)
We are introducing a significantly enhanced architecture for OpenRoaming on Cisco Meraki MR access points. Moving away from the previous proxy-based implementation, this new approach leverages RADSec (RADIUS over TLS) for a more direct, secure, and scalable connection. Instead of relying on a central cloud-to-cloud proxy, each Meraki MR Access Point now establishes a dedicated, encrypted RADSec tunnel directly to the RADIUS server endpoint integrated with Cisco Spaces.
Architecture Traffic Flow:
Meraki Access Points maintain a secure and managed connection to the Meraki Cloud via a Secure Meraki Tunnel. This tunnel facilitates device management, monitoring, and policy enforcement from the Meraki Cloud.
Advantages of RADSEC architecture
This per-device tunnel architecture provides the following advantages:
-
Easier Configuration from Spaces Dashboard
-
Improved Performance & Security: RADSec tunnels replace cloud proxy - reduces the number of hoops for authentication, reducing time to connect significantly, allowing:
-
Scalability
-
Seamless inter AP roaming
-
Secure accounting packets from APs
-
Visibility: Troubleshooting and visibility will be enhanced as we have less hops before reaching to Spaces connector
-
Serviceability: Improved tools for troubleshooting/support available with Spaces/Meraki support teams enabled via APIs
-
Reporting: Enables accounting packets for OpenRoaming Statistics: No' of onboarded devices – New/Repeat, Avg. Visit Duration, Devices by IDP, Data consumed per user etc
This new architecture streamlines configuration, improves troubleshooting visibility, and delivers a more robust foundation for seamless OpenRoaming deployments.
Pre-requisites for Configuring Meraki OpenRoaming
-
Ensure you have an active Cisco Spaces account.
-
Complete your Wireless Network Setup in the Cisco Spaces Dashboard. This should be done by initiating the Meraki Spaces integration from the Cisco Spaces.
-
Meraki APs should have the right firmware version installed. The following minimum versions are required based on AP models:
|
AP model generation |
Firmware Version (RECOMMENDED) |
|
Wi-Fi 7, Wi-Fi 6E, Wi-Fi 6 APs |
R31.1.6 and above RADIUS Proxy Architecture RADSEC Direct Architecture (Coming Soon) |
|
Wi-Fi 5 Wave 2 APs |
R30.7.2 and above RADIUS Proxy Architecture RADSEC Direct Architecture (Coming Soon) |
Some clients might refuse to connect to SSIDs using OpenRoaming when configured with weak encryption methods (e.g., WPA1 or 'WPA1 and WPA2'). Please ensure the SSIDs are configured with strong encryption, such as 'WPA2 Only' or 'WPA3', under Wireless > Configure > Access Control, in the 'WPA encryption' section.
Integrate your Meraki Network with Cisco Spaces
To get step-by-step instructions on how to connect your Meraki account to Cisco Spaces via the Meraki dashboard, go to the Cisco Spaces Setup Guide. The guide also provides information on licensing requirements for this integration.
Configuration Prerequisites on Meraki Dashboard
Before you begin OpenRoaming Configuration, please ensure that either one of the following conditions are true:
-
There exists an Unconfigured SSID for your Meraki Network, Spaces will pick an unconfigured SSID for OpenRoaming.
-
In case you do not have an unconfigured SSID, rename an existing SSID to the "target" SSID name planned for OpenRoaming use.
Once the OpenRoaming configuration is pushed from the Spaces to Meraki, it is not recommended to modify the RADIUS Settings or Modify the SSID name directly from the Meraki Dashboard.
Configure OpenRoaming SSID in Spaces Dashboard
To configure OpenRoaming in Cisco Spaces follow the below steps:
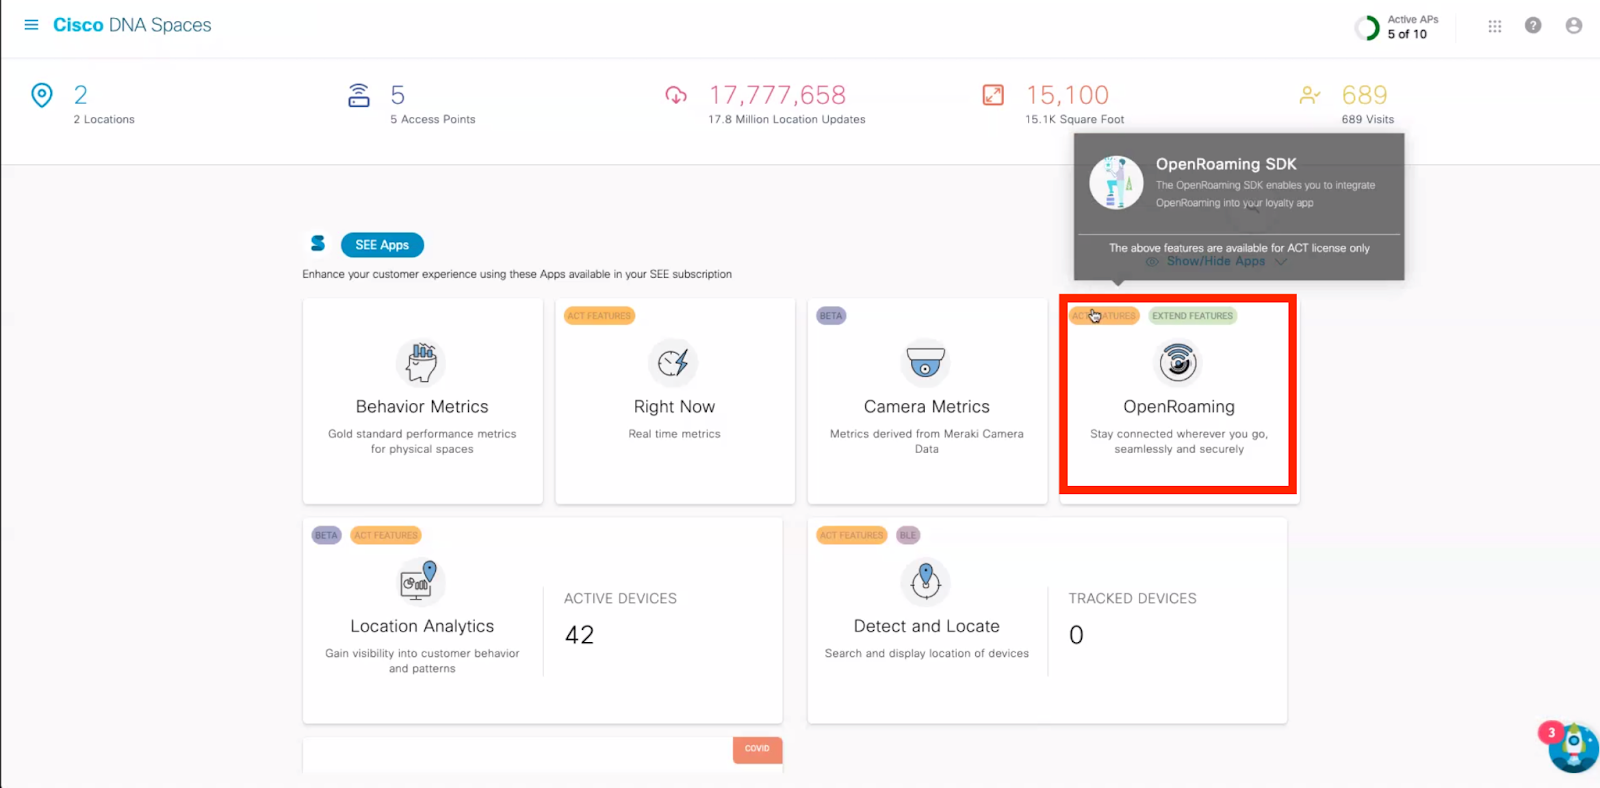
1. Click on the OpenRoaming title in Spaces UI
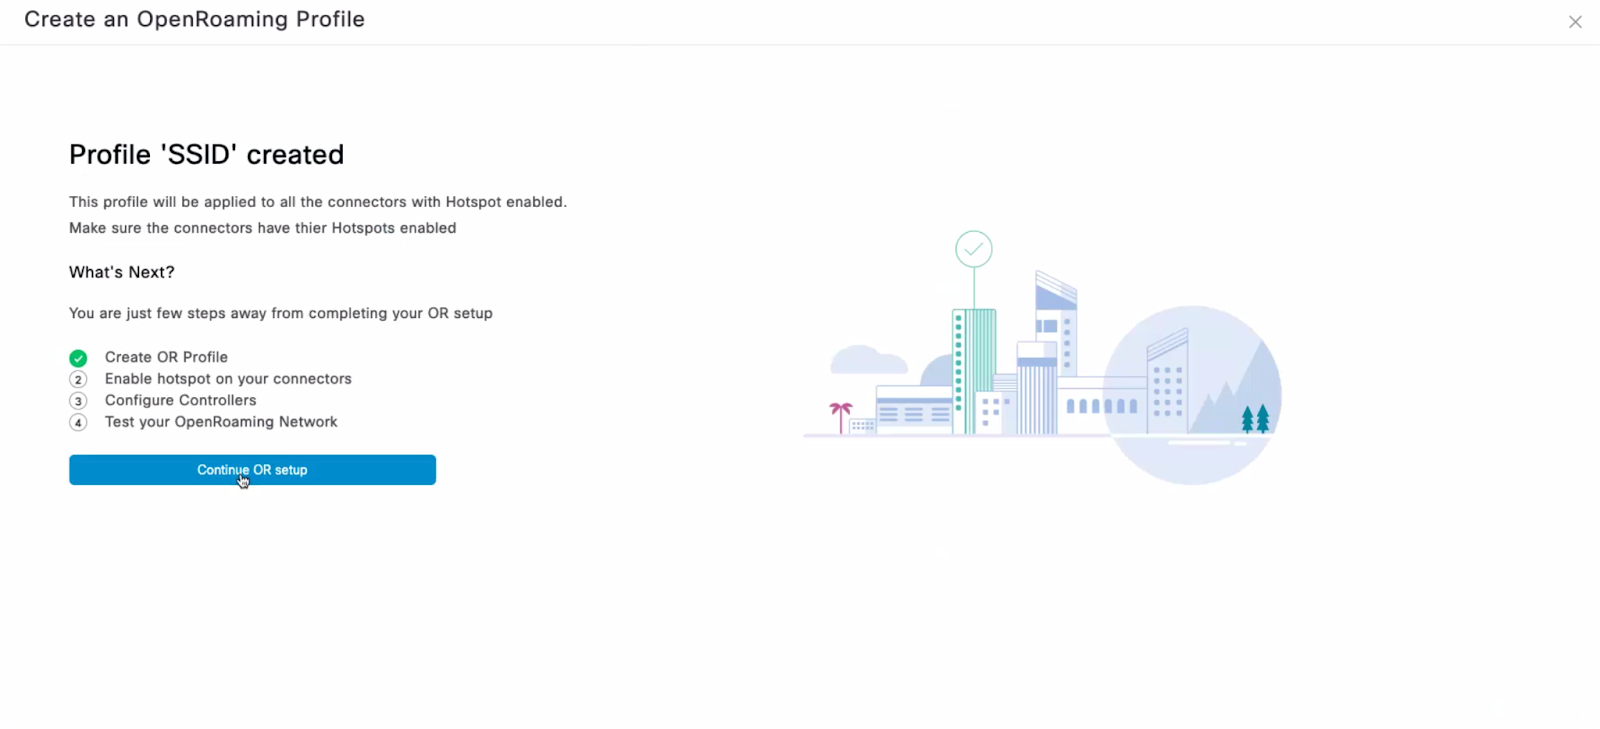
2. Create an OpenRoaming profile with the required configuration.
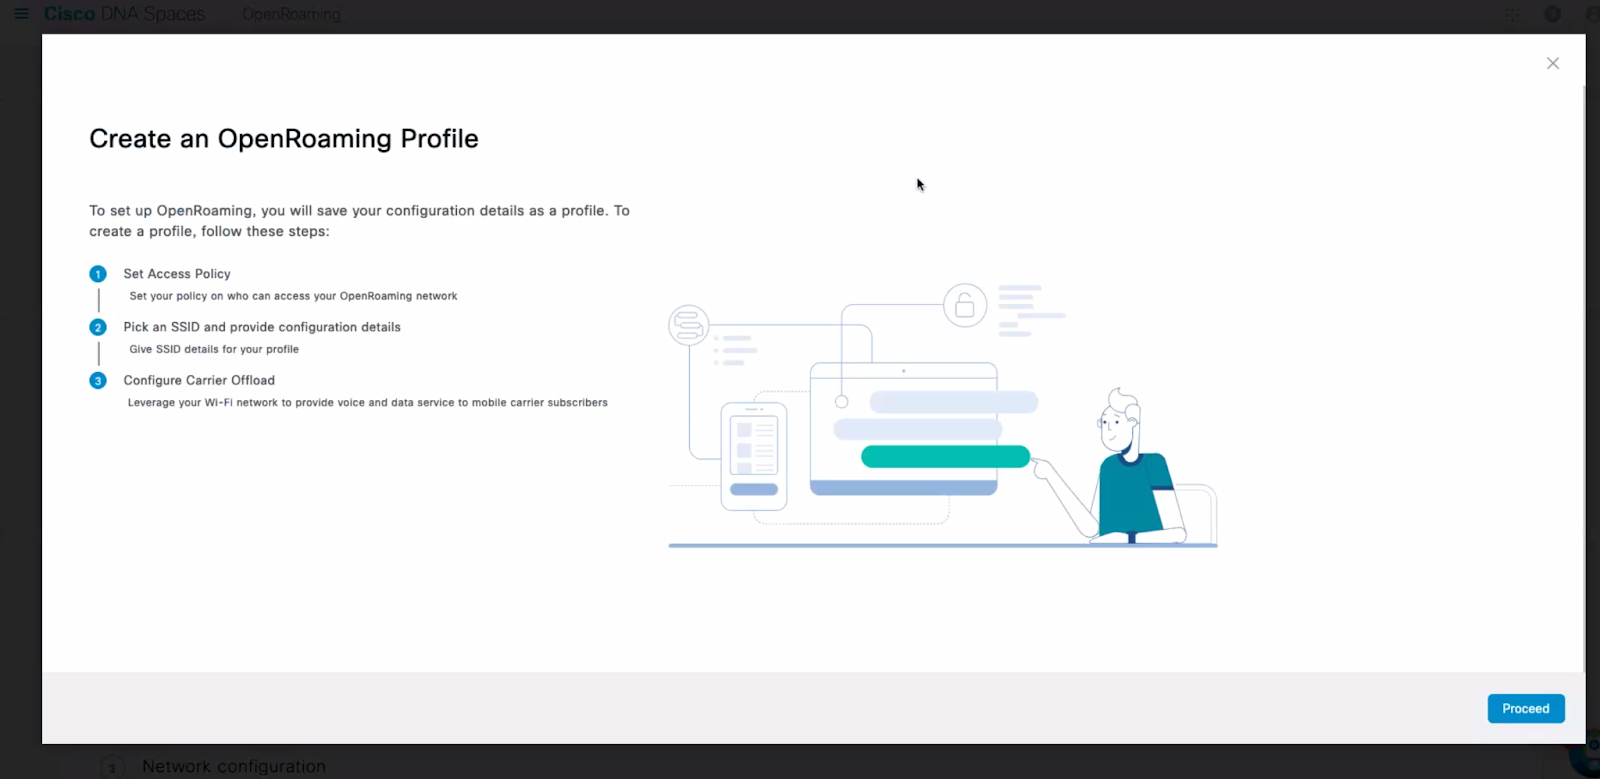
3. Follow the steps shown by the Spaces UI to create an OpenRoaming profile.
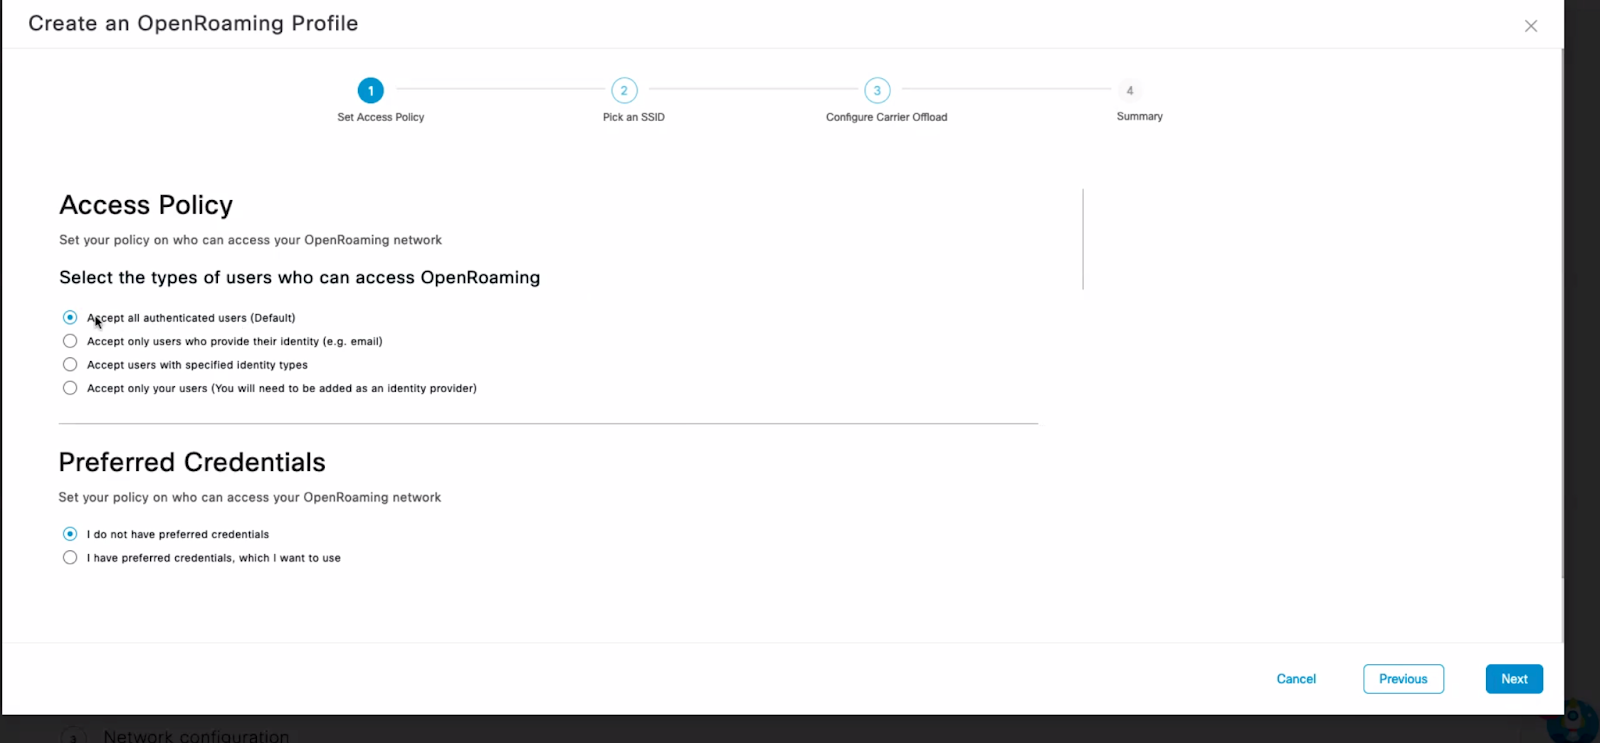
3. Select the SSID which needs to be configured for OpenRoaming. If you want to create a new SSID then enter the name of the SSID and Spaces will create and configure the SSID for OpenRoaming.
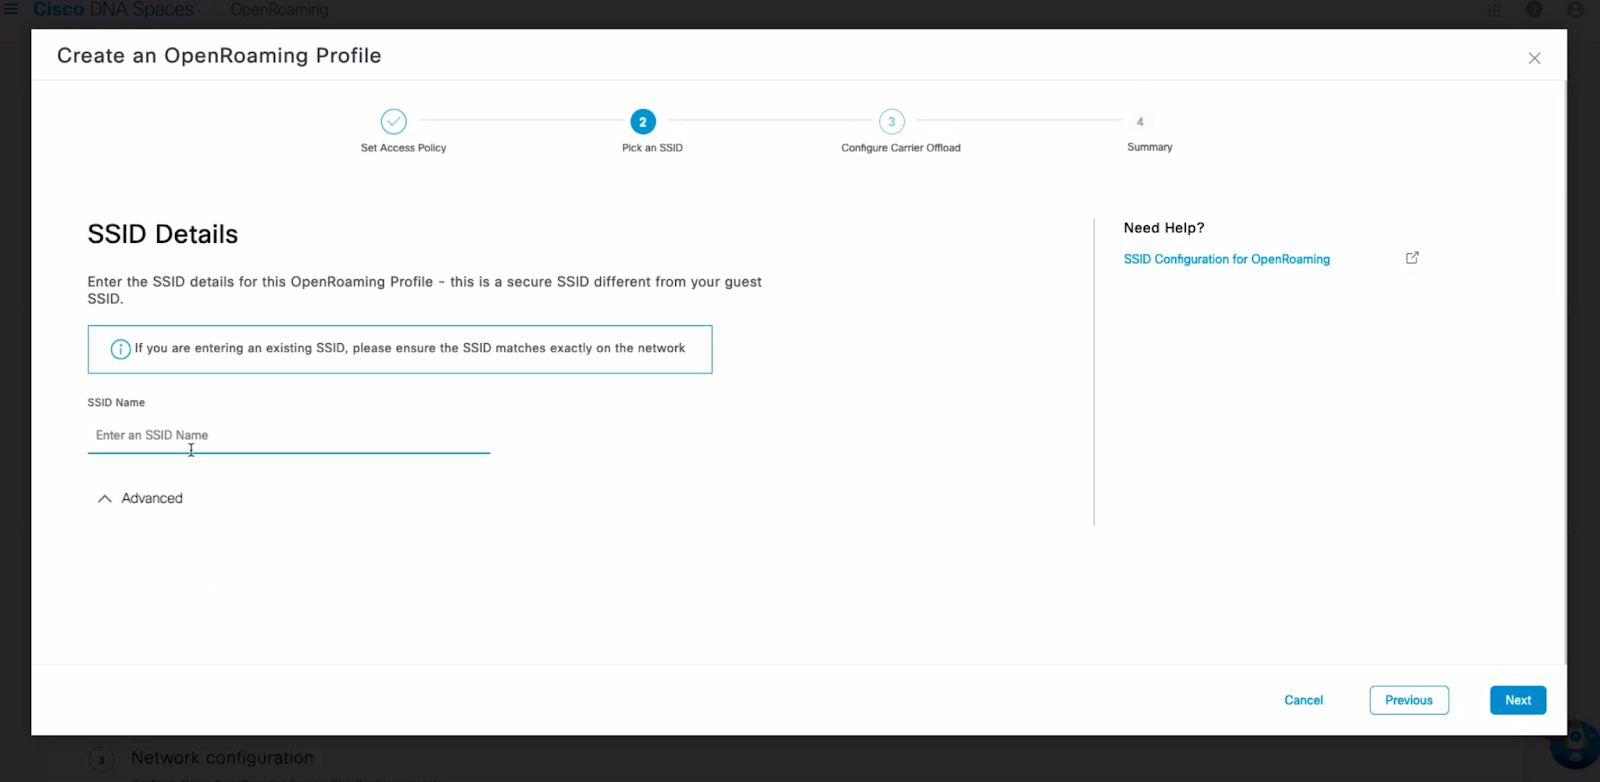
5. After following all the steps an OpenRoaming profile will be created by DNAS Spaces. Activate this profile on the required Dashboard network.
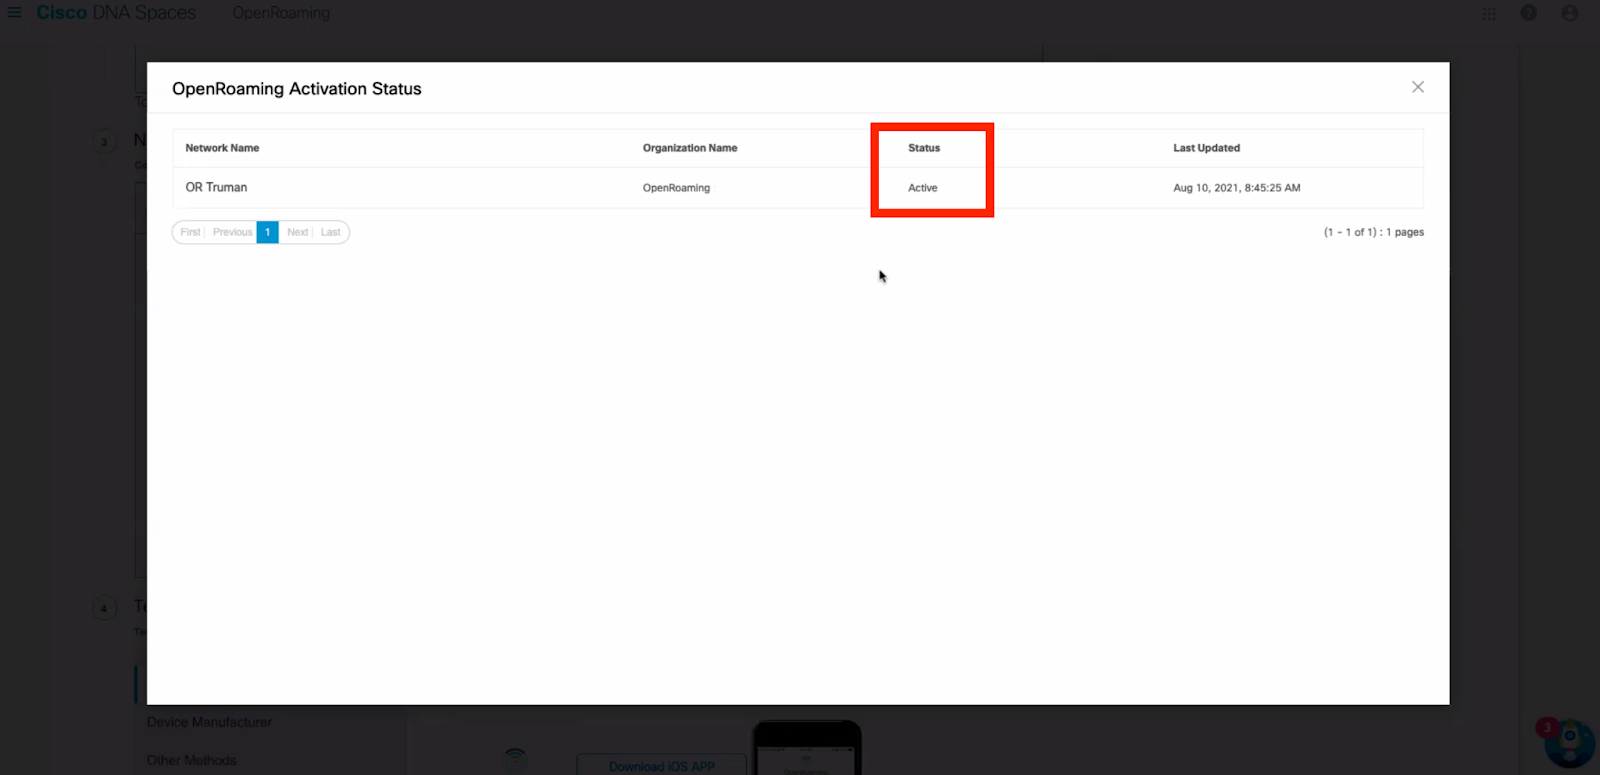
If all the steps are followed correctly the status of OpenRoaming will change to Active and Cisco Meraki APs will start broadcasting the configured SSID for OpenRoaming.
For a detailed step by step process of configuring refer to Spaces OpenRoaming configuration document.
Note: Only one OpenRoaming SSID can be created on a per network level.
Client Examples
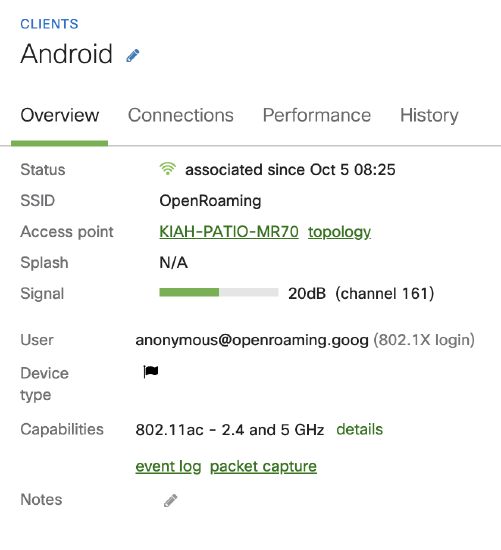
Android 11
Android 11 recognizes the OpenRoaming spec and if the device has multiple accounts, it will prompt you to select which one you want to use.
Successful client connection in dashboard:
Basic Troubleshooting
Client device is not connecting
|
Possible cause |
Next step |
|---|---|
|
OpenRoaming app is not installed |
The user needs to download the OpenRoaming app and sign in |
|
The client device is not signed into the OpenRoaming app |
Users who wish to connect to an OpenRoaming SSID need to sign into the app |
|
The user profile is not accepted |
Administrators need to check their Spaces settings to ensure the chosen client device is allowed |
|
The device is already connected to a known SSID |
Users need to manually choose the OpenRoaming SSID |
User is prompted for credentials
If a device is prompted for credentials, it's likely that:
- the SSID is misconfigured
- the OpenRoaming profile is not correctly configured on Spaces
Please check the OpenRoaming profile and, if necessary, recreate it.
Can't find OpenRoaming app in store
If the client device cannot find the app in the store, it's most likely because the device does not support Hotspot 2.0. Please as the customer to check the device specifications and if needed, upgrade its firmware.
Frequently Asked Questions
This document provides information about the new OpenRoaming implementation using RADSec on Cisco Meraki MR Access Points, integrated with Cisco Spaces.
1. What is OpenRoaming with RADSec on Cisco Meraki MRs?
This is an enhancement to the OpenRoaming feature on Cisco Meraki MR access points. It replaces the previous proxy-based method for communicating with Cisco Spaces with a more direct and secure connection using RADSec (RADIUS over TLS).
2. Why is this new implementation being introduced?
The previous proxy-based architecture for OpenRoaming communication with Cisco Spaces had stability and scalability issues. This new RADSec-based approach is designed to provide a more robust, scalable, and reliable solution for OpenRoaming deployments.
3. What are the key benefits of using OpenRoaming with RADSec?
-
Seamless Configuration: Customers can configure OpenRoaming easily through Cisco Spaces using a cloud-based connector.
-
Improved Stability: The new architecture addresses stability issues found in the previous proxy-based implementation.
-
Enhanced Scalability: By creating a secure tunnel on a per-device level, the solution is designed to scale effectively, supporting larger networks
-
Reliable RADIUS Accounting: RADIUS accounting, which was previously a blocker, will now function correctly, providing valuable data for network administrators and service providers.
-
Increased Visibility: Network administrators and support teams will gain better visibility into the status of RADSec tunnels at the network/organization level and on a per-AP basis. They will also be able to view the certificates used for RADSec tunnels directly within the Dashboard UI.
-
Resilience to Configuration Changes: Changes to other SSID parameters (like RF profiles or firewall rules) should no longer disrupt the OpenRoaming integration.
-
Secure Authentication: Continues to leverage secure EAP-TLS authentication for seamless client onboarding on open networks.
4. What is the primary use case for this feature?
The biggest use case is providing secure and seamless access on Guest/Open networks. It allows users to automatically and securely connect to Wi-Fi using EAP-TLS without manual interaction, which is particularly beneficial for service providers and public venues.
5. How is OpenRoaming configured with this new method?
Configuration is primarily done via APIs, typically initiated from the Cisco Spaces side. API endpoints will also be made public for customers who use their own connectors.
6. How does this improve troubleshooting?
The new implementation provides enhanced tools and visibility for support teams and administrators, including:
-
Viewing the certificate used for RADSec in the Dashboard UI.
-
Viewing the status of RADSec tunnels at a network or organization level.
-
Accessing event logs on a per-AP level that indicate when a tunnel connects or disconnects, along with reason codes.
7. Which Cisco Meraki AP models are supported?
This implementation is supported on Wi-Fi 5 wave 2 and above Meraki MR Access Points.
8. Does this replace the existing RADSec proxy feature?
Yes, this new implementation is intended to replace the existing RADSec proxy-based architecture for OpenRoaming with Cisco Spaces. Efforts will be made to clean up legacy UI and APIs over time as customers adopt the new architecture.
9. Are there any recommendations around fast roaming while using this feature?
We recommend that 802.11r fast roaming be turned ON while using this feature.
10. Is there a recommendation around server timeout and retry count for the SSID using OpenRoaming?
Yes, the following values are recommended for “Retry count” and “Server Timeout”
|
No of Retries |
3 retries |
|
Server Timeout |
5 sec |

