
Branch Network Setup
This section provides additional information on how to configure MX security appliances as the Internet gateways for branch locations.
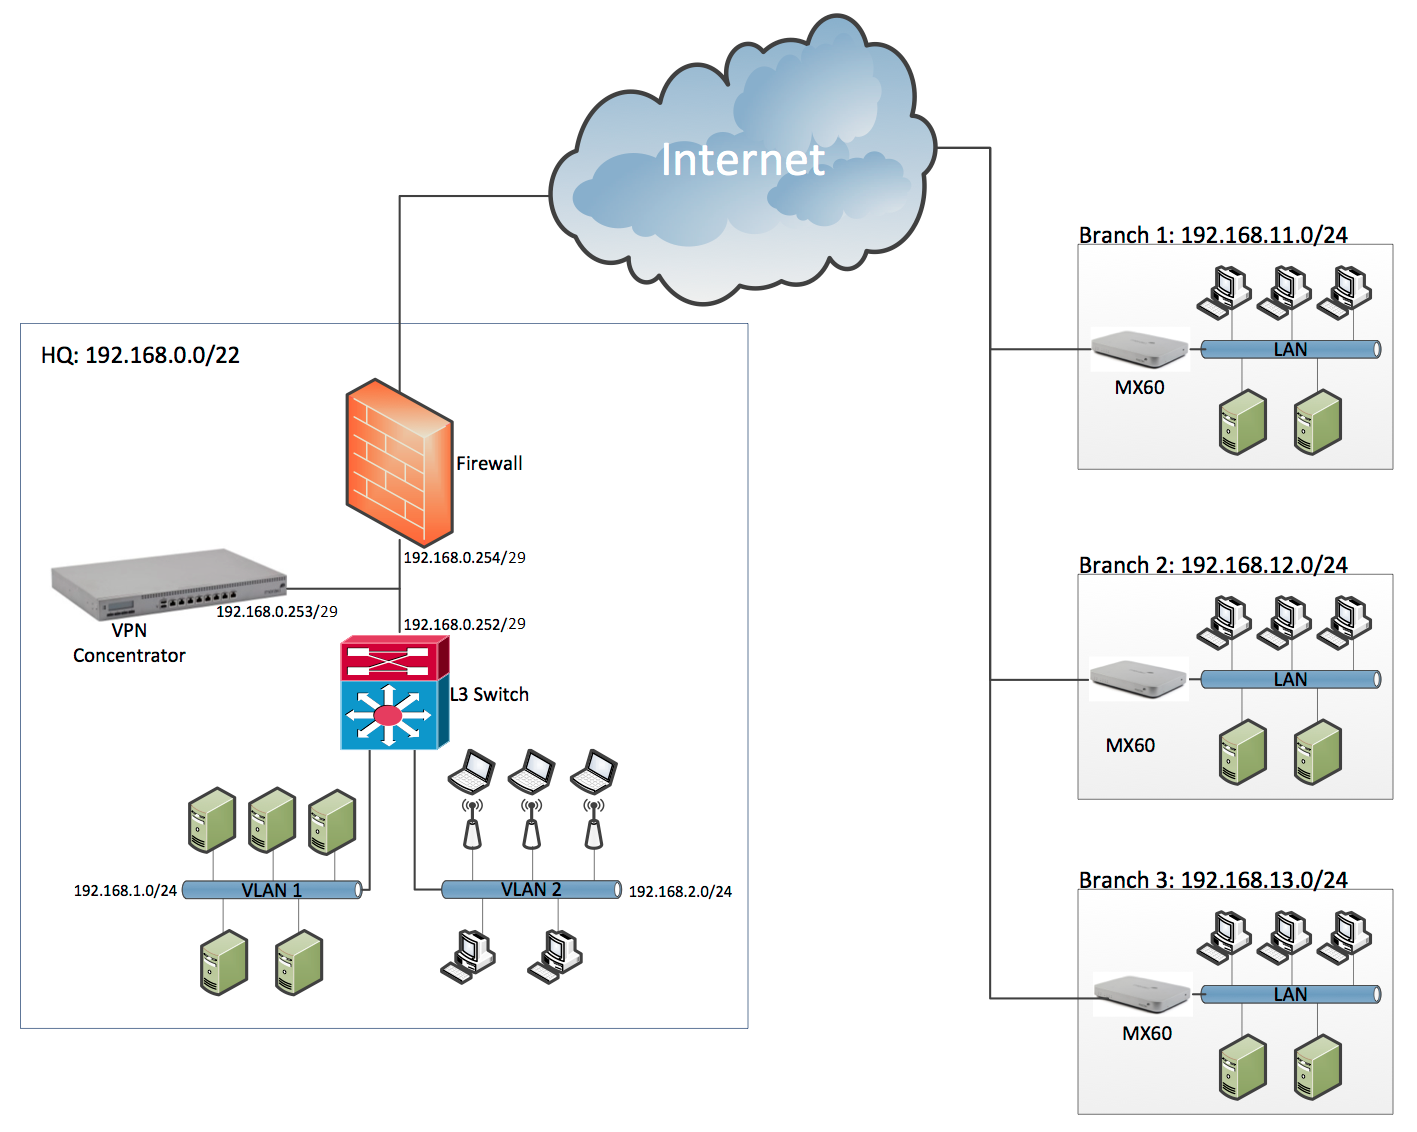
Example topology
In this example, there are three remote locations that use MX60 devices. The devices are connected to HQ by means of a Meraki site-to-site VPN.
Branch WAN and LAN settings
First, you need to make sure that the appliance can connect to the Internet and access the Meraki Dashboard. Once this is done, you can use the Dashboard to set the subnet range and DHCP settings, as well as to assign fixed IP addresses to devices such as printers and access points within the branches.
Here are the WAN and LAN settings for the Branch #1:
- Connect the appliance to the DSL or cable modem through the modem's Ethernet output.
- Set the MX series WAN IP address and DNS settings, with the following two options
- You can let the device negotiate these settings with the local ISP automatically through DHCP.
- Alternatively, if your ISP has provided you with a static IP address and DNS settings, you can enter them manually. (For more on how to set the device WAN IP address, refer to the appropriate installation guide for your MX series device.)
- Login to your Dashboard account at https://dashboard.meraki.com.
- To verify that the device is accessible in the Dashboard, choose Security & SD-WAN > Monitor > Appliance status.
- Assign a subnet for each branch:
- Choose Security & SD-WAN > Configure > Addressing & VLANs.
- Choose whether you want a Single LAN or multiple VLANS under Routing > LAN Setting.
- Enter the local subnet scope in CIDR notation in Subnet field. For example, if your subnet is from 192.168.11.1 to 192.168.11.254, you'll need to enter the following information in the Subnet field: 192.168.11.0/24.
- Enter the VLAN Interface IP (for example, 192.168.11.1). This sets the IP address of the MX device on this LAN.
- Choose your DHCP option.
- For locations with a third-party DHCP server (such as a Microsoft Windows server that serves as the local domain controller):
- Choose Security & SD-WAN > Configure > DHCP.
- Choose Do not respond to DHCP requests.
- For locations, where you'd like the MX to provide DHCP services:
- Choose Security & SD-WAN > Configure > DHCP.
- Choose Run a DHCP server.
- For locations with a third-party DHCP server (such as a Microsoft Windows server that serves as the local domain controller):
- Connect a laptop to one of the LAN ports of the MX, and then make sure that you have Internet access and that you are getting an IP address within the subnet field you have assigned.
Site-to-site VPN
Traditional site-to-site VPN
Although there are a variety of solutions for site-to-site VPN connection, all peering devices need the following information:
- Preshared key (PSK) or certificate
- Public IP addresses of other peer devices
- NATed subnets behind the peer devices
- VPN phase1 and phase2 parameters to ensure matching encoding and various other settings
Based on the information above, peer devices establish the VPN tunnel through the following:
- Connecting to each other directly
- Jointly negotiating VPN phase1 and phase2 offers
- Adding one or several routes to their route maps to reach the other peer's NATed subnets through the VPN interface
Meraki site-to-site VPN is different
Traditionally, most of the steps above are manual and therefore are prone to user errors (such as mistyped subnet information or nonmatching VPN configs). MX devices are different. They are all connected to the Dashboard and they each use Dashboard to help broker VPN connections to their peer networks in a given organization, as follows:
- Each MX device constantly advertises its public IP address and its NATed subnets to the Dashboard.
- When VPN is enabled, VPN peers automatically contact each other and initiate an IPSec VPN connection.
- The Dashboard assigns a unique preshared key for all participating VPN peers.
- Finally, the Dashboard sends a globally adjusted route map to each device, so that they all know how to reach each other's NATed subnets.
The end result of this automated process is a site-to-site VPN that is always up-to-date, dynamically adjusting to any changes in the network and that is up and running with a single click.
Setting up site-to-site VPN with Meraki MX devices
Creating a site-to-site VPN tunnel to the HQ from branches is simple:
- Choose Security & SD-WAN > Configure > Site-to-site VPN.
- Choose Hub from the VPN type options.
- Select 'Enabled' for VPN Mode for the local subnets that should be available on the VPN.
- Choose Automatic from the NAT traversal options.
You are done!