Meraki Umbrella SDWAN Connector Deployment Guide
Overview
Organizations are shifting their network landscape by moving all on-prem applications to the public or private cloud. Previously all traffic was back-hauled through data centers, but now almost 80% of traffic is routed directly to the internet. Securing a network edge has always been complex and with this change in network infrastructure, it became even more difficult to manage and secure an entire organization.
Integrating Umbrella SIG (Secure Internet Gateway) with Meraki MX connects the Meraki SD-WAN fabric to Umbrella cloud security services. This solution reduces the complexity in securing the network WAN edge. Umbrella's unified cloud platform simplifies managing and designing security policies for all sites within the Meraki SD-WAN fabric.
Umbrella SIG is a cloud-based security solution designed for remote sites. This deployment guide outlines how to configure and deploy the Umbrella-SIG connector establishing an Auto VPN connection from a Meraki MX Security and SD-WAN appliance to the Umbrella cloud. Umbrella's SIG provides centralized management for security so that network administrators do not have to separately manage security settings for each branch. All Internet-bound traffic will be forwarded to Umbrella SIG through an Auto VPN tunnel to the UMB-SIG device in the Umbrella cloud for inspection and filtering.
Important Announcement: Discontinuation of Meraki Umbrella SD-WAN Connector
Effective May 20, 2025, the Meraki Umbrella SD-WAN Connector will be discontinued for all new customers. This change does not affect existing customers who are actively using the Umbrella SD-WAN Connector. Current users can continue to use the solution without any immediate impact. For further assistance, please reach out to your Meraki account team.
Please refer to this link for more information on Meraki-Umbrella integration.

Use Case
-
Inspect all internet-bound traffic at scale from a single cloud-delivered platform.
-
Managing and monitoring both network devices and their security policies from simple cloud-based solutions.
-
Network administrators want to manage the entire set of security policies for all SD-WAN branches using a single pane of glass.
-
Organizations want to exclude guest traffic or high bandwidth application traffic from cloud security services.
-
Organizations want to utilize a unified cloud-based security solution without incurring additional costs from interconnecting it to their existing Meraki network solution.
Requirements
Umbrella
-
the Umbrella SIG Essentials package is required. Please visit Umbrella for more package information.
Meraki
- Branch MXs must be on MX 14.00+ firmware versions
- Meraki Umbrella SDWAN Connectors must be on MX 15.37+ firmware versions
- MV cameras and other Meraki devices that do not use FIPs Device-to-Cloud connectivity(TCP-443) must have their dashboard management traffic excluded from SIG tunnels, or they may experience issues with dashboard configuration updates.
The UMB-SIG device does not require any additional licensing and is included as part of your MX licensing purchase (as long as you have SIG licensing on the Umbrella dashboard).
Meraki MX SDWAN Plus Licensing is required for exclusion of Layer 7 Application traffic from the Auto VPN to Umbrella SIG.
SDWAN connectors Data Center List

Americas
Disaster Recover DC: Reston (RST1)
|
SDWAN Connector Region |
City |
Data Center Name |
|---|---|---|
| US West Coast | Los Angeles, CA | LAX1 |
| US West Coast | Palo Alto, CA | PAO1 |
| US South East | Atlanta, GA | ATL1 |
| US South East | Miami, FL | MIA1 |
| US North East | Ashburn, VA | ASH1 |
| US North East | New York, NY | NYC1 |
| US Central | Dallas, TX | DFW1 |
| US Central | Denver, CO | DEN1 |
| South America/Brazil | Rio De Janeiro | RIO1 |
| South America/Brazil | Sao Paulo | SAO1 |
| Canada Central | Toronto, ON | YVR1 |
| Canada Central | Vancouver, BC | YYZ1 |
Asia Pacific
Disaster Recover DC: Osaka (OSA1)
|
SDWAN Connector Region |
City |
Data Center Name |
|---|---|---|
| Asia 1 | Tokyo | NRT1, NRT2 |
| Asia 1 | Singapore | SIN1 |
| Asia 2 | Hong Kong | HKG1 |
| Asia 2 | Mumbai | MUM1, MUM2 |
| Australia | Melbourne | MEL1 |
| Australia | Sydney | SYD1 |
Europe
Disaster Recover DC: Amsterdam (AMS1)
|
SDWAN Connector Region |
City |
Data Center Name |
|---|---|---|
| Europe East | Frankfurt | FRA |
| Europe East | London | LON1, LON2 |
| Europe South | Milan | MIL1 |
| Europe South | Madrid | MAD1 |
| Europe West | Prague | PRG1 |
| Europe West | Paris | CDG1 |
| Europe North | Stockholm | STO1 |
| Europe North | Copenhagen | CPH1 |
Middle East and Africa
Disaster Recover DC: Amsterdam (AMS1)
|
SDWAN Connector Region |
City |
Data Center Name |
|---|---|---|
| South Africa | Cape Town | CPT1 |
| South Africa | Johannesburg | JNB1 |
Deploying the Meraki Umbrella SDWAN connectors
The following highlights the steps required to deploy the Meraki Umbrella SDWAN connectors, so as to connect branch MXs to Umbrella SIG using the Meraki AutoVPN:
Note: The Umbrella Audit log records all changes to Umbrella configuration that have been made both on the Umbrella Dashboard and the Meraki Dashboard. See https://docs.umbrella.com/deployment...dit-log-report for more info. e.g. If Umbrella is enabled or disabled in Meraki Dashboard > Security & SD-WAN > Configure > Threat Protection, then this event will be reflected in the Umbrella Audit log. It will not be logged in the Meraki event or change log. However, the Meraki Dashboard > Network-wide > General Alerts page may be configured to Alert when any such configuration changes are made.
Umbrella dashboard
- Create Umbrella Management API Keys on the Umbrella dashboard

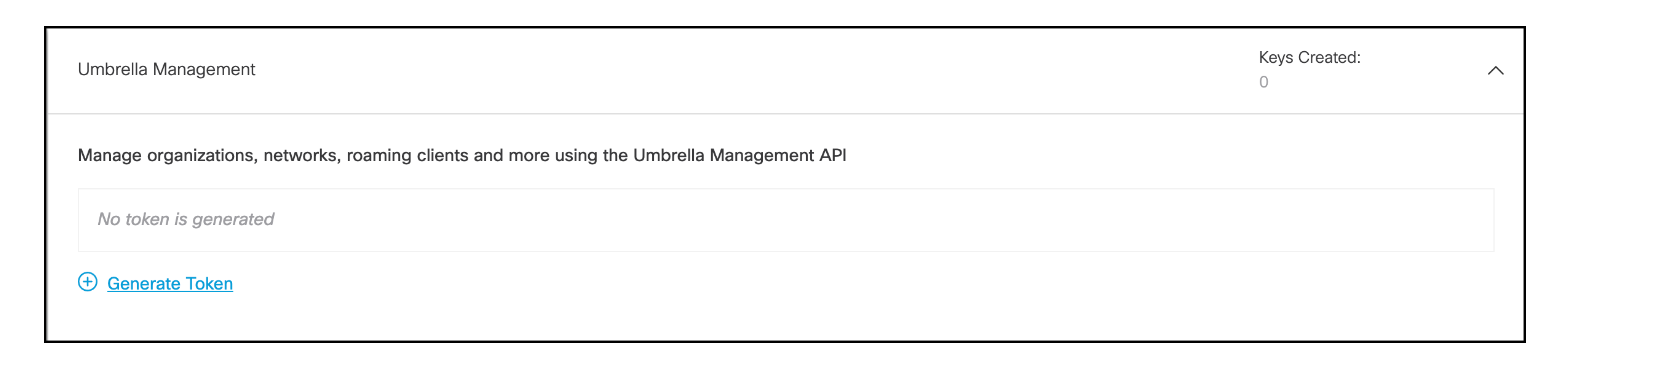
In the Umbrella dashboard, navigate to Admin > API Keys > Click Legacy Keys, and then expand the Umbrella Management section.

Click Generate Token.
Copy your management API Key and Secret to a secure location then check the box that reads To keep it secure, we only display your key's secret once. For future reference, copy this secret and keep it in a safe place. Tick this box to acknowledge this and click Close.

Meraki dashboard
- Enable Cloud On-Ramp
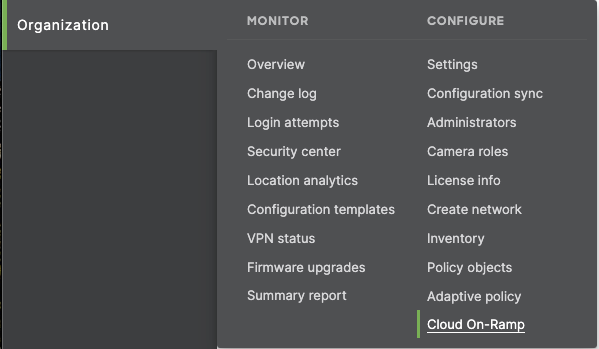
In the Meraki dashboard, navigate to Organization > Configure > Cloud On-Ramp
- Add API keys from the Umbrella dashboard to the Meraki dashboard
On the Configuration tab, click Connect to Cisco Umbrella

Input both the management API key and secret and continue the process by clicking the Yes, continue button

Click on Deploy, to begin the process of deploying the Connector

Kindly note that
1. If you have already had a MR-ADV integration, you won't be able to enable Meraki Umbrella SD-WAN Connector. A new Meraki Org is needed.
2. If you have already linked your Meraki Org to an Umbrella SIG Org, you will need to use that Umbrella Org and won't be able to link your Meraki Org to a different Umbrella SIG Org.
3. Meraki Umbrella SD-WAN Connector is available with the MR and MX DNS integrations.For any problem illustrated above, please reach out to your SE for assistance.
- Choose the Data Center (DC) location pair where the Connectors will be deployed
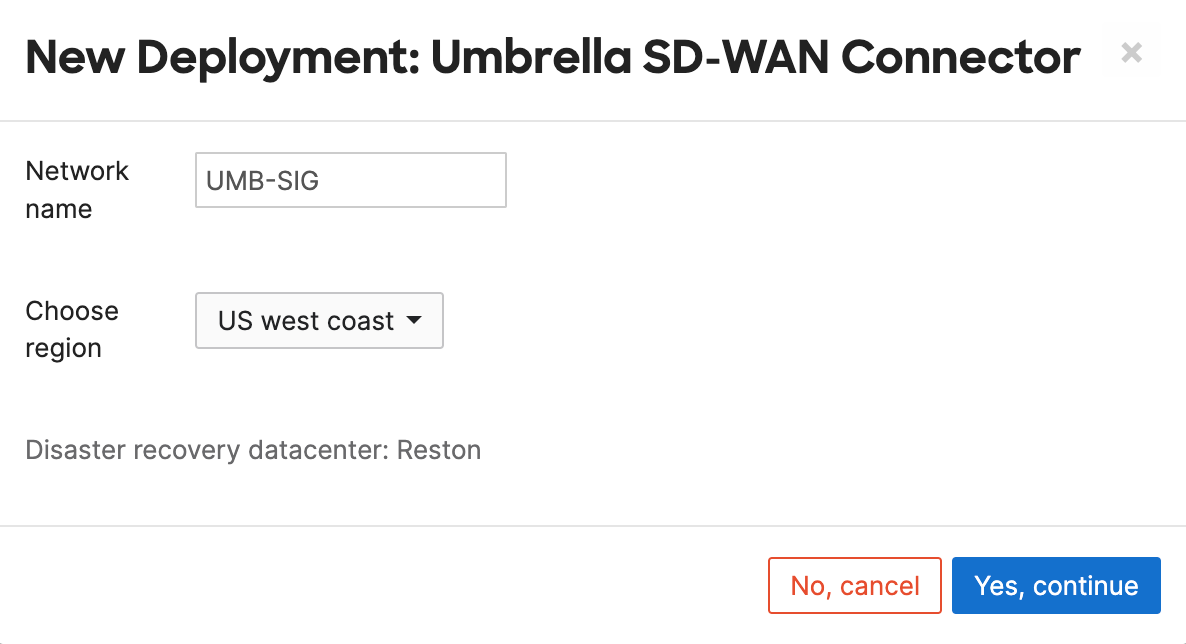
Input a name for the Connector network and choose the DC locations. This will create 2 networks, with a connector in each located at the chosen locations. For example, If you choose US west coast, the networks will be created on the Meraki dashboard and the two connectors will be hosted at both the Los Angeles and Palo Alto DCs. The name of the new networks created in the Meraki Dashboard will follow the format:Network 1
<Network Name>-<Region specific DC-1>
Network 2
<Network Name>-<Region specific DC-2>

Next, choose a Network Region (associated DC pair) to which your branch sites will connect in order to access SIG. Click Yes, continue to execute the deployment. The location of the Disaster Recovery (DR) Data Center is highlighted once a DC pair is chosen

- Verify the Meraki Umbrella SDWAN connectors are deployed
Navigate to the deployment tab, Organization > Configure > Cloud On-Ramp > Deployments to access the newly deployed connectors. A correctly deployed SD-WAN connector will display a status of "deployed" for both of the connectors. The following status messages infer:
Created:
The UMB-SIG network was created in the Meraki dashboard and a UMB-SIG connector added to it
Deployed:The Meraki Umbrella SDWAN connector was instantiated inside the Umbrella cloud and it should check-in on the Meraki dashboard within 5-10 minutes after the deployment is complete.
Tunneled:
A network tunnel was created in your linked Umbrella dashboard under Deployments > Network Tunnels

Once fully deployed, the Connectors will be pre-configured as:
1. A Hub, Select one of the Connector networks and navigate to the Site-to-site VPN page, Security & SD-WAN > Configure > Site-to-site VPN

2. BGP enabled with a peer IP: 169.254.0.9 and ASN:36692 Umbrella. NOTE: Sigraki 1.0 does not support changing the default BGP VPN AS from 64512 to another value.

There will be no option to change Site-to-site VPN configs for Meraki Umbrella-SIG connector networks. These connectors are pre-configured and the Auto VPN default route to Umbrella SIG is advertised to all spokes connected to these Umbrella-SIG connector hubs. Please make sure not to have an overlapping default route for any of the IPsec VPN tunnels, this can disrupt the overall Umbrella SIG routing.
Due to the default Meraki Auto-VPN design, all VPN hubs in an organization will automatically tunnel to all other hubs in an organization. This behaviour changes for the Meraki Umbrella SDWAN Connector solution, when the connector hubs are deployed, all other hubs in the organization will not automatically tunnel to SIG and all hub traffic will not be defaulted to Umbrella. The Meraki Umbrella SDWAN Connector network hubs will not automatically tunnel to other hubs in the organization.
- Connect your branch MX to the Connectors on the Site-to-Site VPN page


The branch MX needs to be configured as a Spoke on the Site-to-site VPN page, Security & SD-WAN > Configure > Site-to-site VPN, and the deployed connectors need to be configured as Hubs.
DO NOT select the 'Default route' option, as Connector Hubs advertises default routes to Umbrella SIG for all spokes connecting

Deleting a Meraki SDWAN Umbrella connector
Once a UMB-SIG deployment has been created following the steps above use only the delete button on the Cloud On-Ramp page to delete the deployment. DO NOT manually delete the network tunnel from the Umbrella dashboard or remove the UMB-SIG node from its Meraki network under the Security & SD-WAN > Monitor > Appliance status page
Disaster Recovery Capability
While choosing the DC pairs for a deployment, you are also able to select the corresponding Disaster Recovery datacenter region for that DC pair. The whole idea behind disaster recovery DCs are to have a highly available network infrastructure. In case of failure of both the DC pairs or even failure of one of the DC pairs and the other one operating at max capacity, the traffic is routed via the associated DR (Disaster Recovery) DC for that region. For Eg: As shown below the DR site for US west coast is the Reston data center. In case of failure of both DCs in US west coast the traffic is routed through the Reston DC.
The Disaster Recovery DCs for APAC and Australia are subjected to network localization i.e. upon failure of Australian DC pair, the DR DC is located in Osaka and the Auto VPN to Osaka connectors will result in localized language and version of the network.
Sizing Considerations
The total number of deployments allowed per organization is directly mapped to the number of networks in the organization. Organizations with <=20 Networks (MX deployed sites) can have 1 deployment and accordingly the number of deployment limit increases for every additional 20 networks. For larger organizations beyond 400 networks, the limit on number of deployment is set to 20 deployments. Please reach out to your SEs if you require additional deployments.
In addition to the above, each UMB-SIG node is currently limited to 250 Auto VPN tunnels and up to 250Mbps of bandwidth per UMB-SIG connector.
Choose which subnets (local networks) to export over VPN on your SPOKE (Branch) Meraki MX network
Earmark which locally defined or available subnets are to be exported to the Auto VPN. To do this simply set the relevant subnets as yes under Use VPN and set no for the non-relevant subnets.

If you have branches servicing the same range of Local subnets, then please contact Meraki Support to enable NAT translation to ensure each subnet in the Auto VPN domain is unique.
UMB-SIG Connector Network Routing
BGP Routes
We can confirm that our tunnel to SIG and associated routing is successfully established by looking at the UMB-SIG and branch MX routing table.
In the UMB-SIG device navigate to Security & SD-WAN > Monitor > Route table (click on view new version in the upper right if not already on the new version of the route table).
In the route table you should now see a 0.0.0.0/0 eBGP default route to our Umbrella BGP peer (next hop should be a 169.254.0.9 IP) and it should be in a green/healthy state.
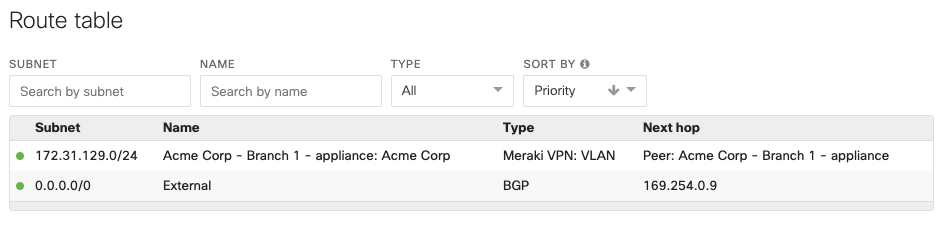
On the Branch MX we can also check the same route table and ensure this default route has propagated to the spokes via iBGP (the next hop will show up as a 6.X.X.X IP. This is expected).

If 192.168.255.0/24 is used for a local network, please do not use 192.168.255.254/32 to avoid IP conflict with Umbrella loopback address. This will cause SIG tunnel disconnection.
UMB-SIG Connector Connectivity Validation
UMB-SIG Devices Online
The first thing to check post-deployment is to ensure both of the UMB-SIG devices created are online and checking in to the dashboard. As part of the above deployment you will notice two new networks created in your Meraki organization. These networks will be in the following format (based on the input provided above)
<Deployment name>-<Region specific DC Name >
<Deployment name>-<Region specific DC Name >
Navigate to the Security & SD-WAN > Monitor > Appliance status page to confirm both devices are online and healthy.
Disabling the local device status page (LSP) for UMB-SIG networks in the Network-wide > Configure > General page will disable certain backend monitoring for the UMB-SIG connectivity status. This will limit engineering's ability to automatically respond to and recover an offline UMB-SIG Connector after DC maintenance windows. We recommend enabling the LSP for UMB-SIG Connectors for backend monitoring, otherwise, you may need to contact support for assistance recovering an UMB-SIG appliance that does not fully come back online after scheduled maintenance.
Umbrella Tunnel Endpoints Created
Next, we can confirm that a network tunnel was created in our Umbrella dashboard. Within the Umbrella dashboard navigate to Deployments > Core Identities > Network Tunnels.
Here you will find two new tunnels created, one with the serial number of the primary UMB-SIG device and the other with the serial number of the secondary UMB-SIG device. Once the tunnel has been fully established it will show here as active with a green checkmark.

Umbrella SIG Features and Policies
Umbrella SIG offers security features such as:
DNS Policies
A DNS policy provides DNS-layer visibility, security, and enforcement with the ability to selectively proxy risky domains for added security. You can have more than one DNS policy and your identities can be added to any number of policies. However, Umbrella applies the first matching policy to your identity and immediately stops evaluating policies.
If no matching policy is found, Umbrella applies the DNS default policy. Because of the way Umbrella evaluates identities against policies, it's important that you configure policies correctly for each of your organization's identities. An error in configuration may result in unintended results: identities being left unprotected to various threats or users accessing destinations you may want blocked. Plan and design your policies before you build them. For some helpful suggestions, see Best Practices for DNS Policies.
Firewall Policies
Umbrella’s cloud-delivered firewall (CDFW) provides visibility and control for internet traffic across all branch offices. With Umbrella’s cloud-delivered firewall, all activity is logged and unwanted traffic blocked using IP, port, and protocol rules.
The Umbrella cloud-delivered firewall (CDFW) expects an RFC 1918 IP address as the source IP address for outbound packets. If you use routable IP addresses on your internal network, you must contact Umbrella Support and provide the range of IP addresses that you use. Without this information, Umbrella cannot determine the IP address and may drop packets. For information about address allocation and private networks, see RFC 1918.
Web Policies
Umbrella's Web policy is the heart of its cloud-based Secure Internet Gateway (SIG) platform, providing URL-layer visibility, security, and enforcement to your organization's web traffic. There is only one Web policy, which is made up of rulesets and rules that set various security, permission, and access controls for your identities.
While the Web policy does include a default ruleset that is applied to all identities and which you can configure, to best take advantage of the various features offered by Umbrella's cloud-based SIG, add your own organization-centric rulesets and rules. Indeed, you can add multiple rulesets and rules so that your various identities can be granted different permissions within the Web policy.
Data Loss Prevention Policies
The Data Loss Prevention policy monitors content classified as personally identifiable or sensitive information. When necessary, content is blocked from an upload or a post. There is only one data loss prevention policy. Rules are added to the policy to define what traffic to monitor (identities and destinations), the data classifications that require monitoring, and whether content should be blocked or only monitored.
Prerequisites
HTTPS Inspection must be enabled either on the Web Default Policy, or at least one web policy ruleset where the same identity is configured in a DLP rule. For example, if the identity "Network A" is configured for a DLP rule, it must also be configured for a web policy ruleset where HTTPS is enabled. For more information see Configure a Ruleset > 2. Ruleset Settings > G. HTTPS Inspection.
Please visit Umbrella's documentation for a comprehensive guide to Umbrella SIG features.
DNS Policy Consideration
The extension of SD-WAN to Umbrella will default all traffic that is not routed to other sites in the Auto-VPN topology with more specific routes to the connector in Umbrella. This include all DNS traffic.
When you establish tunnels to the Cisco Umbrella head end to use the cloud-delivered firewall, DNS traffic should be bypassed to ensure that DNS Layer Enforcement is not impacted.
When DNS traffic gets routed in tunnels, the traffic will go through all services in the service chain in the cloud-delivered firewall, undergo Network Address Translation (NAT), and then go to the Umbrella Resolvers with the cloud-delivered firewall's public IP address. In that situation, Umbrella Resolvers will not be able to apply DNS-based policies as the source IP will not match your organization.
To ensure that DNS Layer security is not impacted by the cloud-delivered firewall, traffic for destination port 53 to IP address 208.67.222.222 and 208.67.220.220 should be bypassed.
If your organization is currently leveraging or plans to implement Umbrella DNS policies that are using Meraki Networks by Public IP address as Identities in these policies, one of the following 3 actions will need to be taken:
1. Umbrella API integration for DNS policies in Meraki Dashboard
If your organization has not yet implemented DNS protection for your Meraki sites, another option is to configure the API integration for Umbrella DNS policies in the Meraki Dashboard. This method will use network devices as the identity to apply policy to as opposed to using the public IP address from the Meraki Site. Given the nature of how this integration works, it also prevents users from circumventing Umbrella DNS policies by changing their DNS resolver configuration on their end user system.
Details on how to perform this integration and the configuration options for it are available at these two links:
2. Configure L3 VPN exclusion for the Umbrella Resolver IP addresses in Meraki Dashboard
- Navigate to Security & SD-WAN > Configure > Site-to-site VPN
- If the site is configured as a Spoke ensure that the two Umbrella SIG Connectors are configured as Hubs and that they do not have the Default route option checked.
- Navigate to Security & SD-WAN > Configure > SD-WAN & traffic shaping
- Scroll down to Local Internet breakout > VPN exclusion rules and click Add +
- Under Customer expressions, Select protocol UDP.
- For the Destination, input the Umbrella resolver IP address 208.67.222.222/32 and port 53, click add expression
- Repeat for IP address 208.67.220.220
Migrating from SIG IPSec Tunnels to SD-WAN Tunnels
If you do not require SD-WAN/Auto VPN connectivity to Umbrella SIG, you can also connect with a standard IPSec tunnel from any MX appliance. To do so, follow this KB.
If you have already deployed IPSec tunnels to SIG and wish to migrate to SD-WAN tunnels follow the below steps for a seamless migration:
-
On the Meraki dashboard deploy the UMB-SIG connectors following the steps above.
-
On the Umbrella dashboard add the two new network tunnels created by the on-ramp in step 1 to any required security policies
-
On the Meraki dashboard, point all of your spoke MX sites to the new UMB-SIG connectors.
-
Once the auto-vpn tunnels to the UMB-SIG connectors are established delete the IPSec tunnels under the site-to-site VPN settings page
-
(optional) If using the SD-WAN Plus license, define any VPN exclusions for traffic you wish to exit locally instead of being tunneled to SIG.
Error Codes
Potential error codes include the following:
Invalid API credentials
Message: Umbrella API Error. Code: 401. Error: Invalid authentication credentials
Wrong API Key type
Reason: You provided a network device API key instead of a management API key
Message: Umbrella API Error. Code: 403. Error:
No SIG licensing
Reason: By default one UMB-SIG deployment is allowed per organization for every 20 networks. Trying to create additional deployments will result in this error.
Message: This organization has no available licenses for UMB-SIG
Name has already been taken
Reason: Duplicate deployment name and DC selection entered (same deployment name can be used if different pair of DC’s are used).
Message: Validation failed: Name has already been taken
Umbrella tunnel limit reached
Reason: The limit for the amount of network tunnels you can create in your Umbrella org has been reached. Please reach out to your Umbrella SE to inquire about increasing this limit.
No available SIG licenses
Reason: The linked Umbrella organization does not have any available SIG licensing
Message: This organization has no available licenses for UMB-SIG
SIG Test
Proxy Debug
To validate traffic is flowing through Umbrella SIG you can use the following Umbrella test site:
http://policy-debug.checkumbrella.com/
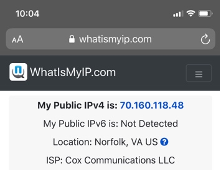
The external IP field below shows you the public IP where your traffic egresses to the internet and the page offers a link to the Umbrella dashboard and policies that are acting on your traffic.

Traffic Test
To validate traffic being sent to over the auto-vpn tunnel to SIG vs traffic not being sent over the tunnel we can connect to a network on a VLAN that is participating in the VPN and one that is not to observe the difference.
For this test we used the below configuration where the Default VLAN1 is not participating in VPN and the SIG VLAN 10 is participating. This configuration can be viewed under Security & SD-WAN > Configure > Site-to-site VPN.

Using a Wireless capable MX68CW two SSIDs were created. One on VLAN 1 and the other on VLAN 10.
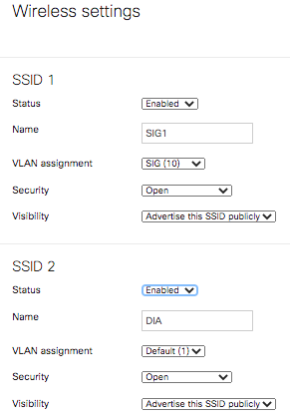
When a device connects to the SSID SIG1, it receives an IP on VLAN10.
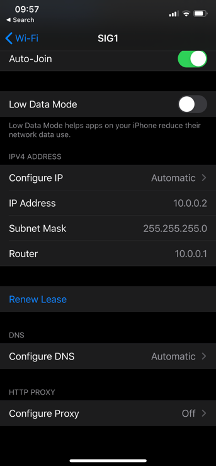
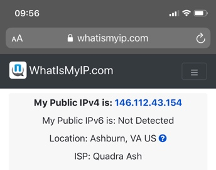
When the device accesses the Internet, the traffic will have a NAT address from Umbrella (an IP in the 146.112.0.0/16 subnet means it is exiting Umbrella).
When a device connects to the SSID DIA, it receives an IP on VLAN1.
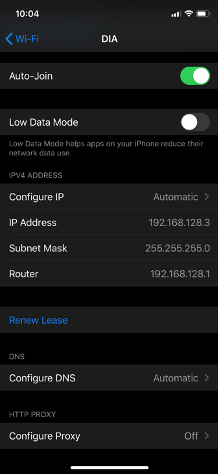
When the device accesses the Internet, the traffic will have a NAT address from the MX Internet Interface.