
Geofencing with Managed Devices
Geofencing allows limitations to be established as to where Systems Manager devices are allowed to be. When devices are detected outside of that area, alerts can be generated to notify administrators and designated profiles can be applied or removed. For more accurate location results, the systems manager app should be installed on the geofenced devices. More information about how Systems Manager approximates the location of a device can be found in this KB article: Location Approximation in Systems Manager
Note: Geofencing policies are only enforced when the device location has been reported "via GPS", "via User-Defined", or "via IP Override".
Create a Geofence
Multiple geofencing rules can exist, with each potentially covering multiple physical areas. This allows administrators to limit the scope of different sets of devices to different physical locations.
- Navigate to Systems Manager > Configure > Geofencing.
- Click Add new in the upper right corner.
- Enter a Name for this geofence.
- Select a Scope for which devices this geofence should apply to, based on tags.
- Select a Grace period which determines how long a device can be outside of the defined area before an alert is generated.
- Click Add a new area.
- Click the Geocode button under Find by address.
- In the box that appears, search for the address or location the geofence should cover, then click Submit.
- A geofence boundary indicator will appear, indicated by the semi-transparent blue circle, centered at the location provided. Click and drag the center indicator to move the boundary, while similarly using the scale indicator to control the size of the boundary, until it covers the desired area.
- Update the Description field for the row with a friendly name of the boundary, such as a building or campus name.
- If additional geofence boundaries are desired for this scope of devices, repeat steps 6-10 as needed.
- When done, click Save Changes.
- If additional geofences need to be configured with different scopes, click Back to list and repeat steps 2-12 as needed.
Enabling geofencing alerts
If configured, alerts can be sent to administrators whenever a device within the scope of a geofence remains outside of the designated boundary for more time than permitted by the grace period. To configure these alerts:
- Navigate to Systems Manager > Configure > Alerts > Geofencing alerts.
- Click the checkbox for any options that are desired.

- Click Save Changes.
If an alert must be generated, based on the geofences defined and the selection made above, it will be sent to the address(es) indicated in the Delivery settings section of the page.
Linking geofencing to a profile
Once a geofence has been created and applied to devices, those devices will automatically receive one of two tags, dependent on whether they are within the geofence or not. These tags can be used to control the scope of profiles. The feature is only available with Systems Manager Enterprise.
Devices currently compliant: Device is currently inside a geofence that it is within the scope of, or it has not yet exceeded the grace period.
Devices currently violating: Device is not within any of its geofences and is beyond the grace period.
To make a profile dependent on device compliance:
- Navigate to Systems Manager > Manage > Settings.
- Select a profile.
- Under Scope, choose an appropriate option that allows for use of tags.
- Click in the tags box, and under Geofencing, select one of the options explained above, in addition to any other desired tags.
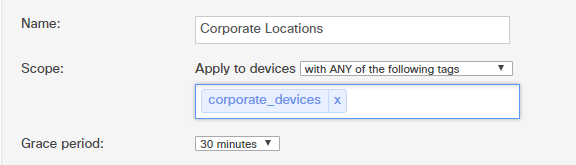
In the screenshot below, only devices with the "corporate_devices" tag will receive this profile and only when they are within a geofence boundary. Once they leave the geofence and exceed the grace period, the profile will be removed from the device the next time it is unlocked and checks in. If the device is within the scope of multiple geofences, compliance takes priority and the device will be considered compliant as long as it is within at least one geofence boundary.
Note: The geofencing auto tags cannot be used with apps, due to how app association with accounts is handled.
Checking the status of geofenced devices
It is also possible to manually check on devices to determine if they are currently within the geofence boundary or not. To do this:
- Navigate to Systems Manager > Monitor > Devices.
- Add the "Geofencing status" column, if it doesn't already exist, by clicking on the + to the right of the other column headers, then checking the box for Location > Geofencing status.
- Click the + button again to close the dropdown window.
- The Geofencing status column will indicate if the device is within the geofence.
Green - Device is within geofence.
Red - Device is outside of geofence and beyond grace period (time outside of geofence will be indicated)
Yellow - Device is outside of geofence but within grace period (time outside of geofence will be indicated).
To check the status of a specific client, as well as see which auto tag is currently applied:
Note: Auto tags based on geofence compliance are only available with Systems Manager Enterprise.
- Navigate to Systems Manager > Monitor > Devices.
- Click on the client in question.
- Under Auto tags the device should be listed as violating or compliant.
Deleting a geofence or boundary
To delete an existing geofence:
- Navigate to Systems Manager > Configure > Geofencing.
- Click the checkbox next to the geofence that should be deleted.
- Click Delete in the menu above the list.
- Click the checkbox to Confirm deletion.
- Click Delete # checked geofence(s).
To delete a boundary within a geofence:
- Navigate to Systems Manager > Configure > Geofencing.
- Click on the Name of the geofence containing the boundary to be deleted.
- Click the X in the Delete column for the boundary to be removed.
Note: The boundary will turn red on the map when the row is hovered over. - Click Save Changes.