
Creating an Offline Certificate Request in Windows Server
EAP-TLS, PEAP-MSCHAPv2, LDAP/TLS require a digital certificate be installed on your RADIUS server. The certificate provides authentication, encryption, and validation. Follow the steps below to create an offline certificate request on your Windows server when obtaining a certificate from a commercial or standalone Certificate Authority.
Launch the Certificate Console
1. Log into your Windows server running IAS or NPS (RADIUS Server).
2. Launch the Microsoft Management Console (mmc.exe).
3. Select File menu > Add/Remove Snap-in.

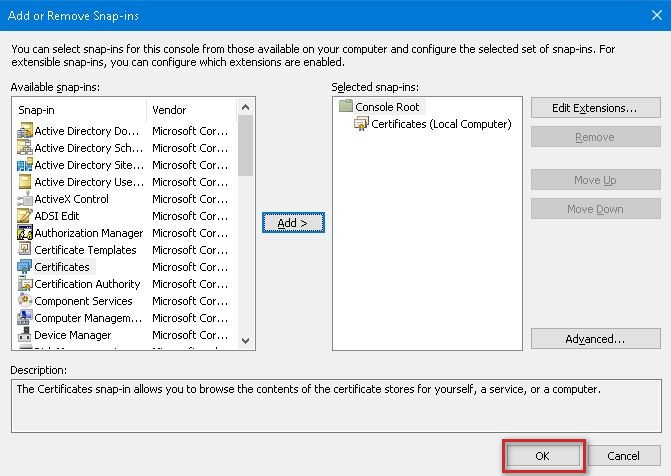
4. Choose Certificates from Available Snap-ins and click Add.

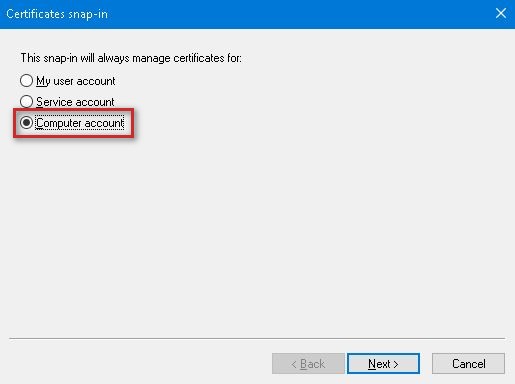
5. Choose Computer account for snap-in management and click Next.
6. Choose Local computer to use the snap-in on the current computer and click Finish.

7. When back at the Add or Remove Snap-ins click OK.
Create an Offline Certificate Request
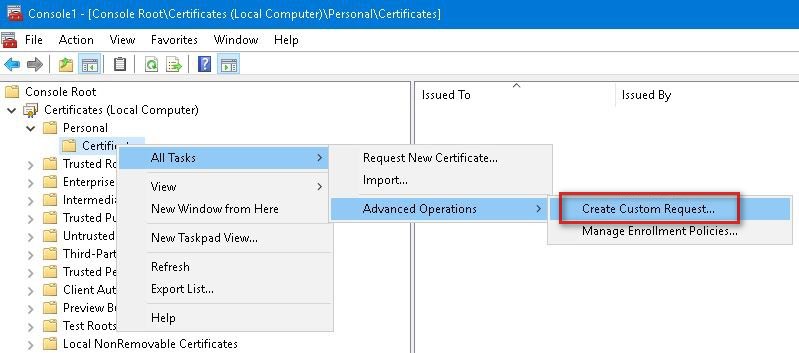
1. From the Certificate manager console, navigate to Certificates (Local Computer) > Personal > Certificates. Right click Certificates and navigate to All tasks > Advanced options and select Create custom request.
2. The Certificate Enrollment Wizard will open. Review the Before You Begin section and click Next.

3. Choose "Proceed without enrollment policy" unless a predefined certificate template needs to be used.

4. Leave the default "No template" option for Custom request and click Next.

5. On Certificate Information, expand Details then click the Properties button.

6. When Certificate Properties opens to the General tab, fill out the Friendly name and Description values. These values are not required but are useful to distinguishing your certificate among other installed certificates.

7. Select the Subject tab. Add values to the Subject name and Alternative name attributes. To add the attributes, select an attribute Type from the drop down, enter the correct Value and then click Add.
Below are the values that should be filled out:
- Subject name
- Common name: Fully Qualified Domain Name of your RADIUS server host. Most Commercial CA's require the host to have a public top-level domain such as .com or .net, e.g. myserver.mydomain.com. (required)
- Organizational Unit: Depends on your organization but this could be your department. (optional)
- Organization: Your organization name. (optional)
- Locality: Your city, this cannot be abbreviated. (optional)
- State: Your state, this cannot be abbreviated. (optional)
- Country: Your country. (optional)
- Alternative name:
- DNS: Fully Qualified Domain Name of your RADIUS server host. Most Commercial CA's require the host to have a public top-level domain such as .com or .net, e.g. myserver.mydomain.com. (required)

8. Select the Extensions tab, expand Key usage, select Digital signature and Key encipherment from the Available options and click Add to place in Selected options. The Make these key usages critical box is checked by default.

9. On the Extensions tab, expand Extended Key Usage (application policies), select Server Authentication and optionally Client Authentication from the Available options and click Add to place in Selected options.

10. Select the Private Key tab. Expand Cryptographic Service Provider. For Select cryptographic service provider, make sure RSA, Microsoft Software Key Storage Provider is the only boxed checked. Expand Key options and select 2048 in the Key size drop down.

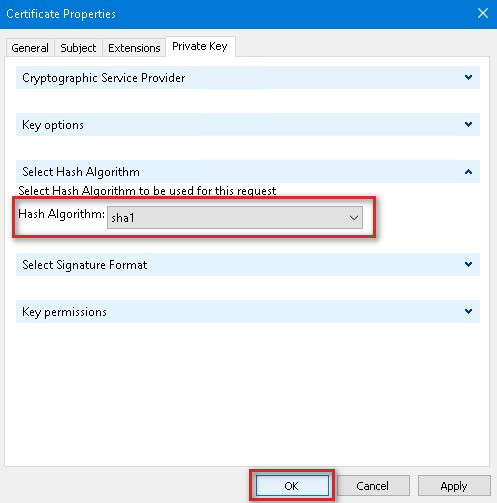
11. On the Private Key tab, expand Select Hash Algorithm. For the Hash Algorithm drop down, select sha1 which is the only e hashing compatible dynamic keying and then click OK.
12. On the "Where do you want to save the offline request?", give your certificate request file a name and save it to a location on your computer. In the example below, the certificate request file is named certreq711 and it is saved at the root of C:. Make sure the File format is set to Base 64 and then click Finish.

13. After creating your certificate request, you will need to submit it to a Certificate Authority so they can process your request and issue a certificate. The certificate request is a text file. Usually, you are required to copy the text from the file and enter it into an online submission form on the Certificate Authority website. You will need to contact your Certificate Authority directly for instructions on the process for submitting your certificate request.
Follow the certificate request submission instructions provided by your Certificate Authority. Once your CA has processed your request and issues the certificate, download it to your server so it can be imported. Once your CA has provided you the certificate, please refer to Microsoft documentation for instructions on how to import the certificate.