
Troubleshooting Client Speed Using iPerf
Overview
This article describes how to use iPerf and iPerf3 to test Transmission Control Protocol (TCP) and User Datagram Protocol (UDP) throughput between two devices connected to the network. Use this testing process to troubleshoot client speed and throughput-related issues.
iPerf generates traffic from a computer acting as a client, which sends data to the IP address of a computer acting as a server. TCP tests then measure bandwidth to show an accurate representation of the network speeds received. iPerf can also determine the quality of a link or test latency, jitter and datagram loss. This article explains how to use iPerf and iPerf3 to test Local Area Network (LAN) and Wireless Local Area Network (WLAN) speeds.
Environment
To run this test you will need two networked computers which have access to each other through your local LAN. Each computer will have to have a copy of iPerf or iPerf3 software installed.
Troubleshooting client speed using iPerf3
iPerf3 is the current recommended version of the iPerf tool. Use the steps in this section to run TCP and UDP throughput tests, adjust window size, and send parallel streams using iPerf3.
Troubleshooting steps
Step 1: Run iPerf3 tests
After downloading iPerf3:
1. Open a command prompt and navigate to the folder containing the iperf3.exe file.
Example: If the file is on your desktop, use the following command:
cd C:\Users\Administrator\Desktop\iperf-3.1.3-win64
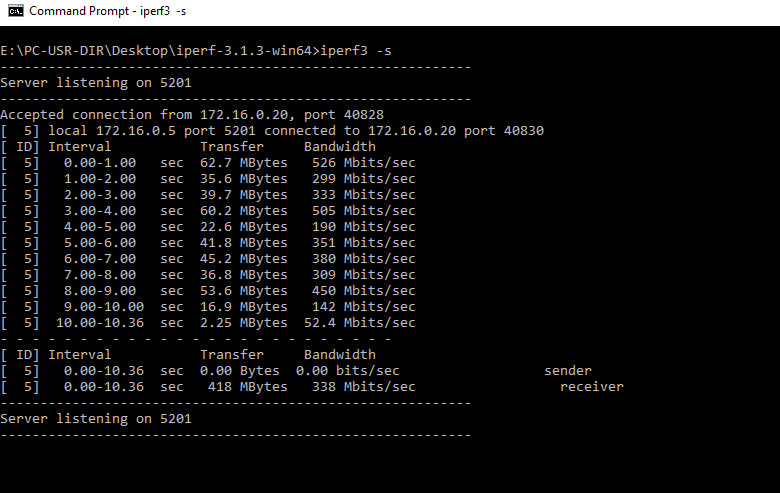
2. On the server side, run the following command to listen on port 5201 (default port) for client data.
iperf3 -s
3. On the client side, run the following command:
iperf3 -c 10.0.0.105
As long as the client and server have connectivity on the same network, results display on both sides.
Windows
Client:

Server:
Linux
Client:
Server:

The following options can be run on the client side to change the type of data sent:
To measure bandwidth in both directions, use option -R, for example:
- iperf3 -c 10.0.0.105 -R
Note: A lowercase ' r ' will NOT work and must be capitalized in iPerf3
To measure bandwidth in both directions at the same time, use option -d, for example:
- iperf3 -c 10.0.0.105 -d
Step 2: TCP window size
Sending large streams of data over fast connections can generate a lot of CPU usage, especially when testing over 1Gbps links. Specifying a larger window size reduces the amount of processing that needs to be done on both the client and server side computers.
The window size sets the amount of data that can pass before synchronization is required. To specify the window size iperf3, use the –w option. The default unit is bytes, but K and M can be used to specify Kilobytes and Megabytes, respectively.
Client:
iperf3 -c 10.0.0.105 -w 2000
The -w option manually sets the window size. The window size can be set between 2 and 65,535. In this example, the window size is set to 2000 bytes.
Server:
iperf3 -s
Step 3: Parallel streams
iPerf3 supports sending parallel streams at the same time. Parallel streams send multiple streams of traffic through the tunnel to more thoroughly test the link.
For 1 Gbps links, use window sizing and parallel streams together. Use more parallel streams to fully saturate a high-speed link.
Client:
iperf3 -c 10.0.0.105 -P 2
This command runs two parallel streams
Server:
iperf3 -s
The server side does not require the parallel streams option, as the server is already listening for all incoming traffic.
Troubleshooting client speed using original iPerf
This section covers throughput testing using the original iPerf tool. Use these steps if iPerf3 is not available in your environment. The commands and options differ slightly from iPerf3.
Troubleshooting steps
Step 1 Run iPerf tests
After downloading iPerf:
1. Open a command prompt and navigate to the folder containing the iperf.exe file.
Example: If the file is on your desktop, use the following command:
cd C:\Users\Administrator\Desktop\iperf-2.0.5-2-win32
2. On the server side, run the following command. This tells the server to listen on port 5001 (default port) for client data:
iperf -s
3. On the client side, run the following command:
iperf -c 10.0.0.105
As long as the client and server have connectivity on the same network, results display on both sides.
Windows
Client:
Server:
The following options can be run on the client side to change the type of data sent:
To measure bandwidth in both directions, use option r.
iperf -c 10.0.0.105 -r
To measure bandwidth in both directions at the same time, use option d.
iperf -c 10.0.0.105 -d
Step 2 TCP window size
Sending large streams of data over fast connections can generate high CPU usage, especially when testing over 1 Gbps links. Specifying a larger window size reduces the processing required on both the client and server computers. The window size sets the amount of data that can pass before synchronization is required.
To specify the window size in iPerf, use the -w option. The default unit is bytes, but K and M can be used to specify kilobytes and megabytes, respectively.
Client:
iperf -c 10.0.0.105 -w 2000
The -w option manually sets the window size. The window size can be set between 2 and 65,535. In this example, the window size is set to 2000 bytes.
Server:
iperf -s -w 4000K
In this example, the window size is set to 4000 Kilobytes
Step 3 Parallel streams
iPerf supports sending parallel streams at the same time. Parallel streams send multiple streams of traffic through the tunnel to more thoroughly test the link.
For 1 Gbps links, use window sizing and parallel streams together. Use more parallel streams to fully saturate a high-speed link.
Client:
iperf -c 10.0.0.105 -P 2
This command runs two parallel streams.
Server:
iperf -s
The server side does not require the parallel streams option, as the server is already listening for all incoming traffic.
Additional flags
Using UDP ports for testing
Both iPerf3 and original iPerf support the use of UDP ports for testing with the -u flag on the client side.
Client:
(iperf OR iperf3) -c 10.0.0.105 -u 5001
This initiates a connection from the client to a server at 10.0.0.105 using UDP port 5001.
Server:
(iperf OR iperf3) -s
No special configuration is required on the server side.
Setting target bandwidth for connections
Both iPerf3 and original iPerf support setting a custom target bandwidth for UDP and TCP connections using the -b flag on the client side. The default target bandwidth for UDP connections is 1 Mbps, and the default target bandwidth for TCP connections is unlimited. When using multiple streams with the -P flag, the target bandwidth is set for each individual stream.
Client:
(iperf OR iperf3) -c 10.0.0.105 -u 6789 -b 5M
This initiates a connection from the client to a server at 10.0.0.105 using UDP port 6789, with a target bandwidth of 5 Mbps. Use K to indicate Kbps. A numeric value without a unit is interpreted as bits per second.
Server:
(iperf OR iperf3) -s
No special configuration is required on the server side.
Using burst mode with target bandwidth
In addition to the target bandwidth feature, burst mode can be set for either TCP or UDP connections. Burst mode allows a series of packets to be sent in succession from the client without pause. To enable burst mode, add a forward slash and a number after the bandwidth value. The number after the slash is the number of packets to transmit rapidly, even if doing so temporarily exceeds the target bandwidth.
Client:
(iperf OR iperf3) -c 10.0.0.105 -p 3456 -b 8K/5
This initiates a connection from the client to a server at 10.0.0.105 on TCP port 3456, with a target bandwidth of 8 Kbps. Burst mode allows five packets to transmit without pause, even if bandwidth temporarily exceeds 8 Kbps.
Server:
(iperf OR iperf3) -s
No special configuration is required on the server side.
Additional resources
For a GUI-based tool similar to iPerf for testing LAN and WLAN speeds, refer to the Troubleshooting client speed and traffic shaping using jPerf.
For additional iperf or iperf3 flags and options, refer to iperf's official documentation.