
Using the Dashboard File Upload Tools
Overview
In response to the North American Object Storage Service Impact, Meraki has designed two distinct tools to assist with re-uploading files that were deleted. The first tool allows users to select files in bulk to match and replace deleted files. The second tool allows users to re-upload floor plan images individually, and to then replace them on their Maps & Floor plans page.
Using the Bulk File Upload Tool
The Bulk File Upload Tool works by having users select multiple files to upload, and then attempts to match them against our database records for the deleted files. When a match is found, users will have the ability to replace the deleted file with the file that was uploaded. To get started, perform the following actions:
- Navigate to Announcements > North American Object Storage Service Impact
- Scroll down to where it says Bulk File Upload Tool
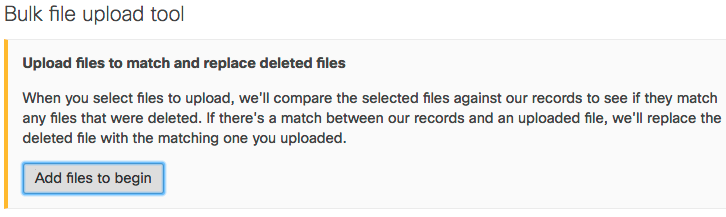
- Select the Add files to begin button.
- Choose the files to upload. Multiple files can be uploaded and matched at once.
- Select "Upload replacements" to replace the matched deleted files. If no files are a match, select "Start over" and upload new files.
Using the Floor Plan Replacement Tool
Navigating to the floor plan replacement tool
The Floor Plan Replacement Tool allows administrators to re-upload a single floor plan image by re-uploading the original floor plan image or replacing the deleted floor plan image with a new version. If a new image is used, the administrator will have the ability to resize and scale the new image on the Maps & Floor plans page. To get started, perform the following actions:
- Navigate to Announcements > North American Object Storage Service Impact
- Scroll down to where it lists Floor plans images
- Click the link for "replace your floor plan images individually on this page"
Uploading an image file to replace a deleted floor plan image file
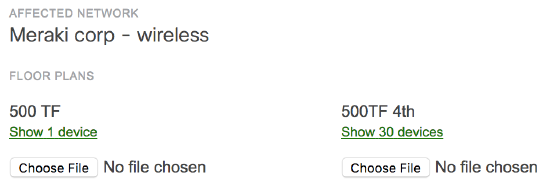
The bottom portion of the floor plan replacement tool page will aggregate all of the missing floor plans from across your Dashboard organization. Each section lists the missing floor plans within each Dashboard network. Below is an example network named "San Francisco Wireless". It has two floor plan images that have been deleted and can be replaced.
To upload a new image, perform the following actions:
- Locate the Dashboard Network and individual floor plan that you wish to replace
- Click the "Choose file" button
- Select the image file from your local machine that you wish to upload as the replacement
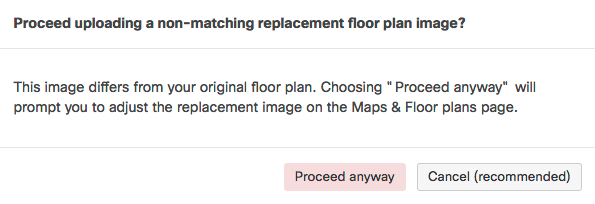
- Once uploaded, Dashboard will compare the checksum we have on file with the checksum of the new image selected. If they match, select "Proceed" to have this new image uploaded. If this new image does not match perfectly, Dashboard will display "File checksum doesn't match". Refer to the following section if this is the case.
Using a replacement image that does not match the original deleted file
All replacement floor plan images will be scaled to match the old image's size and shape. Modifying the replacement floor plan image will remove this scaling from the replacement floor plan image and will change the Scanning API coordinates for the APs.
Replacement floor plan images that do not match the original images may be uploaded to Dashboard. The new floor plan images can be scaled and positioned on the map so that they align with the existing AP placements.
- Locate the Dashboard Network and individual floor plan that you wish to replace
- Click the "Choose file" button
- Select the floor plan image file from your local machine that you wish to upload as the replacement
- Because the uploaded floor plan image does not match the deleted file, Dashboard recommends choosing "Cancel" as it is easier to replace a deleted floor plan with the original file. Since the original floor plan image is not available, click "Proceed anyway".
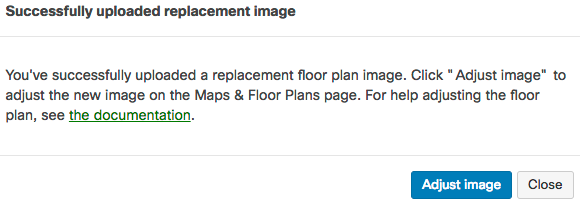
- After uploading the replacement floor plan image, select the "Adjust image" button. A new tab will open on the Maps & Floor plans page.
- Within the new tab, the replacement floor plan image can be scaled and positioned over the map view. Use the image tools to rotate, scale, and orient the new floor plan image so that it aligns to the building and the existing AP placements already presented. When you are ready to save this replacement image, select "Save position". After the position of the replacement image has been saved, the floor plan image will be locked to the map position.
Highest rated
(rating)Recently updated
(date updated)Recently added
(date created)