
Access Manager - EAP-TTLS Client Configuration (Windows, macOS and iOS)
This article provides instructions on configuring Windows 10, macOS, and iOS client devices to authenticate against Entra ID using username and password (EAP-TTLS/PAP) and obtain authorization (such as SGT, VLAN, Group Policy, etc.) based on Access Manager rules.
The instructions in this article are intended as a reference to assist organizations in understanding the network settings, which can be useful when configuring network settings through an MDM or Group Policy (GP) update.
Please refer to Securing Managed Endpoints - Username/Password Authentication against Entra ID to view instructions on how to configure Entra ID integration, wired/wireless networks and Access Manager rules.
Download RADIUS CA Certificate From Access Manager
In EAP-TTLS/PAP flows, Access Manager presents its certificate during authentication, enabling the client to validate it before connecting. It is recommended to install the root CA certificate that signed the Access Manager certificate on your endpoints to ensure the Access Manager certificate is trusted automatically, without requiring user intervention.
Follow the instructions below to download the RADIUS CA certificate from Access Manager and install it on the endpoint:
- Navigate to Access Manager > Configure > Certificates

- Click on Download RADIUS CA certificates

- This downloads multiple files - make sure your browser allows multiple file downloads.
Windows 10
-
Open the downloaded RADIUS certificate from previous step and click open again

-
Click on Install Certificate

-
Click Next > Next > Finish to continue installing certificate successfully
-
In windows, navigate to the Network and Sharing Center > click on Set up a new connection or network

- Choose Manually connect to a wireless network and click Next

- Enter the Network name that exactly matches the SSID configured for this use case, and choose WPA2-Enterprise as the security type. Click Next.

- Your network is successfully created. Click on Change connection settings

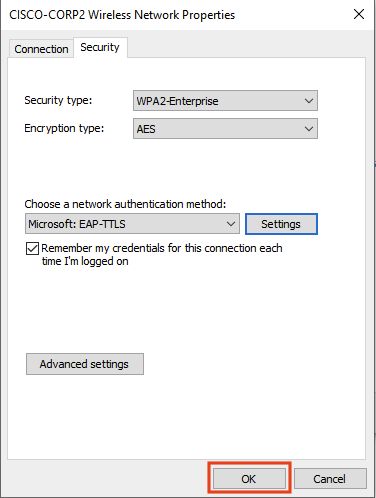
- Click on Security > choose Microsoft: EAP-TTLS as the authentication method > click on Settings

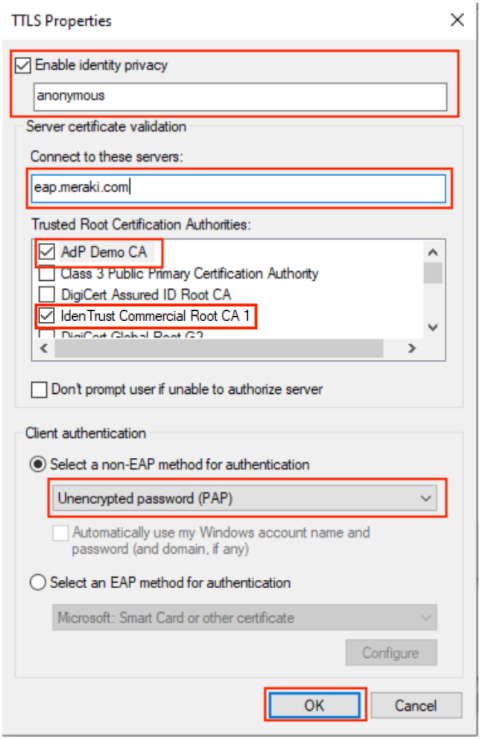
- Make sure following selections are made:
- Enable identity privacy is checked (to ensure the true username is not shared in the initial EAP exchange)
- Connect to these servers: Enter eap.meraki.com to ensure the client only connects to Meraki's server and no other rogue device advertising an SSID.
- Trusted Root Certificate Authorities: Select your PKI's trusted root CA and Identity Trust Commercial Root CA 1 (Access Manager root installed in the previous step)
- Select a non-EAP method for authentication: Choose Unencrypted password (PAP). Please note that while the password is unencrypted, it is transmitted over an encrypted TLS tunnel.
- Click Ok
- Click Ok again on the main properties window
- The windows client is now successfully configured to connect to the wireless network using a username and password (EAP-TTLS/PAP).
macOS and iOS
macOS
- In macOS, open Keychain Access > Click on File > Import items > select the downloaded RADIUS CA certificate and click open

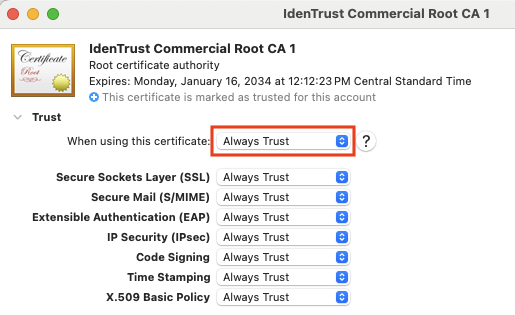
- Find the installed certificate (IdenTrust Commercial Root CA 1) from the list and open it > select Always Trust and close the window
- In macOS, open Apple Configurator application (you will need to download it from the App Store if you do not already have it)
- Click on File > New Profile
- Enter the Name and Identifier for the profile

- Click on Certificates > Configure > Select downloaded RADIUS CA certificate and click open


- Click on Wi-Fi and set the following values:
- Service Set Identifier (SSID): SSID that exactly matches the SSID configured for this use case
- Security Type: WPA2/WPA3 Enterprise
- Accepted EAP Types: TTLS
- Inner Authentication: PAP

- Click on Trust under Enterprise Settings and Set the following values
- Trusted Certificates: Choose the certificate that was added in Certificates tab - Identity Trust Commercial Root CA 1
- Trusted Server Certificate Names: Add eap.meraki.com to ensure the client only connects to Meraki's server and no other rogue device advertising an SSID.

- Click File > Save
- Open the saved profile - this action will download the profile
- Navigate to Settings > Device Management > Double click on the profile > Install


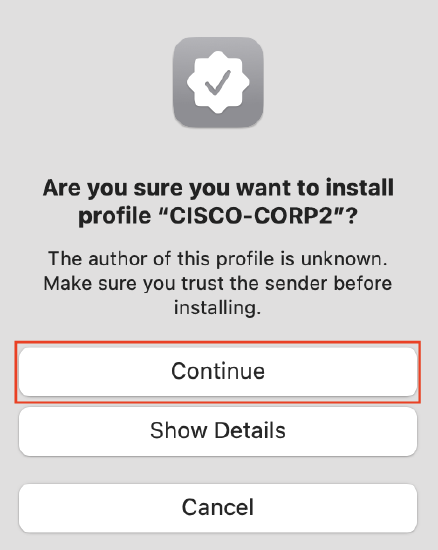
- Click Continue > Install

- The macOS client is now successfully configured to connect to the wireless network using a username and password (EAP-TTLS/PAP).
iOS
On iOS, follow the same steps from macOS section:
- Copy the downloaded RADIUS CA certificate to iPhone and click open
- Navigate to Settings > Profile downloaded
- Click Install > Install again > Done

 .
. 
- Copy the Profile created on Apple Configurator in the macOS section to iPhone and click open
- Navigate to Settings > Profile downloaded
- Click Install > Install > Install > Done


- The iOS client is now successfully configured to connect to the wireless network using a username and password (EAP-TTLS/PAP).