
Okta SAML Integration
Overview
Okta for SAML configuration can be authenticated in one of two ways: By uploading the identity provider's (IdP) metadata file or by manually configuring with specific IdP fields. For provisioning Okta after configuration, see Provision Identities from Okta.
Prerequisites
-
id.swg.umbrella.com must be sent to the Umbrella secure web gateway (SWG) and not sent directly to the internet.
-
SAML metadata must have a signing key.
- If you are using an on-premises identity provider (IdP) such as ADFS, ensure that your IDP Endpoint (the URL used to communicate with your identity provider) bypasses the Umbrella proxy to avoid an authentication loop.
-
Configure SAML with your identity provider (IdP) that supports SAML 2.0 POST profiles.
-
Download your IdP's metadata file in XML format.
-
Enable cookies for your browser.
-
Enable SAML and HTTPS inspection on a Ruleset that includes the Network and Tunnel identities from which the user traffic arrives.
Please visit Configure SAML Integrations and Prerequisites for more information on prerequisites.
Deployment
Configure Okta for SAML with Metadata Upload
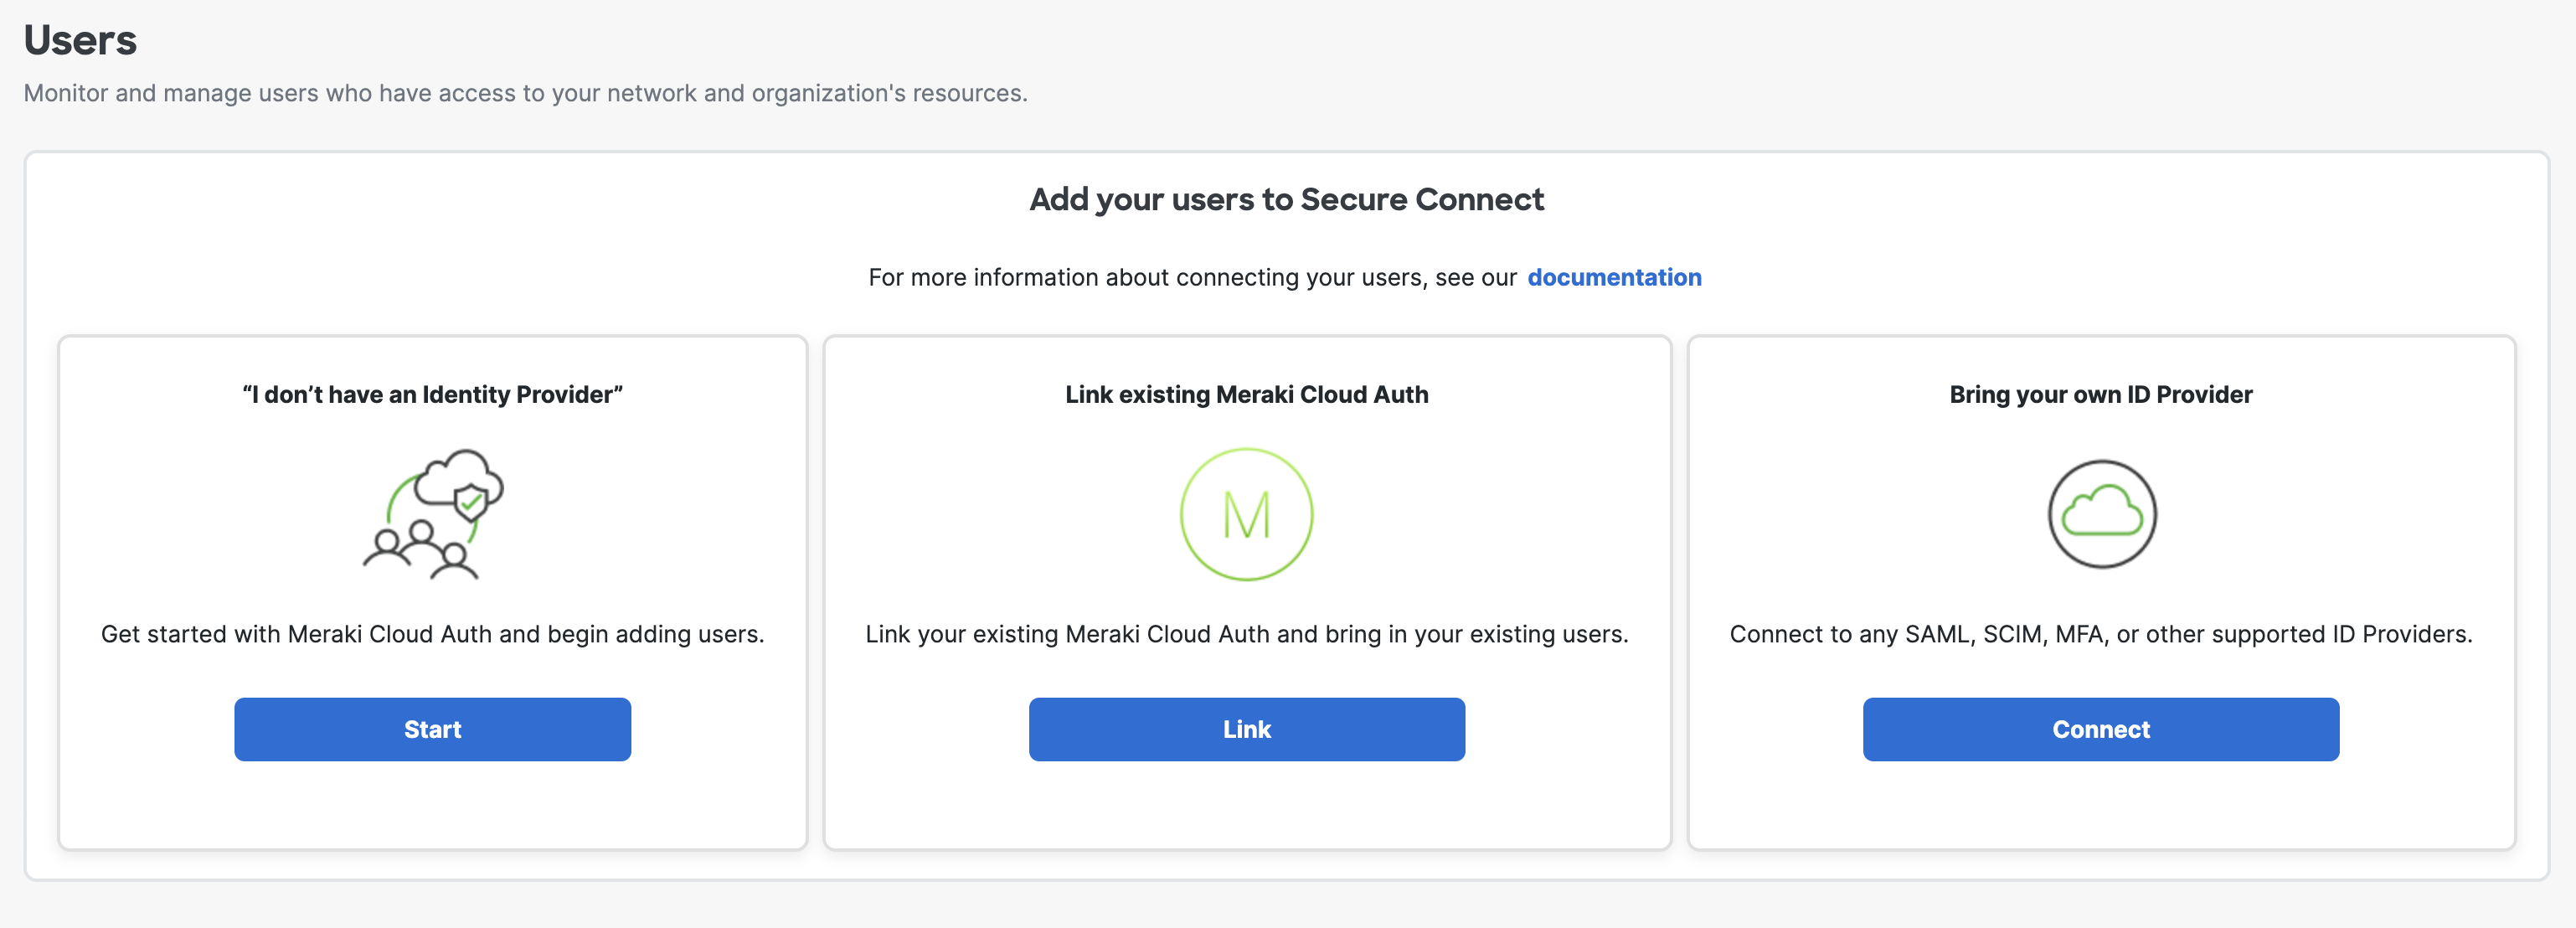
1. Go to Secure Connect -> Identities & Connections -> Users, select your identity provider, click Connect under "Bring your own ID Provider".
2. Then click Configure SAML in the next page, you will be then directed to Umbrella dashboard.

3. Navigate to Deployments > Configuration > SAML Configuration and click Add.

4. Select Okta and click Next.
Notice: Turn on Organization-specific Entity ID Enabled to enable the entity if you have multiple Secure Connect Orgs and need to configure SAML authentication for these Orgs against the same IdP. Otherwise, leave it uncheck by default.

5. Select XML File Upload.

6. Download the Umbrella metadata file (SP metadata file) and click Next.
Do not use the Cisco Umbrella application within Okta.
This application is designed for the Umbrella dashboard and not for Secure Web Gateway users. You must configure Umbrella as a generic SAML 2.0 application within Okta.
For details on how to download Okta IdP metadata, please scroll down this page and check the section Configurations on Okta.
Okta does not provide a method to upload Umbrella metadata for automatic configuration. Extract the EntityID and AssertionConsumerService Location URLs from Umbrella metadata and add these to the applicable fields in Okta. Contact Okta support for assistance.
The Umbrella SP metadata includes the Service Provider Issuer ID, the assertion consumer endpoint URL information, and the SAML request signing certificate from Cisco Umbrella. This metadata is required when configuring your IdP for Umbrella.
Note: Your IdP must send the Cisco Umbrella User Principle Name in the NameID attribute in the SAML assertion. For more information on configuring your IdP, exporting your IdP metadata, obtaining your IdP details, or downloading your IdP signing certificate, refer to your vendor's documentation.
7. Upload your IdP's metadata file in XML format and click Next.
For details on how to download Okta IdP metadata, please scroll down this page and check the section Configurations on Okta.

8. From the Re-Authenticate Users drop-down list, choose how often Umbrella re-authenticates users: Never, Daily, Weekly, or Monthly.

9. Click Save. Your new configuration appears as SAML Web Proxy Configuration.

Configure Okta for SAML Manually
- Navigate to Deployments > Configuration > SAML Configuration and click Add.

2. Select Okta and click Next.
3. Select Manual Configuration.

4. Download the Umbrella metadata file (SP metadata file) and click Next.
The Umbrella SP metadata includes the Service Provider Issuer ID, the assertion consumer endpoint URL information, and the SAML request signing certificate from Cisco Umbrella. This metadata is required when configuring your IdP for Umbrella.
5. Enter the appropriate information to configure Okta's provider metadata and click Next.
For details on how to access Okta IdP metadata, please scroll down this page and check the section Configurations on Okta.
- Entity ID—A globally unique name for an identity provider
- Endpoint—The URL used to communicate with your identity provider.
- Signing Keys—Your identity provider’s x.509 certificate used to sign the authentication request.
- Signed Authentication Request (optional)—You can sign the authentication request for this IdP.

6. From the Re-Authenticate Users drop-down list, choose how often Umbrella re-authenticates users: Never, Daily, Weekly, or Monthly.
- Click Save. Your new configuration appears as SAML Web Proxy Configuration.
Configurations on Okta
1. Go to Okta -> Applications -> Applications and click Create App Integration.

2. Select SAML 2.0 in the new window and click Next.

3. As the first step to create SAML integration, type in App name and click Next.

4. For Single sign-on URL, please put https://gateway.id.swg.umbrella.com/...h/acs/response. Or you can also find in Umbrella Metadata file which you downloaded from earlier step in Configure Okta for SAML with Metadata Upload -> Step 5.

- Single sign-on URL in Umbrella Metadata file

5. For Audience URI (SP Entity ID), please put saml.gateway.id.swg.umbrella.com. Or you can also find in Umbrella Metadata file which you downloaded from earlier step in Configure Okta for SAML with Metadata Upload -> Step 5.
_Okta.png?revision=1&size=bestfit&width=729&height=285)
- Single Audience URI (SP Entity ID) in Umbrella Metadata file
_UMB.png?revision=1&size=bestfit&width=596&height=73)
6. For Name ID format and Application username, you can select, for exmaple, EmailAddress and Email, for your own SAML processing rules. Once done, leave the rest as default and click Next. Finish the Okta survey questions in the next page and click Finish.


7. Now you finish all the required steps on Okta and are redirected to the Secure_Connect_SAML_integration main page. To download the metadata for uploading on the Umbrella side, scross the page down, under Sign On -> SAML Signing Certificates section, click Actions next to the active certificate and click View IdP metadata, save it in a .xml format and upload to the Umbrella side (Configure Okta for SAML with Metadata Upload -> Step 7).
