How to Authenticate Certificate-based Wi-Fi on SM and Meraki APs
Click 日本語 for Japanese
Introduction
This article explains the steps to configure certificate-based (EAP-TLS) Wi-Fi authentication for iOS, Android, macOS, and Windows devices. The configuration involves Cisco Meraki Systems Manager and Cisco Meraki access points.
Devices enrolled in Systems Manager are given a unique SCEP certificate. This certificate is used by access points to authenticate the device.
Authentication occurs automatically in the background without requiring users to manually enter credentials or distribute certificates.
This method allows users to authenticate the same SSID with a username and password. However, user credentials need to be managed from the Users page.
This image shows the certificate-based authentication workflow.

Prerequisites
-
Devices must be enrolled in Systems Manager network in the same organization as the wireless network they are connected to
-
Android 4.3 or higher
-
Systems Manager app required
Step-by-step instructions
Step 1 Tag relevant devices
Providing access to the wireless network from mobile devices using this method is done via manual tags.
For more information about tags, refer to Using and Applying Tags in Systems Manager. In this case, apply the desired tag to relevant devices
Step 2 Configure the Wireless Network
Configure a wireless SSID that will use certificate-based authentication with SCEP certificates. This can be a new or existing SSID, as long as the association requirements are configured correctly.
a. Navigate to Wireless > Configure > Access control.
b. Select the desired SSID.
c. Under Security, select Enterprise with Meraki Cloud authentication.

d. Under SM Sentry Wi-Fi, click Add Sentry Network and select the desired Network, Scope, and Tag(s).
Devices with any of the configured tags are allowed to access the SSID. If the organization contains multiple Systems Manager networks, the network name appears before the tag.

f. Configure any additional SSID settings as required.
g. Click Save Changes.
Allow time for the profile and certificate to be automatically pushed to tagged devices. Devices must be online and able to check in with Systems Manager to receive updates.
Disallow Access
To remove a device’s access to the wireless network:
Verification
Confirm profile on devices
On each device with the relevant tag, a profile named Meraki Wifi is automatically applied. This can be verified from the client details page in Systems Manager.

This can also be confirmed on the device.
For iOS devices:
-
Navigate to General > Device Management > Meraki Management > More Details.
-
Verify that:
-
the configured SSID (in this case, Meraki-Cert) appears under Wi-Fi Networks
-
a certificate named Wi-Fi SCEP Certificate appears under Device Identity Certificates


For Android devices:
-
Open the Systems Manager app.
-
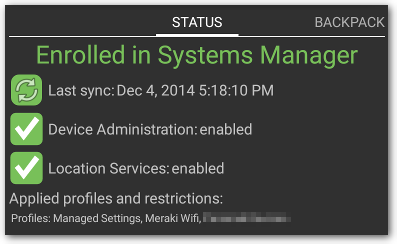
Verify that the Meraki Wifi profile is present.