
Trusted Access for Secure Wireless Connectivity - Onboarding Guide
Overview
Meraki Trusted Access is a simple and secure way to provide network access for phones, tablets, and laptops to Meraki MR wireless networks using certificate-based 802.1x authentication. To enable network access on end-user devices, download and configure Trusted Access profiles by following this guide.
Refer to the Trusted Access Setup Guide to obtain further guidance on setting up Meraki Trusted Access in your Meraki network.
iOS/iPadOS
- Open the Safari browser
 on the target device and navigate to https://portal.meraki.com.
 - Enter the network ID or network enrollment string when prompted.
- Log in using your username/email address, and password.
- Navigate to the menu dropdown located in the upper-right corner of the screen and select Join Wi-Fi.

- Select the Device type from the dropdown menu. Enter a name for the device in the Device name field.
- Click Add device.
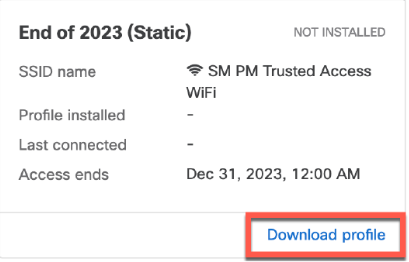
- Locate the Trusted Access profile you want to enable on the device and click Download profile.

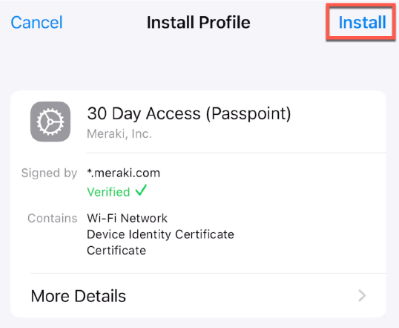
- Click Allow at the system prompt, then click Close in the Profile downloaded alert window.

- Navigate to the Settings app
 and click Profile Downloaded.

- Click Install located in the upper-right corner of the screen to complete the process.
macOS
- Open the Safari browser on the target device and navigate to https://portal.meraki.com.
- Enter the network ID or network enrollment string when prompted.
- Log in using your username/email address, and password.
- Navigate to the menu dropdown located in the upper-right corner of the screen and select Join Wi-Fi.

- Select the Device type from the dropdown menu. Enter a name for the device in the Device name field.
- Click Add device.
- Click Download profile on the desired profile.
- Installation instructions is displayed in the browser window. When prompted, click Allow on the permission prompt to enable downloads from the self-service portal. The Trusted Access *.mobileconfig profile will download to the browser's designated downloads location.

- Open the Trusted Access *.mobileconfig profile. You might receive a notification indicating that the profile has to be installed from System Settings.

- Click the System Settings icon
 in the Dock or select Apple menu
 > System Settings to navigate to System Settings on your Mac. Then, click the Profiles option under the 'Others' category.
 - Double-click the Trusted Access profile under the Downloaded category.

Note: If the *.mobileconfig profile is not installed within 10 minutes, it may be removed from this section and have to be re-downloaded from portal.meraki.com.
- Review the profile details and click Install at the prompt.

- When prompted, enter your local account password or use a fingerprint to authenticate with TouchID.
- Connect to the Trusted Access wireless network when it is in range.
Windows
- Open any available browser on the target device and navigate to https://portal.meraki.com.
- Enter the network ID or network enrollment string when prompted.
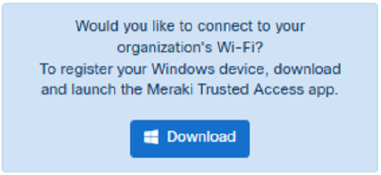
- Before logging in, click Download in the information box. The Meraki Trusted Access app will download to the designated download file location for the browser.
- Open the TrustedAccess.appinstaller file.
- In the Installer window, Click Install. If you select "Launch when ready," the app will automatically launch when the installation is complete.

Note: During installation, the Meraki Trusted Access app may prompt you to install additional Windows system packages required for its functionality. Follow the on-screen instructions to install these packages if prompted."
- After launching the Meraki Trusted Access app, enter the network ID or enrollment string at the prompt, then click Continue.

- Log in using your username/email address and password.
- Enter a name for the devices in the Device name field, then click Add.

- Find the Trusted Access profile you want to enable on the device and click Install.

- The status will change to Installed after successful installation.

- Connect to the Trusted Access wireless network when it is in range.
Note: This is the expected behavior of the Windows operating system. When a wireless network is configured through a predefined networking profile, it is the profile name that shows up in the list of available wireless networks, and not the SSID. If this feature is required the Trusted Access SSID to show up in the list of available networks after installing the Trusted Access profile, then the Trusted Access profile name set in Dashboard must be same as the SSID.
Android (with Passpoint)
Note: This feature is available for devices running Android 10+. Passpoint must be enabled on the SSID. Additional details can be found in the Trusted Access Setup Guide.
- Open the Chrome browser
 on the target device and navigate to https://portal.meraki.com.
 - Enter the network ID or network enrollment string when prompted.
- Log in using your username/email address, and password.
- Navigate to the menu dropdown located in the upper-right corner of the screen and select Join Wi-Fi.

- Select Android Passpoint from the Device type dropdown menu. Enter a name for the device in the Device name field.
- Click Add device.
- Locate the Trusted Access profile you want to enable on the device and click Download profile.

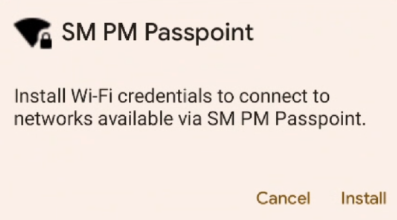
- Click Install at the system prompt, then click Done at the Credentials installed alert window.
- Connect to the Trusted Access wireless network when it is in range.