

How to Share External Files Using Box
Overview
Cases in the Cisco Meraki dashboard have a maximum file size limit of 25 MB. If you need to share files that exceed this limit, Meraki Support will use Box as an alternative for file sharing.
Box is a secure cloud-based file sharing platform that allows users to sync and share files with Meraki. Support team ensures customer data is secured and protected.
Step-by-step instructions
There are two options for sharing files with Meraki Support using Box:
- File request
- Folder collaborate invite
File request
The file request option provides a quick way to upload files to Meraki Support using Box. It does not require logging in to an existing account or creating a new Box account. This option is generally used if Meraki Support needs to troubleshoot your issue right away.
- Maximum file size upload limit: 32 GB
- Maximum number of files: 500 files
To upload files using the file request option:
- Meraki Support will provide a file request link via email. The link will direct you to the Submit files webpage.

- Select the Select Files button and choose the file or files to upload.
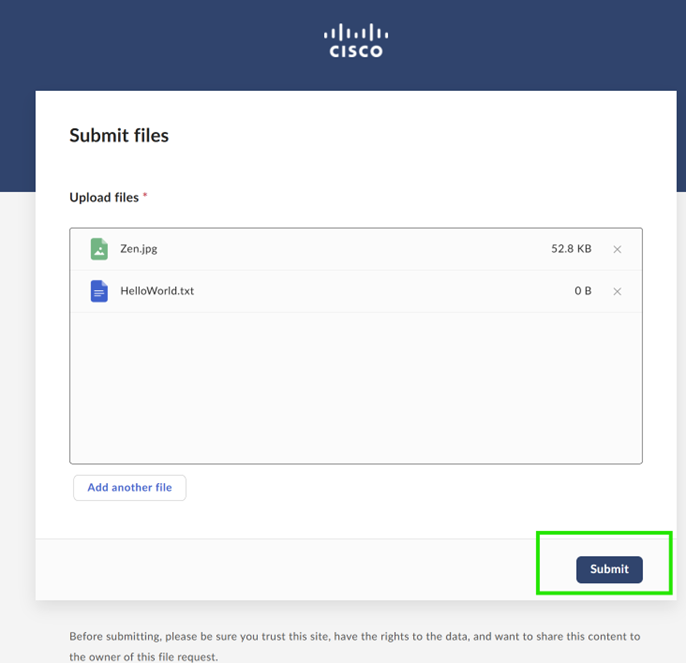
- Select the Submit button to complete the file upload request.
- An uploading progress bar and processing your files message will appear to show the status of the file upload.
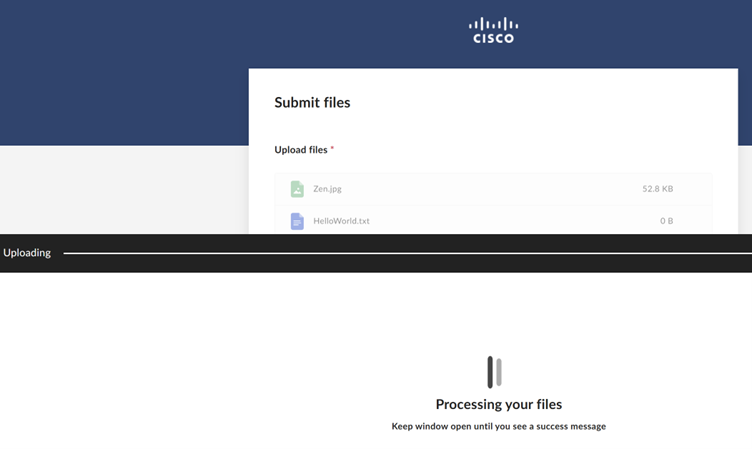
- Once the file upload is complete, a message will appear stating: Success! Your files have been submitted.

- Confirm with Meraki Support that you have uploaded files to the Box folder.
Folder collaborate invite option
This option adds you as a collaborator on the shared folder in Box. You will be able to upload and download files from the shared folder.
This option provides a larger allowance for file uploads. The maximum file size upload limit for this option is 150 GB.
Prerequisites:
- You must have an existing Box account, or create a free Box account using your business email address.
- You must enable Multi-Factor Authentication (MFA) on your Box account before you can access a file shared by Meraki Support. These steps are required to safeguard your data.
Access the shared folder
To access the shared folder in Box, follow these steps:
-
Meraki Support will send an email from noreply@box.com with a following details:
- Subject line: Meraki Support agent name and shared folder name
- From: Meraki Support agent name and noreply@box.com email address
- Body: Folder name and list of files already contained in the folder

- Select the Go to Folder button. You will be redirected to the Cisco Box Login page (cisco.account.box.com).

- Select the Not a part of Cisco button.

- Log in to your existing box account using a business email address. If you do not have an account, refer to the Create a Free Box Account section below.
- Download file(s) by selecting the Download option. To access the download option, select the ellipses (...) icon or right-click on the file.

- To upload additional files to the folder, select New > File Upload. You may also drag and drop the file directly in the folder on the web browser.
 Due to permission restrictions, you will not be able to delete files that are uploaded to the shared folder.

Create a free box account
If you do not have a Box account, follow these steps to create a free individual box account:
-
From the Sign in page for users outside of Cisco, select Sign Up on the top-right side of the page.
- Select the Individuals and Teams option. Under the Individual (free) column, select the Sign-Up button.
- Enter your full name, business email address, and password. You must use a business email address. Personal email addresses such as Gmail, Yahoo, or iCloud are not accepted. The folder collaboration invite will fail if a personal email address is used.
- Log in to your Box account. An Action Required message will appear, prompting you to complete the authenticator app setup. You must complete this step before you can access the shared folder.

- Select the Set Up button, and the Set Up 2-Step Verification dialog box should appear.

- Follow the on-screen instructions. Once completed successfully, a prompt to accept the invitation to collaborate will appear.

- Select the Accept button. A message will appear stating: Collaboration invite to 1 item has been accepted.

- Refresh the web page to view the shared folder and its contents.
