
Alerts Management Overview
Overview
This guide provides an overview of alert management in Meraki Insight. Alert management is made available for WAN and VoIP health.
Alerts management introduced under WAN and VoIP helps IT teams to get better visibility into critical networks and reduce mean time to resolution.
Alerts Management
Meraki Insight has added a new page under Insight > Alerts. This page consists of WAN and VoIP tabs to allow you to configure alerts under their respective sections. 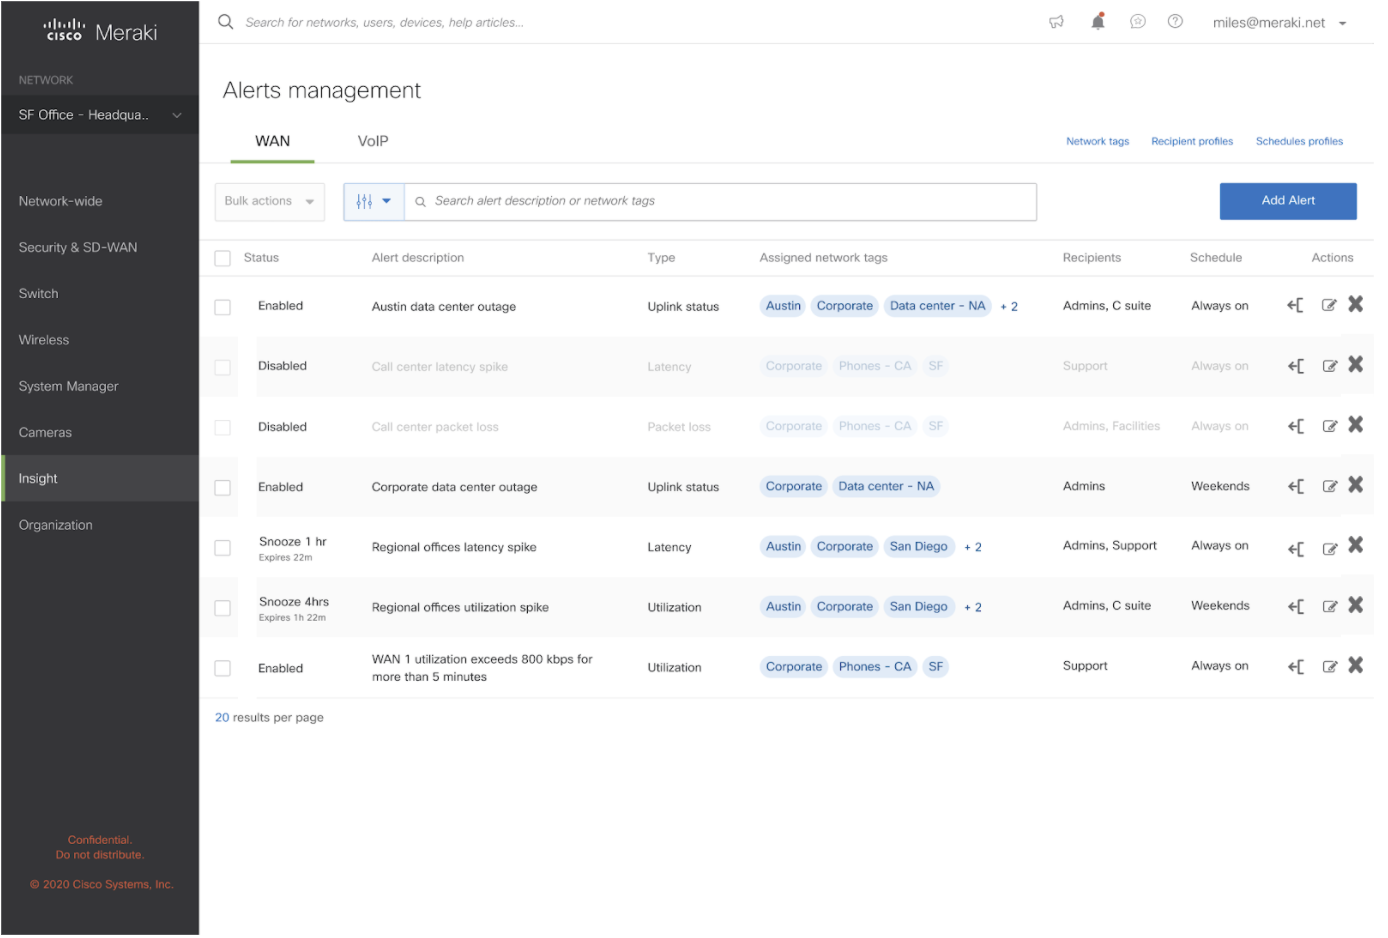
The alert management page has the following fields:
- Status: Indicates if the alert is enabled or is disabled.
- Alert description: User-defined alert field to help distinguish between common alert types
- Type: Indicates the type of alert that is configured
- Recipients: Administrators who will be receiving email notifications when the alert is triggered
- Actions: The slide-out panel will give a preview of the alert configured. The edit button helps to reconfigure the alert. The
button is to delete the alert
How to configure alerts
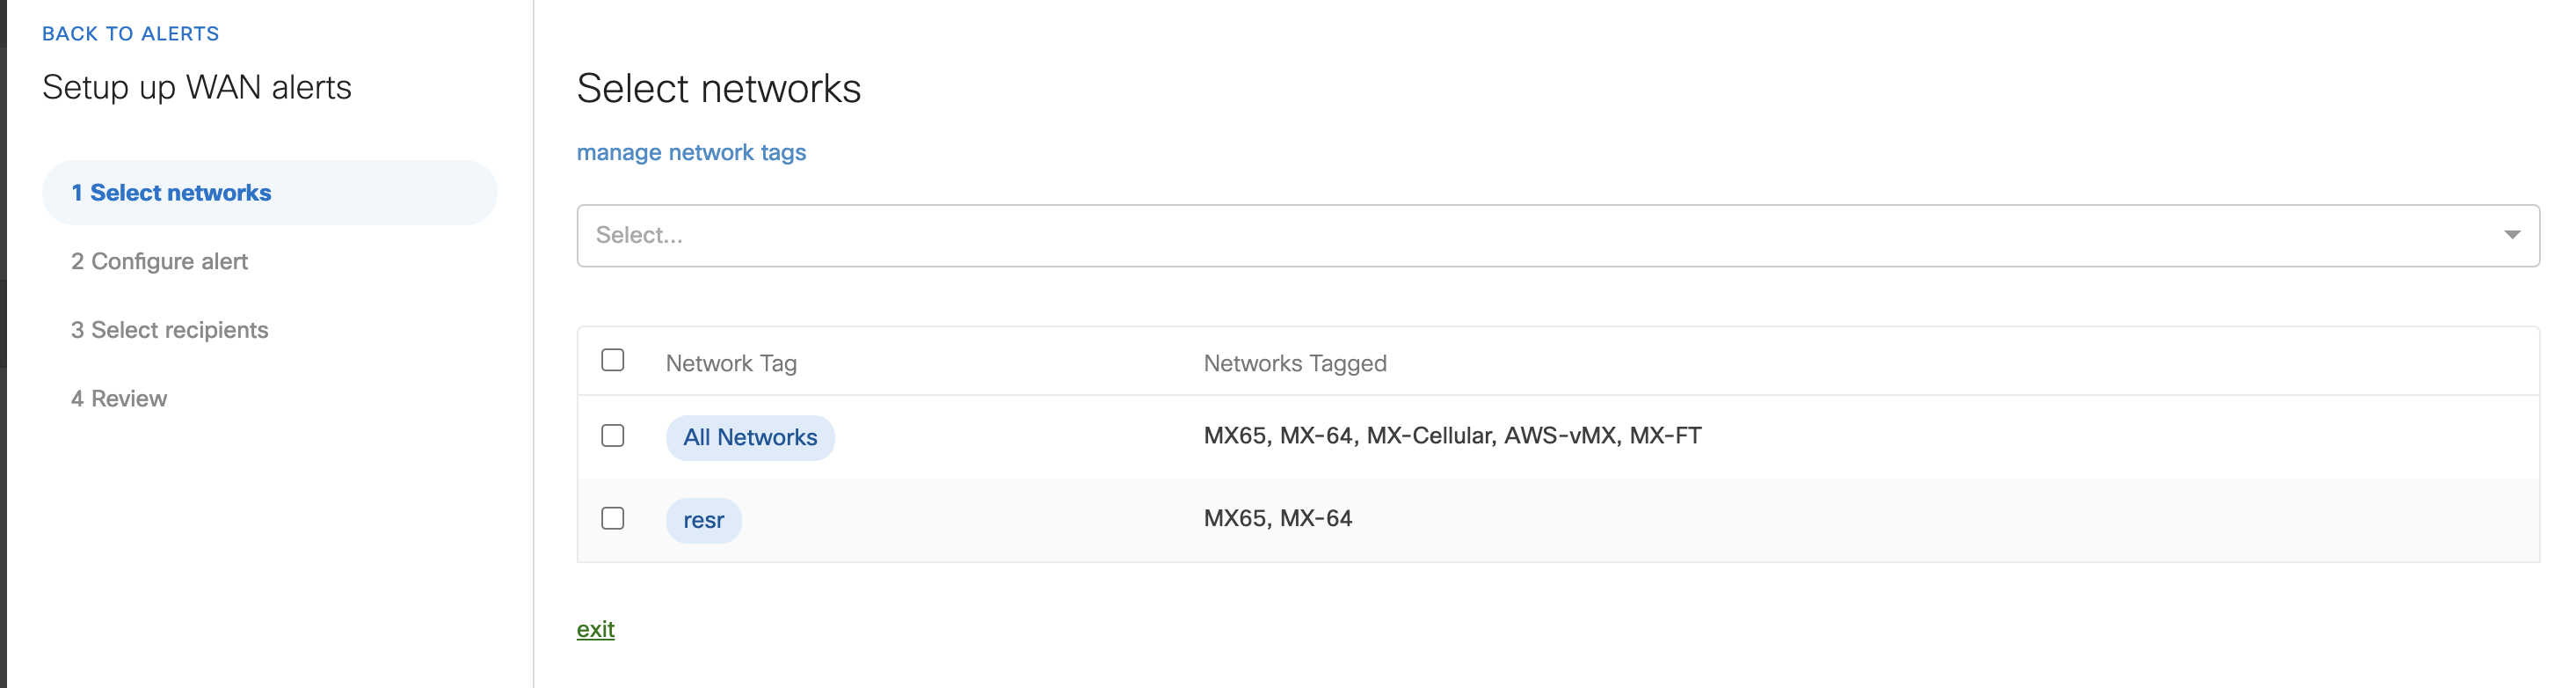
The Add Alert option will open up a configuration wizard and walk you through steps to help configure alerts.
Select networks consist of the manage network tags option to add tags to networks that do not already exist. The network tags that already exist will appear in the table below. You can either select them or create a new tag using the manage tags option. The table will consist of the tag name and the name of the networks associated with the tag. Once the networks are selected, click on the Next button on the bottom right corner of the page.
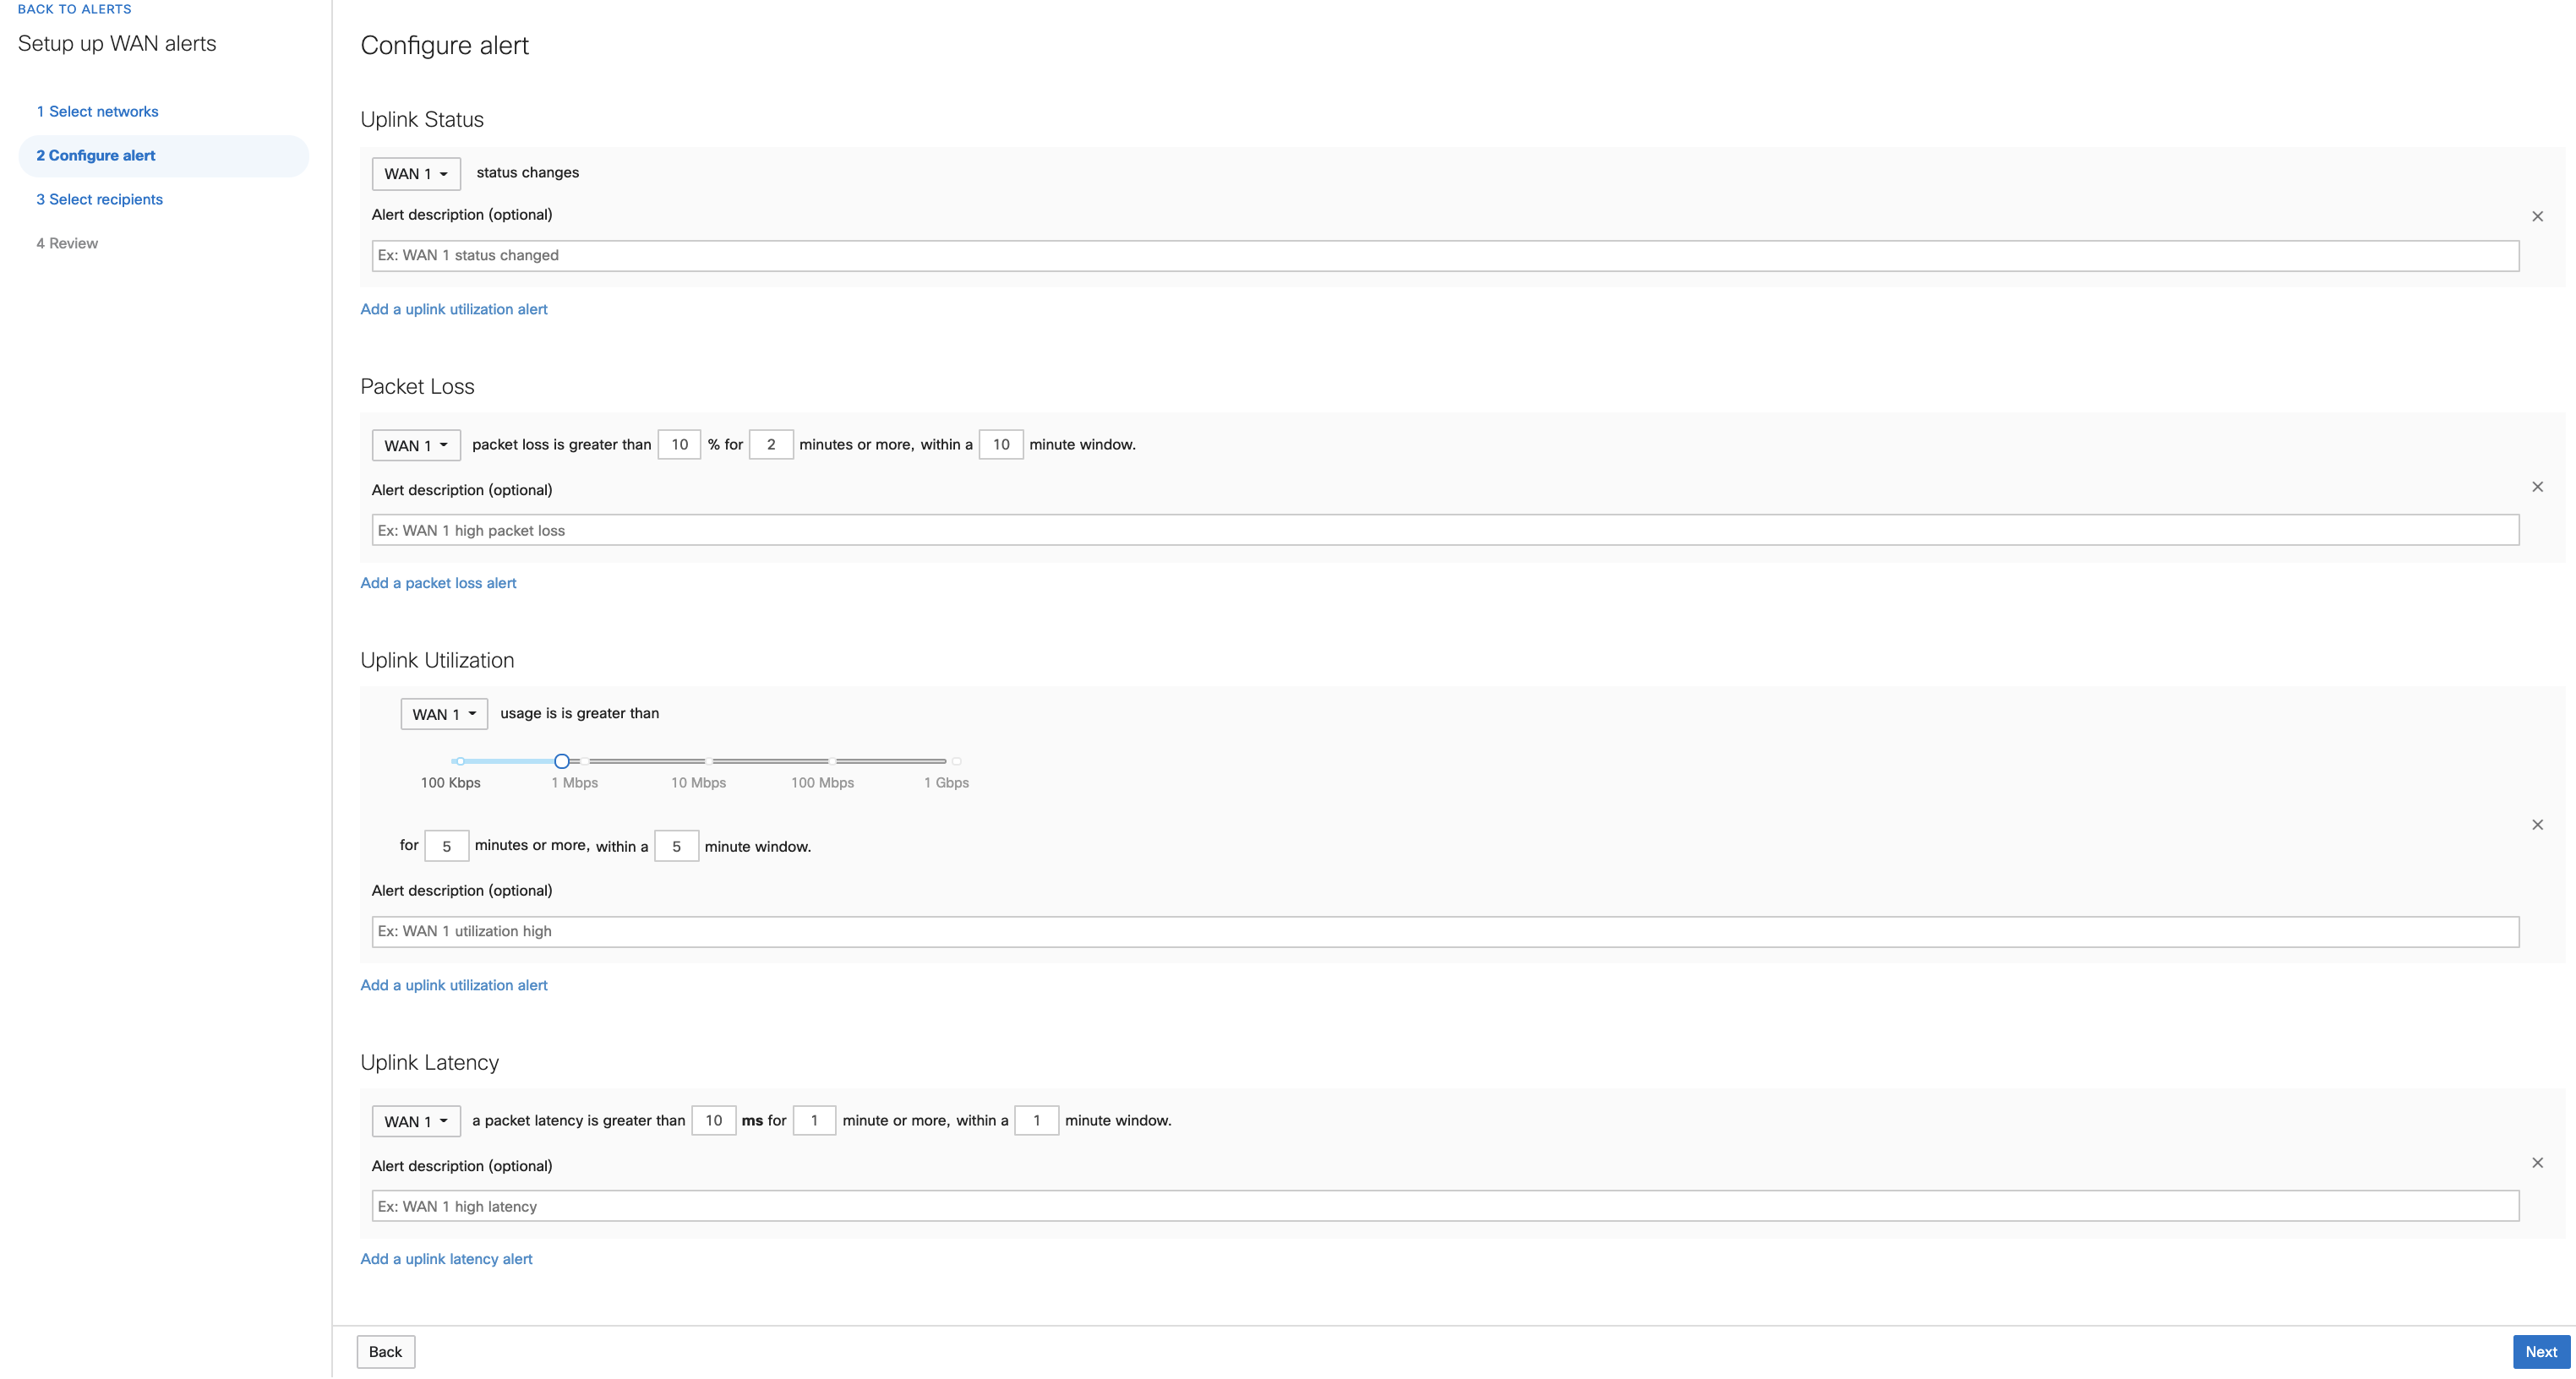
Configuring WAN alerts
Configure alert gives you four alert types.
- Uplink Status: Add WAN 1 or WAN 2 status change to be notified when either of the links experiences 100% packet loss.
- Packet loss: Configure the alert on an uplink where the loss is set to a threshold that exists over a given period of time.
- Latency: Configure the alert on an uplink where the latency is set to a threshold that exists over a given period of time.
- Utilization: Configure the alert on an uplink where the utilization is set to a threshold that exists over a given period of time.
Note: Uplink status will use Pinger destination set as default on the SD-WAN & traffic shaping Page--> Uplink Configuration tab
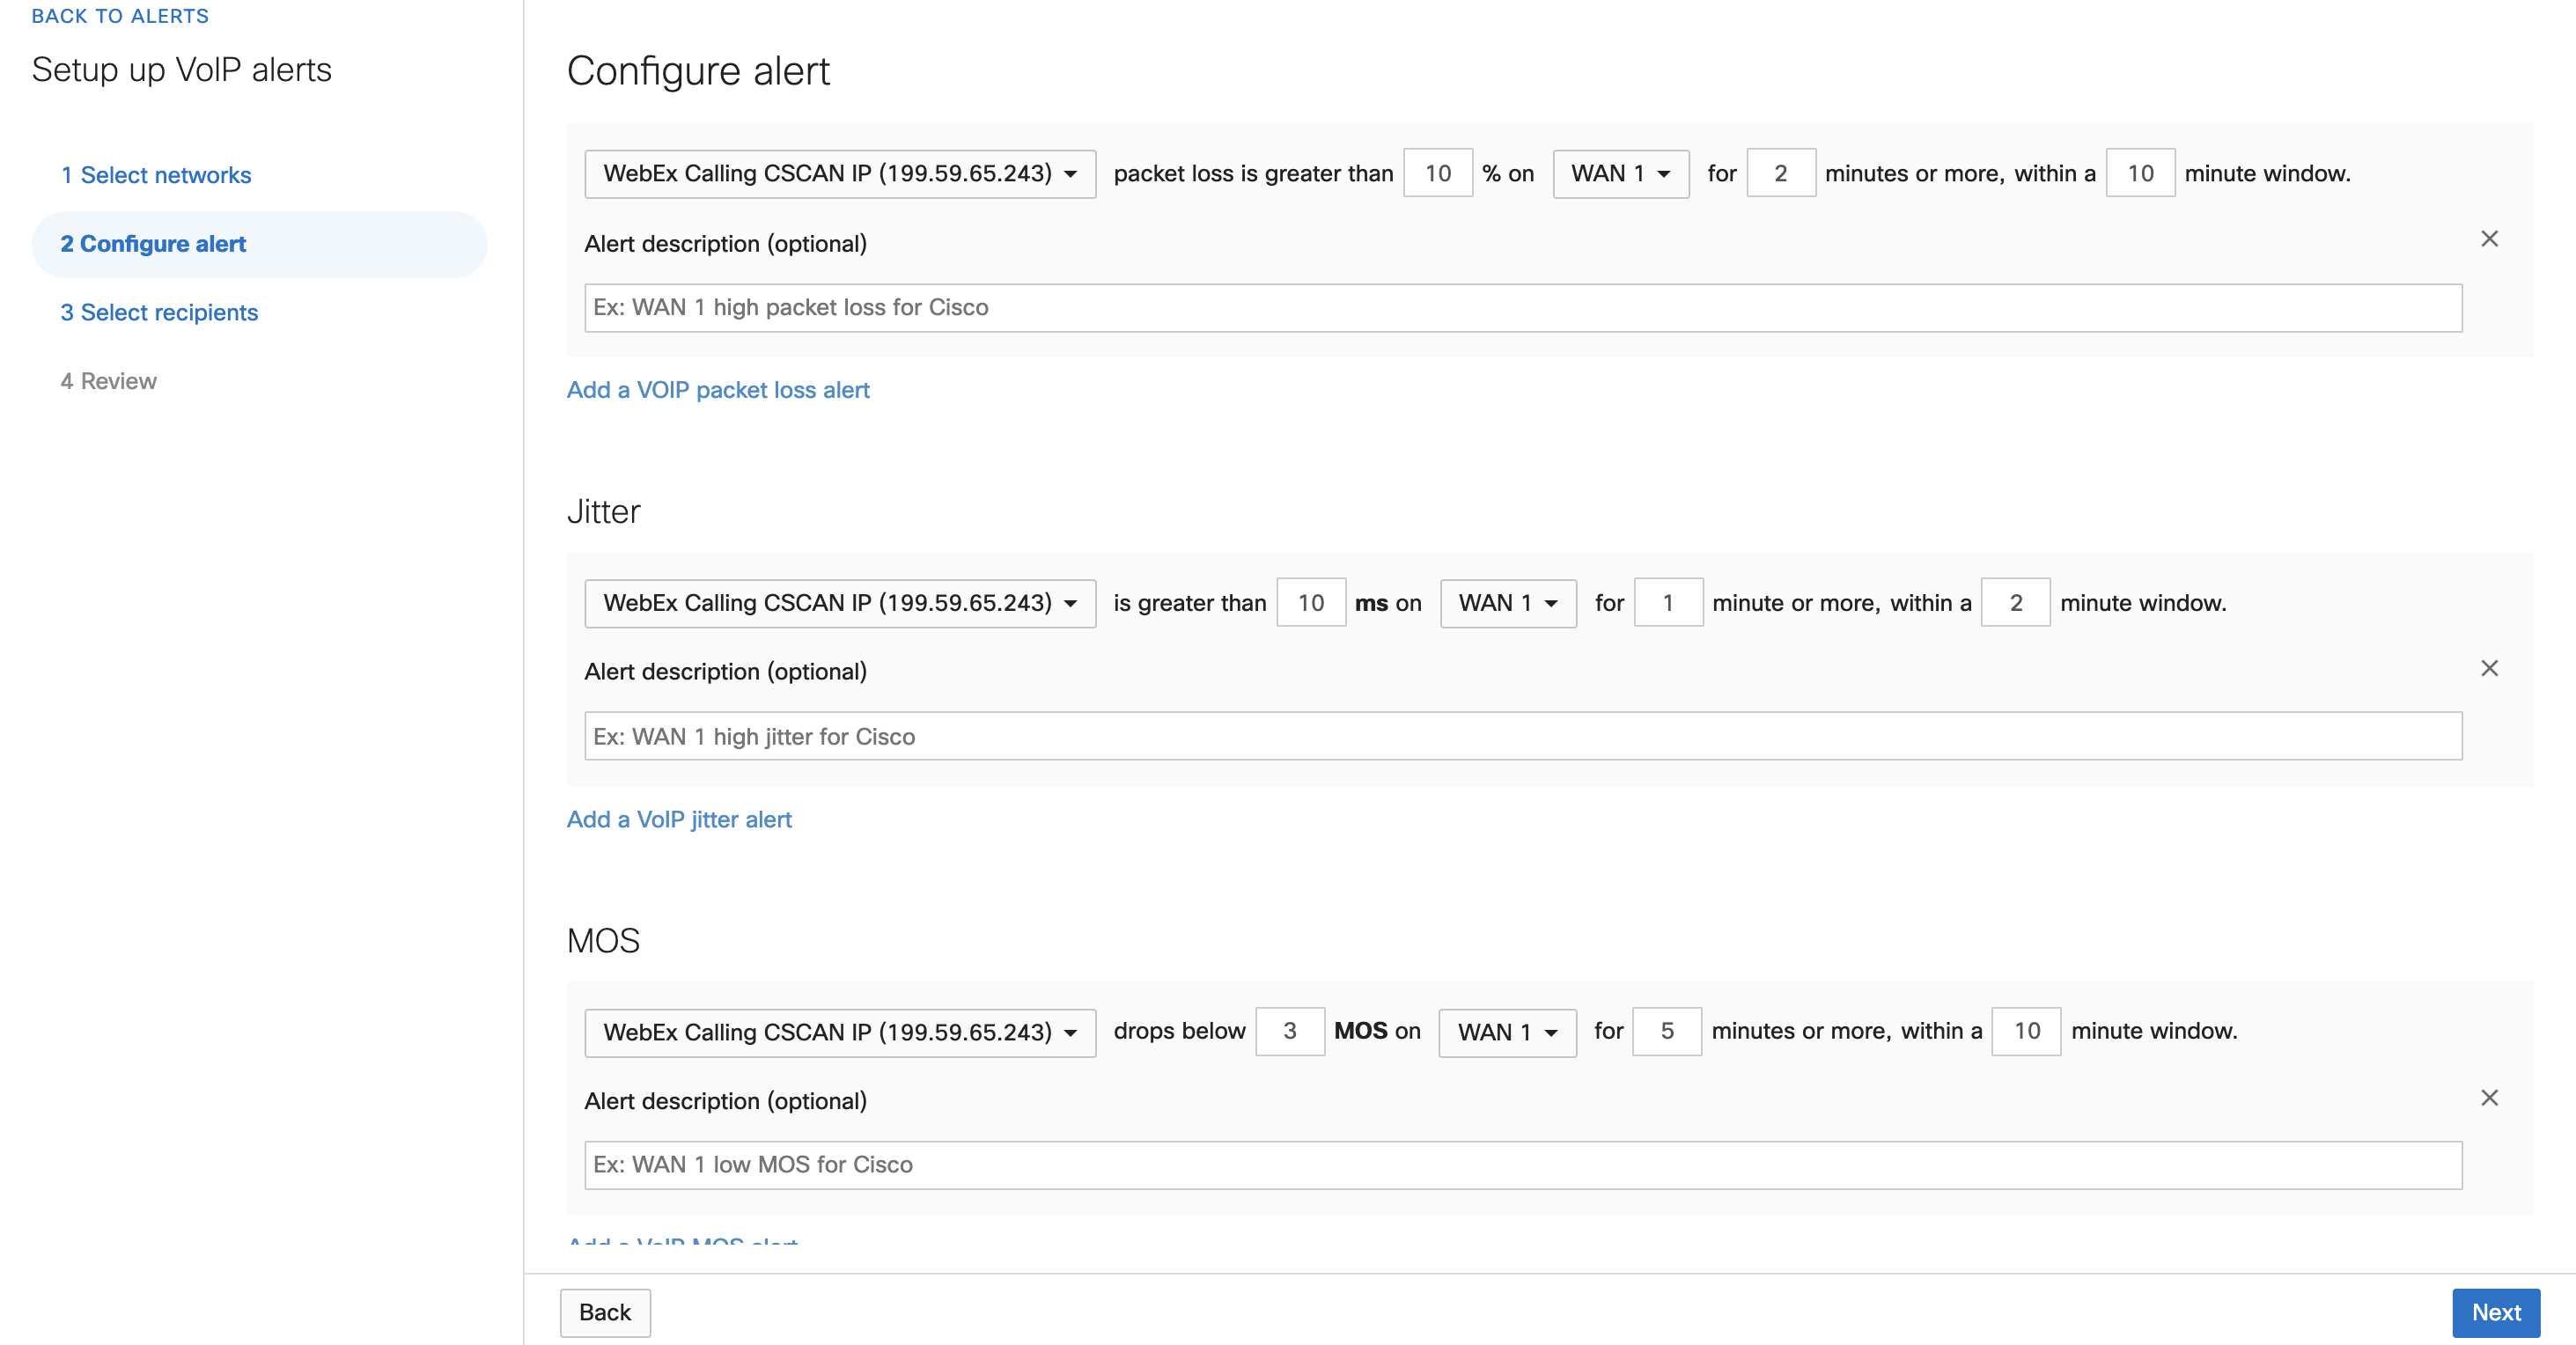
Configuring VoIP alerts
- Packet loss: Configure the alert for a particular VoIP provider where the loss is set to a threshold that exists over a given period of time.
- Latency: Configure the alert for a particular VoIP provider where the latency is set to a threshold that exists over a given period of time.
- MOS Alert: Configure the alert for a particular VoIP provider where the MOS is set to a threshold that exists over a given period of time.
The admin can set a user-defined value with each field above to help manage alerts across different networks and different alert types.
You can add as many alerts and different alert types under the same configure window.
Click Next to go to the next window to add Recipients. The pre-populated recipient's list will appear to select from the list or you can add a new email address. Once done, click Next to go to the review page.
The review page will give you a quick snapshot of all the previous steps to review and change any fields if necessary.
Click Done to save the alert configuration which will take you to the Alerts Management page displaying a banner Successfully created x number of alerts and the new alert(s) will appear in the table.
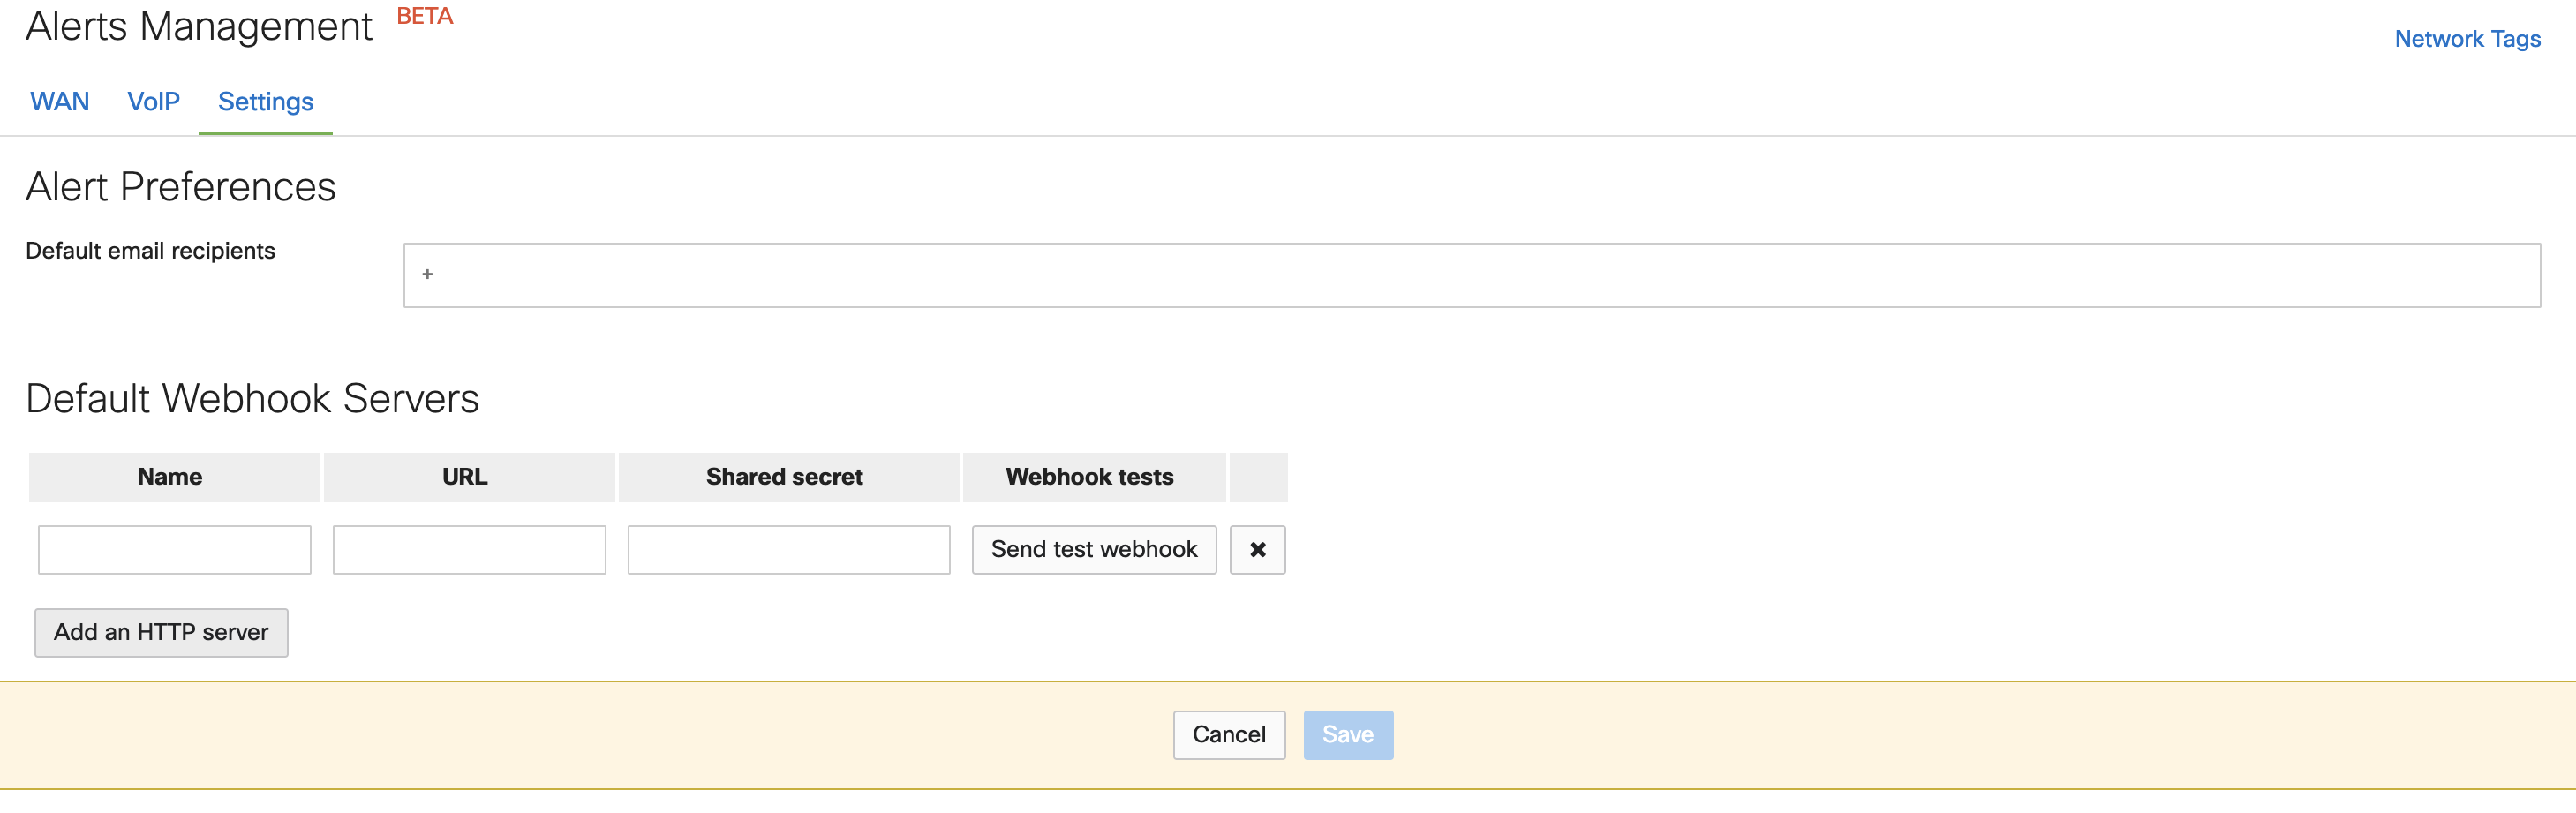
Webhooks
Webhooks can be configured under the Settings page on the Alerts management page. The Default email recipient will allow you to add email addresses only. All WAN and VoIP alert when triggered will now be sent to the default email recipient and its individual email recipient configured in the guided configuration.
The Default Webhook server will allow users to add a webhook server with a given URL and shared secret. You can also send a test webhook to verify if it's working as expected.
Per-Alert Webhooks
Users who wish to add different webhook servers for different alert types can do so by configuring the webhook server on the settings page and adding such servers under the Select recipient--> Webhook destinations in the guided configuration/editing an alert.

The Review page will show all recipients who will receive the alerts i.e per-alert email recipient, per-alert webhook destination, and Default email recipient.
Note: changing one or more recipients for any alert type at any time will reload the detector causing the alert/s to be triggered right away if it's in the alerting state.
Frequently Asked Questions
Why don't we have the same capabilities for Web App health alerts?
There are plans of bringing the same capabilities for Web App health under the Alerts Management page.
Can I create more than one alert in the same configuration step?
Yes, you can create more than one alert in the same configuration window. However, they will appear as different alerts under the alerts management page.
If there are two or more alerts of the same type for two different networks, will I receive one email or two?
You will receive two emails for two different networks alerting for the same type of issue.
Is Webhooks available for Web app alerts?
No, webhook functionality is only available for WAN and VoIP alerts and not web app alerts.