
NAT Mode with Meraki DHCP
NAT mode with Meraki DHCP allows an MR access point to provide client addressing by running its own DHCP server to simplify management, allow guest access, and provide client isolation functionality.
Client Addressing in NAT mode with Meraki DHCP
The DHCP server run by the Cisco Meraki AP provides addresses in the 10.0.0.0/8 subnet (10.x.x.x). Outbound connections will be initiated with the LAN IP address of the AP using Network Address Translation. Wireless clients that connect to the network will be given the following configuration via Meraki DHCP:
- An IP address in the 10.0.0.0/8 range. The IP address is created by running the client’s MAC address through a hashing algorithm.
- A gateway address of 10.128.128.128
- A DNS address of 10.128.128.128
- A Lease Time of 24 hours
Customization of IP address range, gateway address, lease time or other DHCP options is not supported. For more advanced DHCP configuration, including control over lease times and IP ranges, using Bridge mode or an external DHCP server is recommended.
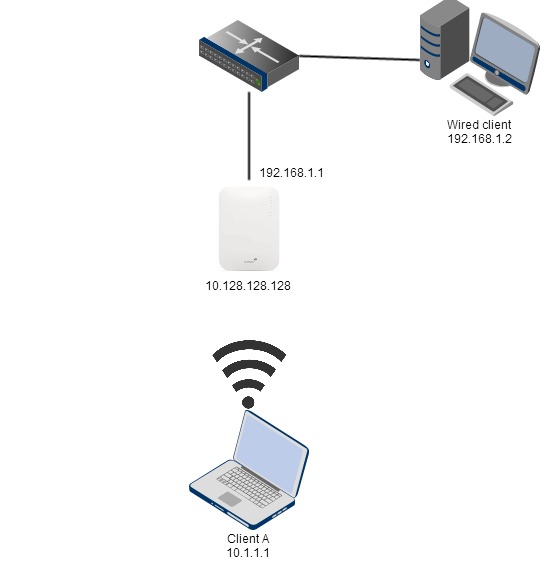
A wireless network using NAT Mode with Meraki DHCP can be seen below. When clients on the wireless network access resources upstream of the AP, their IP addresses will be translated to the IP address of the AP (192.168.1.1):

Client Isolation
NAT mode with Meraki DHCP isolates clients. Devices with a Meraki DHCP address will be able to access external and internal resources, such as the Internet and LAN (if firewall rules permit). However, connected clients will be unable to contact each other. The client isolation features of Meraki DHCP can be seen in the above figure. Client A and Client B can both access the Internet. When Client A wants to send traffic to Client B, the traffic will reach the AP. However, the AP will not forward this traffic to Client B. Therefore, the two clients are isolated from each other.
Since the client isolation function of NAT mode prevents wireless devices on the SSID from communicating with other wireless devices, NAT mode is not recommended for use with wireless peer-to-peer devices like a wireless printer or Google Chromecast.
Due to the implementation of client isolation, clients on a NAT mode SSID cannot talk to clients on a bridge-mode SSID when both clients are connected to the same AP.
Configuring NAT mode with Meraki DHCP
To configure NAT mode with Meraki DHCP on an SSID, follow the directions below:
- Navigate to Wireless > Configure > Access control
- Select the appropriate SSID from the SSID menu at the top of the page
- Under the Client IP and VLAN section, select Meraki AP assigned (NAT mode), as seen in the image below
- Click Save

DNS and NAT Mode
In NAT mode, a Cisco Meraki AP acts as a DNS forwarder. DNS resolution in NAT mode follows the process below.
- Wireless client sends DNS query to the AP at 10.128.128.128.
- The AP checks in a per-SSID cache to see if the record requested by the client is cached from a previous DNS lookup.
- If the record does exist in the AP's DNS cache for that SSID, the AP resolves the query locally and responds to the wireless client with the record in a DNS response.
- If the record is not in the AP's DNS cache for that SSID, it queries the local DNS servers that it has been configured to use. The AP will try the primary DNS server first. If the primary DNS server does not respond, a secondary DNS server will be queried, if configured. If neither DNS server responds, a DNS reason code "Reply timed out - The DNS server did not respond within the allotted time frame" message is sent to the client.
- When the AP receives a response containing the DNS record from the local DNS server, it caches the results and sends a DNS response to the wireless client.
Note: Cisco Meraki APs can resolve external or internal DNS names depending on the ability of the local DNS servers they are configured to use. The AP only performs DNS recursively. If the recursion bit is not set in the DNS request from the wireless client the AP will not be able to resolve the DNS query.
If it is desirable to have wireless clients use different DNS servers than those configured for the AP itself, custom DNS server addresses can be provided.
Configuring Custom DNS for an SSID in NAT Mode
This article shows how to set custom DNS servers for a NAT mode SSID, rather than using the AP's DNS server. This is typically used to forward NAT mode SSID clients to a DNS server with custom content filtering.
To configure custom DNS for an SSID in NAT mode, follow the directions below:
- Navigate to Wireless > Configure > Access control in Dashboard
- Choose the desired SSID from the drop-down menu at the top of the page
- Under Client IP and VLAN, select Meraki AP assigned (NAT mode)
- For Custom DNS servers, enter the preferred custom DNS IP addresses. A maximum of 2 DNS servers can be specified
- Click Save to apply the settings
Note: Wireless clients will still be assigned the AP's internal IP 10.128.128.128 as their DNS server IP. This configuration customizes the destination server of the AP's DNS proxy.
Common Problems
There are a few common problems that can arise when deploying NAT mode with Meraki DHCP to provide client addressing. These problems are outlined in detail below:
- Roaming - NAT mode with Meraki DHCP will use the IP address of the AP as the public IP address for wireless clients. When a client roams between APs with Meraki DHCP, TCP connections will drop and have to be re-established. This can cause problems with some applications and devices.
- Bonjour and multicasting protocols - The client isolation features of Meraki DHCP will prevent wireless clients from communicating with each other. This will prevent Bonjour, layer 2 discovery protocols, and multicasting protocols from working. This can cause problems in networks that use Bonjour among wireless clients, or have IP phones or applications that require multicasting.
-
Group Policy “Security appliance only” settings - Client information (such as MAC address and IP address) is hidden from an upstream MX due to NAT being performed on a downstream MR. As a result, the MX won’t be able to enforce group policy settings specific to security appliances only for clients connected to an SSID using Meraki DHCP.
- Inbound client connections - NAT mode with Meraki DHCP prevents inbound connections to a wireless client. This can cause problems if a wireless client needs to be accessible from a different network. The image below illustrates this problem. A connection, such as a remote desktop session, from the wired client to wireless client A will fail. Other common examples include failed wireless LAN connections to Chromecast devices, AirPlay enabled devices, printers or projectors.
The issues described above can be resolved by using bridge mode for client addressing. Bridge mode simply passes traffic between the wireless client and wired distribution system. An upstream DHCP server will be required to handle client addressing.
Additional Resources
For additional information about NAT mode with Meraki DHCP and client addressing, please consult the following documentation: