
Enabling WPA2-Enterprise in Windows
It is important to manually configure WPA2-Enterprise for your wireless network profile in Windows. You must not be in the process of associating to the SSID because the configurations will not save correctly. Follow the steps below to configure WPA2-Enterprise:
Windows Vista/7
- In Windows, navigate to Control Panel > Network and Internet > Network and Sharing Center.
- Click Manage Wireless networks.
- Click Add.
- Choose Manually create a network profile.

- On the next page, enter the following:
- Network name: This is the SSID name. It is case sensitive.
- Security type: Choose WPA2-Enterprise.
- Encryption type: Choose AES.
- Check Start this connection automatically if you want Windows to connect to this network automatically.
- Check Connect even if the network is not broadcasting if the SSID is hidden and you want Windows to connect to this network automatically.
- Click Next.

Note: If the RADIUS server has a certificate that may not be trusted by the wireless client or is not a member of the domain in which the RADIUS server resides, on the "Successfully added" page, click Change connection settings.
- Choose the Security tab.
- Click Settings.
- Uncheck Validate server certificate if the wireless client may not trust the RADIUS server certificate.

- For the Authentication Method, choose EAP-MSCHAP v2.
- Click Configure.
- Uncheck Automatically use my Windows logon on name and password if the computer is not on the domain.
.png?revision=2)
- Click OK.
Note: It may be required to specify user or computer authentication based on whether the client is part of the domain or if machine or user authentication is a condition of the RADIUS policy.
To choose user or computer authentication, from the Security tab,- Click Advanced settings.
- Select the 802.1X settings tab.
- Check Specify authentication mode.
- Choose User or computer authentication. Or choose an alternate option if required.

- Click OK to close out.
Windows 10/11
- Navigate to Control Panel > Network and Sharing Center.
- Click Set up a new connection or network.
- Select Manually connect to a wireless network.

- On the next page, enter the following:
- Network name: This is the SSID name. It is case sensitive.
- Security type: Choose WPA2-Enterprise.
- Encryption type: Choose AES.
- Check Start this connection automatically if you want Windows to connect to this network automatically.
- Check Connect even if the network is not broadcasting if the SSID is hidden and you want Windows to connect to this network automatically.
- Click Next.

- Click Change connection settings.

- Choose the Security tab.
- Click Settings.
_is_selected_from_the_toggle_option.png?revision=2&size=bestfit&width=375&height=524)
Note: Make sure that Microsoft: Protected EAP (PEAP) has been selected under 'Choose a network authentication method:'
- Uncheck Verify the server's identity by validating the certificate if the wireless client may not trust the RADIUS server certificate
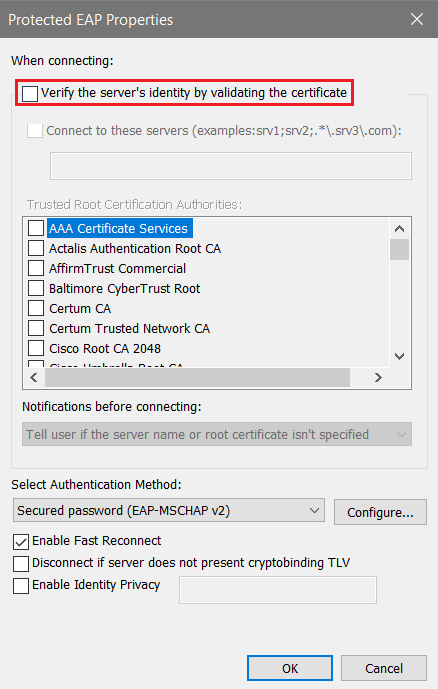
Note: Make sure that Secured password (EAP-MSCHAP v2) has been selected under 'Select Authentication Method:'
- Click Configure...
- Uncheck Automatically use my Windows logon name and password (and domain if any) if the computer is not on the domain.
.png?revision=2&size=bestfit&width=359&height=568)
- Click OK.
Note: It may be required to specify user or computer authentication based on whether the client is part of the domain or if machine or user authentication is a condition of the RADIUS policy.
- Back at the security tab, click on Advanced settings.

- Check 'Specifiy authentication mode:'

- Click Ok.
Note: Your computer will use your Windows logon credentials and domain unless you uncheck the box as shown in the Step 12 screenshot.
- WPA2-Enterprise with 802.1X Authentication
https://documentation.meraki.com/MR/Encryption_and_Authentication/Wireless_Encryption_and_Authentication_Overview
- RADIUS: Configuring PEAP EAP-MSCHAPv2
/Wireless_LAN/Encryption_and_Authentication/Enterprise_(802.1X)/RADIUS:_WPA2-Enterprise_With_PEAP-MSCHAPv2_Using_Microsoft_NPS