
IPSK Authentication without RADIUS
Click 日本語 for Japanese
Overview
Learn more with these free online training courses on the Meraki Learning Hub:
When setting up an enterprise wireless network, it is common to configure WPA2 Password authentication to onboard users onto the wireless network. However, this method has limitations. For example, IT administrators cannot use different passwords on the same SSIDs to assign different VLANs or firewall rules to groups of users. While using 802.1X authentication, IT administrators can provide this level of granularity; however, it’s not always possible to use 802.1X because not all devices support it.
Therefore, IT administrators are left with two options:
-
They can provision a new SSID with a dedicated password for each device type. Unfortunately, this creates a lot of RF overhead and lowers possible throughputs.
-
They can create a single SSID with one password shared among all devices incapable of 802.1X (RADIUS) authentication. However, this approach has significant security and management overhead issues. IT administrators must reconfigure every device with a new password if this single password gets compromised.
Meraki solves this use case with Identity Pre-Shared Key (IPSK) without RADIUS. This feature allows you to configure multiple passwords for a single SSID and assign different Group Policies to each password without the added complexity of configuring and maintaining a RADIUS server. Furthermore, devices that cannot use 802.1X authentication (e.g., IoT devices) can also benefit from this feature.
This document will walk you through configuring IPSK without RADIUS in the dashboard.
Feature Requirements and Limitations
-
All APs in your network must be Wi-Fi 5 Wave 2 (MR20, MR30H, MR33, MR42, MR42E, MR52, MR53, MR53E, MR70, MR74. MR84), Wi-Fi 6 (MR28, MR36, MR36H, MR44, MR46, MR46E, MR56, MR76, MR78, MR86, MR45/55), Wi-Fi 6E (MR57, CW9162I, CW9164I, CW9166I) or newer.
-
APs must be running MR 27.1 or newer firmware.
Note: If you add an AP that doesn't match these limitations into a network that already has an IPSK without RADIUS SSID, the SSID disappears.
-
IPSK without RADIUS does not support WPA3 encryption.
-
IPSK without RADIUS does not support 802.11r.
-
IPSK without RADIUS supports up to 50 IPSKs per SSID in the firmware versions MR 27.X, 28.X, and 29.X. Each PSK must be at least 8 to 63 alphanumeric characters long.
-
IPSK without RADIUS supports up to 5,000 IPSKs per SSID in the firmware versions MR 30.1 and newer.
-
When using configuration templates, please ensure that the SSID name for child networks is not overwritten when using IPSK without RADIUS. Clients will fail to authenticate if the SSID name differs from the one configured on the template level.
Note: It might be necessary to reboot your APs to clear Group Policies inherited from respective IPSKs after changing the SSID authentication type from IPSK without RADIUS to a different authentication method.
Configuration
Configuration on the dashboard is as follows:
1. Navigate to Wireless > Configure > Access Control.
2. Under SSID, select the SSID from the drop-down that you want to configure.
3. Select IPSK without RADIUS from the Association Requirements section of the page.
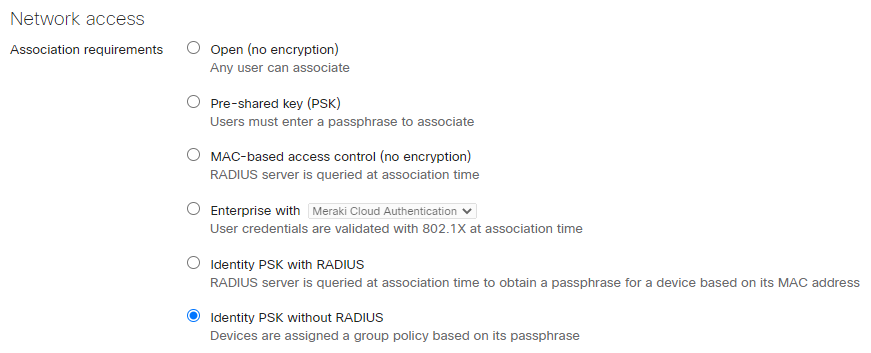
4. Select the Add an Identity PSK option.
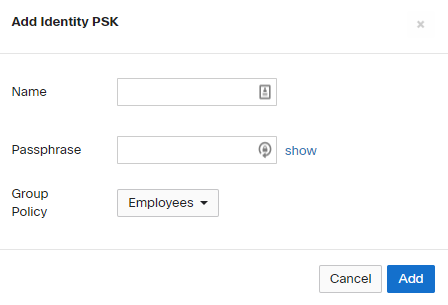
5. Here you can define a name for the PSK to Group Policy mapping and define a unique PSK.
6. Once the PSK is defined you have the option to select the Group Policy from the drop-down that are defined in the dashboard. Please refer to the Creating and Applying Group Policies article to add a new Group Policy.

7. Click Add and Save changes.
8. Once configured you can use the show button to see the PSK configured for each mapping.
9. Clicking on the Name of the PSK to Group policy mapping will allow you to modify the mapping on the dashboard.
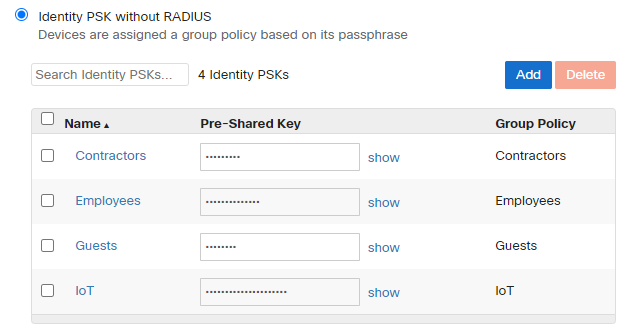
NOTE: Modifying/Removing the PSK will cause clients to disconnect using that specific PSK only. Other wireless clients using a different PSK will still be connected without any issues. Similarly adding a new PSK will have no impact on existing client devices connected to the SSID.
10. Clicking the Add button on the top right will allow to add new PSKs to the SSID and clicking on the checkbox and clicking Delete will allow removing the PSK from the SSID.
Monitoring
Dashboard
1. Navigate to Network-wide > Monitor > Clients and add the "IPSK Name" column.

2. IPSK name used by each client will be displayed under the "IPSK Name" column.

API
IPSK name used by a client can also be obtained via API using GET /api/v1/networks/{networkId}/clients with a query parameter pskGroup for IPSK name.
Please refer to https://developer.cisco.com/ for more information.