RADIUS Proxy for WPA2-Enterprise SSIDs
Overview
There may come instances where the deployment includes a larger number of Meraki Access-points that have to be installed and require SSIDs with WPA2-Enterprise RADIUS authentication. In this scenario, it may not be possible to add all of these access points as individual clients in the RADIUS server. This article talks about an alternative approach to fit this use case. In such situations, a RADIUS proxy can be set up such that instead of adding the access points as individual clients, dashboard IP ranges can be used.
Learn more with these free online training courses on the Meraki Learning Hub:
Benefits of RADIUS Proxy
The RADIUS proxy feature allows for the use of the Meraki cloud as the source of RADIUS Access-Request messages instead of the access points themselves. This means that the RADIUS server should be configured to allowlist the Meraki cloud communication and Backup Meraki cloud communication IP ranges found under Help > Firewall info on the dashboard instead of adding individual access points as clients. This allows bypassing the addition of multiple individual Access points to the radius server for larger deployments.
General Use Cases
This feature would generally be used if there is a centralized RADIUS server to which VPN connectivity is not possible.
Different VLANs/ Subnets
Access points have been configured with management IPs in separate subnet/VLAN via DHCP or static IP assignment.
Example:
Access Point 'A' is in VLAN 1 and Access Point 'B' is in VLAN 2 and both are broadcasting the same WPA2-Enterprise SSID. Using the standard method without RADIUS proxy, both of these access points would have to be added as clients in the RADIUS server. Using the Meraki RADIUS proxy feature would bypass this requirement as these access points are in the same dashboard network and the Meraki cloud address range would be configured as a client on the RADIUS server instead.
SSID Availability
RADIUS proxy can be useful in cases when SSID availability has been set up such that all access points are in the same subnet but are not all broadcasting the same WPA2-Enterprise SSID. In this case, only a subset of the access points are servicing clients on the SSID.
Example:
500 of a total 1000 access points are broadcasting the WPA2-Enterprise SSID. Using RADIUS proxy for these access points will remove the need for the manual addition of the 500 access points as clients on the RADIUS server.
Please refer to our article for more information on how to configure SSID availability.
Configuration
- Navigate to Wireless > Access control and select the SSID using WPA2-Enterprise with > my RADIUS server.
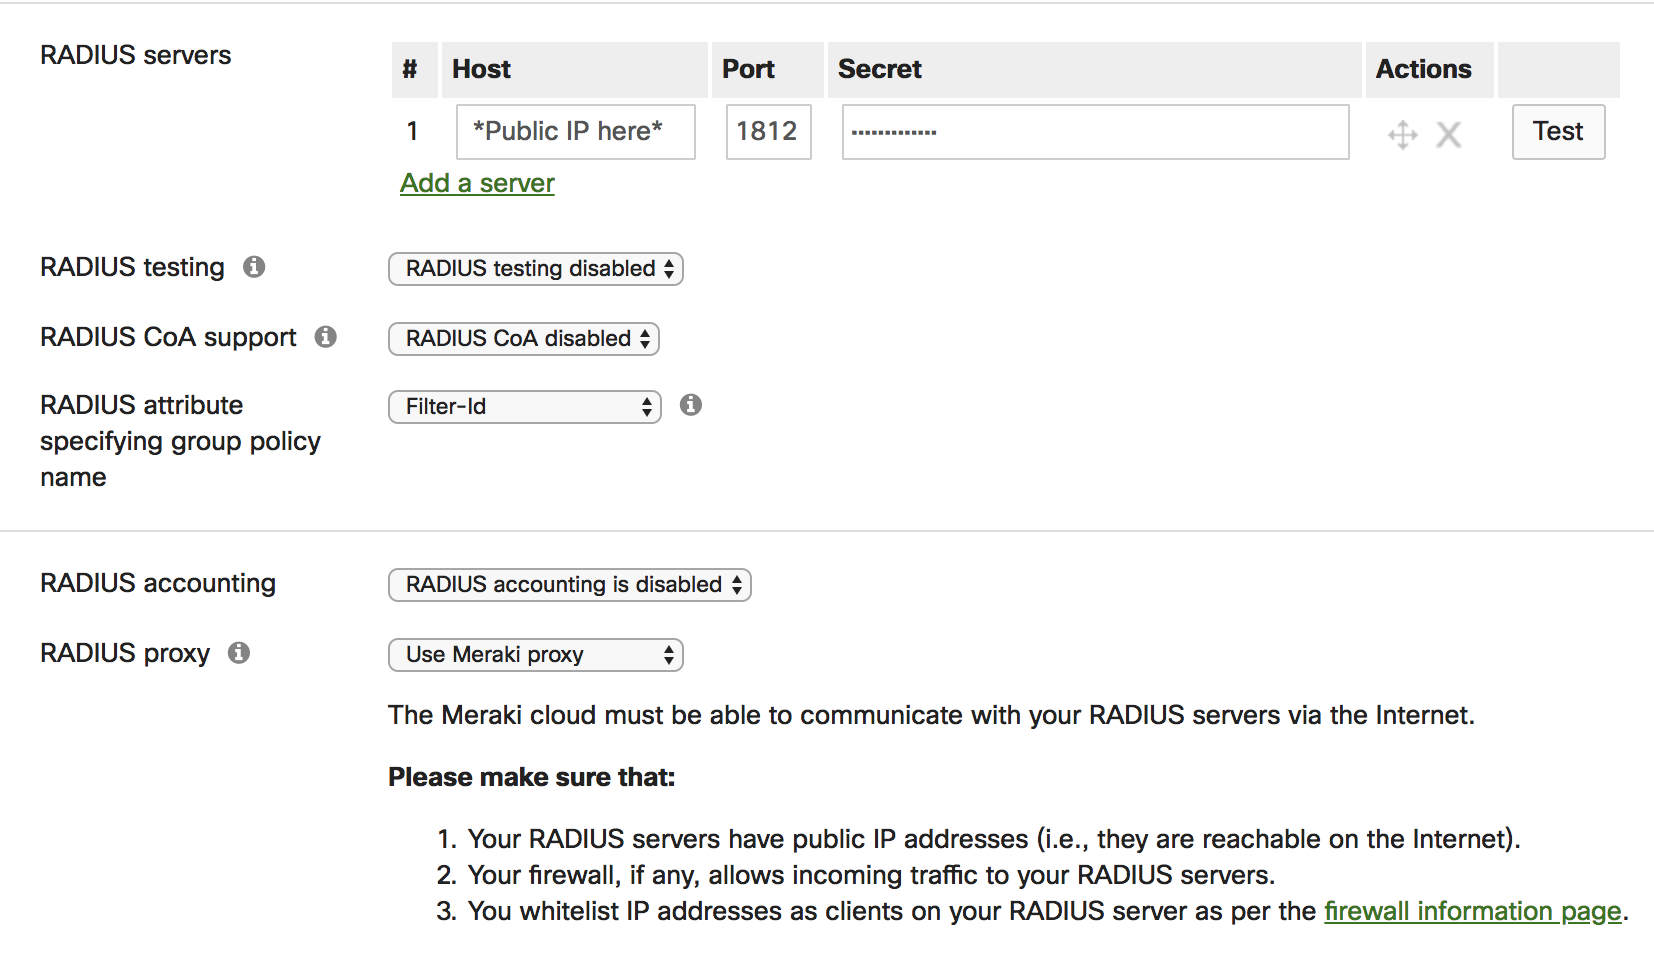
- In the RADIUS servers section, enter the public IP address and port (standard UDP 1812) that can be used by the Meraki cloud to communicate with the RADIUS server.
Use Meraki Proxy from the drop-down. This can be seen in the image below. 
- Once this option is enabled navigate to Help > Firewall info on the dashboard.
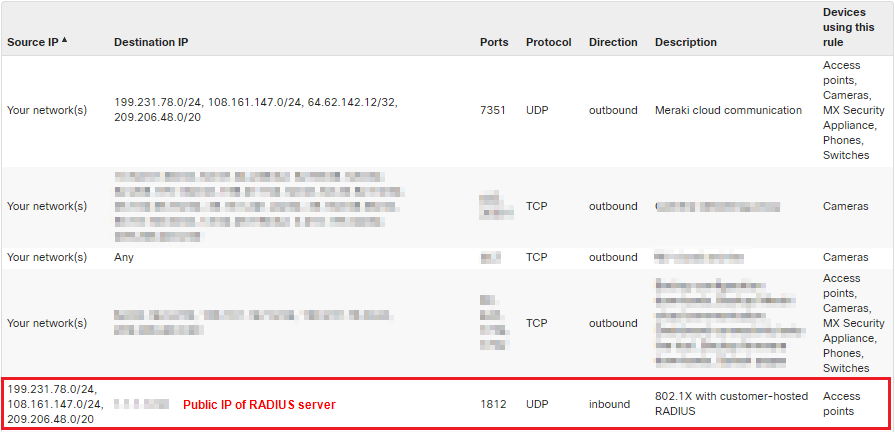
- Here you will notice an entry with for 802.1X with customer-hosted RADIUS using the destination IP and UDP port that was configured in the above steps as shown below:

- The Source IP column will show the dashboard IP ranges that will be used for RADIUS communication that need to be allowlisted on the RADIUS server as clients.
Please make sure that:
- Your RADIUS servers have public IP addresses (i.e., they are reachable on the Internet)
- Your firewall, if any, allows incoming traffic to your RADIUS servers
- You allowlist IP addresses as clients on your RADIUS server as per the Help > Firewall info page on the dashboard
- RADIUS CoA support is disabled. If enabled, then Dashboard RADIUS proxy cannot be configured
You can add a specific dashboard IP instead of the subnets by doing a DNS lookup for "n<Server number>.meraki.com" seen in the browser URL once logged into dashboard. Please note that this IP may change and cause disruption in the service if it does, so it is recommended to include the entire subnets whenever possible.
Topology
The prerequisite for this feature to function is that you make your RADIUS server accessible via a public IP address so that the dashboard can reach it. In networks with an edge firewall, this would imply allowing inbound communication to the RADIUS server from the dashboard IP ranges and ports shown in Help > Firewall info page via 1:1 NATs or port forwards.
In the example shown below, an MX appliance is being used as the edge firewall and an MR access point is connected behind this MX via an MS series switch. The SSID is configured with the RADIUS settings that are mentioned in the configuration section of this article.
Although this example shows a client and RADIUS server on the same network, the same working principle applies to them being in individual networks.

Topology Setup
- The MX has a public IP on its WAN interface which will be used by the Meraki cloud to point to the RADIUS server in the RADIUS server configuration of the SSID.
- The MR Access point has an IP 10.0.0.6/24 and connected to an MS series switch which uplinks to the MX.
- The RADIUS server is local and configured with an IP 10.0.0.4/24 and has the Meraki cloud (Dashboard) IP ranges allowlisted as clients.
- The MX is configured with a port forwarding rule to forward traffic received on its WAN interface for UDP port 1812 to the RADIUS server on the LAN at 10.0.0.4/24.
A 1:1 NAT rule can be used instead of the port forward, provided the public IP being used is assigned to the MX by the upstream network.
Topology Communication Flow
- When a client associates to the access point, the access point sends a RADIUS Access-Request to the Meraki cloud (dashboard) indicated by the green arrows.
- The Meraki cloud will then forward this request to the configured RADIUS server public IP on the dashboard using the Meraki cloud as source.
When the MX receives this traffic on UDP port 1812, the MX will forward this request to the RADIUS server on its LAN complying with the port forward rule set. - The RADIUS server on receiving this request will respond either with a RADIUS Access-Challenge, Access-Accept or Access-Reject message destined to the dashboard.
- On receiving this response the Meraki cloud will send this information to the corresponding access point where the communication originated and eventually to the client thus completing the communication.

