
Splash Page Traffic Flow and Troubleshooting
Click 日本語 for Japanese
Introduction
A Splash Page is a web-based authentication method that requires clients to click a button (Click-through Splash Page) or provide credentials (Sign-on Splash page) to be granted full network access. Prior to authentication, a client's network access is limited by a "Captive Portal." Once splash authentication has completed, the Captive Portal is removed for the client and full network access is granted.
This article details the functionality and traffic flow for different types of splash pages, as well as some common issues and troubleshooting steps.
Note: Splash authentication uses HTTPS for security. Because the traffic is encrypted, it is not possible to analyze splash flow using traditional packet capture analysis. Flows in this document were analyzed using web proxy software installed on the client device. The proxy software decrypts the HTTPS traffic which permits us to view the HTTP traffic inside. While any web proxy software can be used to analyze splash flow, these captures were gathered using Burp.
Identifying Authentication State
A client that has not clicked-through or signed-on to the Splash Page is "unauthenticated." Unauthenticated clients will show “Splash: Not authorized” on their client details page:

For unauthenticated clients, network access is restricted to the Captive Portal Strength and Walled Garden configuration on the SSID, which are defined as follows:
- Captive Portal Strength: Defines the scope of network access a client has prior to authentication.
- Walled Garden: Specifies which IP addresses, IP ranges, or hosts an unauthenticated client can access regardless of Captive Portal Strength.
Clients who have not authenticated are unable to access network resources outside of the Captive Portal with the exception of IP address, ranges or hosts specified in the Walled Garden.
After successfully authenticating, the client details page will show the client is “Authorized” with the amount of time remaining until the current authentication expires:

When authentication expires or the client has their access revoked (by clicking the revoke option) they will be placed back into the Captive Portal. Splash authentication will be required to regain full network access.
To block a client's access to the internet once it is placed into the captive portal after, it is important that the Captive portal strength for the splash is set to "Block all access until Sign-on is complete" under the Access-control page of the SSID (This will not disassociate the client from the SSID, only block internet access). Failing to do so will allow the client to continue using the network even after authorization has expired as the most traffic nowadays is HTTPS which is allowed when the Captive portal strength is set to "Allow non-HTTP traffic prior to Sign-on". The splash page would be served to the client again, post expiry of the Splash authorization, only when it sends an HTTP GET.
If a Sign-on Splash Page is used, login attempts are reported in Dashboard under Wireless > Monitor > Splash logins and Wireless > Monitor > Login attempts.
Wireless > Monitor > Splash logins page:

Wireless > Monitor > Login attempts page:

Splash Flow Breakdown
Splash flow is described in this section. The complete splash process consists of three major steps:
-
Fetching the Splash URL.
-
Splash Authentication in Dashboard.
-
Fetching the continue_url.
Fetching the Splash URL
Splash authentication always begins the same way. An unauthenticated client must send an HTTP GET request for a web page. The AP sees the request coming from an unauthenticated client so it redirects the client to the splash URL.
Sometimes the Operating System (OS) may not wait for the user to open up a web browser and navigate to a web site. Instead, the OS will try to detect if there is a Captive Portal or Splash authentication as soon as the device associates with an SSID. It's a Captive Portal Detection feature.
This OS feature requests specific URLs and if the response is different than what is expected, it means there is a Captive Portal or Splash and the user would get a notification. Each OS will fetch their own Captive Portal Detection URLs.
Captive Page Detection Feature and the specific Captive Detection URLs do not change the Splash Page Flow. A client device would get a different web page as it was redirected to the splash URL. Check your own OS documentation to get a list of your Captive Detection URLs. This article describes the Splash Page Flow regardless of Captive Portal Detection feature.
The diagram and HTML output below show the redirect process in detail if client browse URL: "http://www.google.com":

Before sending the HTTP GET, the client first sends a TCP SYN to the URL's IP address, then the AP replies back on behalf of the site with TCP SYN ACK. After that, the client sends the HTTP GET. You can see this only in the wireless/monitor mode captures and you can identify the AP is responding on behalf of the real site by looking at the source mac address, which will be AP's ethernet mac address. For other packets seen on the air, the source mac address will be the default gateway mac address.
|
Parameter |
Value |
Function |
|
splash URL |
URL where client is directed to begin splash authentication process |
|
|
continue_url |
URL where client should be directed after authentication |
The <hostname> value may vary depending on the deployment and region. For example, networks located in the Asia-Pacific region may see the splash URL https://apac.network-auth.com/splash/?.
The splash URL should be treated as authoritative for each request. Do not restrict or validate the hostname against a fixed pattern. Any integration, firewall, or filtering policy must allow the hostname exactly as provided.
The AP detects an HTTP GET request sent from an unauthenticated client, it intercepts it, and returns an HTTP 307 Temporary Redirect which informs the client to fetch the splash URL. The splash URL also contains a continue_url parameter. This parameter is used during the splash authentication session to inform the cloud which website the client was originally trying to fetch prior to being redirected:

The client receives the redirect response from the AP and sends an HTTP GET to the cloud for the splash URL:

Splash Authentication in Dashboard
Splash authentication happens in two stages: A client first authenticates in Dashboard by fetching the grant URL, then the cloud notifies all other APs in the network of the client authentication. This step differs based on the type of splash page, so this section covers the authentication process for the following pages:
-
Click-Through Splash Page
-
Sign-On Splash Page
Click-Through Splash Page
When a Click-through splash page is configured, credentials are not used to authenticate. Instead, authentication occurs by clicking a "Continue" button. The diagram and HTML output below show the process in detail:

Before sending the HTTP GET, the client first sends a TCP SYN to the URL's IP address, then the AP replies back on behalf of the site with TCP SYN ACK. After that, the client sends the HTTP GET. You can see this only in the wireless/monitor mode captures and you can identify the AP is responding on behalf of the real site by looking at the source mac address, which will be AP's Ethernet mac address. For other packets seen on the air, the source mac address will be the default gateway mac address.
|
Parameter |
Value |
Function |
|
splash URL |
URL where client is directed to begin splash authentication process |
|
|
grant URL |
https://<hostname>.network-auth.com/<ssid name>/hi/1234567/grant? |
click-through splash page authentication URL |
|
continue_url |
URL where client should be directed after authentication |
|
|
cookie |
p_splash_session |
session cookie |
|
grant_user_access URL |
<hostname>.network-auth.com/splash/grant_user_access/?key |
URL where client should be directed for AP authentication |
When the cloud receives the GET request for splash URL, it returns an HTTP 200 OK along with the click-through splash page and a session cookie:

If you inspect the HTML of the click-through splash page, you will see the grant URL appended with the continue_url parameter: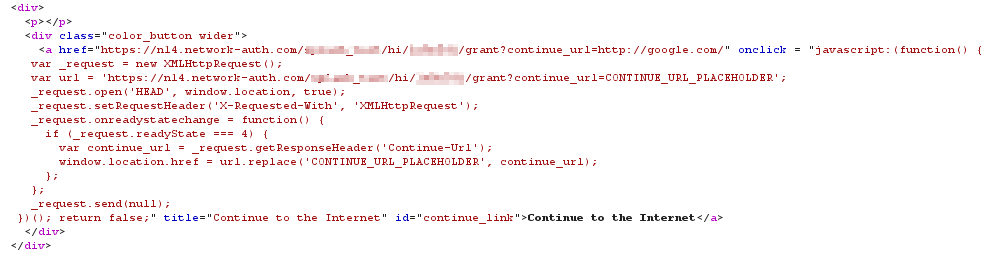
The user clicks the Continue button which sends a GET for the grant URL appended with the continue_url along with the cookie:

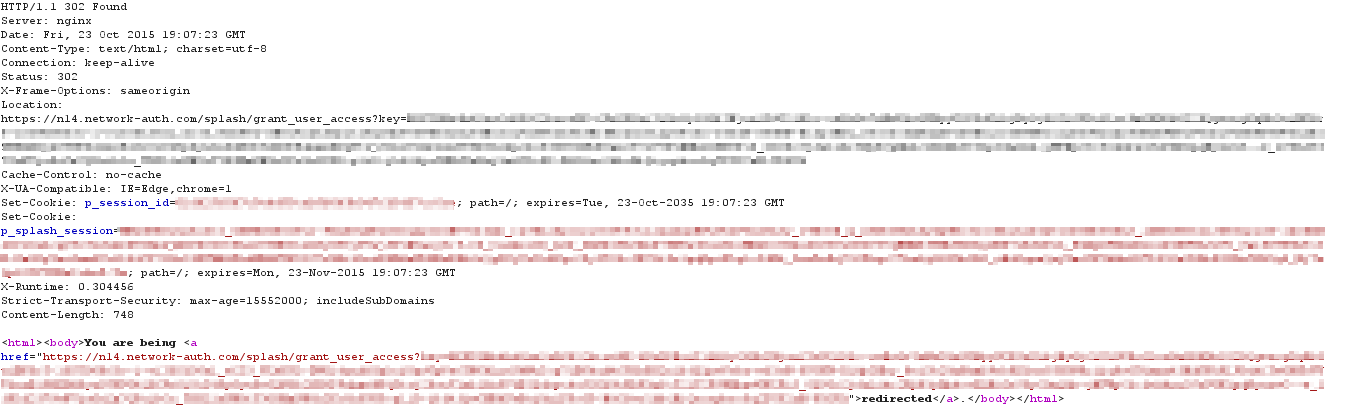
When the cloud receives the request for the grant URL, the client is authenticated. The cloud responds with an HTTP 302 Found message, redirecting the client to the grant_user_access URL.
The cloud also notifies all of the APs in the network of the client's authentication. At this point the AP will remove the captive portal for the client device and full network access is granted:

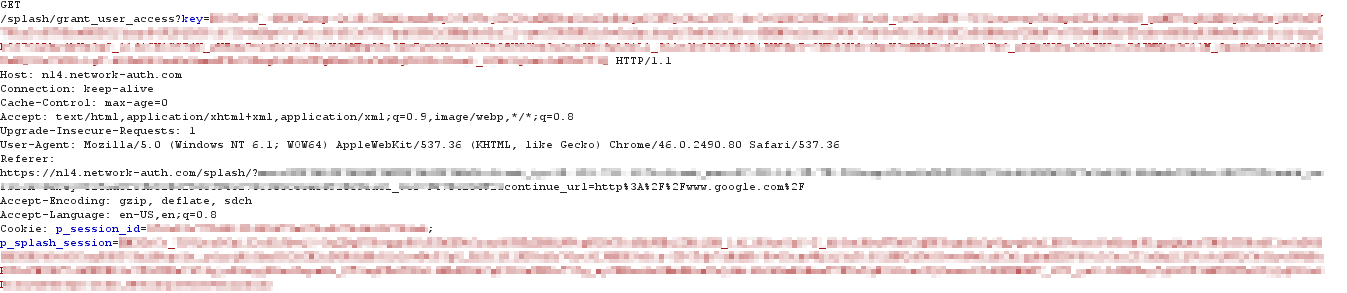
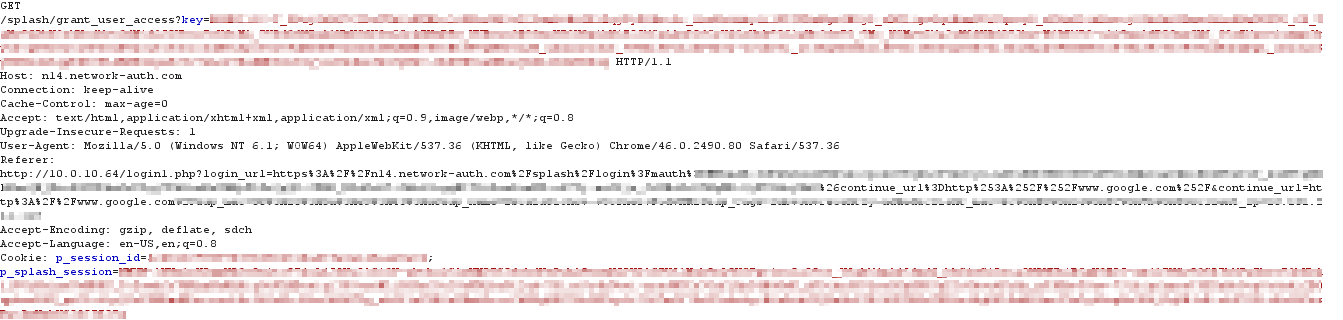
Finally, the client sends an HTTP GET for the grant_user_access URL:
Sign-On Splash Page
When a Sign-on splash page is used, the user is prompted for login credentials. Credentials are sent to the cloud using an HTTP POST. The cloud authenticates the user account based on the configured server type in Dashboard (Meraki Authentication Server or RADIUS) and if successful grants the client full network access. The diagram and HTML output below show the process in detail:

Before sending the HTTP GET, the client first sends a TCP SYN to the URL's IP address, then the AP replies back on behalf of the site with TCP SYN ACK. After that, the client sends the HTTP GET. You can see this only in the wireless/monitor mode captures and you can identify the AP is responding on behalf of the real site by looking at the source mac address, which will be AP's ethernet mac address. For other packets seen on the air, the source mac address will be the default gateway mac address.
|
Parameter |
Value |
Function |
|
splash URL |
URL where client is redirected to begin splash authentication process |
|
|
login URL |
https://<hostname>.network-auth.com/<ssid name>/hi/1234567/login? |
sign-on splash page authentication URL |
|
continue_url |
http:www.google.com |
URL where client should be redirected after authentication |
|
cookie |
p_splash_session=<string value> |
session cookie |
|
grant_user_access URL |
<hostname>.network-auth.com/splash/grant_user_access/?key |
URL where client should be redirected for AP authentication |
When the cloud receives the GET request for splash URL, it returns an HTTP 200 OK along with the sign-on splash page and a session cookie:

If you inspect the HTML code of the sign-on splash page you will see it contains a web-form to enter user credentials and the login URL appended with the continue_url parameter:
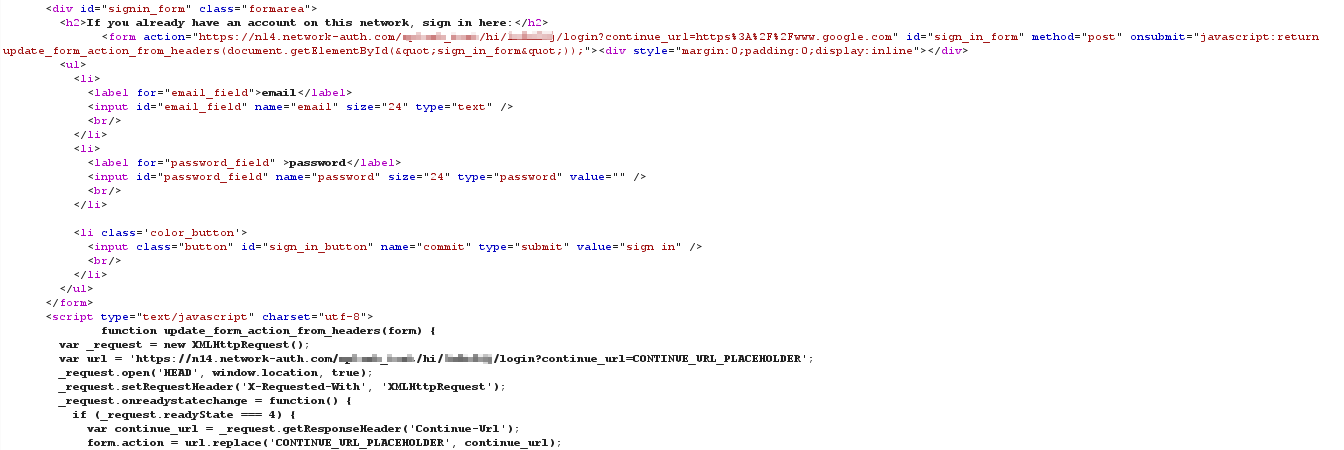
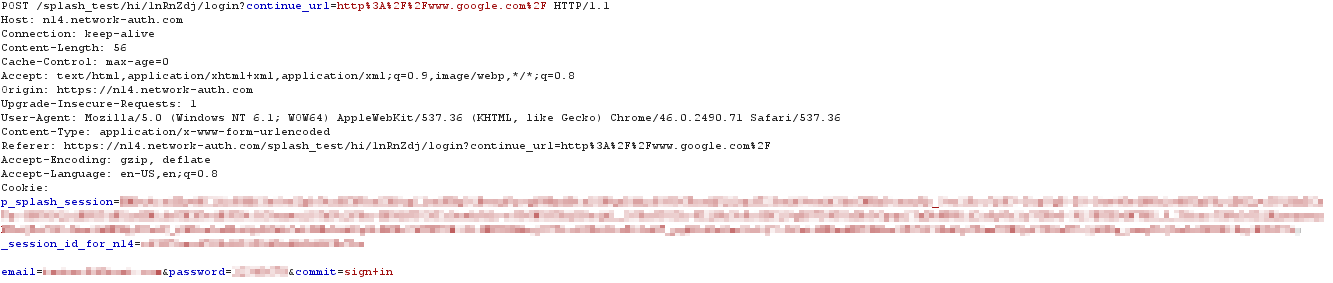
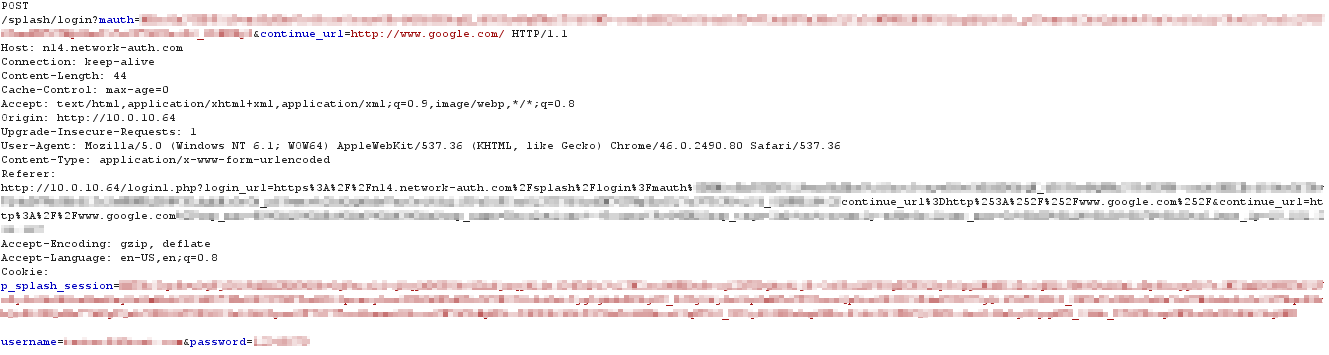
The user enters their username and password and clicks the sign-in button. This action generates an HTTP POST of the credentials to login URL (Cloud) appended with the continue_url parameter along with the cookie:
 The cloud receives the credentials and authenticates the user against the configured server type. If authentication is successful, the cloud returns an HTTP 302 Found redirecting the client to the grant_user_access URL. Additionally, the cloud notifies all of the APs in the network of the client's authentication and the captive portal is lifted giving the client device full network access:
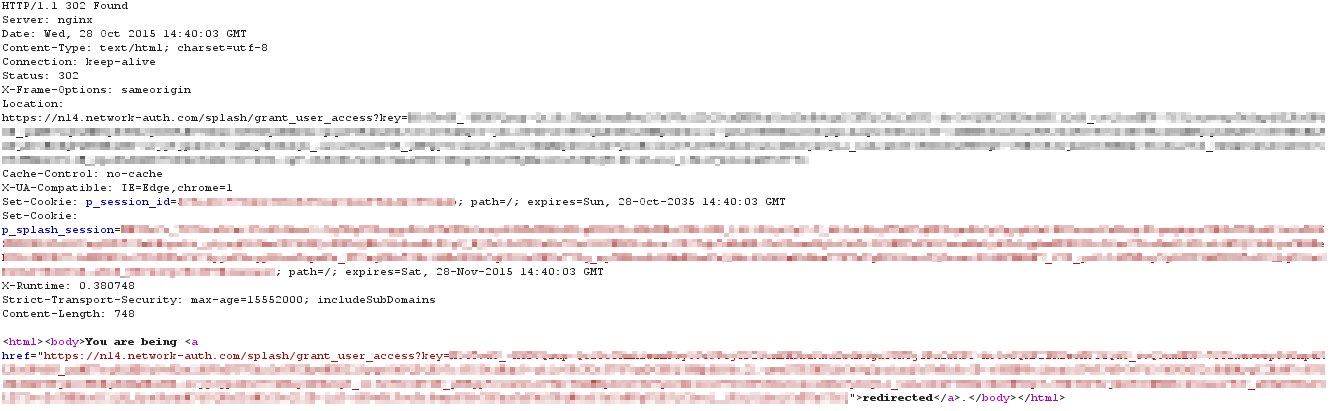
Splash Authentication with EXCAP
Click-through Splash Pages with an External Captive Portal (EXCAP) and Sign-On Splash Pages with an EXCAP server should only be used when externally hosting a splash page on a private server. This section will cover the authentication process for the following pages:
Click-through Splash Page with EXCAP
Note: For more information about custom-hosted splash pages, please reference our documentation regarding Configuring a Custom-Hosted Splash Page, or our Captive Portal Solution Guide.
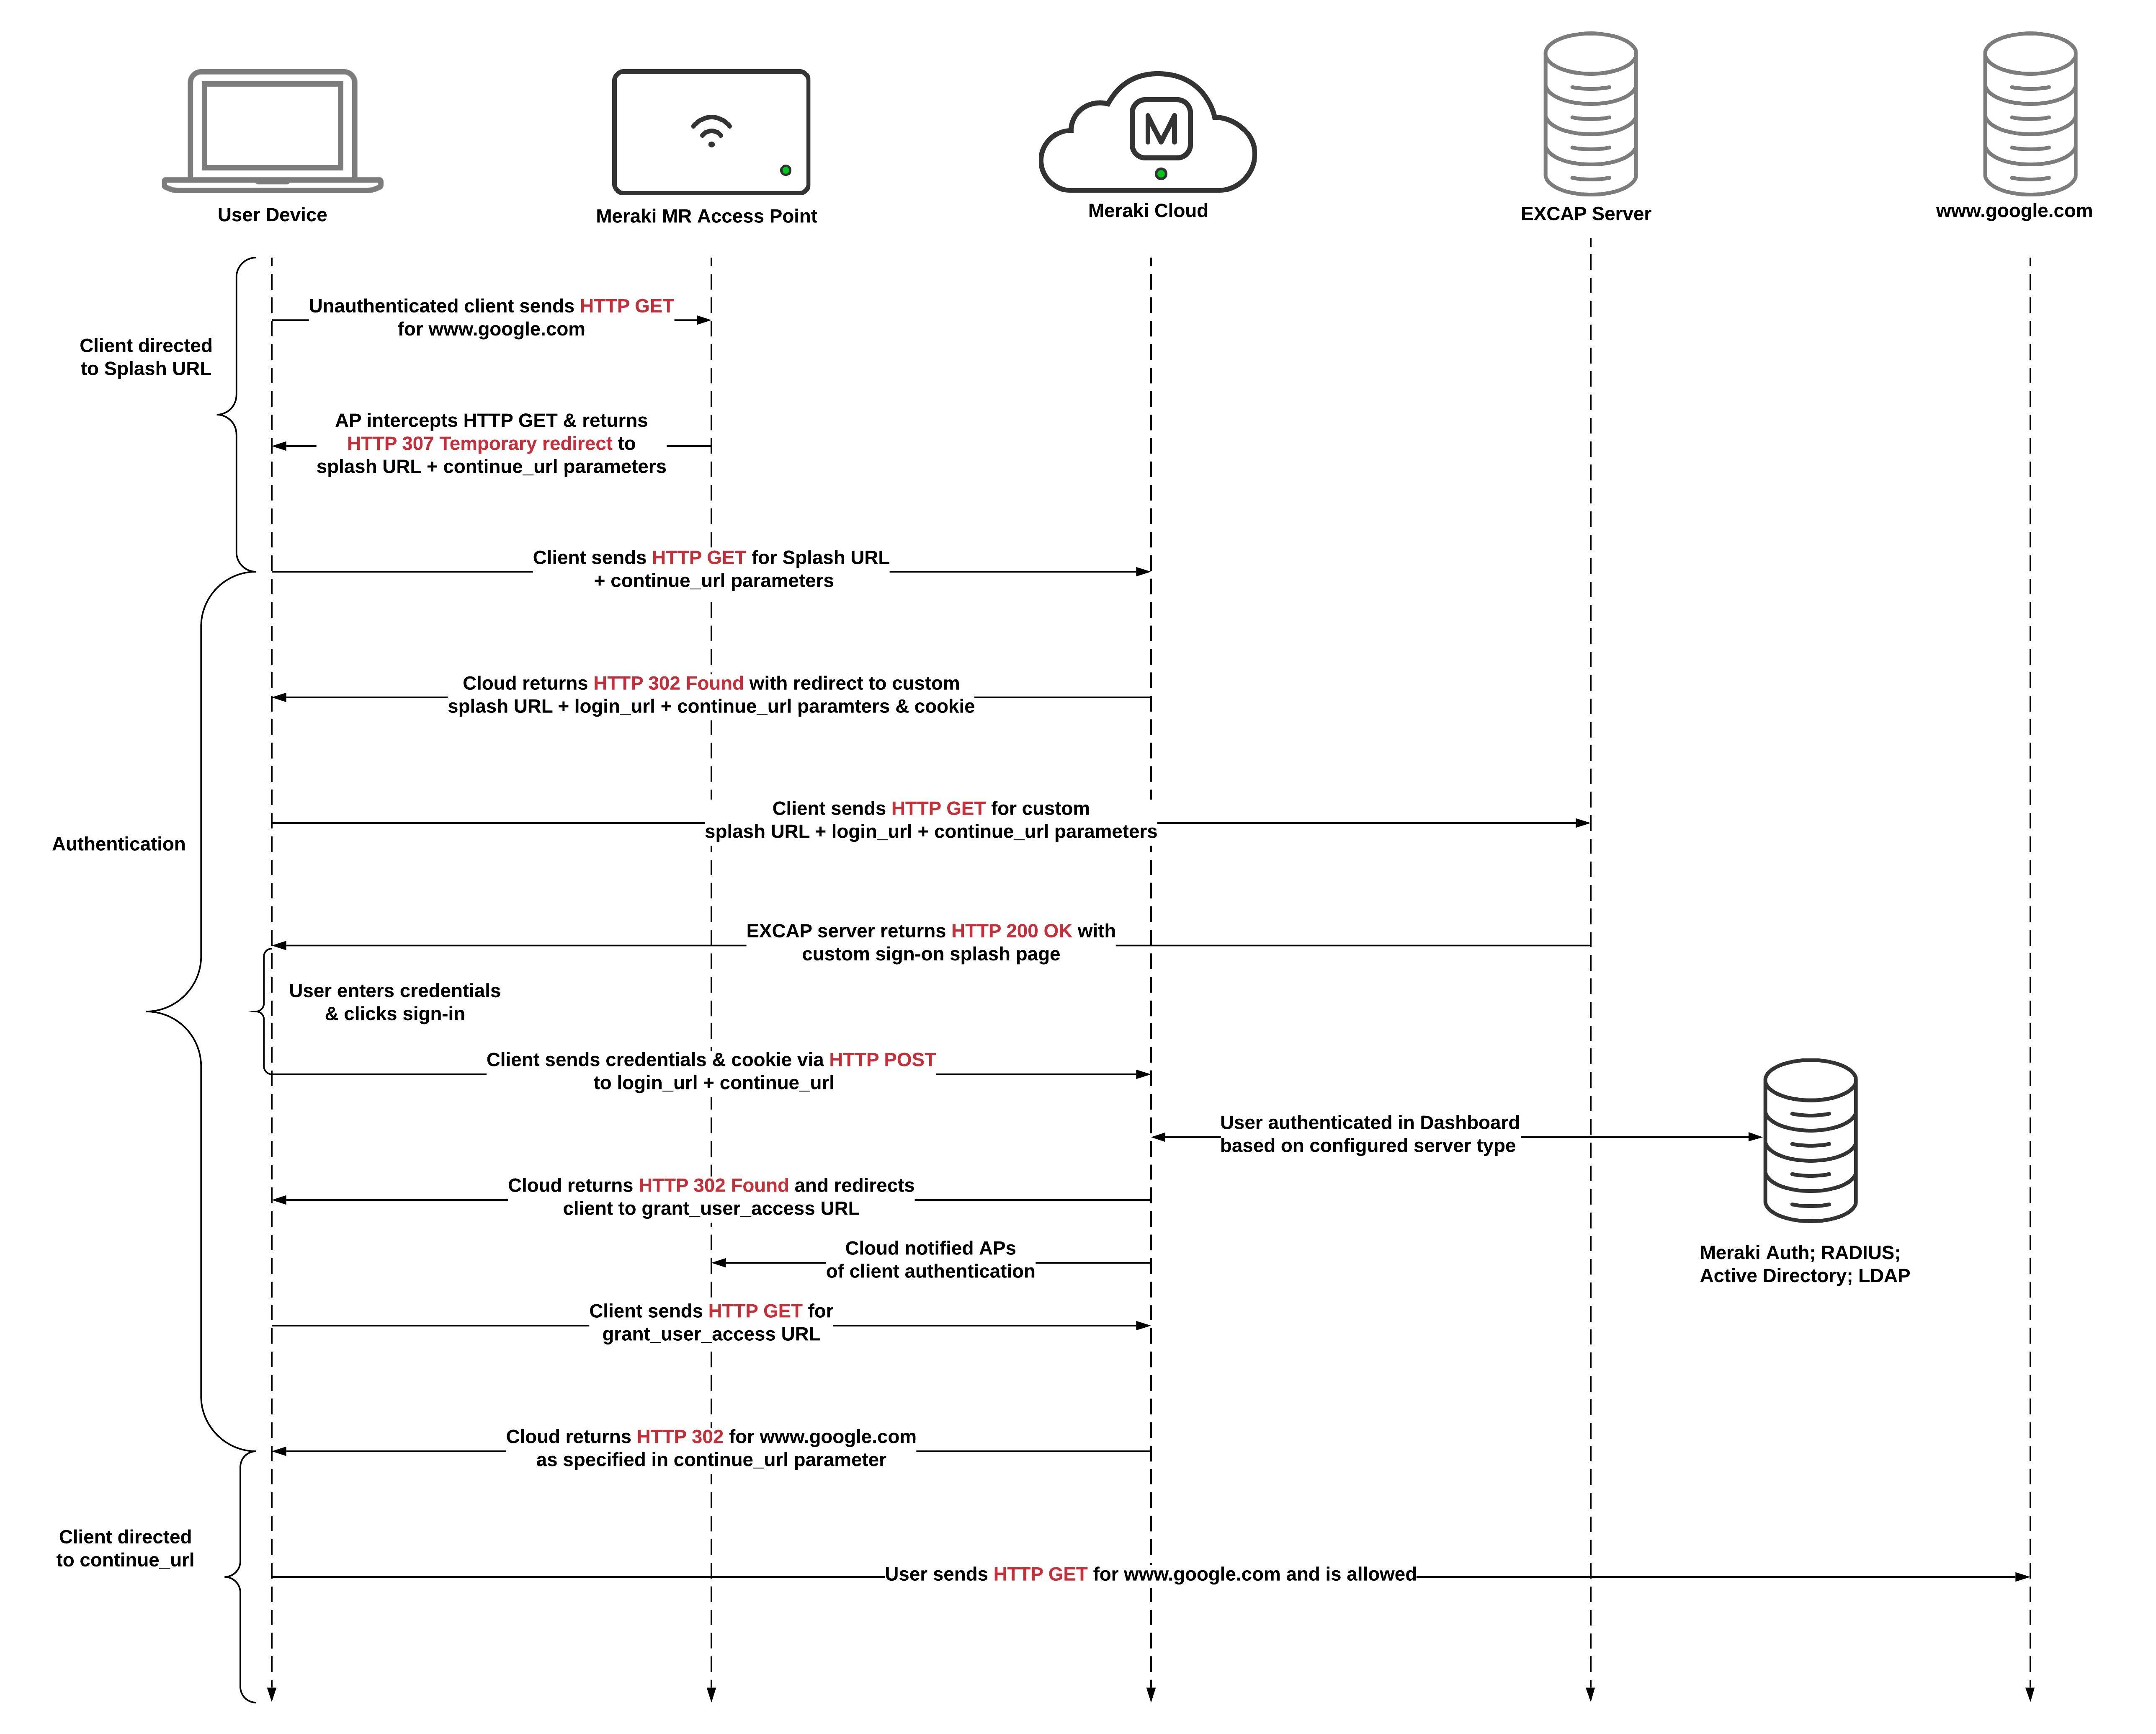
When a Click-through splash page with EXCAP is configured, authentication occurs by clicking a "Continue" button on an externally-hosted custom splash page. The diagram below describes the traffic flow during this process:
.jpeg?revision=3)
|
Parameter |
Value |
Function |
|
splash URL |
URL where client is directed to begin splash authentication process |
|
|
base_grant_url |
tells the EXCAP server which value to use for the grant URL |
|
|
user_continue_url |
tells the EXCAP server which value to use for continue_url |
|
|
cookie |
p_splash_session=<string> |
session cookie |
|
grant URL |
click-through splash page authentication URL |
|
|
continue_url |
URL where client should be redirected after authentication |
|
|
grant_user_access URL |
<hostname>.network-auth.com/splash/grant_user_access/?key |
URL where client should be redirected for AP authentication |
When the cloud receives the GET request for splash URL, it returns an HTTP 302 Found redirecting the client to the custom splash URL along with a session cookie: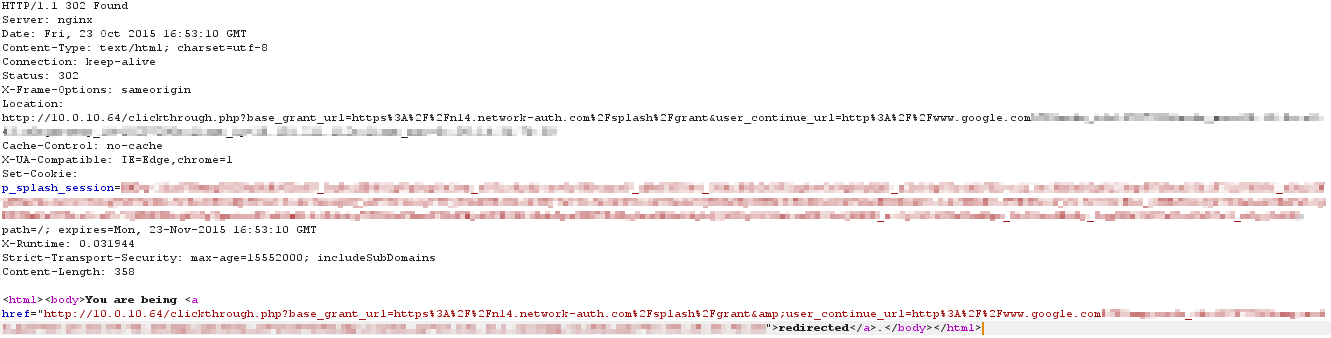
The client receives the response and sends a GET request for the custom splash URL hosted on the EXCAP server. The EXCAP server uses the request's base_grant_url and the user_continue_url parameters to build the authentication URL for the splash page:
When the EXCAP server receives the GET request for the custom splash URL, it returns an HTTP 200 OK along with a custom click-through splash page. The page must contain an authentication URL which pointing to grant URL appended with the continue_url parameter:
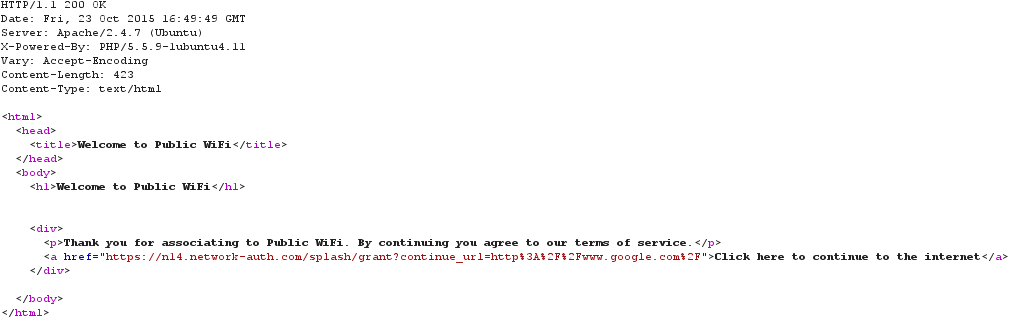
The user clicks the Continue button, which sends a GET for the grant URL appended with the continue_url along with the cookie:
When the cloud receives the request for the grant URL, the client is authenticated. The cloud responds with an HTTP 302 Found redirecting the client to the grant_user_access URL. The cloud also notifies all of the APs in the network of the client's authentication. At this point the AP will remove the captive portal for the client device and full network access is granted.
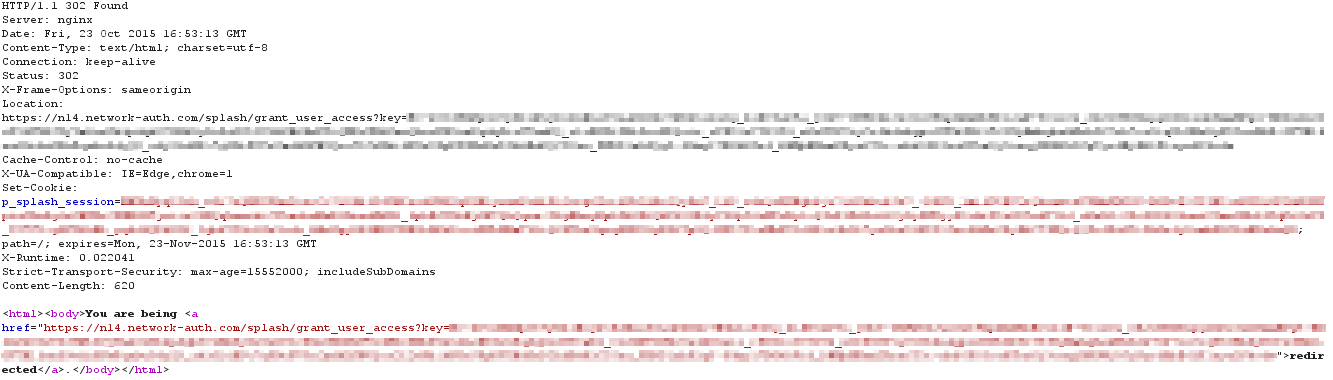 Finally, the client sends an HTTP GET for the grant_user_access URL.

Sign-On Splash Page with EXCAP
A Sign-on splash page with EXCAP is configured uses a custom, externally-hosted splash page that prompts users for login credentials. Credentials are sent to the cloud using an HTTP POST. The cloud then authenticates the user account based on the configured server type in Dashboard (Meraki Authentication Server or RADIUS).
The diagram and HTML output below show the process in detail:
.jpeg?revision=3)
|
Parameter |
Value |
Function |
|
splash URL |
URL where client is directed to begin splash authentication process |
|
|
login_url |
<hostname>.network-auth.com/splash/login?mauth |
tells the EXCAP server which value to use for the login URL |
|
continue_url |
tells the EXCAP server which value to use for continue_url |
|
|
cookie |
p_splash_session=<string> |
session cookie |
|
login URL |
<hostname>.network-auth.com/splash/login?mauth |
sign-on splash page authentication URL |
|
grant_user_access URL |
<hostname>.network-auth.com/splash/grant_user_access/?key |
URL where client should be redirected for AP authentication |
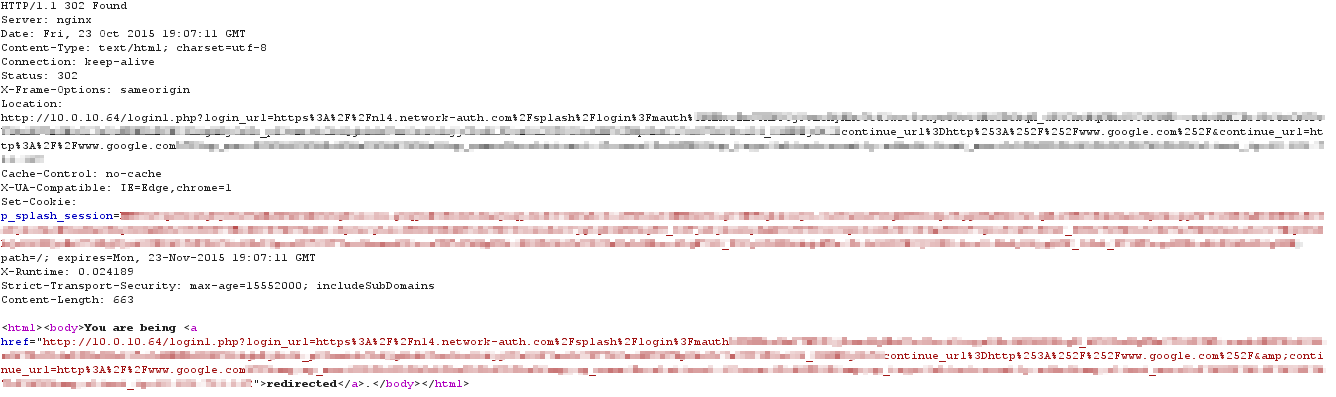
When the cloud receives the GET request for splash URL, it returns an HTTP 302 Found redirecting the client to the custom splash URL along with a session cookie:
The client receives the response and sends a GET request for the custom splash URL hosted on the EXCAP server. The EXCAP server will need to make use of the login_url and continue_url parameters in the request to build the authentication URL for the splash page:

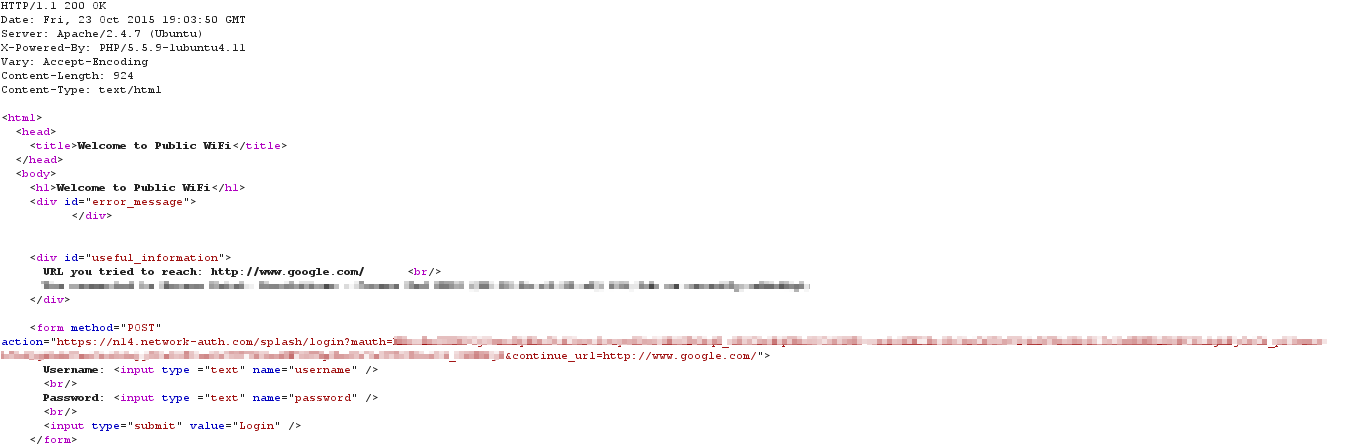
When the EXCAP server receives the GET request for the custom splash URL, it returns an HTTP 200 OK along with the custom sign-on splash page. This should be a web form where user credentials can be entered. The request must contain the authentication URL pointing to a login URL, appended with the continue_url parameter:
Fetching the continue_url
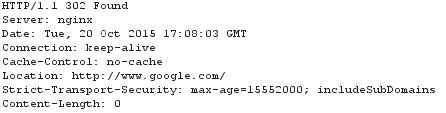
Upon receiving the request for the grant_user_access URL, the cloud responds with an HTTP 302 Found for the URL specified in the continue_url parameter (in this example, www.google.com). Because the client is not longer subject to Captive Portal, they are able to access the website as outlined below:

The cloud sends a HTTP 302 message containing continue_url:
The client then sends an HTTP GET for continue_url:

Identifying and Mitigating Common Issues
This section describes how to identify and mitigate common issues experienced by clients when a splash page is used.
Unauthenticated Client Has Full Network Access
If an unauthenticated client has full network access and they are not whitelisted, check the following:
-
Is the “allow non_HTTP access prior to sign-on” setting enabled under Wireless > Configure > Access control > Captive portal strength? This setting permits full network access, with the exception of HTTP (TCP Port 80), prior to authentication. If you do not want clients to access network resources outside of the Walled Garden without being authenticated or whitelisted, the Captive Portal Strength should be set to “Block all access prior to sign-on”.
-
If Controller disconnection behavior is set to “Open” and the Splash URL/Cloud controller is unreachable, the client will be allowed full access until the Splash URL becomes available. Set this to "Restricted" to block network access until the URL is available.
Connection Timeouts
If an unauthenticated client reports a connection timeout error in their browser instead of receiving the splash page when fetching a website, it is likely that the Captive Portal Strength is set to “Block all access prior to sign-on” and the client is using HTTPS when fetching the website.
When the web browser of an unauthenticated client sends an HTTP GET on TCP port 80, a Meraki node can see the request, intercept it, and respond with a redirect to the splash server. If an unauthenticated client are accesses a web page outside of the Walled Garden using HTTPS, the traffic is encrypted. Therefore the AP is unable to redirect the client successfully and the traffic will be blocked. In these instances, make sure the client accessing the web page using HTTP so they can be redirected properly.
Custom URL Unreachable
If clients are unable to fetch the custom URL in an EXCAP implementation, verify the following:
-
EXCAP web server is added to the Walled Garden.
-
A valid custom URL is configured in Dashboard.
-
The URL configured in Dashboard exists on the EXCAP server.
-
The web service is running and the website is accessible on the EXCAP server.
Too Many Redirects
If an unauthenticated client receives a "too many redirects" error in their browser instead of an EXCAP-hosted splash page, it is likely that the IP address or hostname of the EXCAP server is not added to the Walled Garden. The "too many redirects" error occurs because the client is redirected by the splash server to the EXCAP splash page, but the client isn't allowed to access the splash page. Therefore, the AP redirects the EXCAP request back to the splash server, looping continuously until the browser timeouts.
Because clients are redirected to EXCAP before authentication, a Walled Garden must be enabled and the correct IP address or hostname of the EXCAP server should be specified.
Client Reports a Blank Page
If a client reports a blank page after authenticating through splash page, it is likely their browser is not allowing cookies. The client's details page may also say it's "Unauthorized" after authentication.
Cookies are used by splash pages to track individual client sessions. If a cookie is not present when the user fetches the grant URL, the splash server will not be able to identify the session and authenticate the client. In these cases, confirm the web browser accepts and is not deleting the session cookie.
Splash Page Loads but Post-Splash URL Doesn't On Android