

How to Manage Dynamic Frequency Selection (DFS) Events
Overview
This article explains how to identify Dynamic Frequency Selection (DFS) events on Cisco Meraki access points and how to reduce their impact on your wireless network.
DFS detects radar signals that must be protected against interference from 5 GHz (802.11a/n/ac/h) radios. When radar is detected, DFS dynamically switches the operating frequency of the 5 GHz radio to a frequency that does not interfere with radar. Transmit Power Control (TPC) works similarly. It adapts the transmission power of a radio based on regulatory requirements and range information.
Certified devices can enable DFS to use additional channel options. These devices listen for radar communication and dynamically update their radio settings, if necessary.
DFS event alerts from access points
An access point may occasionally detect a radar signal and trigger an alert. When this happens, the access point:
-
Disconnects the clients on its 5 GHz radio. Clients on the 2.4 GHz radio are not affected.
-
Moves the 5 GHz radio to a different channel.
-
Continues to operate as expected.
You do not need to take any action. For details on this process, go to How access points respond to DFS events.
How access points respond to DFS events
DFS-enabled radios monitor the operating frequency for radar signals. If the radio detects radar on the channel, the wireless device takes these steps:
-
Blocks new transmissions on the channel.
-
Broadcasts an 802.11h channel-switch announcement.
-
Disassociates the remaining client devices.
-
Selects a different channel permitted within the regulatory domain. The access point may temporarily use a channel that you excluded in dashboard. For details, go to Access point uses an excluded channel after a DFS event.
-
This step applies only when the access point uses static channel assignment. After the original DFS channel reaches its DFS non-occupancy period, the access point moves back to that channel if no clients are associated. It then scans the channel for 60 seconds.
-
If there are no radar signals on the channel, the wireless device enables beacons and accepts client associations.
-
If no other DFS events are detected and no wireless clients are associated to the SSID on 5 GHz, the access point reverts to the original DFS channel, usually in 30 minutes.
-
If clients are detected, the access point takes 12 hours to return to the original DFS channel.
Prerequisites
-
A Meraki access point certified to operate on DFS channels.
-
The correct regulatory domain for the access point. The Meraki Cloud assigns regulatory domain information to each Meraki access point and enforces the wireless regulations. The bands and channels available to an access point depend on:
- The access point model
- Indoor or outdoor operation
- The regulatory domain
The channel list on the Radio Settings page shows only the channels that the access point is certified to use. For specific certification and band information, refer to the install guides and to the regulatory information pamphlet in the access point's original packaging.
Step-by-step instructions
Identify DFS events in the event log
-
Go to Network-wide > Event Log.
-
At the top of the page, set the event log to for access points.
-
From Access points, select Any.
-
Under Event type included, select DFS event detected.
-
Select Search.

The following example report shows that the access point named Gateway detected radar on channel 100.

Reduce the impact of frequent DFS events
If your access points detect many DFS events, use one of these three approaches to keep the wireless network reliable:
- Recommended: Use the new AI Channel Planning feature.
- Administrators can manually assign non-DFS channels to access points
- exclude DFS channels from the Auto Channel assignment in an RF profile.
Manually assign non-DFS channels to access points
-
In dashboard, go to Wireless > Configure > Radio Settings.
-
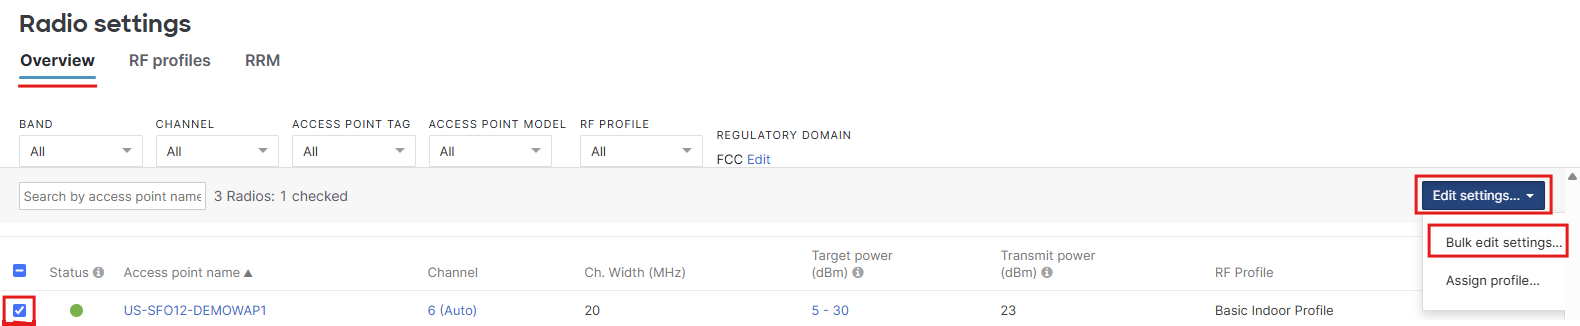
On the Overview tab, select the access point that you want to update.
-
On the right, select Edit settings… and then Bulk edit settings….
-
In the pop-up window, select Manually override channel assignment.
-
Select Next. The window shows the channels that the access point can manually operate on.

-
Select an available non-DFS channel. Non-DFS channels are any channels outside UNII-2, UNII-2 Extended, and weather radar. Grayed-out channels are not allowed in the access point's regulatory domain.
-
Select Review Changes, and then select Apply.
After you manually override the channel, dashboard cannot change the channel if interference occurs. Use manual assignment only if the access point must stay on this channel.
Exclude DFS channels in an RF profile
Use RF profiles to have Auto-RF automatically assign non-DFS channels to the access points on the network. To do this, update the RF profile so that its assignment pool contains only non-DFS channels.
-
Go to Wireless > Configure > Radio Settings, and then select RF Profiles.
-
To confirm which RF profile applies to the access points, check the RF Profile column on the Overview tab.
-
In the list of available profiles, select Edit for the profile that you want to modify.

-
In the new window, select 5 GHz, or scroll down to the 5 GHz radio settings section.
-
Under Channel assignment method, select Change channels used by AutoChannel….

-
In the pop-up window, manually deselect all DFS channels or select Deselect DFS Channels. Grayed-out channels are not allowed in the access point's regulatory domain.

-
Select Done, and then select Save at the bottom of the page.
Grayed-out channels are not allowed in the access point's regulatory domain.
Once this is applied to the RF profile, Auto-RF will slowly update the channels to minimize the network's impact.
For more information on selecting and planning wireless with DFS channels, please take a look at the RRM: Radio Resource Management for Wi-Fi Channel and Power Management document.
Verification
Confirm channel changes
- RF profile exclusion: After you apply the RF profile, Auto-RF gradually updates the channels to minimize the impact on the network.
- RF profile assignment: On Wireless > Configure > Radio Settings, the RF Profile column on the Overview tab shows the RF profile assigned to each access point.
Review DFS events in Dashboard
Dashboard reports DFS events in the following locations:
-
Event log: The Meraki cloud event log reports DFS events as they occur. Go to Verify DFS events in the event log.
-
Access point status page: DFS/Radar events also appear on the access point status page, which shows the channels that are hit most often for that access point.

-
Network Alert hub: For a network-wide view, dashboard combines all DFS/Radar events into one list in the Network Alert hub.

-
Insights tile: Expand the Insights tile to see DFS/Radar events detected by each access point.