
Configuring Microsoft NPS for MAC-Based RADIUS - MS Switches
Network Administrators can use port based access control to prevent unauthorized access to the corporate LAN. MAC-Based RADIUS is one method for providing this type of security. This article discusses the benefits of MAC-Based RADIUS and how to configure it in Microsoft NPS and Dashboard.
Benefits of MAC-Based RADIUS
In some environments it is critical to control which devices can access the wired LAN. Ports in common areas make a network vulnerable to access by guests and other unauthorized users. MAC-Based RADIUS can be used to provide port based access control on your MS series switches. Unauthorized users are prevented from accessing to the wired LAN because each device that connects to a switch port will need to be authenticated before network access is granted. Devices are authenticated at the port level with MAC-Based RADIUS. When a device connects to a port with an access policy assigned, before network access is granted, the device must be authenticated by the RADIUS server. The switch (RADIUS client) sends a RADIUS Access-Request to the RADIUS server containing the username and password of the connecting device. The username and password combination is always the MAC address of the connecting device, lower case without delimiting characters. If a RADIUS policy exists on the server that specifies the device should be granted access and the credentials are correct, the RADIUS server will respond with an Access-Accept message. Upon receiving this message, the switch will grant network access to the device on that port. If the RADIUS server replies with an Access-Reject because the device does not match a policy, the switch will not grant network access. It is possible however, to configure the switch to drop devices into a Guest VLAN when they fail to authenticate. The Guest VLAN would provide Internet access only. Below is an example of a basic MAC-Based authentication exchange.

Adding MS Switches as RADIUS clients on the NPS Server
All switches that that need to authenticate connecting devices must be added as RADIUS clients on in NPS. Below are the steps to add the switches as RADIUS clients.
1) Open the NPS Server Console by going to Start > Programs > Administrative Tools > Network Policy Server.
2) In the Left pane, expand the RADIUS Clients and Servers option.
3) Right click the RADIUS Clients option and select New.
4) Enter a Friendly Name for the MS Switch.
5) Enter the the IP Address of your MS Switch.
6) Create and enter a RADIUS Shared Secret (note this secret - we will need to add this to the Dashboard).
7) Press OK when finished.
8) Repeat these steps b - g for all switches. See Figure 1 for a sample RADIUS client configuration.
Figure 1.

Create a user account in Active Directory for a connecting device.
1) Open Active Directory Users and Computers: Start > All Programs > Administrative Tools > Active Directory Users and Computers.
2) Create a new user account. the username and password should be the MAC address of the connecting device (letters need to be lower case and it should not have any delimiting characters). See Figure 2 for example user account.
Figure 2.

Configuring a NPS Connection Request Policy.
1) In the NPS Server Console, navigate to NPS (Local) > Policies > Connection Request Policies.
2) Right click on Connection Request Policies, and select New.
3) Name the policy and select Next.
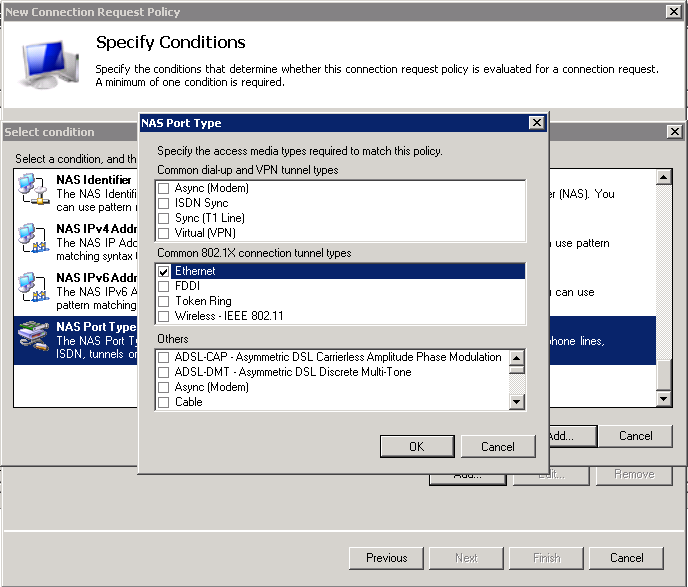
4) On the Specify Conditions page add the following condition: NAS port type as Ethernet (Figure 3) followed by clicking Next.
5) Click Next on the Specify Connection Request Forwarding screen.
6) Click Next on the Specify Authentication Methods screen.
7) Click Next on the Configure Settings screen.
8) Review settings and click Finish on the Completing Connection Request Policy Wizard screen.
Figure. 3
Configuring a NPS Network Policy.
1) In the NPS Server Console, navigate to NPS (Local) > Policies > Network Policies.
2) Right click on Network Policies, and select New.
3) Name the policy and select Next. (Figure 4)
Figure 4.

4) On the Specify Conditions page add the following two conditions Windows Groups, this can be the group containing especially for the user accounts created in Part 3. For our example we will use DOMAINNAME\Domain Users. Then specify NAS port type Ethernet followed by clicking Next. (Figure 5)
Figure 5.

5) Click Next on the Specify Access Permission screen.
6) On the Configure Authentication Methods page, uncheck all options except Unencrypted authentication (PAP, SPAP). (Figure 6)
Figure 6.

7) Click Next on the Configure Constraints screen.
8) Click Next on the Configure Settings screen.
9) Review settings and click Finish on the Completing New Network Policy screen. (Figure 7)
Figure 7.

Creating a MAC-Based RADIUS Access Policy in Dashboard.
1) On the Dashboard navigate to Configure > Access Policies.
2) Click on the link Add Access Policy in the main window then click the link to Add a server.
3) Enter the IP address of the RADIUS server, the port (default is 1812 or 1645), and the secret you created above in part 2. (Figure 8)
4) Click Save changes.
Figure 8.

Apply Access policy to MS Switchports
1) On the Dashboard navigate to Configure > Switchports.
2) Select the port(s) that should have the policy applied.
3) Click the Edit button, make sure the port type is Access, and from the Access policy drop-down select the policy that was created in part 5.
(Figure 9)
Figure 9.
