
Configuring Camera FOVs on a Floor Plan
Overview
Cameras placed on a map or floor plan can now display their Field of View (FOV) to provide additional context, such as:
-
Visualize camera orientation
-
Easily differentiate between different camera types based upon their cone-shaped FOV or circular FOV (MV32)
-
Easily identify the operation state of any camera
-
Observe which areas of your location may have poor coverage
-
Device identification during emergencies
-
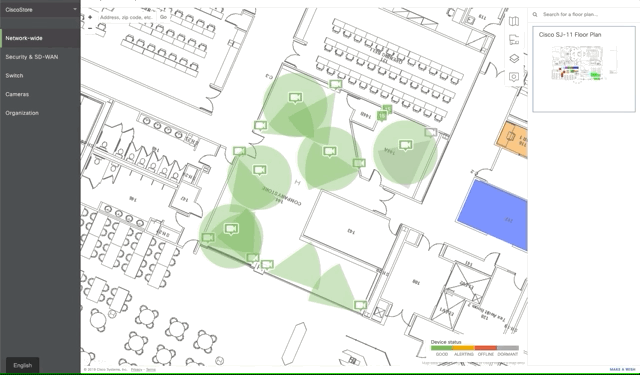
For any area of interest (example indicated in blue below), we can easily identify which camera(s) offer coverage of that area.
-
We can easily identify which cameras provide coverage for any area of interest (example indicated in blue below).
-

For information on how to upload custom Floor Plans and place devices, refer to Using a Floor Plan or Custom Map in Dashboard article.
Configuration
Updating the FOV rotation angle
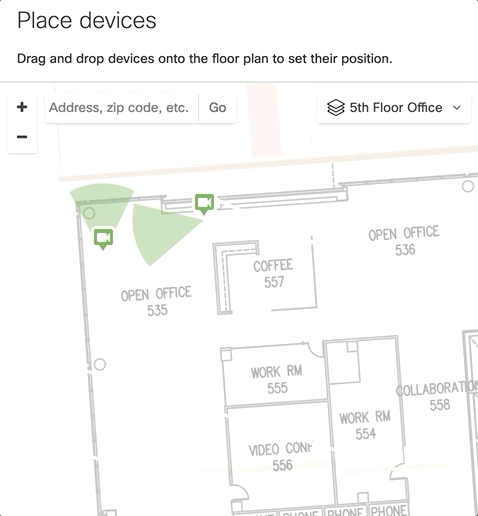
- To get started, navigate to Network-wide > Map & floorplans > Place Devices on [floor plan name].

- Click and drag the cones to indicate the direction of cameras:

Clicking "Save device placement" redirects the user to the maps marker overlay page, where changes to the FOV rotation angle are displayed.

Hide cones during zoom
Cones are hidden when zoomed out to prevent cluttering. To view camera FOV cones, simply zoom into the Maps & Floorplans until they are represented on the map.
Circular vs. cone-shaped FOV
Cone-shaped FOVs are used to represent MV12N, MV12W, MV22, MV72, etc. Circular FOVs are used to represent MV32 fisheye cameras.

Colored FOVs represent camera status
Camera FOV cones are colored to match their current online status: green for online, yellow for alerting, red for recently offline, and grey for dormant devices. This helps users to quickly be able to notice when something’s gone wrong with a camera.


Final Product
Once camera FOV cones are configured in Maps & Floorplans, you can easily identify which cameras are directed toward an area of interest.

You can then use Maps & floorplans to easily identify which camera will have the best view of an incident:
Refer to FAQs for more information