

IPsec VPN Configuration Settings
Overview
This article describes how to configure site-to-site IPsec VPN on Cisco Meraki MX WAN appliances. IPsec VPN is required when Auto VPN cannot be used, such as between WAN appliances in different organizations or when connecting to third-party VPN peers. It covers the configuration of IPsec VPN peers, including required parameters like public IP, subnets, pre-shared keys, and IPsec policies, to establish secure connectivity between networks.
Auto VPN vs IPsec VPN
-
Auto VPN is a VPN connection between/among the WAN appliances in different networks of the same Meraki dashboard organization.
-
Non-Meraki site-to-site VPN is used when you form a VPN tunnel with a third-party/non-Meraki device or when you establish a VPN connection with a Meraki WAN Appliance in a different dashboard organization.
-
Like Non-Meraki Site-to-Site VPN, Auto VPN has encryption, authentication and a key. The traffic is encrypted using an AES cipher. However, all of this is transparent to users and does not need to be (and cannot be) modified.
Prerequisites and limitations
Licensing requirements
-
Active Cisco Meraki MX license applied to all participating devices
Hardware requirements
-
All MX models support IPsec VPN
Firmware requirements
-
IKEv2 requires firmware version 15.12 or greater
-
IPv6 peering requires firmware version 18.2 or greater
Limitations
- IPsec VPN peers cannot use MX and Z-Series appliances as an "exit hub" as they do not interpret a default route (0.0.0.0/0) as a valid traffic selector, unless you have configured either:
- A Passthrough or VPN Concentrator MX advertising a 0.0.0.0/0 route as a "Local Network" on the Site-to-Site VPN page.
- A NAT mode MX with a 0.0.0.0/0 LAN static route enabled for VPN. - IPsec VPN connections are only established over the active WAN uplink, and cannot be established across multiple WAN uplinks unless Multi-Uplink IPsec VPN is configured. Check our documentation on Multi-Uplink IPsec VPN for more information.
Configuration steps
The recommended number of the dashboard configured IPsec VPN peers is 1500.
Starting with MX19 firmware on vMX platforms, Meraki has begun to deprecate the use of DES and 3DES encryption for Phase 2 (IPsec) of Client, and IPsec VPN connections due to its insecure nature. Subsequent firmware releases will continue to deprecate it on all platforms, see more information on the Insecure Cipher Deprecation article.
To create Site-to-site VPN tunnels between a MX WAN appliance or a Teleworker Gateway and an IPsec VPN endpoint device, navigate to the Security & SD-WAN > Configure > Site-to-site VPN > IPsec VPN peers.
In both organizations, select the Add a peer link. Fill out this entry as if the other MX were a third party device, where each field should be configured as follows:
-
A name for the remote device or VPN tunnel. This field is cosmetic.
-
What Internet Key Exchange (IKE) version to use (IKEv1 or IKEv2) * for more information regarding the difference between IKEv1 and IKEv2 , refer to the article.
-
Enter the public IP address of the remote device. The public IP address from which the remote MX can be contacted.
- If the peer device is part of a high availability (HA) pair, enter the HA virtual IP.
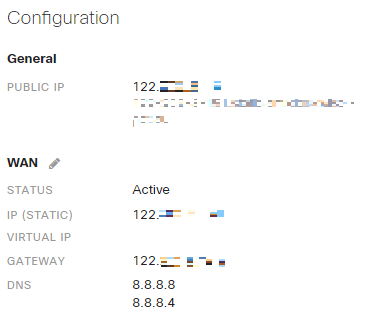
- For MX WAN appliances, locate the public IP address from which the remote MX can be contacted at Security & SD-WAN > Monitor > Appliance status > Uplink > Configuration > General > Public IP
4. To enable private subnets:
All subnets on the remote peer that will be participating in the VPN, in CIDR notation (for example, 10.0.1.0/24). Can be found on the remote MX in the dashboard under Security & SD-WAN > Configure > Addressing & VLANs.
5. Local ID of this MX. This is an optional configuration and is what the remote peer will receive as the remote ID of this MX. Only available with IKEv2.
- If left blank (default) it is the uplink IP of the MX, not the public IP. Some peers may expect this to match the public IP of the MX, a User FQDN (for example, user@domain.com), or FQDN (for example, www.example.com) based on their configuration.
6. The Remote ID of the remote peer. This is an optional configuration and can be configured to the remote peer User FQDN, FQDN, or IPv4 address as needed.
- Which of these values you use is dependent upon your remote device. Consult with its documentation to learn what values it is capable of specifying as its remote ID, and how to configure them (for example, Determining an ID Method for ISAKMP Peers for ASA firewalls).
-
The subnets behind the third-party device that you wish to connect to over the VPN. 0.0.0.0/0 can also be specified to define a default route to this peer.
-
If an MX device is configured with a default route (0.0.0.0/0) to an IPsec VPN peer, traffic will not fail over to the WAN if the VPN tunnel goes down. The default route will still point to the VPN without failing to direct internet access. However, when health checks are used on routed tunnels, you can configure the option to enable failover directly to the internet.
-
Select the IPsec policy.
-
It is recommended to keep the default policy on both sides to avoid mismatches.
-
If a custom policy is configured for this tunnel on either peer, it must match exactly on both peers.
For more information, refer to the Custom IPsec policies with Site-to-site VPN.
-
Enter the pre-shared secret key (PSK).
-
A custom passphrase for encryption purposes.. This must match exactly on both peers.
-
Availability settings to determine which WAN appliances in your dashboard organization will connect to the IPsec VPN peer.
-
By default, all devices in an organization will establish tunnels with a third-party peer. However network tags can be used to limit these connections to a few networks.
-
Only networks with a network tag associated under Organization > Overview can be selected in the availability section.

This process would need to be repeated for each remote/local MX pair as desired. The image below shows an example of an MX to MX VPN connection when the devices are in different Organizations:

When setting up IPsec VPN connections between two MXs in different organizations, make sure to populate the Remote ID field of the IPsec VPN peer with the private IP address of the remote MX if all the following conditions are met:
- The MXs are running firmware version MX 15 or higher.
- They do not use User FQDN.
- They are connected behind an upstream NAT device.
An MX WAN appliance can establish tunnels to both Auto VPN and IPsec VPN peers. An MX that builds tunnels to both Auto VPN and IPsec VPN peers will not route traffic between other Auto VPN peers and the IPsec VPN peers. The MX will send traffic to those VPN peers using the principles discussed above and in the MX Routing Behavior Document. However, an MX that builds tunnels to both Auto VPN and IPsec VPN peers, will only route traffic between the IPsec VPN peers and other Auto VPN peers if BGP routing over IPsec VPN is in use.
Making changes to any config under Security & SD-WAN > Configure > Site-to-site VPN, might result in existing IPsec VPN tunnels bouncing. We recommend that you make changes during a maintenance window to minimize the impact of IPsec VPN tunnels bouncing.
Remote ID - Identifier for the remote peer which is required if the remote peer is behind a NAT
Configuring IPsec VPN peering with FQDN
This feature enables the use of FQDN instead of an IP address while configuring an IPsec VPN peer. Using IP addresses can be tedious because with a dynamic IP address, a customer must manually modify the IPsec VPN settings on the Site-to-Site VPN page when there is an IP address change. With FQDN configuration, the hostname of the remote peer would automatically get resolved each time a connection is initiated.
“FQDN” differs from “User FQDN.” The MX resolves the FQDN to an IP address of the remote peer, whereas “User FQDN” is used in conjunction with the IP address of the remote peer. “FQDN” identifies the remote peer and is configured in the “Public IP/Hostname” field. “User FQDN” identifies the local peer and is configured in the “Local ID” field.
Supported Products:
-
MX running firmware 18.1 or higher
-
Requires IKEv2
Configuration
-
The FQDN of the IPsec VPN peer can be configured in the Public IP/Hostname field when IKEv2 is the selected IKE version.
The default behavior of the MX is to set remote_id to FQDN if it is not explicitly added in the dashboard for IPsec VPN peer settings. The remote id on one peer needs to match the local id on the other peer for the tunnel to be established.
If the configured FQDN fails to resolve, an event will be reported in Network-wide > Monitor > Event log on the dashboard.
NOTE for IKEv2
Meraki appliances build IPsec tunnels by sending out a request with a single traffic selector payload that contains all the expected local and remote subnets. Certain vendors may not support allowing more than one local and remote selector in each IPsec tunnel. For such cases, use IKEv1 instead.
An MX and Z series device will not try to form a VPN tunnel to an IPsec VPN peer if it does not have any local networks advertised.
IPsec Policies
There are three preset IPsec policies available.
-
Default: Uses the Meraki default IPsec settings for connection to an IPsec VPN device
- AWS: Uses default settings for connecting to an Amazon Virtual Private Cloud (VPC)
- Azure: Uses default settings for connecting to a Microsoft Azure instance
If none of these presets are appropriate, the Custom option allows you to manually configure the IPsec policy parameters. These parameters are divided into Phase 1 and Phase 2.
Phase 1
- Encryption: Select between AES-128, AES-192, AES-256, and 3DES encryption
- Authentication: Select MD5, SHA1 or SHA256* authentication
- Diffie-Hellman group: Select between Diffie-Hellman (DH) groups 1, 2, 5, 14, 15, or 21
- Lifetime (seconds): Enter the phase 1 lifetime in seconds
DH group 14 requires firmware version 15.12 or greater. DH groups 15 and 21 require firmware version 19.2 or greater
Phase 2
- Encryption: Select between AES-128, AES-192, AES-256, and 3DES encryption (multiple options can be selected)
- Authentication: Select between MD5, SHA1 and SHA256 authentication (both options can be selected)
- PFS group: Select the Off option to disable Perfect Forward Secrecy (PFS). Select group 1, 2, 5, 14, 15, or 21 to enable PFS using that Diffie-Hellman group.
- Lifetime (seconds): Enter the phase 2 lifetime in seconds
On May 8th 2018, changes were introduced to deprecate DES for encryption. Refer to the Deprecation of DES Encryption Algorithm article for more information.
Ensure the phase 2 lifetimes are equal on both ends of the tunnel whenever possible. While MX's can sometimes honor a shorter phase 2 lifetime if they're acting in response to build a tunnel, they cannot while serving as the initiator of the tunnel.
IPsec VPN failover
For IPsec VPN the MX will fail over the IPsec tunnel from the MX Primary to Secondary internet link when the link is marked as failed. The primary link can be set under Security & SD-WAN > Configure > SD-WAN & Traffic Shaping page.
The IPsec VPN device will need to have the ability to designate a backup (failover) peer IP. By designating the public IP address of the MXs secondary uplink as the back-up VPN IP on the IPsec VPN peer, you can ensure that the VPN tunnel will be re-established in the event of an uplink failure.
If your MX device is operating on firmware version MX19.1.4 or later, you have the option to establish both Primary and Secondary VPN tunnels to enhance redundancy. For more information, refer to Primary and Secondary IPsec VPN tunnels.
Peer availability
By default, a IPsec VPN peer configuration applies to all MX and Z-series in your dashboard organization. Since it is not always desirable for every appliance you control to form tunnels to a particular IPsec VPN peer, the Availability column allows you to control which appliances within your Organization will connect to each peer. This control is based on network tags, which are labels you can apply to your dashboard networks.
When All networks is selected for a peer, all MX and Z-series in the organization will connect to that peer. When a specific network tag or set of tags is selected, only networks that have one or more of the specified tags will connect to that peer.
For information on network tags, refer to Organization Overview article.
VPN firewall rules
You can add firewall rules to control what traffic is allowed to pass through the VPN tunnel. These rules will apply to outbound VPN traffic to/from from all MX-Z series appliances in the Organization that participate in site-to-site VPN, including outbound IPsec VPN peer tunnel and related BGP control traffic. Configuration steps for the rules can be found in the Site-to-site VPN Firewall Rule Behavior article.
VPN Firewall rules will not apply to inbound traffic or to traffic that is not passing through the VPN.
Monitoring Site-to-site VPN
You can monitor the status of the site-to-site VPN tunnels between your Meraki devices by selecting Security & SD-WAN > Monitor > VPN Status. This page provides real-time status for the configured Meraki site-to-site VPN tunnels. It lists the subnet(s) being exported over the VPN, connectivity information between the MX and Z-series and the Meraki VPN registry, NAT Traversal information, and the encryption type being used for all tunnels. For more information regarding this page, refer to the VPN Status Page article.
Troubleshooting
If the VPN tunnel is not coming up upon following the set-up guidelines listed above, you may need to generate interesting traffic first. This can be done by initiating a ping to an IP address in the remote subnet.
For other common issues and troubleshooting steps, please refer to Site-to-site VPN Troubleshooting.
MX and Z-series appliances in Passthrough or VPN Concentrator mode cannot be used to initiate interesting traffic into the tunnel. Interesting traffic would need to be initiated from a client behind the Passthrough appliance.
Additional considerations
Caveats
Since this VPN tunnel is functionally the same as a tunnel to a third-party peer, the same restrictions and caveats apply, including the following notable caveats:
-
Limited visibility on the VPN Status Page.
-
To bring the tunnel up, you may need to generate interesting traffic which can be done by initiating a ping to an IP address in the remote subnet.
Additional resources
For more information about site-to-site VPN tunnels and troubleshooting: