MX to Cisco ASA Site-to-site VPN Setup
Overview
This article outlines configuration steps, on a Cisco ASA, to configure a site-to-site VPN tunnel with a Cisco Meraki MX or Z-series device. This article details setting the ASA's phase 1 and 2 parameters to the MX default. Though custom IPsec policies can be configured in Dashboard, it is recommended to stick to the defaults whenever possible to avoid a potential mismatch.
Note: We strongly recommend running ASA 8.3 or above as there is a possibility the tunnel will tear down prematurely on earlier versions. Additionally, ASA 8.2 is the end of life as well as susceptible to critical security issues.
This document should only be used for general reference and not as a strict configuration guide for ASA/ASDM.
Configuration Using ASDM
Note: The following screenshots should be used as a guide as your wizard may vary depending on the version of ASDM which is being used.
The easiest way to configure the VPN tunnel is by logging onto your Cisco ASA via the ASDM GUI and utilizing the IPsec Wizard found under Wizards > IPsec VPN Wizard.

On the first screen, you will be prompted to select the type of VPN. Select Site-to-Site and leave the VPN tunnel interface as outside then click the 'Next' button.

On the second screen, you need to enter the public IP address of the MX security appliance in the text box labeled Peer IP address. Please note that this must be the IP address of the primary interface specified on the MX under Security & SD-WAN > Monitor > Appliance status > Uplink > Configuration > General. Therefore if you have the primary uplink configured as WAN 1 then you must use WAN 1's Public IP address.
Select the radio button for 'Pre-shared key' under Authentication Method and exactly as it appears on the MX under Security & SD-WAN > Configure > Site-to-site VPN > Organization-wide settings > Non-Meraki VPN peers > Preshared secret. The Tunnel Group Name will be automatically filled in for you based upon the peer IP address. Click the Next button to continue.

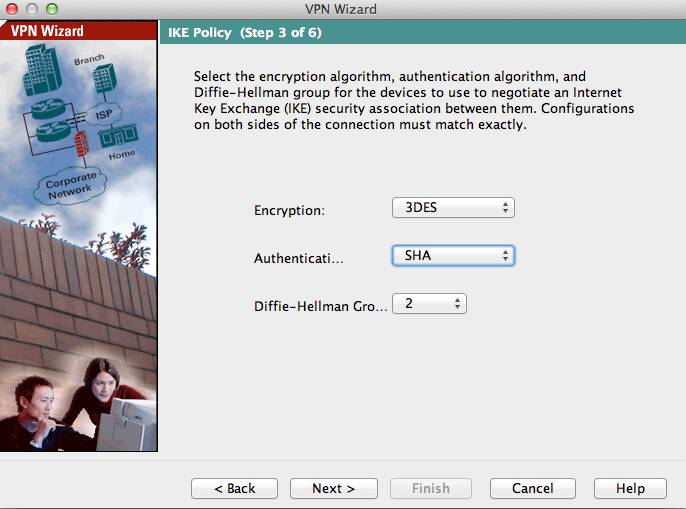
The third screen asks you to specify the encryption and hashing algorithms used by the Phase 1 IKE policy. The MX requires the 3rd party VPN peer to have 3DES selected for the encryption algorithm, SHA1 has the authentication algorithm, and number 2 specified for the Diffie-Hellman group. Click Next once you have selected these options from their subsequent drop-down menus.

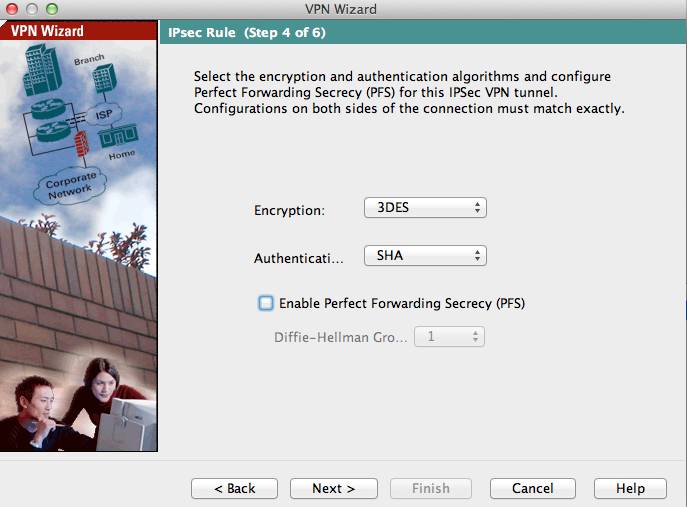
The fourth screen asks you to configure the Phase 2 negotiation parameters for the IPsec rules. The MX security appliance can accept any of the following Encryption algorithms: 3DES, AES-128, AES-192, and AES-256. Additionally, the MX can accept either SHA1 or MD5 as the authentication hashing algorithm.
If the Meraki side VPN configuration is left as default settings, please ensure that the box for PFS or Perfect Forwarding Secrecy is unchecked.
Select the Next button to be brought to the next step.

The fifth screen asks you to specify the subnets that will be shared out over the VPN tunnel. The ASA creates an object called 'inside-network' that is analogous to the subnet residing on the LAN ports of the ASA, this should be selected for the text box labeled Local Network. You can select from a list of objects by clicking on the text box to be displayed a drop-down menu or you can manually type in the subnet in CIDR notation. In the text box labeled Remote Networks type in the private subnet of the MX series in CIDR notation. The checkbox for exempting the inside network from NAT should remain checked. Select next to continue.

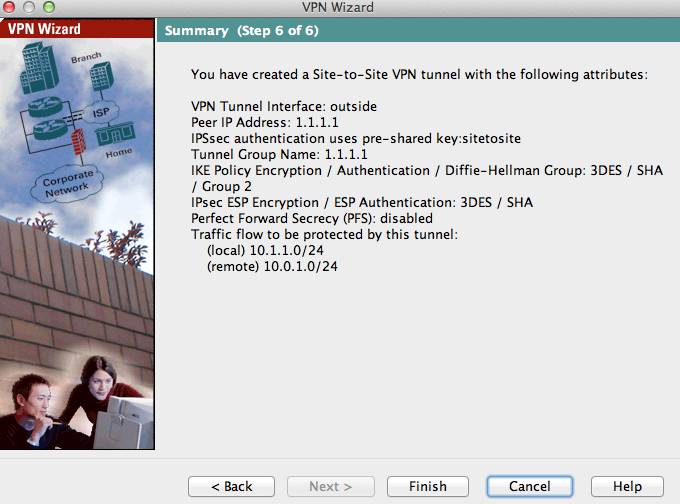
On the sixth and final screen you will be presented with a summary of the configuration selections you made in the last five steps. Click Finish to apply the IPsec VPN settings to the Cisco ASA. With the settings saved to the ASA it will attempt to establish a IPsec VPN tunnel with the MX once client traffic attempts to access the remote subnet. If you have additional subnets or want to allow certain protocols across the VPN tunnel you may need to tweak your cyrpto map or firewall settings on your ASA accordingly. The following link from Cisco can be used as a reference: An Introduction to IP Security (IPSec) Encryption
Configuration Using the CLI
This section will outline the process for configuring a Site-to-site VPN between an MX Security Appliance and a Cisco ASA using the command line interface on the Cisco ASA.
Note: We strongly recommend running ASA 8.3 or above as there is a possibility the tunnel will tear down prematurely on earlier versions. Additionally, ASA 8.2 is the end of life as well as susceptible to critical security issues.
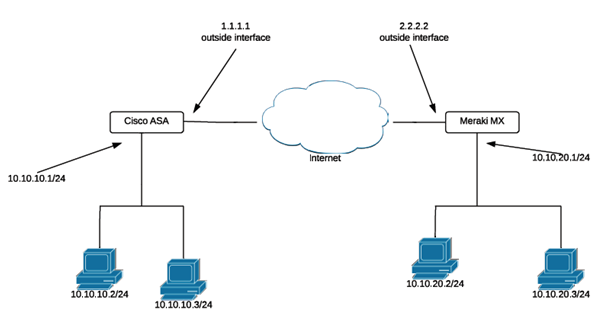
The diagram below will be used in this configuration scenario:

The following ASA commands can be run to establish a site-to-site VPN tunnel with a Meraki MX appliance.
Note: These commands reference the default isakmp/ipsec parameters used by the MX. If the MX is configured to use a custom ipsec policy, be sure to update these commands accordingly.
These commands may differ based on IOS version.
1. Configure ISAKMP Policy (Phase 1)
crypto isakmp policy 1
authentication pre-share
encryption 3des
hash sha
group 2
lifetime 28800
2. Configure IPsec Transform set
crypto ipsec transform-set Meraki_Transform_Set esp-aes-256 esp-sha-hmac
3. Create an access list matching the addresses to communicate over the VPN tunnel
access-list 90 permit ip 10.10.10.0 255.255.255.0 10.10.20.0 255.255.255.0
4. Exclude the VPN traffic from being natted
nat 0 access-list 90
5. Define a crypto map referencing to step 2, 3 and the outside interface of the MX
# Note that only static crypto maps are supported at this time
crypto map ASAtoMX 20 match address 90
crypto map ASAtoMX 20 set transform-set Meraki_Transform_set
crypto map ASAtoMX 20 set peer 2.2.2.2
6. Set the data lifetime to unlimited
crypto map ASAtoMX 20 set security-association lifetime kilobytes unlimited
7. Apply the crypto map to the outside interface
crypto map ASAtoMX interface outside
8. Configure the tunnel group and the pre-shared key. The Tunnel Group Name will be your outside IP address.
Tunnel-group 2.2.2.2 type ipsec-l2l
Tunnel-group 2.2.2.2 ipsec-attributes
pre-shared-key Meraki123
Note: Some of these commands may no longer be applicable with ASA 9.0 and higher. We recommend checking the vendor's website for configuring the ASA accordingly.

