
Intrusion Policies Configuration Guide
Overview and Purpose
Intrusion Policies allow administrators to create organization-level custom intrusion policies for supported MX deployments. Each custom policy starts from a base policy and can be tuned with rule group overrides and individual rule overrides before being assigned on the network Threat Protection page.
This guide explains how to create, review, edit, assign, and manage Intrusion Policies in Dashboard. It combines the workflow, configuration guidance, operational considerations, and common questions into a single document. 
Prerequisites and Limitations
Before configuring Intrusion Policies, ensure the following requirements are met.
Licensing Requirements
-
Coterm: Advanced Security or SDWAN+
-
Subscription: Essentials or Advantage
Hardware Requirements
All devices that support IPS with Snort 3 and 26.2 will support this feature. Snort3 supported devices are listed here
Firmware Requirements
Custom Intrusion Policies are available on supported MX networks running MX 26.2.1 or later. Firmware restrictions are listed here
Limitations
-
Custom Intrusion Policies are organization-level objects that must be assigned per network. Assignment can be completed via the UI or API.
-
A policy cannot be deleted if it is in use by a network
-
A maximum of 10 custom Intrusion Policies can be created
Configuration Steps
To begin, Navigate to Security & SD-WAN > Intrusion Policies. Use this page to review, create, edit, and delete custom Intrusion Policies.
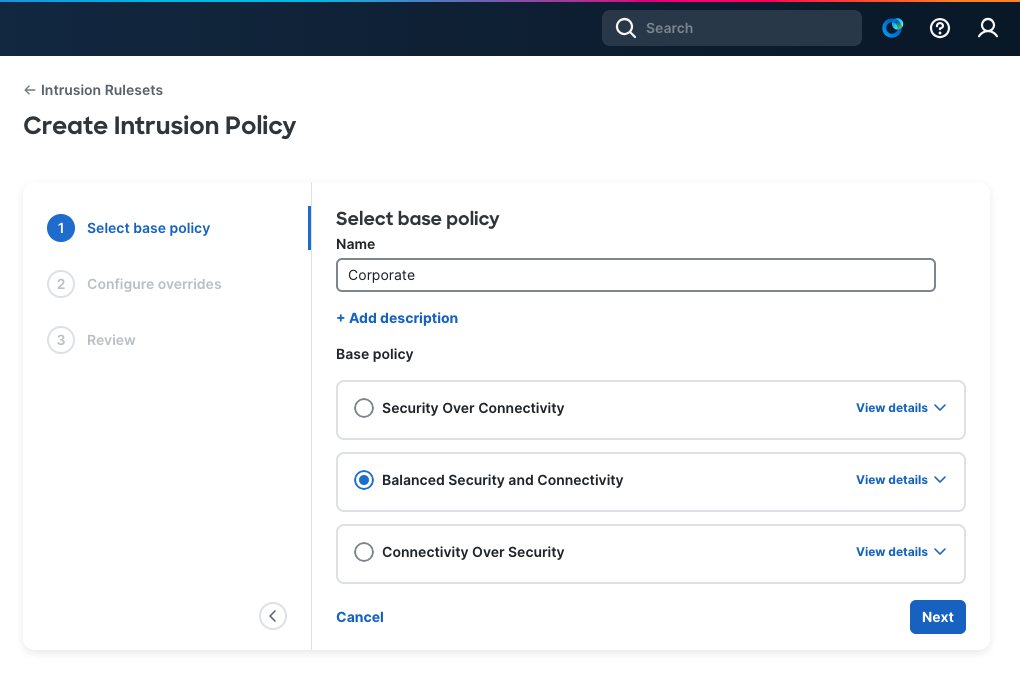
Create a Custom Intrusion Policy
-
Click + Add custom
-
Enter a policy name
-
Enter a description (optional)
-
Select a Base Policy
-
Configure Group overrides and/or Rule overrides
-
Review & Save
Review the rest of the document for details on each step, starting with the Base Policy.
Once the policy is created you should assign the newly created Intrusion Policy to a Network by navigating to the Threat Protection page for the network (Security & SD-WAN > Threat Protection)
Base Policy
Each custom Intrusion Policy starts from one of the available base policies:
-
Connectivity Over Security (Connectivity)
-
Balanced Security and Connectivity (Balanced)
-
Security Over Connectivity (Security)
The selected base policy provides a starting point for the custom policy. Administrators should choose the option that most closely matches the intended security posture before making overrides. Security has the most rules enabled by default, Connectivity has the least rules enabled by default and Balanced is somewhere between the two.
Overrides
Performance Impact of Custom Policies: Custom policies, including policies with a large number of enabled rules, can significantly increase the processing required to inspect network traffic. While broader rule coverage may improve visibility, it also introduces additional system overhead. In high-throughput environments, this can lead to increased latency, reduced throughput, and higher CPU and memory utilization. Before enabling custom policies in your organization consider validating the configuration and performance in a controlled environment.
When configuring overrides there are two columns on the right side of the table Base policy and Override. The Base policy column will show you the original value set by the Base policy and the Override column will give you options to change the value to your preference.
Configure Group Overrides
Group overrides allow administrators to adjust the security level applied to a rule group. A higher level security level generally means that more rules within that category (if applicable) will be enabled. This is useful when a broader category of intrusion behavior needs to be tuned without editing rules individually.
-
Navigate to the override configuration step.
-
Browse the available rule groups. For example you can click into the Rule Categories text to see more categories.
-
Select a rule group to inspect it. Groups can be drilled into further until you reach the Rule level (see next section)
-
Adjust the security level for the selected group as needed.
Group overrides can affect multiple rules at once, so changes should be reviewed carefully before saving.

Configure Rule Overrides
Rule overrides allow administrators to adjust the behavior of specific individual rules within the selected policy hierarchy.
-
Drill into the appropriate rule group. (e.g. Rule Categories > Malware > Tools)
-
Review the individual rules available within that context.
-
Modify the action for the required rule in the Override column. More information on rule actions can be found in the Snort3 documentation.
Rule overrides are best suited for targeted exceptions or more precise tuning than a group-level change.

Review Changes Before Saving
Before the custom policy is saved, Dashboard presents a summary of pending modifications. This review step should be used to confirm the final policy intent.
The review page includes the following information:
-
Group overrides
-
Rule overrides
-
Counts of modified items
Dashboard may display a warning when the pending changes materially modify the default behavior of the selected base policy.

Assign a Custom Intrusion Policy to a Network
-
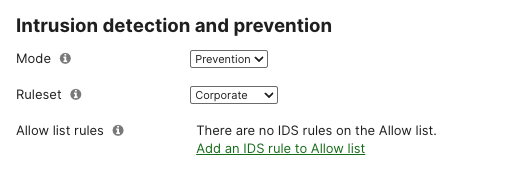
Navigate to Security & SD-WAN > Threat Protection.
-
Locate the intrusion detection and prevention ruleset selection area.
-
Select the desired custom Intrusion Policy.
-
Save the configuration.
Custom policies appear alongside the standard ruleset options for supported networks.
Edit an Existing Intrusion Policy
-
Navigate to Security & SD-WAN > Intrusion Policies.
-
Locate the target policy in the summary table.
-
Select the edit action.
-
Update the policy details or override settings.
-
Review the changes and save.
Changes to a policy that are already assigned to production networks should be assessed carefully before saving.
Delete an Intrusion Policy
-
Navigate to Security & SD-WAN > Intrusion Policies.
-
Locate the target policy in the summary table.
-
Select the delete action.
-
Confirm the deletion when prompted.

Operational Considerations
-
Custom Intrusion Policies are organization-level objects.
-
A custom policy starts from a selected base policy.
-
Group overrides affect broader portions of policy behavior.
-
Rule overrides provide more targeted control.
-
Changes should be reviewed carefully before applying them to production networks.
Troubleshooting Tips
-
Confirm the feature is supported for the organization and network.
-
Verify licensing requirements are met
-
-
Confirm the target MX network supports custom Intrusion Policies.
-
Verify firmware requirements are met
-
Frequently Asked Questions
- What are Intrusion Policies?
- Intrusion Policies are the rules that will be used for the IPS/IDS function. There are three default policies. Custom Intrusion Policies allows you to have control over the policies allowing administrators to tune the policy as needed.
- What is the difference between a group override and a rule override?
- A group override changes the behavior of a broader rule group. A rule override changes the behavior of a specific individual rule. Group overrides are used for wider policy adjustments, while rule overrides are better for targeted exceptions.
- How many custom Intrusion Policies can be created?
- The current implementation limits each organization to 10 custom intrusion policies.
- Can the base policy be changed after creation?
- No. The base policy selector is disabled in edit mode, so the base policy cannot be changed after the custom policy is created.
- Can a custom Intrusion Policy be deleted?
- Yes. Custom Intrusion Policies can be deleted from the Intrusion Policies summary page. A policy must not be attached to a network to be eligible for deletion.
- Can a rule appear in multiple categories?
- Yes, a rule can appear in multiple categories. If a rule appears in multiple categories, enabling it through any selected category can make it active in the policy. Lowering another category’s security level does not disable that rule. To disable the rule, apply a direct rule-level override for that specific rule.
- What are Security Levels?
- Security Levels control how many rules are included from a category. Higher levels include more protections and may increase alerts or blocking. Lower levels reduce policy aggressiveness and may reduce noise, but can also reduce protection. If the same rule is included by more than one category, it remains active if any selected category level includes it, unless a rule-level override changes the final action. As of this writing, the predefined policies roughly align to these security levels: Connectivity aligns with Level 1, Balanced aligns with Level 2, and Security aligns with Level 3. This mapping is provided for reference only and may change in the future.