

Packet Captures and Port Mirroring on the MS Switch
Workstations in promiscuous mode can sniff LAN packets within their broadcast domain. A workstation connected to Cisco Meraki switches can capture these packets through port mirroring. This article will cover how to capture traffic passed by an MS switch, using the following steps:
- Enable port mirroring on your switch
- Connect a workstation on your destination port
- Capturing packets in promiscuous mode
Learn more with this free online training course on the Meraki Learning Hub:
Enable port mirroring on your switch
The most effective way to capture traffic passed on a given switchport is to mirror that port to another available port, so all traffic passed by the source port will be sent out on the mirrored destination port. The following steps outline how to mirror one or more ports on an MS switch:
- In Dashboard, navigate to Switch > Monitor > Switch ports.
- Select one or more ports to be mirrored. Note that multiple source ports can be mirrored to a single destination port.
- Click Mirror:

- Specify the destination mirror port, which will be used to capture traffic on the source ports. Note that both ports must be on the same switch, or within the same switch stack.
Note: You can have multiple source ports but only a single destination port.
- Click Create port mirror:

Note: The MS switch supports utilizing aggregate ports as a source port only (not as a destination port).
Note: The uplink port cannot be used as the destination and will not be listed as an option

Port Mirror Egress Modes
On Meraki switches, there are two egress modes for port mirrors:
- True egress
- Native VLAN traffic is untagged
- Tagged egress
- Native VLAN is tagged
The following table lists support for the two modes:
| True Egress | MS22, MS42, MS120, MS220, MS320, MS350, MS390, MS410, Meraki managed and monitored Catalyst switches |
| Tagged Egress | MS225, MS250, MS420, MS425 |
Connect a workstation to your destination port
Physically connect a workstation to your destination port. Make sure DHCP is enabled on the host, and check that it receives a 169.254.X.X IP address.

Note: Clients connected to a destination port of a port mirror will not have network connectivity, as the destination port will not serve clients.
Using Wireshark for Packet Captures
Wireshark is a utility that will display the packets seen by a device. Packets contain the data that is transmitted between computers. Viewing this information can often aid in the diagnosis of issues that may be occurring in a network. It is possible for a device to not see all packets transmitted on a network if a device is hardwired. In this instance, the device may only see broadcast packets and packets addressed to itself due to the functionality of modern networking equipment.
Learn more with these free online training courses on the Meraki Learning Hub:
Installation
Please visit Wireshark's download page to download Wireshark. When downloading, simply follow the prompts.
Taking Packet Captures
- Open Wireshark.
- Click Capture Options.
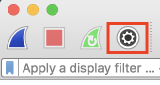
- Uncheck "Enable promiscuous mode on all interfaces", check the "Promiscuous" option for your capture interface and select the interface.

Note: Rolling captures can be configured if required. This option will allow packets to be captured continuously without filling up the storage on your device.
- Click start. This will take you to a new window that will show the packets that the device is picking up.
- When the desired packets have been obtained click stop.

- Save the capture from the "File menu" with a distinct name.
Rolling Captures
A "Rolling Capture" is a capture which automatically saves the output to files at set intervals and can break up a large capture into multiple smaller files. This can be extremely useful when trying to run a long-term capture for troubleshooting intermittent troubles such as choppy audio on VOIP.
Best Way to Run Rolling Captures
For some issues, it may be necessary to perform port mirrors or span port captures which run for long periods of time until the issue occurs. The goal is to run a capture and once the issue surfaces stop the packet capture. If a packet capture is run for a long duration of time, 6 hours, for example, the .pcap file will be too large for your computer to open as captures larger than 100mb become too difficult to open on some computers. To mitigate this trouble, the capture can be set with multiple different options which makes this easier.
What is the Ring Buffer
Ring Buffers can be set to ensure that you will not fill up all of the disk space on your device. It will start overwriting the oldest file based off how many files you specify. This does not have to be used, but it is useful to ensure you do not fill up your HDD.
Taking a Rolling Capture
- Open Wireshark.
- Click Capture Options.

- Uncheck "Enable promiscuous mode on all interfaces", check the "Promiscuous" option for your capture interface and select the interface.
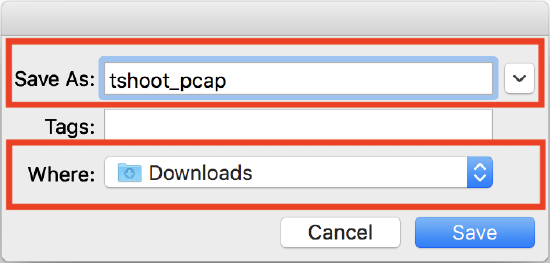
- In the "Output" tab, click "Browse...".

- Enter a filename in the "Save As:" field and select a folder to save captures to. Click Save.
- Select "Create a new file automatically after..." and "Use a ring buffer with x files". This creates a maximum of x number of files, with each file set to the size or timeframe configured. For example, creating a new file automatically after 32 megabytes, with a ring buffer of 128 files, will provide 4 gigabytes of rolling captures.

- Click start. This will take you to a new window that will show the packets that the device is picking up.
Filtering Packet Captures
In certain instances, it can be beneficial to filter a capture for a specific client's IP address or for a specific type of traffic. This filtering can be done prior to the capture as well as after the capture, however, the filters used in these instances differ.
What is a Capture Filter
A capture filter is a type of filter which is used to limit the type of data which is captured and saved to the file and is not used as frequently because of this. The syntax for these differs from the Display Filters. Additional information regarding the different filters and syntax which can be used as a Capture Filter can be found in the Wireshark database.
What is a Display Filter
Display filters are the more common type of filter as they do not reduce the type of traffic which is being captured. This eliminates the possibility of having an incorrect filter applied and missing the traffic required in order to troubleshoot. This type of filter is applied inside of Wireshark when viewing the completed capture and outlined below. Additional information regarding the different filters and syntax which can be used as a Display Filter can be found in the Wireshark database.
Using a Display Filter
- Open your packet capture
- Select the filter box.

- Input filter string as provided by support engineer. Click the "Apply" button.

- To save the filtered data, go to File -> Export Specified Packets...

- Make sure that the "Displayed" radio button is checked and that the file has a unique filename. Once this is complete, select "Save".
