
Configuring RADIUS Authentication with WPA2-Enterprise
Cisco Meraki MR access points (APs) offer a number of authentication methods for wireless association, including the use of external authentication servers to support WiFi Protected Access 2 - Enterprise (WPA2-Enterprise). This article outlines dashboard configuration to use a RADIUS server for WPA2-Enterprise authentication, RADIUS server requirements, and an example server configuration using Windows Network Policy Server (NPS).
For troubleshooting guidance, please refer to RADIUS Issue Resolution Guide.
Overview
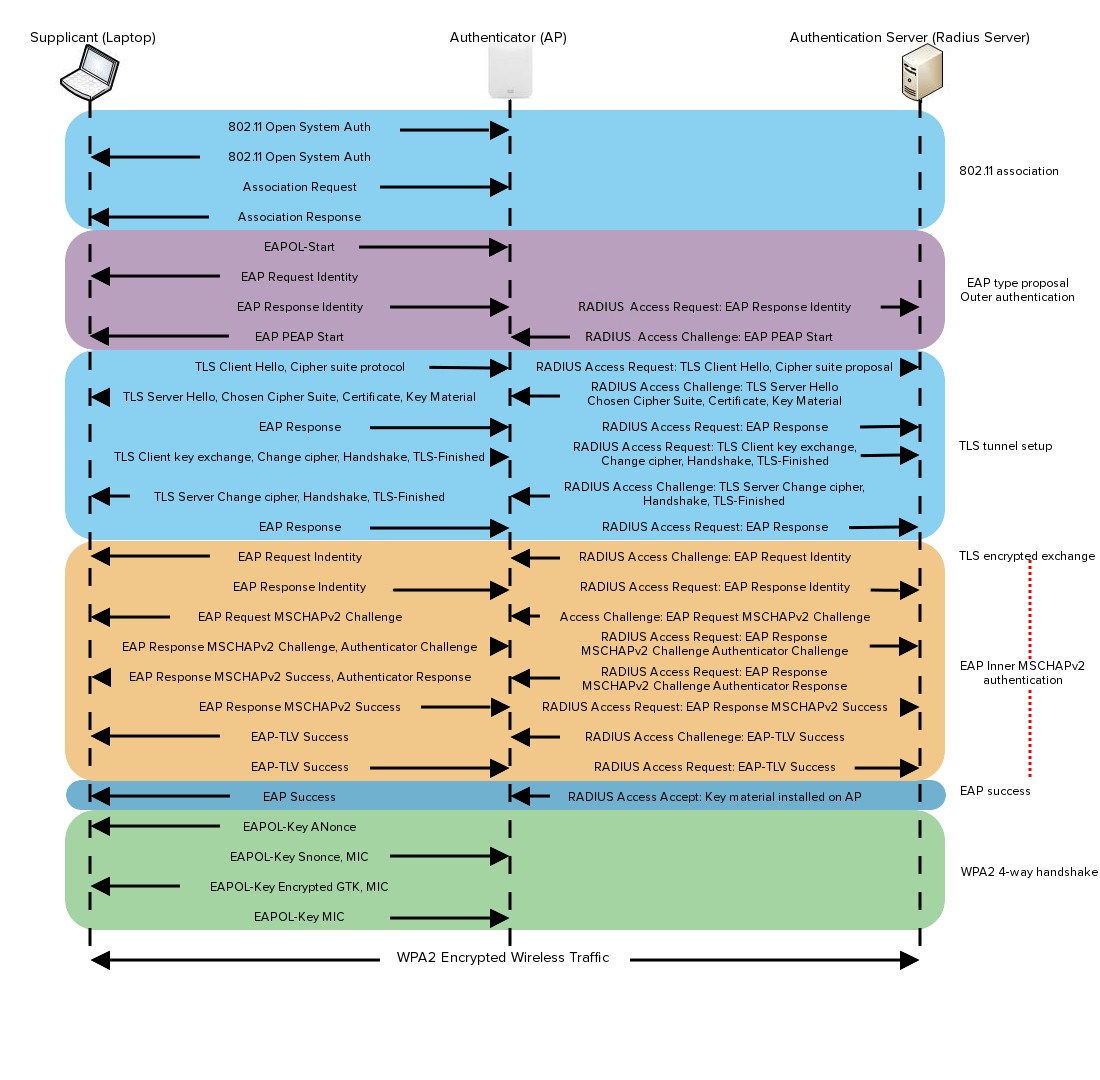
WPA2-Enterprise with 802.1X authentication can be used to authenticate users or computers in a domain. The supplicant (wireless client) authenticates against the RADIUS server (authentication server) using an Extensible Authentication Protocol (EAP) method configured on the RADIUS server. The gateway access point (authenticator) sends authentication messages between the supplicant and authentication server. This means the RADIUS server is responsible for authenticating users.
Access points perform Extensible Authentication Protocol Over LAN (EAPOL) exchanges between the supplicant and convert these to RADIUS Access-Requests messages, which are sent to the RADIUS server's IP address and UDP port specified in dashboard. Gateway access points need to receive a RADIUS Access-Accept message from the RADIUS server in order to grant the supplicant access to the network.
To achieve the best performance, we recommend placing the RADIUS server and gateway access points within the same layer-2 broadcast domain to avoid firewall, routing, or authentication delays. Keep in mind the access point is not responsible for authenticating wireless clients and acts as an intermediary between clients and the RADIUS server.
The following image provides a detailed breakdown of the Protected Extensible Authentication Protocol (PEAP) with the Microsoft Challenge Handshake Authentication Protocol version 2 (MSCHAPv2) association process:
Supported RADIUS Attributes
When WPA2-Enterprise with 802.1X authentication is configured, the following attributes are present in the Access-Request messages sent from the Cisco Meraki access point to the customer's RADIUS server.
Note: Please refer to RFC 2865 for details on these attributes, additional notes for certain attributes are included below.
- User-Name
- NAS-IP-Address
- NAS-Port
- Called-Station-ID: Contains (1) the Meraki access point's MAC address (all caps, octets separated by hyphens) and (2) the Service Set Identifier (SSID) on which the wireless device is connecting. These 2 fields are separated by a colon. Example: "AA-BB-CC-DD-EE-FF:SSID_NAME".
Note: SSIDs broadcasted by repeater access points in a mesh deployment can't use NAS-IP-Address attribute because repeater access points do not have IP addresses assigned. You can use NAS-ID attribute instead, which by default carries NODE_MAC:VAP_NUM.
- Calling-Station-ID: Contains the MAC address of the wireless device (all caps, octets separated by hyphens). Example: "AA-BB-CC-DD-EE-FF".
- Framed-MTU
- NAS-Port-Type
- Connect-Info
- Meraki-Device-Name: Name of the Meraki device as configured in the dashboard
The following attributes are honored by Cisco Meraki when received in an Access-Accept message from the customer's RADIUS server to the Cisco Meraki access point:
- Tunnel-Private-Group-ID: Contains the VLAN ID that should be applied to a wireless user or device. (This can be configured to override VLAN settings that an administrator has configured for a particular SSID in the Cisco Meraki Cloud Controller.)
- Tunnel-Type: Specifies the tunneling protocol. Example: VLAN.
- Tunnel-Medium-Type: Sets the transport medium type used to create the tunnel. Example: 802 (which includes 802.11).
- Filter-Id / Reply-Message / Airespace-ACL-Name / Aruba-User-Role: Any of these attributes can be used to convey a policy that should be applied to a wireless user or device. (Please ensure that the attribute type matches what is configured on the Network-wide > Configure > Group policies page in the Cisco Meraki Cloud Controller, and the attribute value matches the name of the group policy configured on that page.)
RADIUS Configuration
The most common EAP configuration is PEAP with MSCHAPv2, which prompts users for credentials (either user or machine authentication).
Note: Certificate-based authentication using EAP-TLS is also supported by the Meraki platform, but is outside the scope of this document. For more information, refer to the documentation on RADIUS: WPA2-Enterprise With EAP-TLS.
RADIUS Server Requirements
There are many server options available for RADIUS, which should work with MR access points if configured correctly. Please refer to your RADIUS server documentation for specifics, but the key requirements for WPA2-Enterprise with Meraki are as follows:
- The server must host a certificate from a Certificate Authority (CA) trusted by clients on the network.
- All gateway access points broadcasting the WPA2-Enterprise SSID must be configured as RADIUS clients/authenticators on the server with a shared secret.
- The RADIUS server must have a user base to authenticate against.
Once the RADIUS server is configured, refer to the Dashboard Configuration section below for instructions on how to add your RADIUS server to dashboard.
User vs. Machine Authentication
The most common method of authentication with PEAP-MSCHAPv2 is user authentication, in which clients are prompted to enter their domain credentials. It is also possible to configure RADIUS for machine authentication, in which the computers themselves are authenticated against RADIUS, so the user doesn't need to provide any credentials to gain access. Typically, you can use EAP-TLS to configure machine authentication. However, some RADIUS server options make it simple to use PEAP-MSCHAPv2 to configure machine authentication (including Windows NPS, outlined in the example configuration below).
Note: "Machine Authentication" is not the same as MAC-based authentication, which is another configuration option in dashboard under Wireless > Configure > Access Control. Machine authentication, specifically, refers to devices authenticating against RADIUS.
Example RADIUS Configuration (Windows NPS + AD)
The following example configuration outlines how to set up Windows NPS as a RADIUS server, with Active Directory (AD) acting as a userbase:
- Add the NPS role to Windows Server.
- Add a trusted certificate to NPS.
- Add APs as RADIUS clients on the NPS server.
- Configure a policy in NPS to support PEAP-MSCHAPv2.
- (Optional for machine auth) Deploy PEAP-MSCHAPv2 wireless network settings to domain member computers using Group Policy.
Add the NPS Role to Windows Server
Microsoft's RADIUS server offering for Windows Server 2008 and later is their NPS. Please refer to the following two Microsoft documents for instructions on adding the NPS role to Windows Server, and registering the new NPS server in Active Directory (allowing it to use AD as its userbase):
Add a Trusted Certificate to NPS
A RADIUS server must host a certificate that allows both network clients and Meraki access points to validate the server's identity. There are three options for this certificate:
- Acquire a certificate from a trusted Certificate Authority
As long as the CA used is trusted by clients on the network, a certificate can be purchased and uploaded to NPS to verify server identity (required by clients). Common examples of trusted CAs include GoDaddy and VeriSign. - Implement a Public Key Infrastructure (PKI) and generate a certificate (advanced)
A PKI can be used on the network to issue certificates trusted by clients on the network. We recommend you have a strong understanding of PKI for this option. - Generate a self-signed certificate and turn off client server validation (insecure)
You may generate a self-signed certificate for testing/lab purposes. However, clients will not trust a self-signed certificate and you will need to disable server validation to connect.
We do not recommend this option for production deployment, due to dramatically reduced security.
Once a certificate is acquired, refer to the Import a Certificate section of Microsoft's documentation for instructions on how to import a certificate.
Add Access points as RADIUS Clients on the NPS Server
In this scenario, access points communicate with clients and receive their domain credentials, which the access point then forwards to NPS. In order for the NPS to process an access point's RADIUS access-request message, you must first add the access point as a RADIUS client/authenticator by its IP address. Since only gateway access points have an IP address on the LAN, all gateway access points in the network must be added to NPS as RADIUS clients.
To quickly gather all gateway access point's LAN IP addresses, navigate to Wireless > Monitor > Access points in dashboard, ensure that the "LAN IP" column has been added to the table, and take note of all LAN IPs listed. Access points with a LAN IP of "N/A" are repeaters and they do not need to be added as RADIUS clients:

Once a list of gateway access point's LAN IPs has been gathered, please refer to Microsoft's documentation for instructions on adding each access point as a client in NPS. Take note of the shared secret configured in NPS, which is referenced in the dashboard.
Note: To save time, entire subnets can also be added to NPS as RADIUS clients, and any requests coming from that subnet will be processed by NPS. This is only recommended if all access points are on their own management VLAN and subnet, to reduce security risks.
In many cases each RADIUS authenticator must be added to the RADIUS authentication server such as Microsoft NPS or Cisco ISE. For VPN concentration and concentrated Layer 3 roaming SSIDs, only concentrators would need to be added to the RADIUS authentication server.
Configure a Policy in NPS to Support PEAP-MSCHAPv2
NPS must be configured to support PEAP-MSCHAPv2 as its authentication method.
This is accomplished in three steps, outlined below for NPS in Windows Server 2008:
- Create an NPS Policy
- Change the Policy Process Order
- Disable Auto Remediation
Creating an NPS Policy
- Open the Network Policy Server console.
- Select NPS(Local), so you see the Getting Started pane.
- Select RADIUS server for 802.1X Wireless or Wired Connections in the Standard Configuration drop down.
- Click Configure 802.1X to begin the Configure 802.1X Wizard.
- When the Select 802.1X Connections Type window appears select the radio button Secure Wireless Connections and type a Name: for your policy or use the default. Click Next.
- Verify the access points you added as RADIUS clients on the Specify 802.1X switches window. Click Next.
- For Configure an Authentication Method select Microsoft: Protected EAP (PEAP).
- Click Configure to review the Edit Protected EAP Properties. The server certificate should be in the Certificate issued drop down. Make sure Enable Fast Reconnect is checked and EAP type is Secure password (EAP-MSCHAPv2). Click OK. Click Next.
- When the Specify User Groups window appears click Add.
- Type or find the Domain Users group. This group should be located in the same domain as your RADIUS server.
Note: If RADIUS is being used for Machine Authentication, find the Domain Computers group instead. - When the group is added click OK. Click Next.
- Click Next on Configure a Virtual LAN (VLAN) window.
- When then Completing New IEEE 802.1X Secure Wired and Wireless Connections and RADIUS clients appears click Finish.
Change the Policy Process Order
- Navigate to Policies>Connection Request Policies. Right click the wireless policy and Move Up so it is process first.
- Navigate to Policies>Network Policies. Right click the wireless policy and Move Up so it is process first.
Disable Auto Remediation
- Navigate to Policies>Network Policies. Right click the wireless policy and select Properties.
- On the Setting tab for the policy uncheck the box Enable auto-remediation of client computers and click OK.
The following image outlines an example of an NPS policy that supports user authentication with PEAP-MSCHAPv2:

(Optional) Deploy a PEAP Wireless Profile using Group Policy
For a seamless user experience, it may be ideal to deploy a PEAP wireless profile to domain computers so users can easily associate with the SSID. Though optional for user auth, this is strongly recommended for machine authentication.
The following instructions explain how to push a PEAP wireless profile to domain computers using a GPO, on a Domain Controller running Windows Server 2008:
- Open the domain Group Policy Management snap-in.
- Create a new GPO or use an existing GPO.
- Edit the GPO and navigate to Computer Configuration > Policies > Windows Settings > Security Settings > Public Key Policies > Wireless Network (IEEE 801.X) Policies.
- Right Click Wireless Network (IEEE 801.X) Policies and choose Create a New Windows Vista Policy.
- Provide a Vista Policy Name.
- Click Add for Connect to available networks.
- Choose Infrastructure.
- On the Connection tab, provide a Profile Name and enter the SSID of the wireless network for Network Name(s). Click Add.
- Click the Security tab. Configure the following:
- Authentication: WPA2-Enterprise or WPA-Enterprise
- Encryption: AES or TKIP
- Network Authentication Method: Microsoft: Protected EAP (PEAP)
- Authentication mode: Computer Authentication (for machine auth)
-
Click Properties.
-
For Trusted Root Certification Authorities select the check box next to the appropriate Certificate Authorities and click OK.

-
Click OK to close out and click Apply on wireless policy page to save the settings.
-
Apply the GPO to the domain or OU containing the domain member computers (refer to Microsoft's Deploying Group Policy documentation for details).
Dashboard Configuration
When a RADIUS Server is added to the configuration, it will disconnect current clients connected to the SSID.
Once a RADIUS server has been set up with the appropriate requirements to support authentication, the following instructions explain how to configure an SSID to support WPA2-Enterprise, and authenticate against the RADIUS server:
- In dashboard, navigate to Wireless > Configure > Access control.
- Select your desired SSID from the SSID drop down (or navigate to Wireless > Configure > SSIDs to create a new SSID first).
- For Security choose Enterprise with my RADIUS server.
- Under RADIUS click Add server
- Enter the following information in the table:
- Host IP or FQDN*: IP address or FQDN of your RADIUS server, reachable from the access points.
- Auth port: UDP port of the RADIUS server listens on for Access-Requests; 1812 by default.
- Secret: RADIUS client shared secret
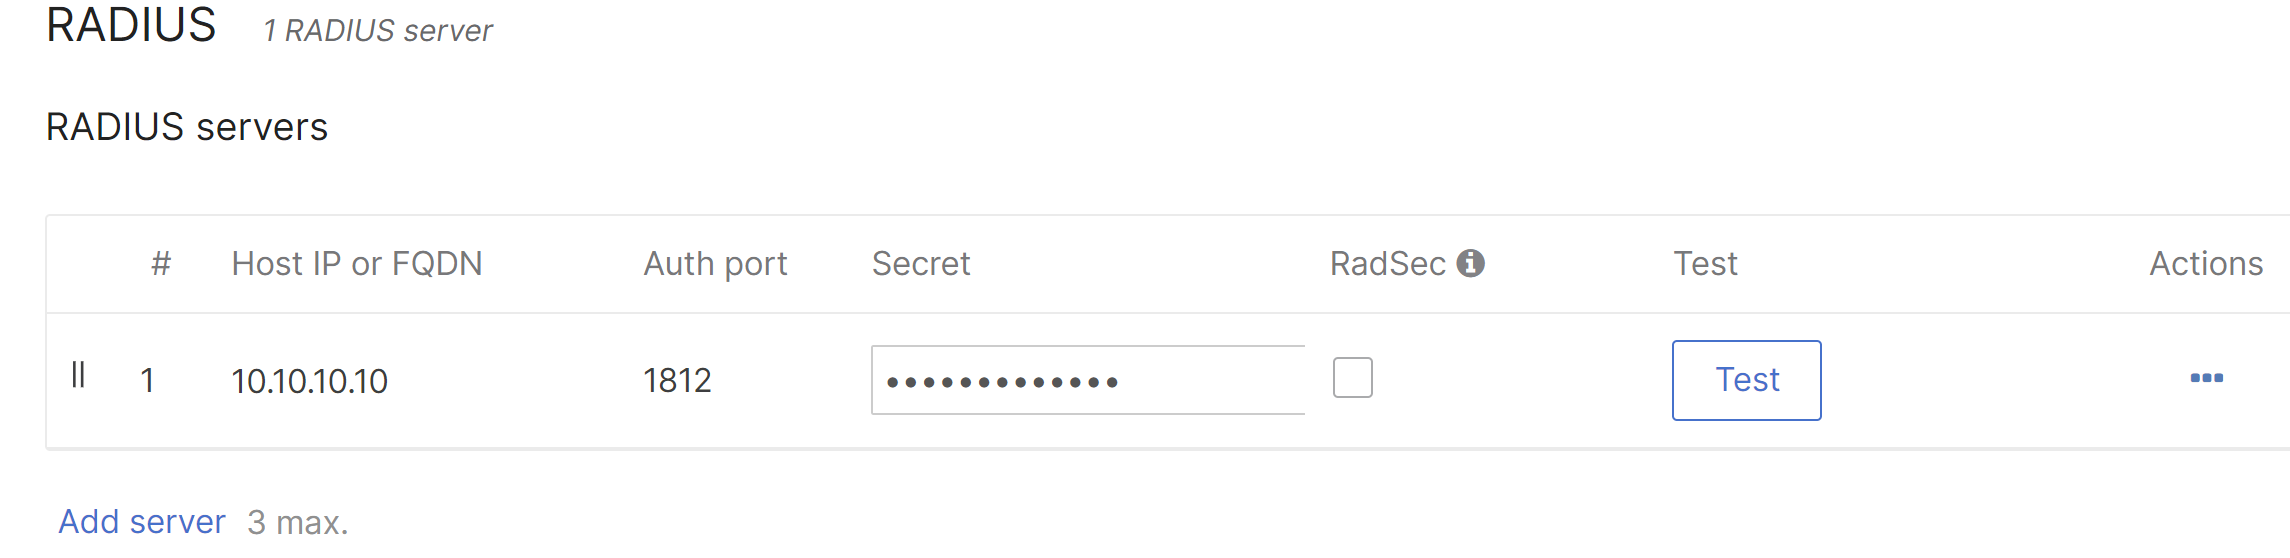
6. Click the Save button.
*The network and all the access points must be running MR28.0+ to support FQDN.
Aside from the RADIUS server requirements outlined above, all authenticating access points will need to be able to contact the IP address and port specified in dashboard. Make sure that your access points all have network connectivity to the RADIUS server and no firewalls are preventing access.
VLAN Tagging Options
Dashboard offers a number of options to tag client traffic from a particular SSID with a specific VLAN tag. Most commonly, the SSID will be associated with a VLAN ID (see VLAN Tagging on MR Access Points), so all client traffic from that SSID will be sent on that VLAN.
With RADIUS integration, a VLAN ID can be embedded within the RADIUS server's response. This allows for dynamic VLAN assignment based on the RADIUS server's configuration. Please refer to our documentation regarding Per-User VLAN tagging for configuration specifics.
Testing RADIUS from Dashboard
Dashboard has a built-in RADIUS test utility, to ensure that all access points (at least those broadcasting the SSID using RADIUS) can contact the RADIUS server:
- Navigate to Wireless > Configure > Access control.
- Ensure that WPA2-Enterprise was already configured based on the Dashboard Configuration section of this article.
- Under RADIUS servers, click the Test button for the desired server.
- Enter the credentials of a user account in the Username and Password fields.
- Click Begin test.
- The window will show progress of testing from each access point in the network, and then present a summary of the results at the end.
- APs passed: Access points that were online and able to successfully authenticate using the credentials provided.
- APs failed: Access points that were online but unable to authenticate using the credentials provided. Ensure the server is reachable from the access points and the access points are added as clients on the RADIUS server.
- APs unreachable: Access points that were not online and thus could not be tested with.
When using the RADIUS Test tool on the Dashboard and an AP fails the test, the pop-up displays a link to a list of all the alerting APs, including those alerting due to 802.1X failures and other issues. A delay of up to 5 minutes between an AP failure due to an 802.1X failure and the Dashboard reporting an alert is expected.
RADIUS Accounting
Optionally, RADIUS accounting can be configured on an SSID that's using WPA2-Enterprise with RADIUS authentication. When RADIUS accounting is configured, "start" and "stop" accounting messages are sent from the access point to the specified RADIUS accounting server.
The following instructions explain how to configure RADIUS accounting on an SSID:
- Navigate to Wireless > Configure > Access control and select the desired SSID from the dropdown menu.
- Under RADIUS accounting servers, click Add a server.
Note: Multiple servers can be added for failover. RADIUS messages will be sent to these servers in a top-down order. - Enter the details for:
- Host IP or FQDN (the IP address or FQDN the access points will send RADIUS accounting messages to)
- Auth port (the port on the RADIUS server that is listening for accounting messages; 1813 by default)
- Secret (the shared key used to authenticate messages between the access points and RADIUS server)
- Click Done and then Save changes.
At this point, "Start" and "Stop" accounting messages will be sent from the access points to the RADIUS server whenever a client successfully connects or disconnects from the SSID, respectively.
Configuring WPA2-Enterprise with RADIUS using Cisco ISE
Cisco Meraki access points can be configured to provide enterprise WPA2 authentication for wireless networks using Cisco Identity Services Engine (ISE) as a RADIUS server. This article will cover instructions for basic integration with this platform. For more detailed information on how to configure Cisco ISE, please refer to the Cisco Identity Services Engine User Guide.
Prerequisites
- Cisco ISE installed and reachable from the access points
- An SSID configured to use WPA2-Enterprise pointing to the Cisco ISE server
Installing Server Certificates
After installation, Cisco ISE generates, by default, a self-signed local certificate and private key, and stores them on the server. This certificate will be used by default for WPA2-Enterprise. In a self-signed certificate, the hostname of Cisco ISE is used as the common name (CN) because it is required for HTTPS communication.
Note: Using a self-signed certificate is not recommended for RADIUS. In order to use the default self-signed cert, clients will need to have RADIUS server's identity validation disabled in order to connect. For certificate options on the RADIUS server you may refer to the RADIUS configuration section in this document.
Adding Managed Network Devices
- In Cisco ISE, choose Administration > Network Resources > Network Devices.
- From the Network Devices navigation pane on the left, click Network Devices.
-
Add, edit, or duplicate a device:
- Add: Select Add. Alternatively, click Add new device from the action icon on the Network Devices navigation pane.
- Edit: Select the check box next to a device and click Edit. Alternatively, click a device name from the list to edit.
- Duplicate: select the check box next to a device and click Duplicate.
4. In the right pane, enter the Name and IP Address.
5. Check the Authentication Settings check box and define a Shared Secret for RADIUS authentication. This must match the Secret entered for the RADIUS server when configuring the SSID in dashboard.
6. Click Submit.
Enabling Policy Sets
Cisco ISE supports policy sets (see Cisco ISE: Introduction to Policy Sets), which allows grouping sets of authentication and authorization policies, as opposed to the basic authentication and authorization policy model, which is a flat list of authentication and authorization rules. Policy sets allow for logically defining an organization's IT business use cases into policy groups or services, such as VPN and 802.1X. This makes configuration, deployment, and troubleshooting much easier.
- In Cisco ISE, choose Administration > System > Deployment > Settings > Policy Sets.
- Click the Default policy. The default policy is displayed in the right.
- Click the plus (+) sign on top and choose Create Above.
- Enter the Name, Description and a Condition for this group policy.
- Define the Authentication policy.
- Click Submit. After configuring a policy set, Cisco ISE will log out any administrators. Log in again to access the Admin portal.
Configuring an Authentication Policy
- In Cisco ISE, select the Actions menu and click Insert New Rule Above.
- Give the sub-rule a Name (Example: Dot1X).
- Click the small window icon to open the Conditions menu.
- Select Create New Condition (Advanced Option).
- Select Network Access > EAP Authentication.
- Leave the operator box set to EQUALS.
- In the last box select EAP-MSCHAPv2.
- In the Use field, select Active Directory as the identity store( see Managing External Identity Sources). Configure the Active Directory integration as appropriate for the desired deployment.
Static Client Exclusion Policies
MR 32.1.1 firmware introduces support for network administrators to block communication from clients during the 802.11 authentication phase attempting to connect to the wireless network based on listed mac addresses . Oftentimes clients either don't have the correct security policies installed or are using an incorrect cert/password for authentication. Since these client devices are trying to authenticate over and over again, this causes additional requests on the authentication server seen in the network event logs.
Static client exclusion policies allow network admins to block up to 100 MAC addresses per SSID, preventing all inbound client communication including pre and post authentication.
Note: In order to enable static client exclusion policies please contact Meraki support.
Configuration:
-
Navigate to Wireless > Firewall & Traffic Shaping in Dashboard.
-
Within the Client Exclusion section, enable the Client exclusion policies for the desired SSID.
-
In the provided text box, enter the MAC addresses you wish to block.
Note: You may add up to 100 MAC addresses to the static exclusion list.

API
The static exclusion status and static exclusion MAC list can be configured separately.
Static exclusion status
For the status, there are only index (GET) and update (PUT) endpoints
GET /organizations/{organizationId}/wireless/ssids/policies/clientExclusion/bySsid
GET optional parameters: networkIds, includeDisabledSsids, ssidNumbers
PUT /networks/{networkId}/wireless/ssids/{number}/policies/clientExclusion
Static exclusion MAC list
For the static exclusion MAC list, index (GET), bulkAdd (POST) and bulkRemove (POST) endpoints exist
GET /organizations/{organizationId}/wireless/ssids/policies/clientExclusion/static/exclusions/bySsid
GET optional parameters: networkIds, includeDisabledSsids, ssidNumbers
POST /networks/{networkId}/wireless/ssids/{number}/policies/clientExclusion/static/exclusions/bulkAdd
POST /networks/{networkId}/wireless/ssids/{number}/policies/clientExclusion/static/exclusions/bulkRemove
The API then writes the enable flag or the static exclusion list to Postgres.