
Access Manager Username/Password Authentication - EAP-TTLS/PAP with Entra ID Lookup
This article explains how to configure username and password based authentication against Entra ID to apply an identity based dynamic authorization to the users and endpoints connecting to your network.
Although certificate based authentication is the most secure method, some organizations may not have their own PKI infrastructure and/or need an alternative method such as username and password authentication. With Username/Password based authentication (EAP-TTLS/PAP) against Entra ID, you can control network access to your Managed endpoints without the need for deploying and maintaining external PKI infrastructure.
Authentication Flow
Firstly, let’s try to understand the authentication flow for this specific use case. As shown in the diagram below, our goal is to enable end-users or endpoints connect to the network (SSID or a switch port) using domain username and password.
Following is the authentication flow steps:
- The endpoint initiates the connection with the SSID or switch port.
- The network device will request the identity of the endpoint.
- The user will enter their username and password or the endpoint uses the saved credentials that will be sent to network device.
- The network device will forward the identity information within a RADIUS packet to Cisco Meraki Cloud over a Cisco proprietary AES-256-bit encrypted TLS tunnel.
- Cisco Meraki Cloud will authenticate the user directly against Entra ID.
- Cisco Meraki Cloud would have already synchronized users, user groups and user attributes from Entra ID Graph API integration and stored them in its local database.
- Access Manager evaluates the session against the configured rules – a rule is matched if all the defined conditions (like user identity from Entra ID, endpoint identity, network information and others) are matched and the corresponding configured authorization will be applied as a result.
- The resulting authorization (for example SGT, VLAN and others) will be sent back to the network device for enforcement.
- The endpoint will be connected successfully.

Configuration Steps
This section covers the configuration steps at a high-level to explain various components of the workflow. The configuration needed for this use case can be broken down into following steps:
- Configure endpoints for username and password authentication
- Configure Entra ID integration to synchronize users, user groups and user attributes
- Configure SSIDs and Switches to use Access Manager
- Configure authorizations to be used – SGTs, VLANs, Group Policies and others
- Configure Access Manager rules for policy evaluation
Configure Endpoints For Username/Password Authentication
Refer to the following article to view OS level instructions in configuring your endpoints for Username and Password authentication against Access Manager: Access Manager - EAP-TTLS Client Configuration (Windows, macOS and iOS)
Configure Entra ID Integration
Configure Entra ID integration to synchronize all the users, user groups and attributes and store them in Cisco Meraki Cloud database. A proactive synchronization occurs every six hours, and you can initiate a manual synchronization at any time.
Refer to our documentation Organization End Users for more detailed instructions.
Entra ID integration synchronizes users, user groups, and user attributes. However, since password synchronization is not allowed, the integration is also used to perform real-time username and password authentication against Entra ID for Username/Password authentication flows. After successful authentication, Access Manager performs a user lookup against the synchronized Entra ID database. The session is then evaluated against the configured access rules to determine authorization (e.g., SGT, VLAN) based on user groups like HR and Finance or other attributes from Entra ID.
Important: Make sure to set these API permissions at minimum and grant admin consent :
- Graph API> Application > Directory.Read.All
- Graph API > Application > User.Read.All
- Graph API > Delegated > User.Read

Configure Wireless And Wired Networks To Use Access Manager
Wireless - Configure SSID Access Control Settings
-
Assuming, you already have an MR added to your Meraki dashboard and licensed appropriately, navigate to Wireless > Configure > Access control.
- Choose the SSID you want to use for this use case.

- Navigate to Security section and choose Enterprise with Access Manager as shown below:

Extended Local Auth is only applicable for certificate (EAP-TLS) based authentication. Selecting this will ensure that this certificate chain is downloaded on all the MRs that are configured with an SSID that uses Access Manager. In the event of Cisco Meraki Cloud not being reachable, any new endpoints trying to authenticate will be authenticated by the local RADIUS server on each MR using the certificate it downloaded previously. Note that the rules evaluation will not work but instead, the VLAN configured on the SSID will be applied to the session after successful authentication. Make sure to enable this on both the certificate and the SSID Access Control Page.
- Can change any other SSID settings like Client IP and VLAN assignment and others as needed and click save at the bottom.
Wired - Configure Access Policy and Switch Port
For Wired connections, you will need to configure an Access Policy that uses Access Manager as the authentication method and attach that Access Policy to the switch port where the endpoint/s will be connecting to.
Following are the steps at a high-level to configure access policy and switch ports to use Access Manager as the authentication server:
For detailed instruction on how to configure Access Policies, refer to our documentation on Access Policy.
-
Assuming, you already have an MS added to your dashboard and licensed appropriately, navigate to Switching > Configure > Access Policies.
-
Click on Add policy.
-
Choose Access Manager from Authentication method dropdown.
-
Configure other settings like 802.1X or Hybrid Authentication as Policy Type, Single-Host for Host mode and others as desired for the use case.

- Navigate to Switching > Monitor > Switches and select the switch you would like to attach the configured access policy.
- Click on one of the ports where the endpoint/s will be connected to and where you would like to attach the configured access policy.
- Click Edit button next to Configuration and Status.
- Select Access for Type.
- Choose previously created Access Policy (Wired PCs in this example) from the Access Policy dropdown menu.
- Click on Update.
- Optionally, you can update multiple ports at a time by navigating to Switching > Monitor > Switch Ports and selecting multiple ports.

Configure Access Manager Rules
Now that we have everything in place, it is time to configure the Access Manager rules which will determine what authorization (SGTs, VLANs, Group Policies) will be applied to the endpoints when they authenticate.
The rule framework is very straightforward – define the matching criteria and define the corresponding authorization result to be assigned. Following are the steps needed for this configuration:
Access rules are evaluated sequentially from top to bottom. A session will match a rule ONLY IF ALL the conditions specified in the "What's Matched" section are satisfied. This means the conditions are linked by an "AND" operator, requiring each condition to be met for a successful match. If a rule is not matched, the evaluation process continues to the next rule in the list until the default rule is reached.
- Following is an example rule that we will use to illustrate on how to configure rules:

- Navigate to Access Manager > Policies > Access Rules.

For this Early Access Preview, we only support one rule group (default rule group) with the ability to add multiple rules under it.
- To add a rule, click on Add a rule. Name and enable the rule.
- Under What’s matched section, choose Attribute source dropdown.
- Then, you will be able to select attribute and enter values you want to match – as an example, we selected a Product Management group from Entra ID integration.

- Under Authorization section, click on Access permission dropdown to choose an option.
- VLAN ID/name: Assigns a VLAN ID or VLAN name. For successful connection, make sure that the VLAN entered here is present in the network where the endpoint is authenticating.
- Voice domain: Enabling this will ensure that voice traffic is permitted.
- Adaptive policy: Assigns an Adaptive Policy Group (and corresponding SGT value).
Refer to our Adaptive Policy documentation on how to implement zero-trust micro-segmentation policies through Adaptive Policy.
- Identity PSK: Applicable for MAC Authentication Bypass use case only. Assigns a key to the session and if the key entered by the endpoint matches the key assigned, the rule will be matched and corresponding authorization (VLAN, Adaptive policy and others) will be applied.
- Group policy: Assigns a group policy.
Refer to our Group policy documentation on how define and apply a list of rules, restrictions, and other settings to the endpoints that are connecting to your network.
- As an example, we selected Allow restricted access, assigned FTE Laptops Adaptive Policy Group (SGT) and VLAN 250 that we created earlier. Click save after the selections.

- Now, any endpoint matching the criteria defined in the rule (Entra ID Group = Product Management) will be matched with the rule and corresponding authorization (VLAN = 250 and Adaptive Policy = FTE-Laptops) will be applied.
Troubleshooting
If there are any issues in signing in users, make sure to confirm the following:
-
Verify username and password: Verify that the correct username and password are entered while authenticating.
- Verify password used is not a temporary password: Temporary passwords for the users are not supported on this flow. To change the temporary password for a user, login to any Microsoft portal (eg: portal.azure.com) to manually set the password.
- Verify access rule configuration: Verify that the access rules configured (Access Manager > Policies > Access Rules) are correct and include matching criteria for the authentication. Following is an example access rule:

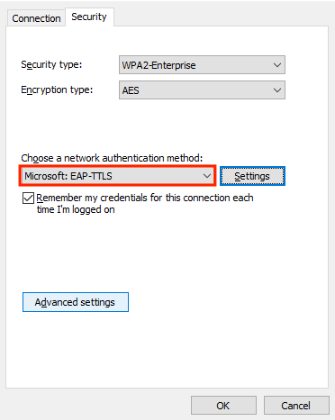
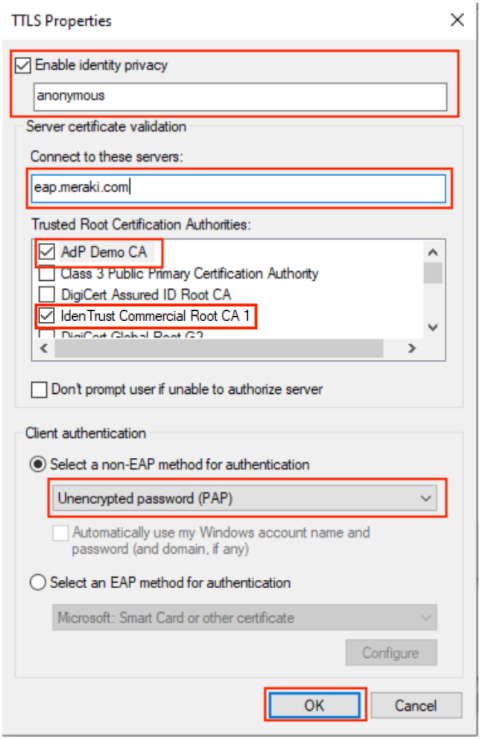
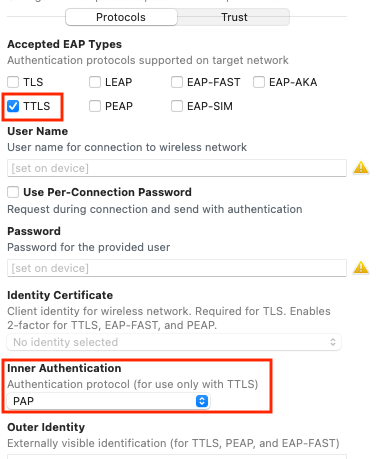
- Verify wired/wireless supplicant configuration: Verify that the wired/wireless supplicant configured on the endpoint includes EAP-TTLS as the authentication method and PAP as the inner method (macOS) / non-EAP method (windows) at minimum.
For detailed instructions, Refer to: Access Manager - EAP-TTLS Client Configuration (Windows, macOS and iOS)
- Windows:
 .
. 
- macOS (using apple configurator)
- Windows:
- Verify API permissions on Entra ID: Verify that the following API permissions are added on Entra ID app registration that was configured for the integration:
- Graph API> Application > Directory.Read.All
- Graph API > Application > User.Read.All
- Graph API > Delegated > User.Read
Note: Click on "Grant admin consent for Default Directory" after adding the the above permissions. Make sure the status shows "Granted.."
- Verify security settings on Entra ID: EAP-TTLS/PAP does not support MFA authentication. It is important to exclude the "app registration" created during Entra ID integration step discussed above from MFA authentication using Conditional Access Policies. Conditional Access Policies requires a paid subscription for Entra ID. Following are overview steps:
Warning: Proceed with caution as these changes may severely impact your security settings. Following steps are for information purposes only. Many organizations may have different settings that may require changes accordingly.
Refer to following resources for more details on security defaults and conditional access:
Security defaults in Microsoft Entra ID
Conditional Access in Microsoft Entra ID
- Disable security defaults:
-
Sign in to the Microsoft Entra admin center as at least a Conditional Access Administrator.
-
Browse to Identity > Overview > Properties.
-
Select Manage security defaults.
-
Set Security defaults to Disabled.
-
Select Save.

-
- Configure conditional access policies:
- Sign in to the Microsoft Entra admin center as at least a Conditional Access Administrator.
-
Browse to Protection > Conditional access.
-
Select Create a new policy.
-
Enter the Name and select All users under Users.
-
Select Target resources > Exclude > Select resources > Select > Select "app registration" created in Entra ID integration step.
-
Select Grant > Grant access > Require multifactor authentication.
-
Select On under Enable Policy.
-
Select Create.
-
Make sure that you do not have any other policies that are applying MFA to all users.
