
Best Practices for Meraki Firmware
Click 日本語 for Japanese
Introduction to Meraki Firmware
Cisco Meraki has always prided itself on delivering powerful networking and IT solutions in a simple, easy to manage fashion. This extends to firmware management on Meraki devices. Cisco Meraki designs firmware to be simple to manage, reliable to run, and safe to upgrade. While firmware updates have traditionally been complex and risky, Meraki removes much of that burden through cloud-based delivery, automation, and clear guidance.
Meraki firmware balances rapid innovation with long-term stability. To support everything from labs and pilots to mission-critical production networks, firmware is organized into clear release stages with explicit recommendations for when to use each.
This document outlines best practices for testing, deploying, and operating Meraki firmware confidently across networks of any size.
Why the Cloud Makes Us Different
Meraki delivers firmware through its cloud-based Dashboard, enabling centralized deployment, scheduling, and management - without manual image handling, on-site intervention, or complex tooling. New features, fixes, and improvements become available immediately in Dashboard, along with guidance on which versions are production-ready and recommended.
This cloud architecture also enables rapid security response. When vulnerabilities are identified, fixes can be developed, validated, and made available quickly, with deployment staged or accelerated based on risk and customer impact. Cloud visibility, real-world telemetry, and controlled rollout allow Meraki to protect networks while minimizing disruption.
Built for Security and Rapid Response
Security threats evolve continuously, and network infrastructure must be able to respond just as quickly. Meraki’s cloud architecture enables rapid detection, validation, and remediation of vulnerabilities at scale.
When a security issue is identified:
- Fixes can be developed, tested, and validated quickly
- Updated firmware can be made available immediately in Dashboard
- Deployment can be staged or accelerated based on risk and customer impact
Simplified Firmware Updates
Meraki is designed to work well by default, while still offering flexibility when needed. Many customers rely on automated upgrades with a defined maintenance window, while others choose to manage firmware versions more directly per network - all through the same Dashboard experience.
Firmware is delivered in a controlled, staged manner, helping most customers stay current with minimal effort. For production environments, Meraki highlights a Recommended Release - the most widely adopted and proven version for each product family - so administrators don’t need to interpret release mechanics or guess which version to run.
Customers always retain control:
- Recommended Release provides the lowest operational risk and is the default choice
- Generally Available firmware enables earlier access to new production features
- Beta firmware supports testing and validation in controlled environments
Cloud-Delivered, Trust-Driven Updates
Firmware is delivered through the cloud platform, enabling fast, reliable distribution at global scale. This approach allows Meraki to validate firmware continuously across real-world deployments and respond quickly to security, stability, and performance needs.
As a result:
- New firmware is available immediately in Dashboard
- Updates are rolled out in a controlled, staged manner
- Most customers stay current with minimal effort
Cisco Meraki Firmware Release Stages
Meraki firmware is delivered through 3 release stages. Each stage reflects a different balance between early access, feature velocity, and operational risk.
|
Beta
|
Generally Available (GA)
|
Recommended Release
If you are unsure which firmware to deploy, Recommended Release is the safest option. |
|
Lifecycle Before Feb 2026
|
Lifecycle Before Feb 2026
|
Lifecycle Before Feb 2026
|
Meraki Firmware Conventions
Meraki firmware nomenclature is the same across products and consists of a major, minor, maintenance, and hotfix number as part of the name.
Meraki's version numbering scheme is designed to help users understand the different levels of updates to their firmware. Major versions are typically more significant than minor versions, and they should be carefully considered before upgrading. Minor versions and maintenance versions are typically less significant, and they can be upgraded more easily.
The firmware version is named using the format given below:
<Product Name> <Major Version>.<Minor Version>.<Maintenance Version>.<Hotfix Version (if applicable)>.
| Firmware Version Type | Description |
| Major | A new major firmware version is released with the launch of new products, technologies and/or major features. |
| Minor | A new minor firmware version is released throughout the lifespan of a major firmware version and may contain new features along with bug fixes. |
| Maintenance | A new Maintenance firmware version is released throughout the lifespan of a minor firmware version and contains bug fix updates to each minor release version. |
| Hotfix | A new hotfix firmware version contains urgent fixes for a minor firmware release version that cannot wait for or be included in the next maintenance firmware version. |
MX appliances use an updated version of this convention that will be supported through the Dashboard UI and API in future updates.
- Major Versions (major changes, representing a family of feature releases)
- Minor Versions (represents the feature release within the major version and includes new features)
- Point Release (takes minor version definition)
For MX appliances, the user interface combines the minor and maintenance/point release numbers. For instance, MX 18.1.05 will appear as MX 18.105 in the UI, where '1' signifies the minor version and '05' represents the maintenance/point release. This means MX 18.201 indicates a different minor version (2) and maintenance release (01) compared to any 18.1XX releases.
Meraki firmware release cycle consists of three stages during the firmware rollout process namely beta, release candidate (RC), and stable firmware. This cycle is covered in more detail in the Meraki Firmware Development Lifecycle section of this document.
Automated Firmware Upgrades
Meraki aims to simplify networking, in part by automating firmware upgrades. To simplify firmware management and help keep networks secure and reliable, Cisco Meraki uses automated firmware upgrades for qualified networks.
Automated upgrades are designed to balance stability, security, and uptime. They allow Meraki to deploy thoroughly validated firmware across the install base in a controlled and predictable manner, while still giving administrators full visibility and control.
How automated upgrades work
When a new firmware version becomes available, it is immediately visible in Dashboard and can be upgraded manually at any time. Automated upgrades, however, are rolled out gradually and do not occur immediately upon release.
Instead, Meraki schedules automated upgrades over time to ensure safe deployment at scale. Depending on network size, device count, and configuration complexity, this process may take several weeks to complete across all eligible networks.
All qualified networks are eligible for automated upgrades, though automated upgrades alone may not meet the needs of every organization’s firmware management strategy.
What firmware versions are selected
By default, automated upgrades target production-ready firmware:
- Recommended Release is the default target for scheduled upgrades
- Generally Available (GA) firmware may also be selected in some cases
- Beta firmware is never deployed automatically unless explicitly enabled
Automated upgrades to beta firmware occur only for networks that:
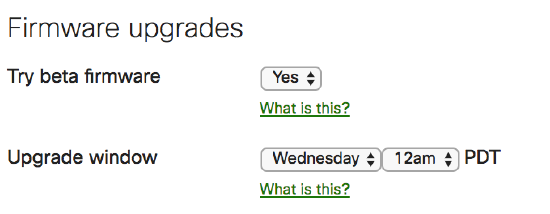
- Have enabled Try beta firmware under Network-wide > Configure > General, or
- Are already running an older beta firmware version
Administrators are always notified by email in advance when an automated upgrade is scheduled.
Why upgrades may be delayed
Meraki may delay or stage automated upgrades to reduce risk and protect network availability. Factors that can affect deployment timing include:
Potential compatibility issues between firmware versions
- The number of devices downloading firmware simultaneously
- Network configurations that require additional caution
- High-impact security, uptime, or stability considerations
If any of these factors present elevated risk, Meraki may wait to deploy until those risks are mitigated.
Administrator control of automated upgrades
- Automated upgrades are designed to reduce operational overhead, but they do not remove administrator control
- All scheduled upgrades can be viewed, rescheduled, or canceled
- Administrators can manually upgrade networks at any time from Organization > Firmware upgrades
Manual upgrades at any time
Manual upgrades are recommended when:
- A faster upgrade timeline is required
- Coordinating changes with business or maintenance windows
- Testing or validating specific firmware versions
Administrators and network alert recipients will be notified when an automated firmware upgrade is scheduled. By default, these upgrades are scheduled at least 1 to 2 weeks from the date of notification. Additionally, a notification banner within dashboard will be present for organization administrators after the upgrade has been scheduled. Networks that do not contain devices or where all devices are dormant will have upgrades scheduled immediately.
This firmware upgrade process cannot be opted out of, as it is a core service provided by Meraki; however, the upgrade(s) may always be rescheduled.
Automated firmware upgrade decisions are made on a per-network basis. As a result, if an upgrade is to be deployed, it may or may not be deployed to all networks in the organization with that device type.
Automated firmware upgrades do not occur on a fixed timetable. As a result, a network running older beta firmware may not be immediately upgraded to recently released beta firmware.
Some networks might not get a firmware upgrade scheduled due to various reasons. We recommend network administrators check all of their Dashboard networks periodically for available firmware upgrades and upgrade them manually to the latest firmware versions in such scenarios.
General Firmware Best Practices
Meraki is designed to make firmware management intuitive and low risk. Through the Dashboard, firmware updates are tested, validated, and deployed in a way that minimizes disruption while keeping networks secure and up to date.
For most environments, Meraki recommends relying on automated firmware upgrades with default settings. These updates target thoroughly validated, production-ready firmware and allow networks to benefit from new features, performance improvements, and security enhancements with minimal administrative effort.
Default firmware behavior
By default, Meraki networks are configured with safe, conservative settings:
Beta firmware is not deployed automatically
Upgrades occur within a defined maintenance window
Scheduled upgrades default to Recommended Release
These defaults are designed to provide the lowest operational risk while maintaining flexibility.
Upgrade cadence and notifications
On average, Meraki releases new firmware for each product family approximately once per quarter. This cadence helps deliver incremental improvements while minimizing disruptive changes between versions.
When an automated upgrade is scheduled:
Administrators are notified 1–2 weeks in advance
Upgrades occur during the configured maintenance window
The upgrade can be rescheduled to a different day or time if needed
The selected maintenance window can be saved as the network default
Best practice guidance
- Use Recommended Release for production and mission-critical environments
- Adjust maintenance windows to align with business operations
- Use manual upgrades only when tighter timing or validation is required
By combining safe defaults with clear controls, Meraki enables organizations to stay current, secure, and stable—without unnecessary complexity.
Early Access to new features and fixes
If you want early access to new features and fixes, you can enable Try beta firmware for a network. Beta firmware is intended for testing and validation in controlled environments and is best used on lab networks or a small subset of production networks.
Beta firmware has already completed extensive internal automated and manual testing, but it may continue to evolve as feedback is incorporated. Running beta firmware allows you to evaluate new capabilities earlier and provide input before features become generally available.
If issues are encountered, you can roll back to a previous firmware version at any time. Rollbacks within 14 days return the network to the previously installed version; rollbacks after that period revert to the last production-ready version.
Templates
With configuration templates it is possible to push a standard configuration against multiple sites at the same time. When a network is attached to a template, the firmware is controlled by the template. It is not possible to configure a network to use a different version of firmware than what the template is configured for. In certain cases Meraki Support is able to upgrade individual devices, but this should not be relied upon as this prevents normal upgrades in the future.
Firmware Rollout Guidance for Multi-Network Deployments
For organizations with multiple sites or large-scale deployments, Meraki recommends a staged firmware rollout approach. Rolling out firmware in phases allows you to validate new functionality, observe real-world behavior, and reduce risk before deploying broadly.
This approach is especially useful when managing diverse environments, critical locations, or large numbers of devices.

Phase 1: Test Networks (Beta)
Designate one or more test networks to evaluate beta firmware when it becomes available. Test networks may include:
- Lab or non-production environments, or
- Smaller production networks that are representative of your deployment
If your organization has production networks of varying sizes or device mixes, consider maintaining more than one test network to reflect those differences.
Why test beta firmware
- Although beta firmware has already completed extensive internal testing, validating it in your own environment helps ensure compatibility with your specific configurations, your client devices and traffic patterns, business-critical workflows
- Testing beta firmware early allows you to identify issues sooner and build confidence before wider deployment.
Providing feedback during beta testing
If issues are discovered while running beta firmware contact Meraki Support to open a case. This ensures the issue is properly documented and escalated to Engineering. In some cases, a targeted fix (hotfix) may be provided for validation. Once confirmed, fixes are incorporated into subsequent beta or production-ready firmware releases.
Phase 2: Broader Production Validation (Generally Available)
After successful beta validation or if you prefer to avoid beta firmware entirely you can begin deploying Generally Available (GA) firmware to a broader set of production networks.
GA firmware is fully supported and production-ready, and this phase allows you to:
- Validate stability at scale
- Monitor performance across diverse sites
- Identify any environment-specific issues before standardizing
This step is particularly useful for organizations that want earlier access to new production features while maintaining control over rollout timing.
Phase 3: Standardized Deployment (Recommended Release)
Once a firmware version becomes a Recommended Release, it is suitable for broad, long-term deployment across your organization. Recommended Releases:
- Represent the most widely adopted and proven GA versions
- Are selected based on real-world stability and support experience
- Are the default target for scheduled upgrades
For most large or mission-critical deployments, Meraki recommends standardizing on Recommended Release to minimize operational risk and ongoing maintenance effort.
Rollback and recovery
At every stage of the rollout:
- Firmware can be rolled back if issues are encountered
- Recent upgrades can be reverted to the previously installed version
- Older rollbacks revert to the last production-ready version
This flexibility allows you to proceed with confidence, knowing recovery options are always available.
Best Practice for MR Firmware
As our wireless portfolio grows, Meraki continues to focus on delivering the high performance and high availability network that modern deployments require. To achieve this goal we focus on minimizing downtime during an upgrade, maintaining scheduling flexibility, and preserving the accuracy of your upgrade maintenance window. Most Meraki access points (APs) will reboot in less than 1 minute after an update, ensuring minimal disruption to the end user even if they need to do a firmware upgrade during working hours.
We are constantly working on improving the firmware upgrade experience and further minimizing network downtime. Please refer to the Access Point Firmware Upgrade Strategy for more details.
Additionally, when you are running a Meraki wireless network, it is important to keep a few things in mind to ensure you have a great Wi-Fi firmware deployment experience. First, make sure you keep all of your APs on a single firmware version. Many Wi-Fi features are depending on the same expected behavior among the access points. For example, if you are using L3 roaming, some different versions of firmware may not be compatible with each other for L3 roaming features in particular.
Second, when upgrading a wireless network, client devices with older drivers may have issues with new features. We test against over 100 unique client devices (including many different laptops, smartphones and legacy wireless devices with unique wireless chipsets) in our labs before shipping any wireless firmware, but it's a good idea to have a single test AP to validate clients that might be unique to your business environment. These may include a custom point of sale (POS) system or barcode scanner that is critical to your business. Again, testing these potentially unique clients on the latest Meraki beta wireless firmware is a best practice as it ensures that Meraki can be notified of any potential interoperability issue early in the development cycle.
In addition to these basic best practices, Meraki APs also include features unique to the product line that make large scale firmware updates better.
Best Practice for Large Scale Wireless Networks
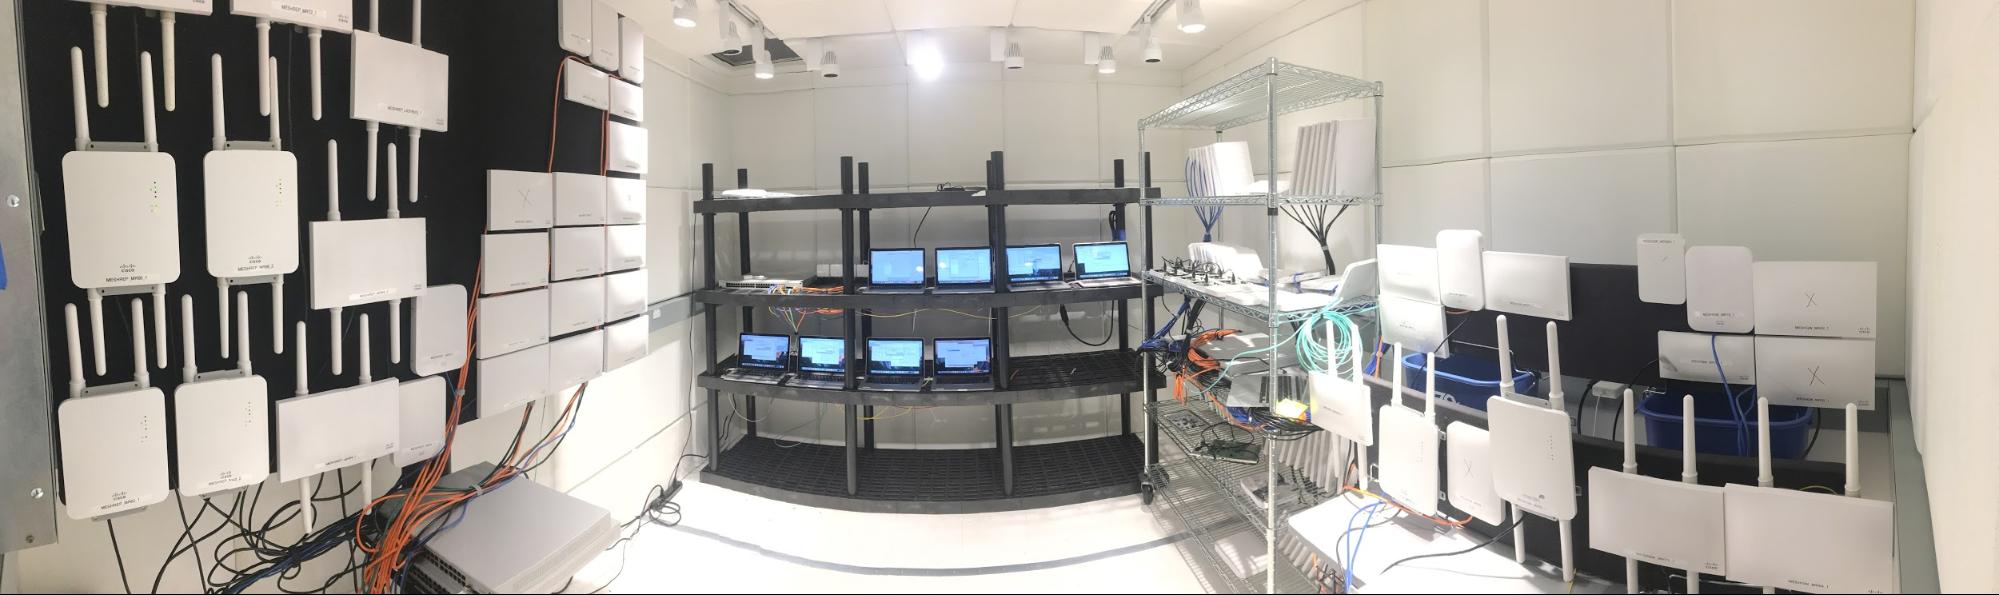
Traditionally, when running large scale campus wireless networks, upgrading wireless firmware has been considered risky. Thanks to the agile and cloud-based firmware development process used by Meraki engineers, there are a few things you can do to make these deployments less risky. Even in the largest networks, the best practice with Meraki is to designate an isolated area of your network to test and validate the newest Meraki firmware. With a designated Meraki MR test area, you can get access to validate all Meraki wireless firmware in your physical environment. This allows you to engage with Meraki engineers directly, earlier in the software development process, so you can help provide feedback on new features and identify any potential issue that may affect your deployment.
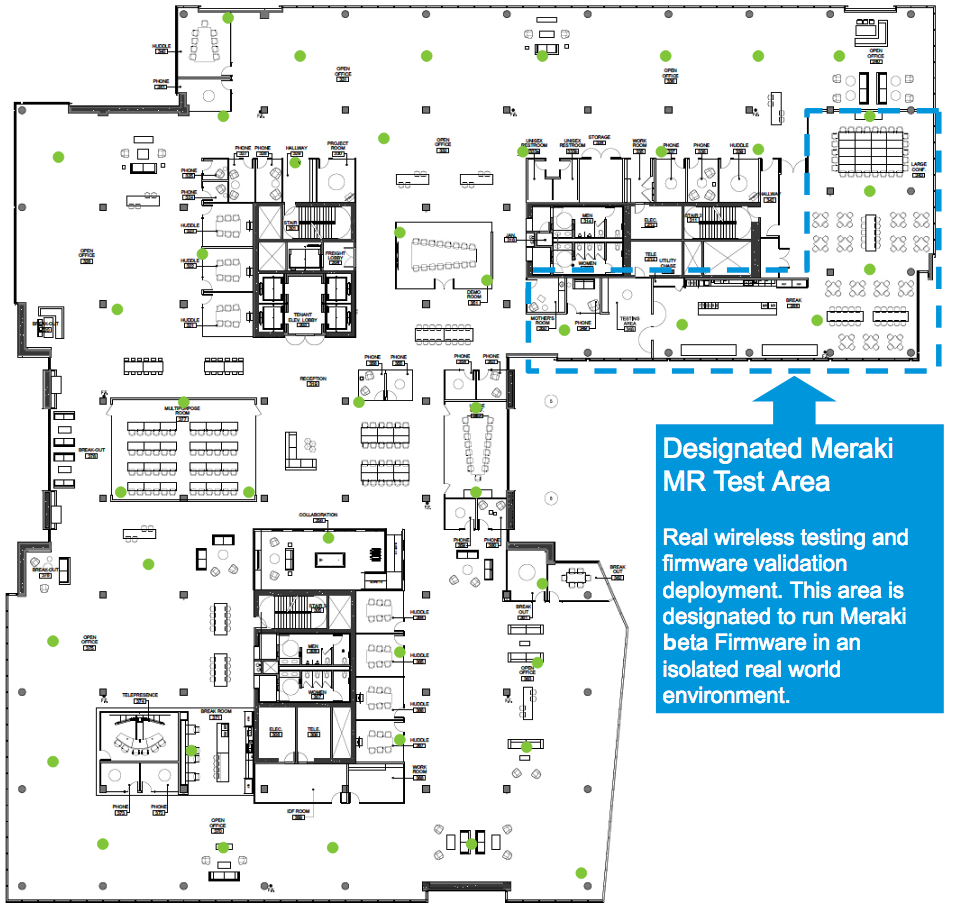
In the example above we have designated the cafeteria and a large meeting area as our Meraki test area. This was done by moving the selected APs into their own dashboard network so they could be assigned a (beta) firmware version, separate from the main network(s). This also allows the APs to be rolled back to a stable version quickly, if needed, by simply moving the APs back to the main production dashboard network.
This part of our deployment is an ideal choice for a few reasons:
- The area includes six Meraki access points, which ensures we have a reasonable number of access points to test on
- The area provides us with a diverse group of client devices, as people will bring many different smartphones and laptops to this area
- Almost all employees frequent this area of the building at some point during the day
- Because this is not a business-critical area, the impact of a potential wireless issue will be more manageable to the users
Once you have validated and are comfortable with the current firmware in the test environment, you can confidently deploy the update to the rest of your network. It is important to note that, in this example, you may occasionally have some roaming issues as users navigate in and out of the designated test area, because the deployed firmware versions may be different, and roaming may not yet be seamless between the two versions.
Best Practice for MS Firmware
When you move farther up the networking stack to switching there are additional things you need to take into consideration. It’s always important to consider the topology of your switches as, when you drive closer to the network core and away from the access layer, the risk during a firmware upgrade increases. Because of this, in a larger switch-based network you should always start the upgrade closest to the access layer. Two unique aspects of managing Meraki switch firmware is that we support both:
-
Staged upgrades to allow you to upgrade in logical increments. For instance, starting from low-risk locations at the access layer and moving onto the higher risk core
-
Automatic updates for switch stacks
When upgrading Meraki switches it is important that you allocate enough time in your upgrade window for each group or phase to ensure a smooth transition. Each upgrade cycle needs enough time to download the new version to the switches, perform the upgrade, allow the network to reconverge around protocols such as spanning tree and OSPF that may be configured in your network, and some extra time to potentially roll back if any issue is uncovered after the upgrade.
The high-level process for a switch upgrade involves the following:
-
The switch downloads the new firmware (time varies depending on your connection)
-
The switch starts a countdown of 20 minutes to allow any other switches downstream to finish their download
-
The switch reboots with its new firmware (about a minute)
-
Network protocols reconverge (varies depending on configuration)
Meraki MS devices use a “safe configuration” mechanism, which allows them to revert to the last good (“safe”) configuration in the event that a configuration change causes the device to go offline or reboot. During routine operation, if a device remains functional for a certain amount of time (30 minutes in most circumstances, or 2 hours on the MS after a firmware upgrade), a configuration is deemed safe.
When a device comes online for the first time or immediately after a factory reset, a new safe configuration file is generated since one doesn’t exist previously. Multiple reboots in quick succession during initial bringup may result in a loss of this configuration and failure to come online. In such events, a factory reset will be required to recover.
It is recommended to leave the device online for 2 hours for the configuration to be marked safe after the first boot or a factory reset.
Staged Upgrades
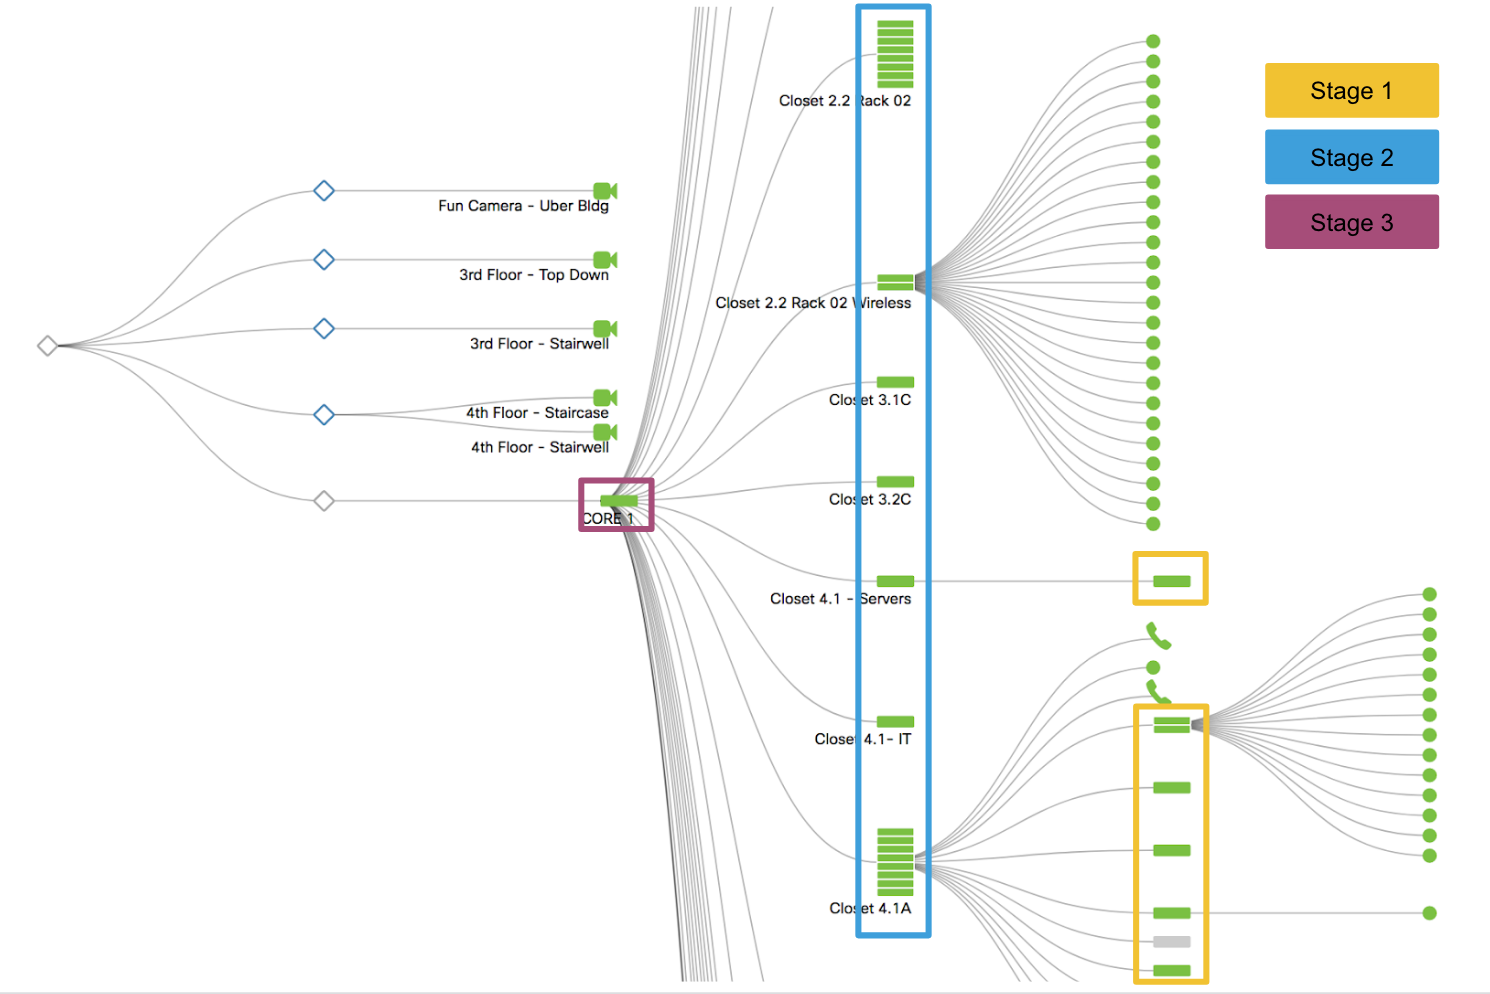
To make managing complex switched networks simpler, Meraki supports automatic staged firmware updates. This allows you to easily designate groups of switches into different upgrade stages. When you are scheduling your upgrades you can easily (as in the example below) mark multiple stages of upgrades. In this case, we started with the access layer switches in Stage 1 and gradually upgraded toward the core in Stage 3. Once you start the staged upgrade, the Stage 1 switches will complete the entire upgrade cycle before the Stage 2 upgrades start. This cycle will repeat until all the switches are upgraded in all three stages. You can find the best practice for staged upgrades outlined by our campus LAN general guidance.
Upgrading a Switch Stack
In addition to supporting staged upgrades, Meraki also simplifies managing a switch stack. As part of our upgrade toolset, we automatically handle the upgrade of the entire switch stack. This upgrade manages the upload of firmware to each switch and takes care of each reboot within the switch stack. If you are upgrading switch stacks within your staged upgrade, Meraki will automatically upgrade the switch stack as part the staged upgrades. The upgrade process for a stack follows the same high-level process outlined previously, with each stack member rebooting close to the same time and the stack then automatically re-forming as the members come online
Best Practice for MX Firmware
Unlike many other products offered by Meraki, MX appliances and Z-Series devices have a one-dashboard-network per-site model. This provides very granular control of how upgrades can be managed across the deployment.
All firmware upgrades will require that the MX appliance reboots, so it is important to ensure that an appropriate maintenance window has been put in place, as the MX upgrade process will take down the entire local network in most scenarios. Given the central/upstream nature of MX devices, it is also recommended to allow for sufficient time to monitor and test after the upgrade completes to ensure the maintenance window completes successfully.
When managing a deployment with many MXs, the following are useful best practices that can help make firmware transitions and management simpler.
Appliance Network with Two MXs in an HA Configuration
When MX appliances configured to operate in High Availability (HA) (either in NAT/routed mode or when operating as one-armed VPN concentrators), the dashboard will automatically take steps to minimize downtime when upgrades are performed to ensure a zero-downtime MX upgrade. This is achieved through the following automated process:
-
The Primary MX downloads firmware
-
The Primary MX stops advertising VRRP
-
The Secondary MX becomes active
-
The Primary MX reboots
-
The Primary MX comes online again
-
The Primary MX starts advertising VRRP again
-
The Primary MX becomes active again
-
The Secondary MX downloads firmware (approximately 15 minutes after the original upgrade is scheduled)
-
The Secondary MX stops advertising VRRP
-
The Secondary MX reboots and comes back online
Deployments using AutoVPN
When upgrading a VPN concentrator, it is important to plan for a maintenance window that allows for the upgrades to complete and for verifications to be performed that ensure connectivity is fully re-established and network systems are healthy.
It is highly recommended that customers plan for maintenance windows in accordance with the scale and complexity of the deployment where the upgrades are being performed. For example, more time should be allotted for upgrading a VPN concentrator supporting 1000 spoke sites and leveraging a dynamic routing connection between the concentrator and datacenter, than for a VPN concentrator with only 10 spoke sites.
If beta firmware is being tested on a VPN concentrator, it is best to plan for time in the maintenance window to allow for the upgrade to complete and validate the operational state after the upgrade has been completed. It is also recommended to allocate an additional window of time for rolling back to the previous build, in case you run into unmanageable issues.
When concentrators are configured in HA, they will follow the steps mentioned above. VPN tunnels will begin establishing to the spare appliance while the primary is upgrading. However, the primary appliances typically complete the upgrades fast enough that spoke sites have minimal interactions with the spare concentrator.
In general, even with equipment in HA, it is best to always be prepared for some amount of downtime and impact for spoke sites. In almost all cases these are simply a matter of seconds as spoke sites fail between concentrator pairs, but the impact can become more noticeable if there are WAN connectivity problems between the data center and spoke locations.
Meraki Firmware Development Lifecycle
As a cloud-managed platform, Meraki combines extensive internal testing with real-world telemetry from its global install base to deliver firmware that is reliable, secure, and ready for production use.
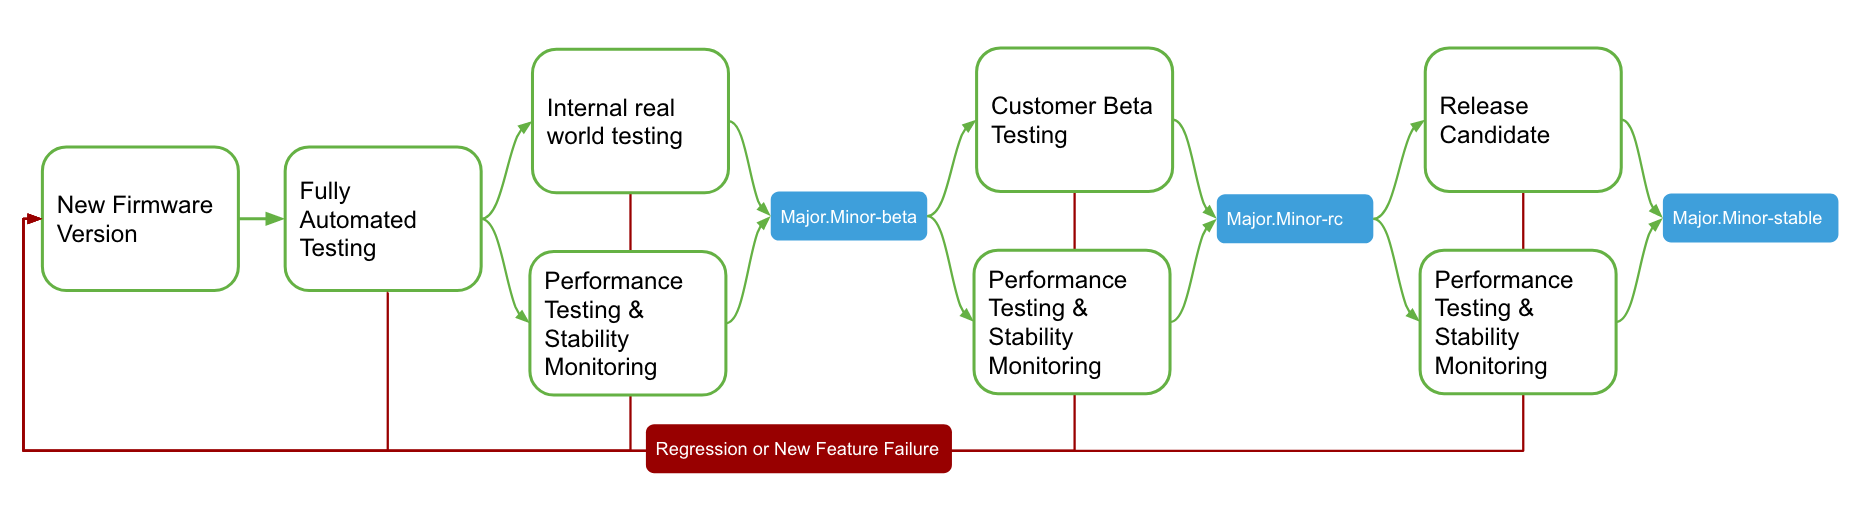
Every firmware build follows a consistent development and validation process. At each step, quality, stability, and operational impact are evaluated. If a build does not meet required standards, it is revised or rebuilt before progressing further.
This lifecycle ensures that customer-visible firmware releases are grounded in both controlled testing and real-world performance.
Internal Development and Validation
Before any firmware is made available to customers, it progresses through internal development and validation stages.
Pre-release (Alpha)
All new firmware—whether major or minor—begins with extensive automated and manual testing. These tests are designed to detect regressions, validate new features, and ensure performance and stability across supported products.
Once a build passes initial testing, Meraki deploys it internally on engineering and corporate networks. Running firmware in real-world Meraki environments for an extended period helps surface issues that may not appear in lab testing alone.
If issues are identified at any point, the build is revised and revalidated before moving forward. In rare cases where a known limitation must ship due to timing or complexity, it is explicitly documented in the release notes.
Customer-Visible Release Stages
After internal validation, firmware becomes available to customers through clear release stages.
Beta
- Beta firmware provides early access to new features and fixes.
- Has already completed internal regression, stability, and performance testing
- Intended for testing and validation in controlled environments
- Requires explicit opt-in per network
- Fully supported for the latest beta version
Customers who enable Try beta firmware are notified and can manage upgrades using the Firmware upgrades tool. Beta firmware may evolve as feedback is incorporated.
Generally Available (GA)
GA firmware represents the latest production functionality for each product family.
- Generally Available firmware is production-ready and fully supported.
- Passed all required quality and telemetry checks
- Suitable for use in production environments
- Includes major, minor, maintenance, and hot-fix releases
- Available for both manual and scheduled upgrades
Recommended Release
Recommended Release represents the most proven GA firmware for each product family.
- Selected based on:
- Broad customer adoption
- Stability and performance metrics
- Support case trends
- Designed for enterprise and mission-critical environments
- Default for newly created networks and scheduled upgrades
Recommended Release is intended to provide the lowest operational risk while minimizing the need for manual decision-making.
Older Production Versions
Earlier GA firmware versions may remain fully supported even after newer releases become available. These versions may not include the latest features but can be appropriate for environments that require a specific release due to compatibility or operational requirements.
Performing Firmware Upgrades
To make all of the best practices above simple to manage, you can use the Meraki firmware upgrade tool. We have built this tool to allow organizations to easily manage all Meraki firmware across the product portfolio in a single dashboard. As with all of our cloud features, we are continuing to build more functionality in the firmware upgrade tool to increase usability and simplify firmware management.

On the Overview tab, customers find a variety of information, such as a list of recent upgrades in the dashboard organization, pending upgrades that have been automatically or manually scheduled, the ability to cancel or reschedule these upgrades as well as a list of firmware versions that are available for a given Meraki product.

Requesting Specific Versions of Firmware
Any problems that are encountered while running versions of firmware that are not either stable or release candidate will not be supported and Meraki Support may need to recommend upgrading to the latest version of firmware in order to continue troubleshooting.
Firmware lock, is a temporary measure to be used mainly for testing purposes, It is not meant for long-term usage/remain on the device outside the troubleshooting session.
Locked Firmware
In general, it is discouraged to upgrade firmware on specific devices rather than upgrading the entire network. However, during the course of troubleshooting, Meraki Support may find it necessary to try a particular version of firmware on a specific device. For devices that have their firmware set manually by Meraki Support, you’ll see the message: Firmware version locked, please contact Support.
Addition or removal of locked firmware cannot be scheduled, please call Meraki Support to have this completed. The device will then automatically downgrade/upgrade to match the network firmware.
Additional Firmware Documentation
In addition to this best practices document please reference our other documentation to help you best deploy your Meraki products: