
Managing Firmware Upgrades
Click 日本語 for Japanese
Overview
Firmware upgrades allow network administrators to utilize the latest features and security enhancements on their Meraki devices. The Cisco Meraki dashboard allows admins to easily schedule and reschedule firmware upgrades on their networks, opt in to beta firmware releases, view firmware change log notes, and set maintenance windows. This article outlines the functions of the firmware upgrades tool in the dashboard, as well as additional considerations for using and managing firmware.
Learn more with these free online training courses on the Meraki Learning Hub:
Firmware Release Stages and Recommendations
To make firmware upgrade decisions simpler and more predictable, Cisco Meraki groups firmware versions into three release stages. Each stage reflects a different balance between access to new features and long-term stability.
Beta
Beta firmware is intended for testing and early validation.
- Requires explicit opt-in by network
- May receive frequent updates as changes are validated
- Fully supported, but not recommended for production environments
- Used for labs, pilots, and evaluating new features or fixes
Generally Available (GA)
Generally Available firmware is production-ready and fully supported.
- Passed all quality assurance and telemetry checks
- Includes new releases, maintenance updates, and hot-fixes
- Suitable for all production networks
- Eligible for manual and scheduled upgrades
- Choose GA if you want access to the latest production features.
Recommended Release
Recommended Release is the most proven firmware version for each product family.
- Selected based on broad customer adoption, quality metrics, and support experience
- Designed for enterprise and mission-critical environments
- Default for newly created networks
- Default selection for scheduled upgrade
- If you are unsure which firmware version to run, Recommended Release is the safest choice.
Choosing the Right Version: Quick decision guide
- Maximum stability and lowest operational risk → Recommended Release
- Need the latest production features &/or bug fix? → Generally Available
- Testing or validating fixes? → Beta
You can upgrade or change firmware versions at any time using the Firmware upgrades tool in Dashboard or by using API automation.

Managing Firmware as an Organization Admin
The firmware upgrades tool in the dashboard allows organization admins to quickly and easily manage firmware versions for all networks and device types. You can use the tool to schedule, reschedule, and cancel bulk upgrades of networks. You can also view firmware change log notes, view firmware version numbers, and roll back the firmware on a recently upgraded network.
Scheduling Firmware Upgrades
Keeping firmware up-to-date allows administrators access to the latest features and security enhancements. Admins can upgrade to the latest Recommended Release or beta firmware version. Follow the steps below to schedule a firmware upgrade.
- Navigate to Organization > Monitor > Firmware upgrades.
- Click the Schedule Upgrades tab in the upper-left.
- Select the devices or networks to be upgraded by clicking the checkboxes beside the network names. Admins can filter by networks and devices by using the Device type, Current version, or Status drop-down selectors.
- Click the Schedule upgrades button.
- Use the Target firmware version selector to choose the desired version.
- Select either Perform the upgrade now or Schedule the upgrade for (specify a date and time for the upgrade).
- Review the Change Summary and select Schedule change for network.
Note: When downgrading from a beta firmware to a Recommended Release firmware, a feedback request page will be presented. You must select any options that reflect the downgrade reason before selecting Schedule change for network.
Staggered Upgrades
For larger networks that contain a number of devices that need to be upgraded, the upgrades are staggered. What this means is that upgrades are done in batches. This is primarily done to distribute the load on our backend infrastructure when a large number of devices are downloading the firmware images.
Upgrades in a batch are staggered when (# devices in upgrade * estimated image size) is greater than the max size we want to support per time slot. For respective upgrade types the batch sizes are:
- 46 switches
- 80 wireless
- 40 wired
- 40 cellular gateway
- 10 cameras
For example in a network that has 92 switches, the upgrade will occur in two batches of 46 switches per batch.
Note: Even if the upgrade is staggered, all devices will be upgraded within the allotted one-hour time slot.
Cancel a Firmware Upgrade
Canceling a firmware upgrade can be performed after a firmware upgrade has been scheduled. Follow the steps below to cancel the firmware upgrade:
- Navigate to Organization > Monitor > Firmware upgrades.
- Go to the Scheduled Changes tab.
- For any given scheduled product upgrade, select the CANCEL button on the upgrade box. Follow the prompts and then cancel the upgrade.
Cancelling scheduled firmware upgrades does not exclude a given network from future scheduled upgrades.
Rescheduling a Firmware Upgrade
Reschedule an upgrade after it has been scheduled. You can do this on the Firmware upgrades Overview tab or the Scheduled changes tab.
- Navigate to Organization > Monitor > Firmware upgrades.
- Go to the Scheduled changes tab (or find the Scheduled changes box on the Overview tab).
- In either area, click the small calendar icon in the upgrade box to reschedule.
- Follow the prompts and then choose Schedule upgrade for, specifying a date and time for the upgrade to take place.
On the Scheduled Changes tab, if there is a batch of networks to be upgraded, the time/date on the upgrade will reflect the next/earliest upgrade in that batch.
Firmware upgrades can be scheduled up to one month in advance and can only be deferred/rescheduled for one month at a time.
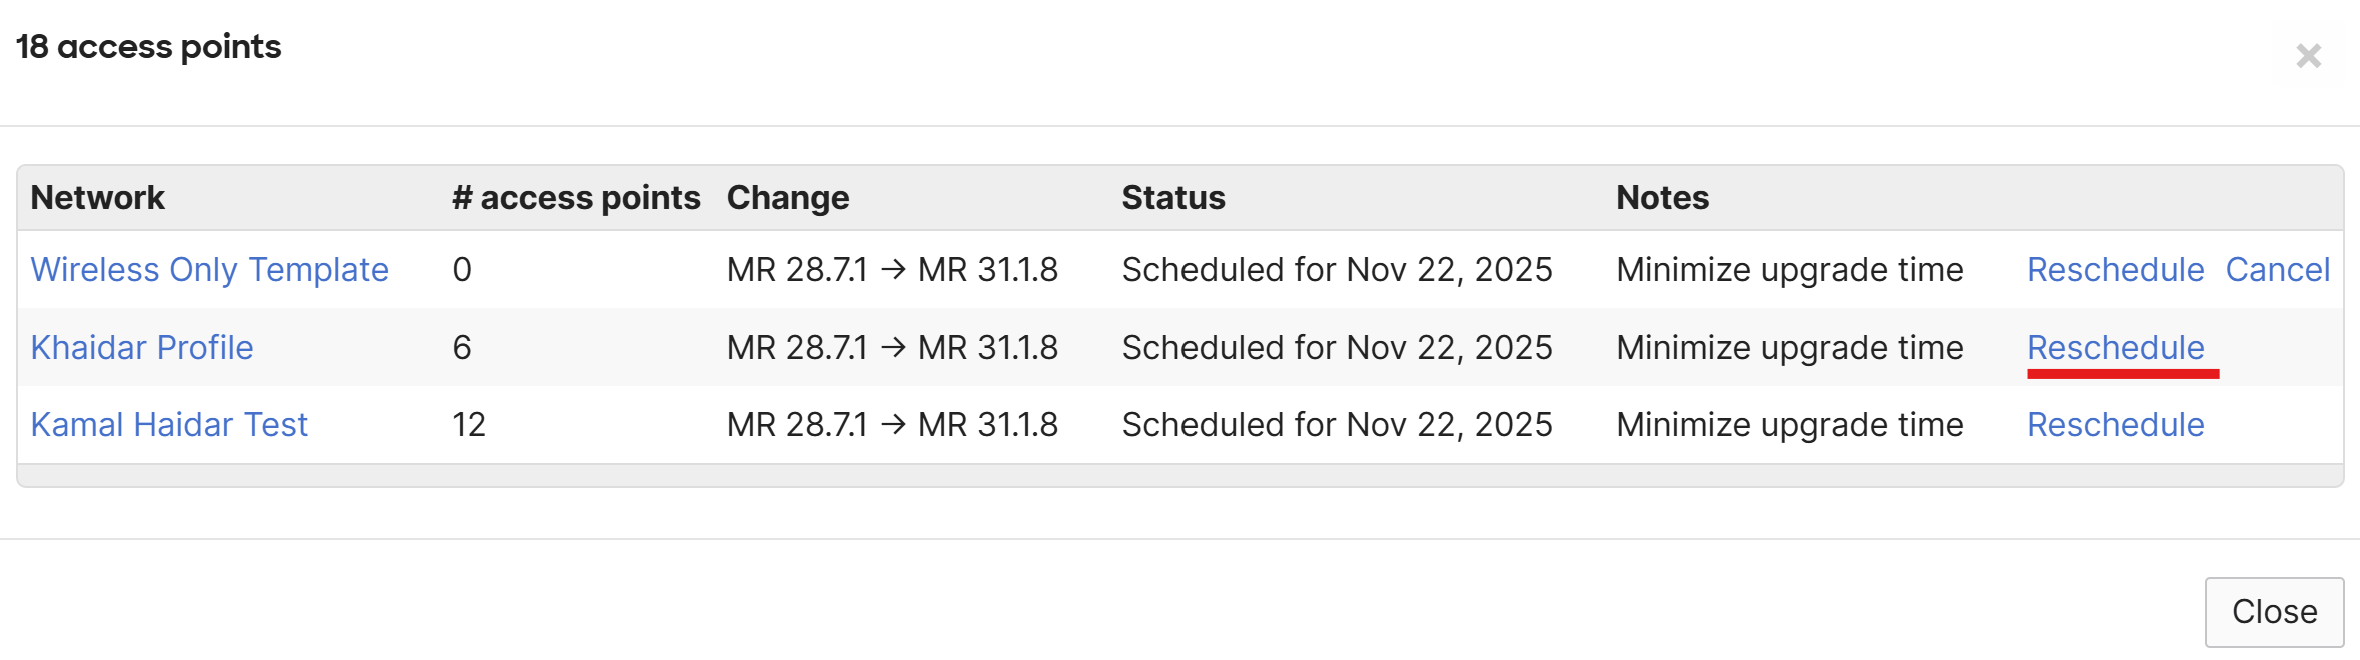
Reschedule a Firmware Upgrade for a Templated Network
- Navigate to Organization > Monitor > Firmware upgrades.
- From the Overview tab, view the Scheduled changes column, click on the number of networks tied to the upgrade in blue. This will list all of the networks tied to the scheduled upgrade individually.
- Click the option to Reschedule the individual network tied to the template.
Rolling Back a Recent Firmware Upgrade
You can roll back a firmware upgrade to the previous version within 14 days of the upgrade. To do this:
- Navigate to Organization > Monitor > Firmware upgrades.
- From the Overview tab, view the Most recent upgrades section.
- Click on the applicable upgrade entry where it lists the number of networks and devices that were upgraded.
- Click the Rollback button.
- Select a reason for the rollback and enter a brief description.
- Select Perform the upgrade now or Schedule the upgrade for, specifying a date and time.
- Click Submit to schedule the rollback.
Viewing Firmware Change Log Notes
Change log notes are maintained on a per-firmware version basis and include information about new features, bug fixes, and known issues that are associated with a particular firmware version. To view them:
- Navigate to Organization > Monitor > Firmware upgrades.
- From the Overview tab, refer to where it lists Latest firmware versions.
- Select Release notes. This will display the current Recommended Release firmware change log notes.
- To view older or newer change log notes, select Previous version or Next version from the change log notes window.
Note: The firmware change log can also be viewed from the Schedule Upgrades tab; by clicking firmware version links listed in the "Current firmware version" column.
Managing Firmware as a Network Admin
You can schedule firmware upgrades per device type for each network. Follow the steps below to manage a network's firmware upgrades:
- Navigate to Network-wide > Configure > General.
- Scroll down to where it lists Firmware upgrades.
- If there is a new firmware available, select the desired option below:
- (Re)schedule the firmware upgrade or Perform the upgrade now: These options will be active if there is a newer upgrade available, whether it is currently scheduled or not.
- Upgrade as scheduled: This option will be selected if an upgrade has been scheduled either by an admin, Support, or the bulk upgrade tool.
- Ignore: This option will appear as selected if there is a newer firmware version available but nothing is currently scheduled. If an upgrade is later scheduled but was subsequently canceled (either from the Organization > Monitor > Firmware upgrades page or by Support), the Ignore option will be selected again. Selecting this option will not prevent future upgrades from being scheduled by Meraki.
- Navigate to the bottom of the page and select Save.
To elect to run beta firmware, select Try beta firmware and select Yes.
There may be some rare instances where networks might not get an automatic firmware upgrade scheduled for various reasons. We strongly recommend manually checking all dashboard networks for available firmware upgrades and manually update them to the latest firmware version as necessary.
Viewing Firmware Change Log Notes as a Network Admin
Follow the steps below to view the firmware change log notes:
- Navigate to Network-wide > Configure > General.
- Scroll down to where it lists Firmware upgrades.
- If there is a new firmware available, select the What's new button beside the corresponding firmware. This page lists the firmware change log notes.
Firmware Upgrade Barriers
Firmware upgrade barriers is a built-in feature to prevent certain upgrade paths on devices running older firmware versions trying to upgrade to a build that would otherwise cause compatibility issues. Having devices use intermediary builds defined by Meraki will ensure a safe transition when upgrading your devices.
When scheduling a network to upgrade to a specific patched firmware version, you will have to first schedule an upgrade to the major firmware version itself.
For example, as of the time of this writing, if you want to upgrade a security appliance from MX 17.10.2 → MX 18.107.8 ( the latest batch on major firmware version MX 18 ), you will have to schedule it like this:
- MX 17.10.2 → MX 18.107.2 ( the latest Recommended Release version on major firmware version MX 18 )
- MX 18.107.2 → MX 18.107.8 ( the latest batch on major firmware version MX 18 )
Please note these versions are examples relevant at the time of writing. The latest Recommended Release version and latest batch may be different at this time.
An example of when firmware upgrade barriers will come into effect:
There is a switch in the network that is running MS 9.27 and we want to update to the latest Recommended Release version, which at the time of this writing, is 11.30. Attempting to upgrade from 9.27 to 11.30 will not be a selectable option in the dashboard and administrators will have to upgrade to 10.35 first.
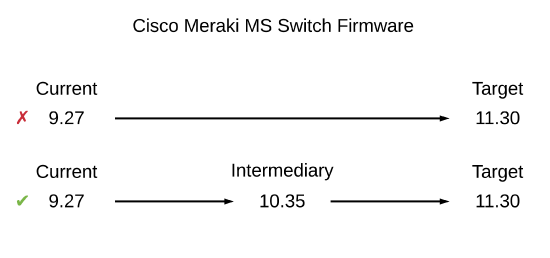
In order to complete the upgrade from the current version to the target version, two manual upgrades will be required. The first from your current to the intermediary version, and another from the intermediary to your target version.
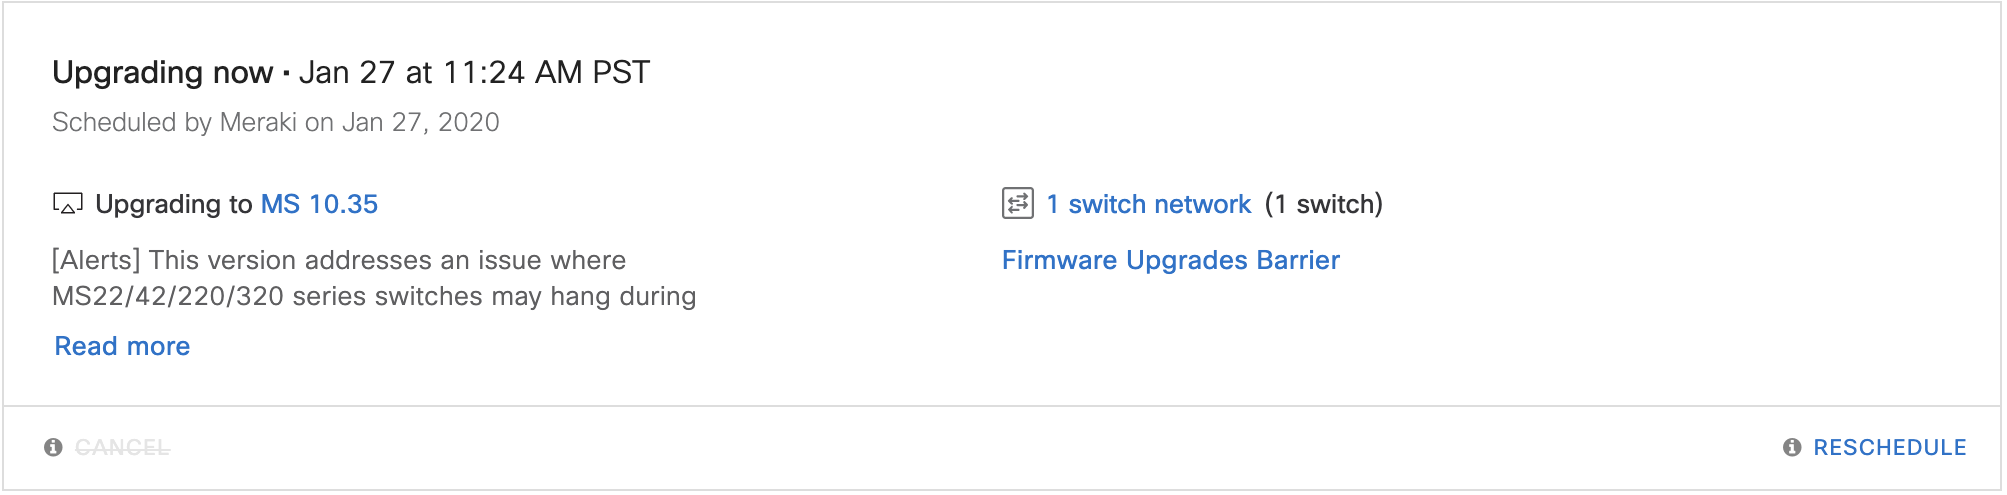
- Select Organization > Monitor > Firmware upgrades > Schedule Upgrades. From here you can select an individual or many networks within your organization

- Select the Target firmware version you are trying to upgrade to from the drop-down menu. In this case, because we are upgrading from MS 9.27 we must upgrade to MS 10.35 first. Note that the latest Recommended Release is not a selectable option and will not be until the device(s) are upgraded to the required intermediary firmware version.

- Select a scheduled time you want to perform the upgrade. Note: You can cancel the upgrade from the Firmware upgrades page and select Reschedule.


- After the first upgrade has completed, repeat steps 1-3 to perform the second half of the upgrade from your intermediary version to your target version.

Firmware Features
For additional information on firmware feature releases, visit the dedicated firmware features homepage.
Firmware Version Status
Cisco Meraki is committed to delivering powerful yet easy-to-manage firmware updates for all Meraki products via the firmware upgrades tool in the dashboard. In order to further simplify and streamline the firmware update process, we are introducing 'Firmware Status' for Meraki firmware. It’s recommended to run the latest Recommended Release version for each respective product in order to ensure the best performance, stability, and protection from security vulnerabilities.
Each firmware version now has an additional Status column as follows:
- Good (Green) status indicates that the network's firmware version does not yet have an End of Firmware Maintenance (EFM) date set or it is greater than 6 months away. Minor updates may be available, but no immediate action is required.
-
Warning (Yellow) status means that the network's firmware has an EFM date set and is within 6 months. When a firmware enters this state the date will appear within the warning text. We recommend you upgrade to the latest Recommended Release or beta version.
-
Critical (Red) status indicates that the firmware's EFM date for your network is past and may have security vulnerabilities and/or experience suboptimal performance. We highly recommend that you upgrade to the latest Recommended Release and latest beta firmware release.
Note: Firmware version status is purely for informational purposes only. To learn more about the End of Firmware Maintenance and Product End of Life policies, refer to this Documentation.

The number of Networks with firmware matching "Warning" and "Critical" status will appear on the overview tab of the firmware upgrades page.

FAQ
Q: What does the date beside "Warning" and "Critical" mean?
• This date shows the End of Firmware Maintenance (EFM) for that firmware version.
• Six months before this date, the firmware status changes to "Warning".
• After the date passes, the status changes to "Critical".
• It's best to update your firmware before it reaches "Critical" to avoid problems.
Q: What are the implications of running firmware marked with "Warning" and "Critical" status?
• Running firmware in these statuses may cause:
• Slower performance
• Stability problems
• Security risks that are fixed in newer firmware versions
• Updating to the latest firmware helps keep your devices secure and running well.
Q: Why does the Firmware upgrades page show networks that do not have corresponding device types?
• This happens because of combined networks that include multiple network types by default, even if some don't have Meraki devices.
• For example, a combined network might include Cellular Gateway, Security & SD-WAN, Switching, Wireless, Cameras, and Sensors networks, but not all device types are actually used.
• These extra networks might be hidden but still exist with their settings saved.
• To remove them, you need to split the combined network and delete the unwanted parts individually, then recombine the networks if needed. Please refer to the Combined Dashboard Networks as needed.
Q: How is Recommended Release chosen?
Engineering, Support, and Product jointly review adoption, quality metrics, and support cases. A version must meet stricter KPIs than the General Available criteria.
Q. Will automatic bulk upgrades target General Available or Recommended Release?
Bulk upgrade campaigns may select either Generally Available or Recommended Release version. You will always receive advance email notice.
Q. How frequently does a build become “Recommended Release”?
On average, each product family receives a new Cisco Recommended build every 6 months.
Q. What is the default firmware for newly created networks?
The default is Recommended Release.