
How to Set Up SNMP Monitoring for Meraki Devices
Click 日本語 for Japanese
Overview
Simple Network Management Protocol (SNMP) lets network administrators query devices for various information. Meraki supports SNMP polling to gather data either from the dashboard or directly from MR access points, MS switches, and MX security appliances. Third-party network monitoring tools use SNMP to monitor certain parameters.
This article explains the dashboard configuration and the information you can gather. Meraki provides two distinct places to configure SNMP. These settings operate independently and you can enable or disable each one separately:
- Polling the dashboard over the public Internet. This communication is between your SNMP server and the Meraki dashboard. The communication is not between the SNMP server and the devices. Configure this on the Organization > Configure > Settings page.
- Polling devices locally. This communication is direct between your SNMP server and the local devices. Configure this on the Network-wide > Configure > General page for each network.
Information you can poll from the dashboard:
- Device MAC address
- Device serial number
- Device name
- Device status (online or offline)
- Device last contacted (date and time)
- Mesh status (gateway or repeater)
- Public IP address
- Product code (e.g. MR18-HW)
- Product description (e.g. Meraki cloud controller 802.11n AP)
- Name of the network that the device resides in (dashboard network)
- Packets/bytes in/out on each physical interface
Note: Exact information varies between the three product lines. Not all of the above information can be polled from devices locally.
Learn more with these free online training courses on the Meraki Learning Hub:
Standard MIBs
SNMP servers use a Management Information Base (MIB), which acts as a database of SNMP Object Identifiers (OIDs). OIDs identify the managed objects that inform the SNMP server which values to poll from the device. Meraki devices support the majority of OIDs within the subset of the following MIBs:
- SNMPv2-MIB .1.3.6.1.2.1.1
- IF-MIB .1.3.6.1.2.1
These MIBs are not proprietary, so they are available on most network monitoring systems.
Proprietary MIB
You can find additional Meraki-specific information in the MERAKI-CLOUD-CONTROLLER-MIB, located under Organization > Configure > Settings > SNMP. This MIB polls the dashboard, not Meraki devices locally. For local device polling options, refer to the standard MIBs above.
Step-by-step instructions
How to configure dashboard polling
Configure the dashboard for SNMP polling from Organization > Configure > Settings > SNMP. After you enable SNMP, you can send SNMP requests to the host defined directly under the enable setting. This page also defines the community string and provides a sample command to extract information via SNMP requests.
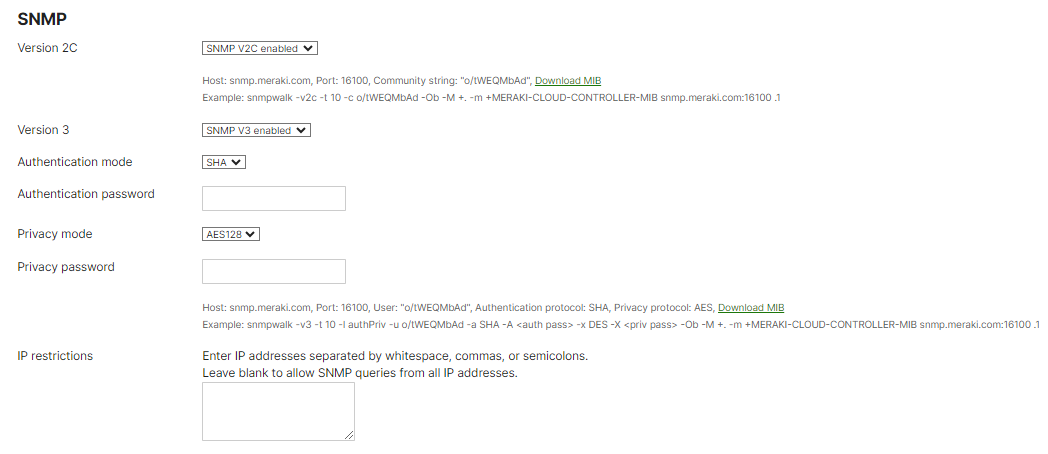
Cisco strongly recommends disabling SNMP V2C and using only SNMP V3 with Authentication mode SHA and Privacy mode AES128 for the highest level of security.
Use the hostname snmp.meraki.com for all SNMP requests. Avoid organization-specific hostnames that use the format nXXX.meraki.com, such as n123.meraki.com.
Configure IP restrictions to restrict SNMP access to particular IP addresses in your environment. SNMP versions 1 and 2 (v2c) send the community string in clear text, so IP restrictions are required to prevent unauthorized SNMP access if another party intercepts or learns the community string. IP restrictions are recommended for v3 but not required.
Meraki SNMP access supports only get requests, so you cannot change the dashboard configuration using SNMP. Meraki uses the read-only community string type. The following SNMP GET methods are supported when polling the dashboard: GetRequest and GetNextRequest.
How to poll individual devices locally
You can also poll individual Meraki devices locally. In this scenario, SNMP traffic stays within the local network, and the network management system polls each device directly. Find these settings under Network-wide > Configure > General > Reporting.
Polling individual devices directly lets you choose between SNMP v1/v2c or v3. Version 3 encrypts communication between the manager (network management system) and the agent (Meraki device). SNMP v1/v2c sends the community string in plain text.

To use v3, configure a username and password, then select your privacy mode. When using v3, Cisco Meraki devices use SHA1 for authentication and DES or AES128 for privacy, with the configured password used for both. Cisco recommends AES128 for privacy.
Note: Starting with MCG 32.2.1, Campus Gateway supports SNMP monitoring only using SNMP V3 with Privacy Mode AES128. Campus Gateway does not support SNMP V2C.
- Cisco strongly recommends using SNMP v3 with privacy mode AES128 for the highest level of security.
- DES is not supported on switches running IOS XE 17.18.2+.
How to poll from outside the network
For security, Meraki devices initially disallow direct SNMP polling from non-local IP networks. To allow external polling:
-
Set an SNMP community string under Network-wide > Configure > General.
-
Grant remote SNMP polling access by adding the desired external IP addresses to the allow list under Security & SD-WAN > Configure > Firewall > WAN appliance services, within the SNMP settings.

How to configure SNMP traps
SNMP traps allow real-time alerting of specific network scenarios. Traps are always forwarded from the Meraki cloud. A complete list of traps is available in the Meraki MIB. SNMP traps use SHA1 for authentication and AES for privacy. SNMP traps are closely related to the alerts you can configure for your network.
Enable traps
-
Go to Network-wide > Configure > Alerts.
-
Under SNMP traps, fill out the required fields. Traps are sent from the Meraki cloud.
-
If the receiving server is behind a NAT, configure port forwards.
-
Select the test trap button to verify that traps are sent and received successfully.
Note that the Receiving server IP must be a public IP.

Cisco strongly recommends using SNMP v3 for the highest level of security.
Define traps to be sent
After you enable traps, configure the alerts that trigger a trap under the Alerts Settings section at Network-wide > Configure > Alerts. To configure an SNMP trap:
-
Select Show additional recipients for the selected alert.
-
Add snmp as a recipient. Alternatively, add snmp as a Default recipient.
Once configured, both an email and a trap are sent when an event is detected. Because traps are sent from the dashboard, any time-sensitive traps begin counting from the moment the dashboard detects the event.
By default, Meraki does not support reporting information related to device "EngineID".

Verification
How to test SNMP
Multiple tools test SNMP functionality on various operating systems.
Windows
Windows-based operating systems can use an open-source tool called net-snmp:
-
Download net-snmp and install it.
-
Save the MIB file from the dashboard (Organization > Configure > Settings > SNMP > Download MIB) to the proper net-snmp directory: C:\usr\share\snmp\mibs\ by default.
-
Copy the sample SNMP walk from your controller and paste it into a command prompt.
Linux (Debian-based)
On a Linux-based system, install an SNMP package to achieve the same results:
-
Install snmpd. For systems with apt-get: sudo apt-get install snmpd
-
Save the MIB file from the dashboard (Organization > Configure > Settings > SNMP > Download MIB) to the proper snmpd directory.
-
Copy the example snmpwalk command from your controller (Organization > Configure > Settings > SNMP) and paste it into a terminal.
Testing individual MRs
Testing SNMP to individual MRs works the same way, but you run snmpwalk against each MR. For example, with two MR access points (MR1 IP: 192.168.100.15, MR2 IP: 192.168.100.16), run snmpwalk twice:
snmpwalk -v2c -t 10 -c meraki 192.168.100.15:161
snmpwalk -v2c -t 10 -c meraki 192.168.100.16:161
Modify the snmpwalk command based on the SNMP version you configured. In the example above, SNMP v2c is used with a community string of "meraki", and the port is left at the default of 161.
The command below is an example snmpwalk for SNMPv3, using the username and passphrase configured in Network-wide > Configure > General:
snmpwalk -v3 -t 10 -a sha -A <passphrase> -u <username> -x des -X <passphrase> -l authpriv <IP address>
Sample Output
The following is sample output from the snmpwalk command run locally, to a local MR 16:
sysadmin@ubuntu:~$ snmpwalk -v2c -c meraki 192.168.100.15:161
iso.3.6.1.2.1.1.1.0 = STRING: "Meraki MR16 Cloud Managed AP"
iso.3.6.1.2.1.1.2.0 = OID: iso.3.6.1.4.1.29671.2.13
iso.3.6.1.2.1.1.5.0 = STRING: "MR16"
iso.3.6.1.2.1.1.9.1.2.1 = OID: iso.3.6.1.6.3.1
iso.3.6.1.2.1.1.9.1.2.2 = OID: iso.3.6.1.6.3.16.2.2.1
iso.3.6.1.2.1.1.9.1.2.3 = OID: iso.3.6.1.2.1.31
iso.3.6.1.2.1.1.9.1.2.4 = OID: iso.2.840.10036
iso.3.6.1.2.1.1.9.1.3.1 = STRING: "The MIB module for SNMPv2 entities"
iso.3.6.1.2.1.1.9.1.3.2 = STRING: "View-based Access Control Model for SNMP."
iso.3.6.1.2.1.1.9.1.3.3 = STRING: "The MIB module to describe generic objects for network interface sub-layers"
iso.3.6.1.2.1.1.9.1.3.4 = STRING: "The MIB module for managing 802.11 implementations"
iso.3.6.1.2.1.1.9.1.4.1 = Timeticks: (0) 0:00:00.00
iso.3.6.1.2.1.1.9.1.4.2 = Timeticks: (1) 0:00:00.01
iso.3.6.1.2.1.1.9.1.4.3 = Timeticks: (6) 0:00:00.06
iso.3.6.1.2.1.1.9.1.4.4 = Timeticks: (6) 0:00:00.06
iso.3.6.1.2.1.2.1.0 = INTEGER: 3
iso.3.6.1.2.1.2.2.1.1.1 = INTEGER: 1
iso.3.6.1.2.1.2.2.1.1.2 = INTEGER: 2
iso.3.6.1.2.1.2.2.1.1.3 = INTEGER: 3
iso.3.6.1.2.1.2.2.1.2.1 = STRING: "wired0"
iso.3.6.1.2.1.2.2.1.2.2 = STRING: "wifi0"
iso.3.6.1.2.1.2.2.1.2.3 = STRING: "wifi1"
iso.3.6.1.2.1.2.2.1.3.1 = INTEGER: 6
iso.3.6.1.2.1.2.2.1.3.2 = INTEGER: 71
iso.3.6.1.2.1.2.2.1.3.3 = INTEGER: 71
iso.3.6.1.2.1.2.2.1.4.1 = INTEGER: 0
iso.3.6.1.2.1.2.2.1.4.2 = INTEGER: 0
iso.3.6.1.2.1.2.2.1.4.3 = INTEGER: 0
iso.3.6.1.2.1.2.2.1.5.1 = Gauge32: 0
iso.3.6.1.2.1.2.2.1.5.2 = Gauge32: 0
iso.3.6.1.2.1.2.2.1.5.3 = Gauge32: 0
iso.3.6.1.2.1.2.2.1.6.1 = Hex-STRING: 00 18 0A 34 36 C4
iso.3.6.1.2.1.2.2.1.6.2 = Hex-STRING: 00 18 0A 34 36 C4
iso.3.6.1.2.1.2.2.1.6.3 = Hex-STRING: 02 18 1A 34 36 C4
iso.3.6.1.2.1.2.2.1.7.1 = INTEGER: 1
iso.3.6.1.2.1.2.2.1.7.2 = INTEGER: 1
iso.3.6.1.2.1.2.2.1.7.3 = INTEGER: 1
iso.3.6.1.2.1.2.2.1.8.1 = INTEGER: 1
iso.3.6.1.2.1.2.2.1.8.2 = INTEGER: 1
iso.3.6.1.2.1.2.2.1.8.3 = INTEGER: 1
iso.3.6.1.2.1.2.2.1.9.1 = Timeticks: (0) 0:00:00.00
iso.3.6.1.2.1.2.2.1.9.2 = Timeticks: (0) 0:00:00.00
iso.3.6.1.2.1.2.2.1.9.3 = Timeticks: (0) 0:00:00.00
iso.3.6.1.2.1.2.2.1.10.1 = Counter32: 77152729
iso.3.6.1.2.1.2.2.1.10.2 = Counter32: 70138554
iso.3.6.1.2.1.2.2.1.10.3 = Counter32: 17035160
iso.3.6.1.2.1.2.2.1.11.1 = Counter32: 0
iso.3.6.1.2.1.2.2.1.11.2 = Counter32: 0
iso.3.6.1.2.1.2.2.1.11.3 = Counter32: 0
iso.3.6.1.2.1.2.2.1.12.1 = Counter32: 0
iso.3.6.1.2.1.2.2.1.12.2 = Counter32: 0
iso.3.6.1.2.1.2.2.1.12.3 = Counter32: 0
iso.3.6.1.2.1.2.2.1.13.1 = Counter32: 0
iso.3.6.1.2.1.2.2.1.13.2 = Counter32: 0
iso.3.6.1.2.1.2.2.1.13.3 = Counter32: 0
iso.3.6.1.2.1.2.2.1.14.1 = Counter32: 0
iso.3.6.1.2.1.2.2.1.14.2 = Counter32: 0
iso.3.6.1.2.1.2.2.1.14.3 = Counter32: 0
iso.3.6.1.2.1.2.2.1.16.1 = Counter32: 16102848
iso.3.6.1.2.1.2.2.1.16.2 = Counter32: 35646246
iso.3.6.1.2.1.2.2.1.16.3 = Counter32: 1540911
iso.3.6.1.2.1.2.2.1.17.1 = Counter32: 0
iso.3.6.1.2.1.2.2.1.17.2 = Counter32: 97878
iso.3.6.1.2.1.2.2.1.17.3 = Counter32: 2728
iso.3.6.1.2.1.2.2.1.18.1 = Counter32: 0
iso.3.6.1.2.1.2.2.1.18.2 = Counter32: 0
iso.3.6.1.2.1.2.2.1.18.3 = Counter32: 0
iso.3.6.1.2.1.2.2.1.19.1 = Counter32: 0
iso.3.6.1.2.1.2.2.1.19.2 = Counter32: 0
iso.3.6.1.2.1.2.2.1.19.3 = Counter32: 0
iso.3.6.1.2.1.2.2.1.20.1 = Counter32: 0
iso.3.6.1.2.1.2.2.1.20.2 = Counter32: 0
iso.3.6.1.2.1.2.2.1.20.3 = Counter32: 0
iso.3.6.1.2.1.2.2.1.21.1 = Gauge32: 0
iso.3.6.1.2.1.2.2.1.21.2 = Gauge32: 0
iso.3.6.1.2.1.2.2.1.21.3 = Gauge32: 0
iso.3.6.1.2.1.2.2.1.22.1 = OID: ccitt.0
iso.3.6.1.2.1.2.2.1.22.2 = OID: ccitt.0
iso.3.6.1.2.1.2.2.1.22.3 = OID: ccitt.0
iso.3.6.1.2.1.31.1.1.1.1.1 = STRING: "wired0"
iso.3.6.1.2.1.31.1.1.1.1.2 = STRING: "wifi0"
iso.3.6.1.2.1.31.1.1.1.1.3 = STRING: "wifi1"
iso.3.6.1.2.1.31.1.1.1.2.1 = Counter32: 0
iso.3.6.1.2.1.31.1.1.1.2.2 = Counter32: 0
iso.3.6.1.2.1.31.1.1.1.2.3 = Counter32: 0
iso.3.6.1.2.1.31.1.1.1.3.1 = Counter32: 0
iso.3.6.1.2.1.31.1.1.1.3.2 = Counter32: 0
iso.3.6.1.2.1.31.1.1.1.3.3 = Counter32: 0
iso.3.6.1.2.1.31.1.1.1.4.1 = Counter32: 0
iso.3.6.1.2.1.31.1.1.1.4.2 = Counter32: 0
iso.3.6.1.2.1.31.1.1.1.4.3 = Counter32: 0
iso.3.6.1.2.1.31.1.1.1.5.1 = Counter32: 0
iso.3.6.1.2.1.31.1.1.1.5.2 = Counter32: 0
iso.3.6.1.2.1.31.1.1.1.5.3 = Counter32: 0
iso.3.6.1.2.1.31.1.1.1.6.1 = Counter64: 77152729
iso.3.6.1.2.1.31.1.1.1.6.2 = Counter64: 70138621
iso.3.6.1.2.1.31.1.1.1.6.3 = Counter64: 17035162
iso.3.6.1.2.1.31.1.1.1.7.1 = Counter64: 0
iso.3.6.1.2.1.31.1.1.1.7.2 = Counter64: 0
iso.3.6.1.2.1.31.1.1.1.7.3 = Counter64: 0
iso.3.6.1.2.1.31.1.1.1.8.1 = Counter64: 0
iso.3.6.1.2.1.31.1.1.1.8.2 = Counter64: 0
iso.3.6.1.2.1.31.1.1.1.8.3 = Counter64: 0
iso.3.6.1.2.1.31.1.1.1.9.1 = Counter64: 0
iso.3.6.1.2.1.31.1.1.1.9.2 = Counter64: 0
iso.3.6.1.2.1.31.1.1.1.9.3 = Counter64: 0
iso.3.6.1.2.1.31.1.1.1.10.1 = Counter64: 16102848
iso.3.6.1.2.1.31.1.1.1.10.2 = Counter64: 35646309
iso.3.6.1.2.1.31.1.1.1.10.3 = Counter64: 1540911
iso.3.6.1.2.1.31.1.1.1.11.1 = Counter64: 0
iso.3.6.1.2.1.31.1.1.1.11.2 = Counter64: 97878
iso.3.6.1.2.1.31.1.1.1.11.3 = Counter64: 2728
iso.3.6.1.2.1.31.1.1.1.12.1 = Counter64: 0
iso.3.6.1.2.1.31.1.1.1.12.2 = Counter64: 0
iso.3.6.1.2.1.31.1.1.1.12.3 = Counter64: 0
iso.3.6.1.2.1.31.1.1.1.13.1 = Counter64: 0
iso.3.6.1.2.1.31.1.1.1.13.2 = Counter64: 0
iso.3.6.1.2.1.31.1.1.1.13.3 = Counter64: 0
iso.3.6.1.2.1.31.1.1.1.15.1 = Gauge32: 0
iso.3.6.1.2.1.31.1.1.1.15.2 = Gauge32: 0
iso.3.6.1.2.1.31.1.1.1.15.3 = Gauge32: 0
iso.3.6.1.2.1.31.1.1.1.18.1 = ""
iso.3.6.1.2.1.31.1.1.1.18.2 = ""
iso.3.6.1.2.1.31.1.1.1.18.3 = ""
After verifying that SNMP is functioning properly, the network management system (NMS) can be configured to poll either the dashboard, MRs, or both. Consult your NMS documentation for configuration steps to add a new managed device (MR/dashboard).
Troubleshooting
Unsupported OIDs
When polled for some unsupported OIDs, the MS/MR fails to respond rather than returning a null or 0 value. This can cause issues when clients expect a value in response. Configure your polling client to tolerate a non-response for these OIDs.
SNMP timeouts
It can take several seconds for the SNMP agent to initially query and build a database of devices for an organization. To give the agent enough time to respond, the example commands set a timeout of ten seconds. If you use proprietary network monitoring software such as WhatsUp Gold, configure the SNMP timeout as well, since the defaults are often too low.
Repeaters cannot be polled
You cannot poll repeaters using SNMP because they do not have an IP address on the LAN.
Trap variable order
The order of variables within an SNMP trap may differ from what you expect. Review the trap message itself before configuring any parsers that rely on a particular variable order.