
Wired Networks (VLANs) in Meraki Go
Overview
The Meraki Go products feature VLAN support across all devices as of application version 2.21.0. A VLAN (virtual local area network) is an effective tool to separate traffic on your network based on any number of factors. Most commonly, a guest network is created and managed separate from business networks and point-of-sale devices. Leveraging VLANs, a more robust and secure network can be constructed. A more in depth article about VLANs and how they work can be found here.
Note: Changing VLAN settings will disrupt your network. Avoid making changes during business hours.
To identify a wired network (or VLAN) there is a separate icon used in the app: 
Terms and Definitions
Each VLAN has the following items:
-
Name: A description for quick identification of the VLAN and its intended use.
-
Example: Guest, Point of Sale, Employees
-
-
Subnet Mask: The size of the subnet.
-
A larger subnet mask creates a smaller subnet. The same goes in reverse, a smaller subnet mask creates a larger subnet with more IP addresses.
-
The default is /24 and is the recommended value.
-
-
GX IP Address: The GX is the router for each VLAN it has defined, and will need to have an IP address in this VLAN. This is what becomes the default gateway IP address to client devices and even your switch or access point connected to the GX.
-
ID: A unique number between 1 and 4096 that identifies the VLAN for this new subnet on the GX.
-
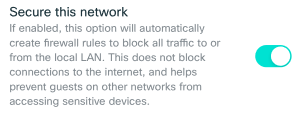
Secure this network: Choosing to secure a wired network ensures other devices are unable to communicate with devices on this network. The GX will block all inbound connections from the internet, other connections from devices on the LAN, and leave devices on this particular wired network to make outbound connections only.
Default Quality of Service (QoS)
All Meraki Go GX devices have a built-in set of rules to help apply DSCP tags to specific traffic. Those rules are as follows:
| Protocol | DSCP Tag |
| SIP | 46 (EF - Expedited Forwarding, Voice) |
| Advertising, Software Updates, and Online Backups | 10 (AF11 - High Throughput, Latency Insensitive) |
| Webex, Skype | 34 (AF41 - Multimedia Conferencing) |
| Video & Music | 18 (AF21 - Low Latency Data, Low Drop) |
GX Wired Networks (VLANs)
The GX firewall is unique compared to the GS and GR products, as it is the router for a given VLAN and has additional settings to configure to work properly. The GX is the gateway of a particular network, and determines how the downstream switches and access points must be configured.
Create a new Wired Network (VLAN) on GX
-
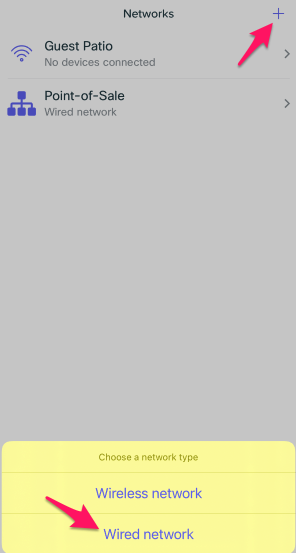
Open the app, login, and go to the Networks tab.
-
Press the + button at the top right of the screen to create a new network, and select Wired network from the popup screen:
-
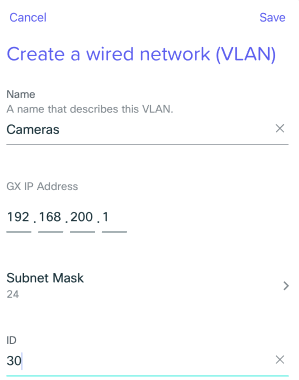
Enter the information for your new VLAN interface on the GX, an example can be seen below:
-
Choose whether to Secure the Network. If enabled this option will deny inter-VLAN traffic on the LAN:
-
Review the entered information for accuracy, and once finished press save to create the new wired network.
The GX LAN ports default to Trunk Mode with Allowed VLANs set to all. Once you have created this VLAN above, it will become available on the LAN ports for downstream devices to use (like your GR guest network).
The above example uses VLAN ID 30 for the Camera network. To configure this guest wifi network using the new VLAN, the switches and access points will also have to be configured to support this new VLAN.
Modify Existing Wired Networks
The procedure to modify a wired network is quite similar to creating one. Instead of pressing the + button to create a new network, tap an existing wired network to open the edit dialog:

Delete Existing Wired Network
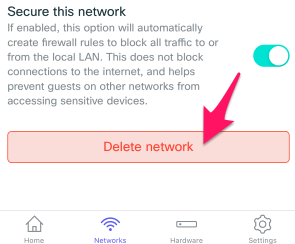
After tapping to modify an existing network, as detailed above, deleting a network is also an option:
Requirements and Considerations
The following must always be kept in mind for wired networks (VLANs) on the GX:
- One wired network must exist. No wired networks is not a possible state to have, and would cause downstream traffic to fail to reach the internet.
- DHCP is enabled by default.
- Secure Network creates layer 3 rules to block inter-vlan traffic.
Steps to configure GS VLANs
By default, all GS ports are configured as Trunk with native VLAN as 1. This matches the GX default configuration. When a new VLAN is added on the GX, or any upstream router, it is immediately accessible on the switch by default.
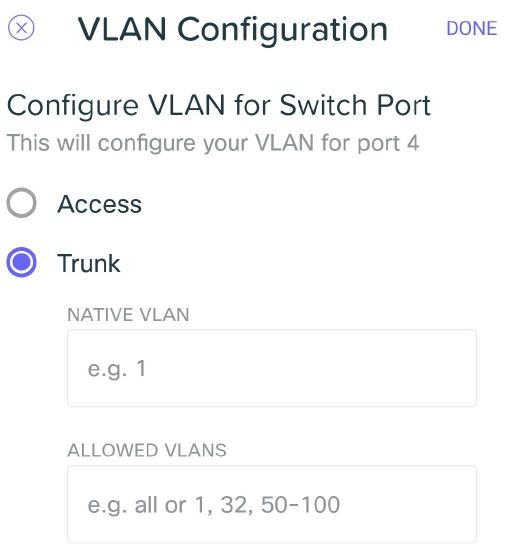
Under the port list view for your switch, the Advanced Settings section reveals the following configuration. More details about switch port configuration can be found in this article.
Note: When modifying the uplink port you risk taking devices offline. Consider carefully the configuration of this port compared to what the GS is connected to upstream.
Steps to configure GR VLANs
Each wireless network on the networks tab has the option, while in bridge mode, to have a VLAN ID.
- Log in to the app and navigate to Networks.
- On the specific network you wish to join a VLAN, go to Settings.
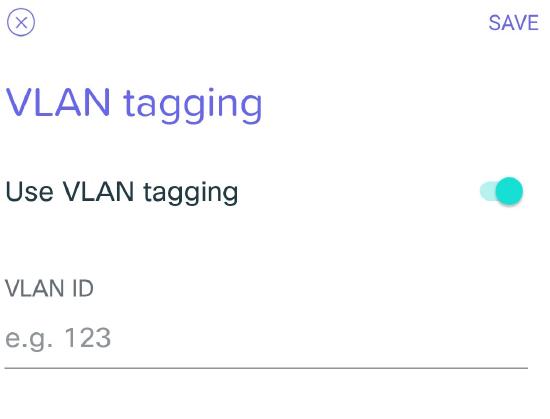
- Under the settings page, you can find Advanced Settings at the bottom, where VLAN tagging configuration exists.
- Tap to enable VLAN support for this network. This allows you to enter the VLAN ID that end users connect to
Configuration Example
This guide will explain how to create a basic VLAN setup with a guest and business network. The use case is to segment guest network traffic away from critical business traffic which may include sensitive information.
Goals
At the end of this example the following will be achieved:
- Two wired networks (or VLANs) will exist on the network:
- Point of Sale and Business.
- Each wired network will behavior differently:
- Business:
- Will be password protected.
- No throughput limitations.
- Used for employees.
- Point of Sale:
- Has sensitive information about sales.
- Will also be password protected.
- Should be segmented away from the business network.
- Used strictly for point of sale hardware in the business.
- Business:
Steps
This step-by-step guide assumes all Meraki Go hardware is in use (security gateway, switch, and access point).
- Begin by defining the Business and Point of Sale wired networks on the GX:
- Rename the existing wired network to Business:
- Navigate to Networks > Tap existing Wired Network
- Change the name to Business when the edit screen appears and tap save.
- Create the new wired network Point of Sale:
- Navigate to Networks > Tap the "+" icon and select new wired network
- Define a new Point of Sale VLAN:
- Name: Point of Sale
- GX IP address: 192.168.129.1
- Subnet Mask: 24
- ID: 2
- Rename the existing wired network to Business:
- Configure switchports on the GS:
- The uplink port should always be Trunk mode to allow all VLANs to reach the GX.
- Any devices using an Ethernet cable to connect to the switch can be configured for a particular VLAN:
- Navigate to Hardware > [Select GS] > See All Ports > [Choose a non-uplink port] > Tap on Settings
- Open Advanced Settings for this port
- Tap on VLAN Configuration
- For an employee workstation, configure the port as access VLAN 1 - the Business VLAN.
- For an access point serving wireless, trunk mode allowing all VLANs is preferred.
- For a point-of-sale device, configure the port as access VLAN 2 - the Point of Sale VLAN configured in step 1.
- Configure wireless networks on the GR:
- Create the Business Wireless Network:
- Navigate to the Network tab in the app and press the + sign in the top right to create a new network:
- Name the network "Business" or your preference for the employee network.
- Define a password to use with this wireless network.
- Tap Save
- Note: This network does not require a VLAN tag, as the default VLAN is Business on the GX.
- Create the Point of Sale Wireless Network:
- Navigate to the Network tab in the app and press the + sign in the top right to create a new network:
- Name the network "Point of Sale" or your preference for the point of sale devices network.
- Define a password to use with this wireless network.
- Tap Save
- Enable VLAN tagging by navigating to Networks > [Select the point of sale network] > Settings > Advanced Settings > Tap VLAN Tagging
- Set Use VLAN tagging to on, and specify VLAN 2 - the Point of Sale VLAN configured in step 1.
- Create the Business Wireless Network: