
Meraki Go Onboarding
Meraki Go Onboarding Steps
Welcome to the Meraki Go family! Meraki Go is a fast, secure and reliable networking solution designed with small businesses in mind. With your first Meraki Go hardware in hand, this onboarding process will help you install your hardware and configure your network quickly.
This guide is for Meraki Go products only. Meraki enterprise product information can be found at documentation.meraki.com
This setup process should take around 30-60 minutes to complete and consists of three main steps:
- Setting up your account and logging in
- Adding hardware to your account and connecting it correctly
- Configuring your network
Additionally, this guide covers important settings on the Meraki Go app.
Step 1: Set up your account
You can create an account either on meraki-go.com or through the app on iOS or Android (preferred).
This QR code can be used find the Meraki Go app in your app store. 
If you have an existing account with dashboard.meraki.com, you will need to use a new email address for Meraki Go.
Once your account is registered, you will need to verify your email address before logging in for the first time.
Start and Log In to the Meraki Go app
If you do not already have the app installed, please download the software from your mobile app store and open the Meraki Go app once it is successfully installed.
If you've already created an account on meraki-go.com, you'll use the same credentials to log into the app.
Account creation is typically quite fast. However, this process may take a few minutes. If you find an invalid email/password combination error immediately after creating your account, please wait up to 5 minutes and try again before contacting support.
Unbox and scan your hardware
After logging into the Meraki Go app you will be prompted to begin adding hardware to your account.
Every Meraki Go device has a QR code near the serial number. Scanning this QR code is the fastest way to add hardware to your account. 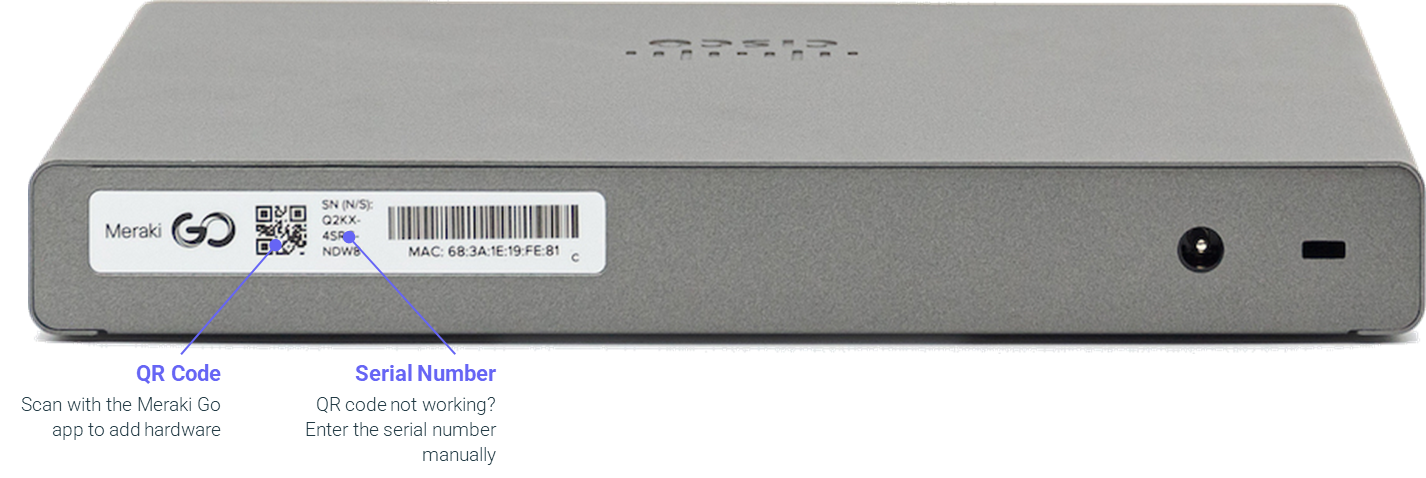
If you still have the metal mounting plate attached to your hardware, you will need to slide that off first to see the QR code.
Tap the add hardware button to get started and use your phone/tablet's camera to scan the QR code on the back of your hardware.
The flashlight button  can be used to enable your device's flash in low light environments.

You may need to give the Meraki Go app permissions to use your camera. This can generally be done under Settings > Applications > Meraki Go on your device.
If you are unable to scan the QR code, you may need to select Enter serial number instead, to manually add the serial number on your Meraki Go hardware. The serial number can be found on the back of the hardware or on the side of the box it came in.
Step 2: Connect your hardware
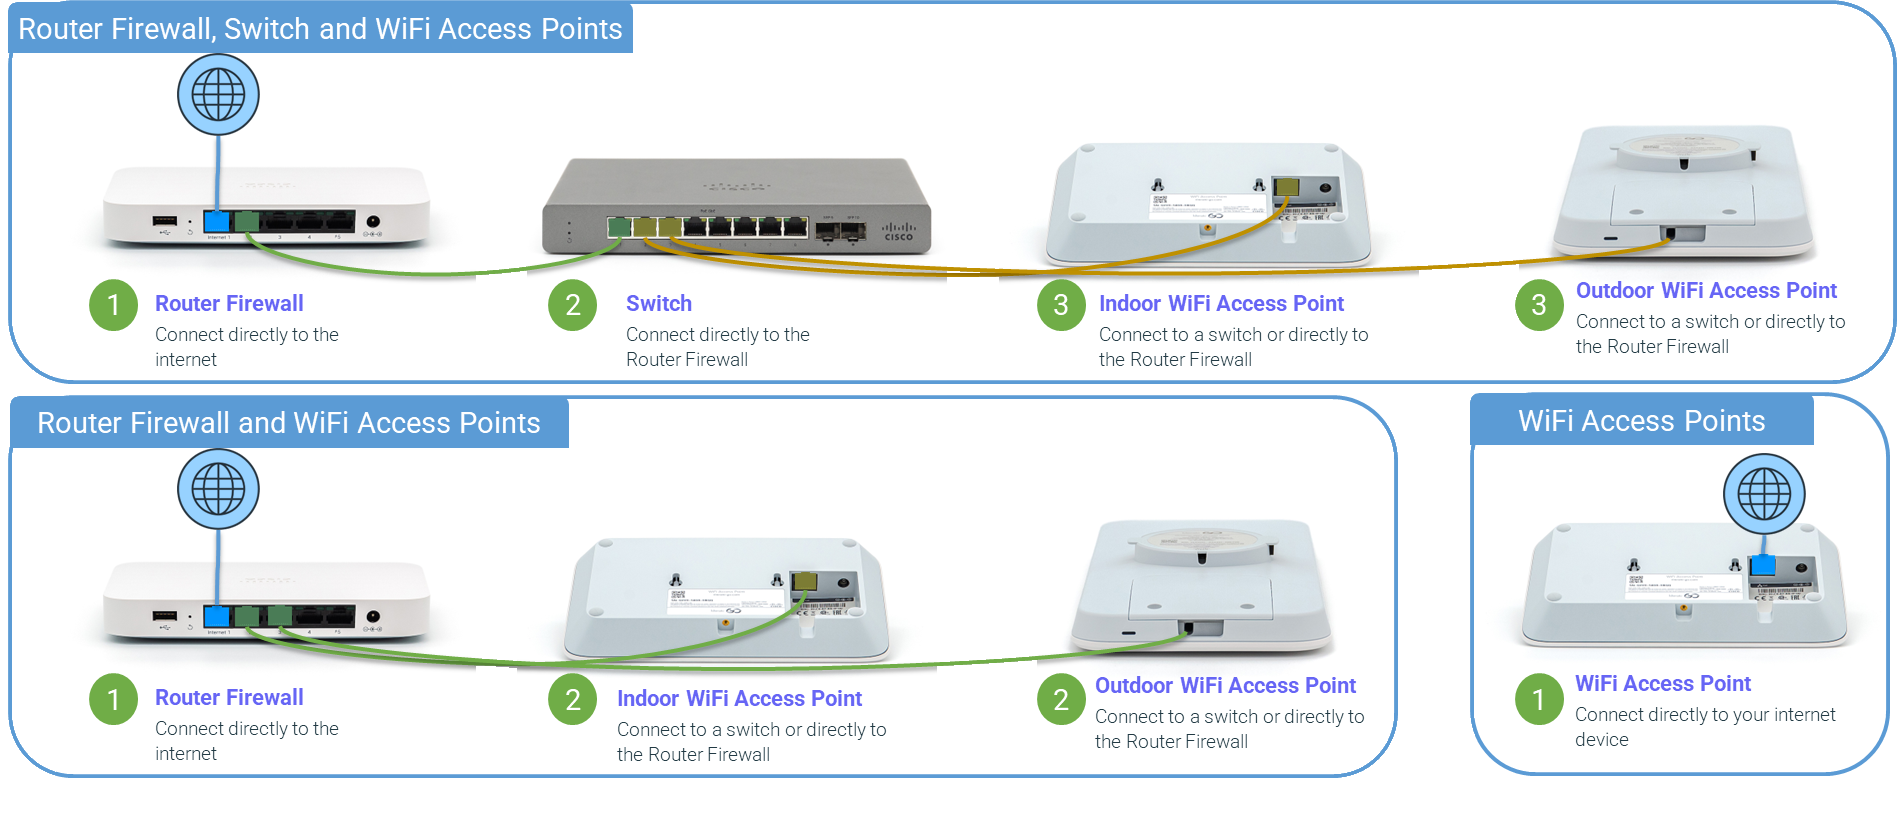
Once your hardware has been scanned and added to your account, you will be prompted to connect the hardware to the internet. Proceed to follow the Meraki Go device section that relates most to the hardware you just added to your account. If you have multiple Meraki Go products, connect them in the order specified below:
- Connect the Meraki Go (GX) router firewall to the internet and power it on.
-
Connect any Meraki Go (GS) switches to the GX and power them on.
-
Connect any Meraki Go WiFi access points (GR) to the GS, the GX or directly to a port on your internet device.
Meraki Go router firewall (GX20, GX50)
The Meraki Go security appliance must be powered by the power supply within the box.
A connection from your internet provider should plug via ethernet cable into Port 1. The router firewall should be the gateway of the network towards the Internet.
Meraki Go switch (GS110 series)
The Meraki Go Switch hardware must be powered by the power supply included within the box.
An internet connection must be provided via an ethernet cable plugged into any one of the ports. This may be a connection from the Meraki Go GX router firewall or optionally directly to another device that provides internet service.
Depending on the model of the Meraki Go switch, it may be PoE (Power-over-Ethernet) capable, meaning it can supply power to Meraki Go WiFi access points and other PoE power based devices.
Meraki Go WiFi access point (GR10, GR60, GR12, GR62)
Your Meraki Go WiFi access point hardware has two ways it can be powered:
-
AC Adapter: Your hardware comes with an AC adapter in the box. This can simply be plugged in to power your device.
-
PoE (Power over Ethernet): If you have a PoE switch, a GX20 router firewall, or an ethernet power injector, you can connect a PoE ethernet cable to the hardware directly without using the AC adapter.
Your WiFi access point will need to have its ethernet cable connected to something that can provide internet service. This is generally an internet modem, a Meraki Go GX Series router firewall or possibly a Meraki Go GS Series switch.
A modem is often provided by your internet service provider (BT, Sky, Virgin, Comcast, AT&T, etc.)
Once your hardware is connected, make sure the ethernet port has lights on it, to make sure it's connected. There should be a green light to the left of the ethernet cable.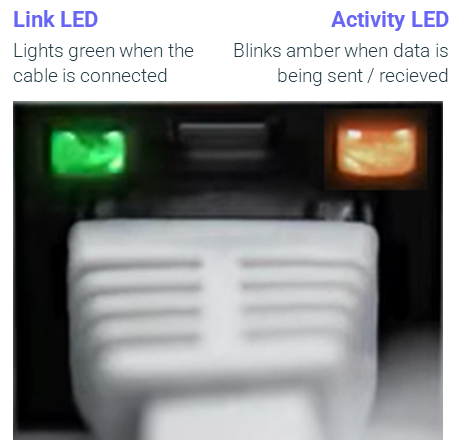
Wait while your hardware updates
After your hardware has connected, it will attempt to find a path to the internet. Your hardware will perform any required software updates, and will come online once this task is completed. This may take as much as 30 minutes.
After the internet connection is connected to the Meraki Go equipment, the device’s LED will cycle through a rainbow pattern. This means that it is establishing connectivity to Meraki Go servers.
After the rainbow pattern, the LED may alternate between an amber and white flashing LED. This is normal. If the LED is flashing a white light this indicates that it is currently installing software updates.
Once the LED stops flashing and is a solid white light (GX, GS Series) or solid green (GR Series) this means that the Meraki Go device is fully operational.
If your hardware does not successfully find an internet connection and display a solid white light (GX, GS Series) or solid green (GR Series) after 30 minutes, refer to our Meraki Go Troubleshooting Guide.
Step 3: Configure a WiFi network
Once you are in the app and your devices are connected, Create a WiFi network for your account. You can do this by clicking on the Networks icon in the app. Once on the networks screen, tap the Create a WiFi network button.
Give your network a name, and then a password (or leave it blank if you'd like it left open). The network name is what guests and users see as an option when connecting to wireless networks.
If you want the network to be for guests, select Check this if this is a guest network to enable client isolation, which prevents clients from communicating with each other, or with devices on your local network.
Once the WiFi network is created, explore the app and additional Meraki Go documentation for more detail on available features.
Success!
Your network is all set and ready to use. Try it out by connecting with a client device such as a laptop or phone.
Note that once you've created a WiFi network and configured your settings, the Meraki Cloud will automatically apply these settings to any other devices you add to your Meraki Go account.