
MG Wireless WAN Dashboard Settings
MG Settings
MG cellular gateways can be configured on dashboard under Cellular Gateway > Settings. The following settings can be configured on the MG cellular gateway: subnet configurations, DHCP, port forwarding, bandwidth limits, and uplink statistics. Each section below will expand on each feature.
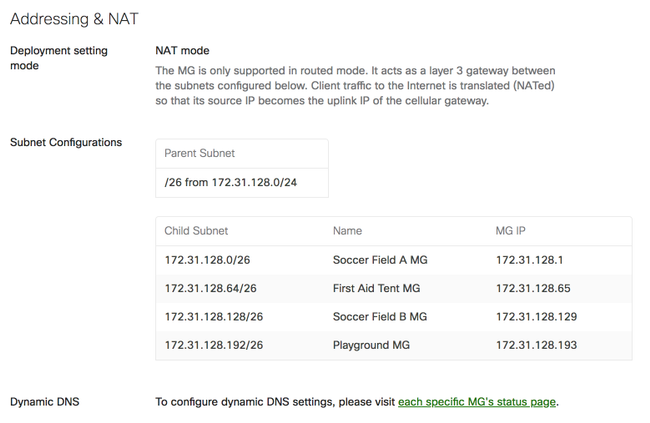
Addressing and NAT Configuration
The MG cellular gateway supports NAT mode. The subnet addressing for each MG cellular gateway in LAN will be controlled by a subnet pool (referred to as the parent subnet). From this parent subnet, the dashboard will auto generate and divide the configured pool into exactly 4 children subnets. These children subnets are each assigned to the MGs available in the network. In the screenshot below, dashboard has taken the /24 parent subnet and divide them into four /26 children subnets.
Note: A network can only have a maximum of four MG cellular gateways.
MG now also supports passthrough mode which is documented in this link: MG IP Passthrough.
The child subnet is automatically calculated from the parent subnet. This simplifies the need to manually calculate the size of each child subnet. Each MG will automatically assigned the first usable IP of that child subnet. This behavior is intended to not be configurable in order to make the MG assignments predictable.
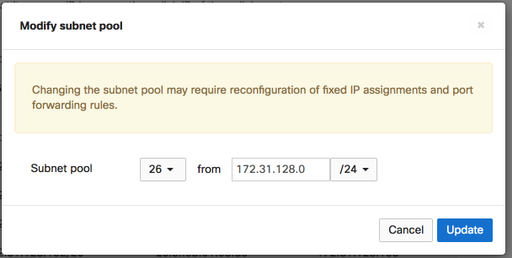
When you click on the parent subnet, there will be the option to change the subnet range and the size of the subnets. The largest child subnet size will be based on the parent subnet when dividing the parent subnet into four equal children subnets. For example, if the parent subnet is set to /26, then the largest child subnet can only be /28.
DHCP Settings
Note: MG templates do not support DHCP Reserved IP Ranges or Fixed IP Assignments.
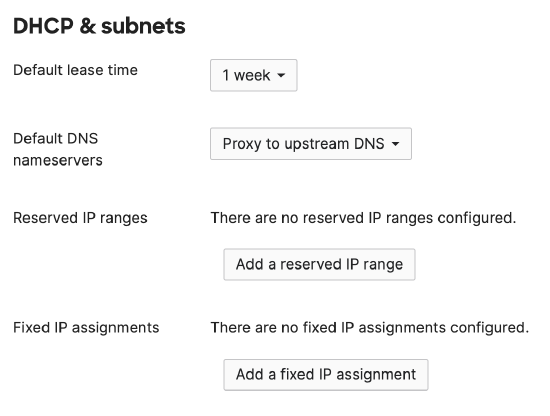
DHCP services are automatically enabled on your MG cellular gateways. The DHCP settings will be based on the subnet configuration in the previous section.
The following settings will allow you to override the DNS on all MG subnets, reserve IPs, and create fixed IP assignments in your child subnets for devices. The DNS default will be to proxy to the upstream DNS.
In order to assign a device a fixed IP in the range, the Add an assignment button will reveal the following menu. For each fixed IP assignment, an MG will need to be selected and then client details filled out. Additionally, once selected from the drop down of available MG cellular gateways, the dashboard will recommend a range based on the assigned child subnet. Below you will see an example for each MG and the proposed range of fixed IPs that the device should be configured to for that particular MG.
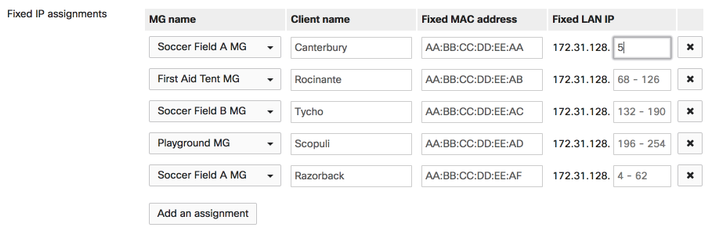
The example shows the device Canterbury will be assigned a fixed IP address of 172.31.128.5 for the MG named Soccer Field A MG. Each time Add an assignment is clicked, dashboard will add a new line. Each new line will have a drop down menu in order to assign a fixed IP to a particular MG in the network. There are 4 MGs in this network. Each time an MG is select, dashboard will suggest a range of IPs for that child subnet belonging to the MG.
Observing the last entry, the selection is on Soccer Field A MG and the suggested fixed IP range is 4 to 62. Notice that while the MG is assigned the first usable IP address in a child subnet, the 2nd and 3rd IP address are not in the suggested range. Dashboard is assuming these IP addresses to be reserved in the case of MG MX deployments. One IP address each MX (if they are in High Availability mode). While configuration to use this IP addresses can be done, it is suggested that the configured children subnets be large enough to allow these two IP address, 2nd and 3rd usable IPs, to not be needed.
Port Forwarding
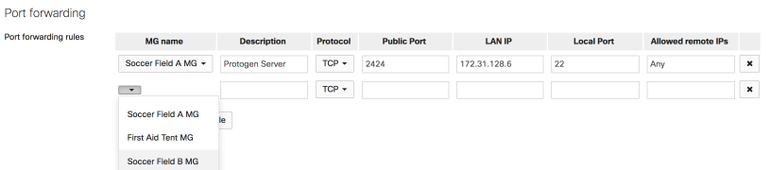
Generally it is recommended to have a fixed IP assigned for a device before creating a port forward rule. Below is an example of a port forward rule. Here we have setup a port forward rule on Soccer Field A MG from the public port 2424 to the Protogen Server address of 172.31.128.6 on port 22. Clicking on additional rules will give options on which MG the rule will be created on.
Note: Most data plans do not have a static IP and require one to work around carrier grade NAT (RFC6598). It is recommended that validation of a static IP on your SIM card data plan as a prerequisite to configuration of port forwarding.
Traffic Shaping
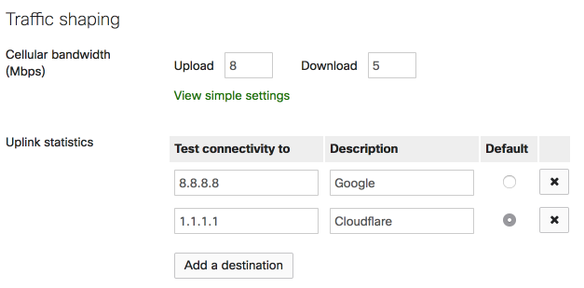
The MG will feature limited traffic shaping capabilities designed around limited the amount of bandwidth used. With cellular data plans being conservative in nature, bandwidth rule will apply to all MGs in the network. Additional uplink statistics can be configured in this section as well.
MG Dashboard SIM settings
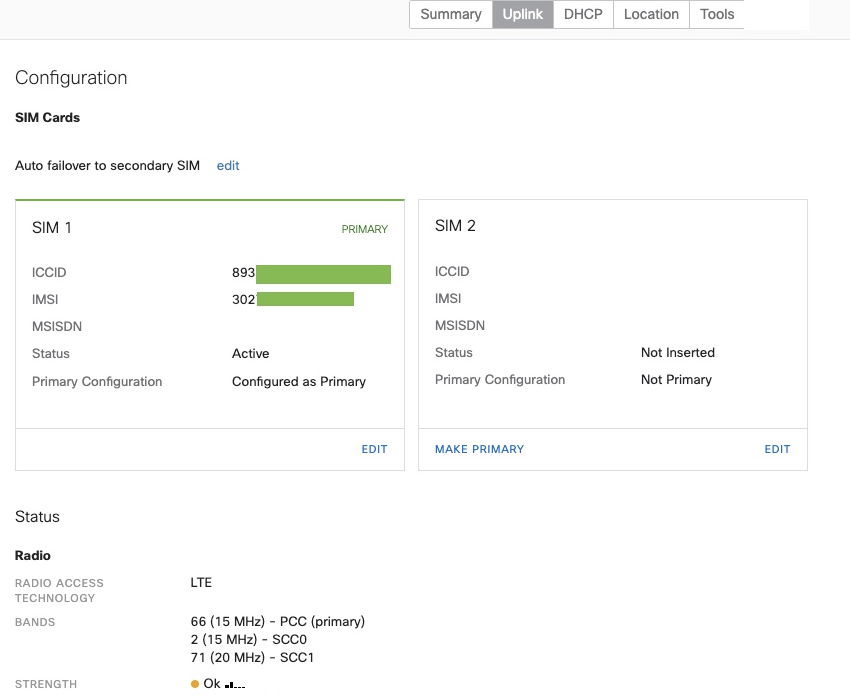
The MG41/51/52 has 2 sim slots with the ability to switch between each of the SIM slot as needed. On bootup, the MG41/51/52 will try to activate the SIM card on the primary slot.
- Use the MAKE PRIMARY option to change the default primary SIM slot. All factory units have SIM 1 slot as the default primary SIM slot setting. However, if the SIM card is inserted into SIM 2 slot on a factory unit, the MG will take a few minutes to detect it internally and then will try to activate the SIM card on the slot 2.
- For redundancy, its recommended to use different carrier SIM cards on SIM slots 1 and 2.
APN Setting
The MG provides the capability to override the default APN settings via the dashboard. APN can be configured on dashboard under the Uplink tab.
- If there is a second SIM card on slot 2, then the APN settings can be applied in advance before activating the SIM card. On a new factory unit, the MG will detect if the SIM card is inserted on slot 2 but will not show the SIM information (ICCID, IMSI , MSISDN) until the MG41/51/52 activates slot 2. Once the MG detects the information of the SIM card on SIM slot 2, it will cache this information once activated even after the SIM card slot is changed to slot 1.

- Make sure the APN settings entered via dashboard are correct. Incorrect APN settings can result in the unit going offline.
- The LSP setting will override any configuration applied via dashboard.
- If the incorrect APN or network outage results in the MG41/51/52 going offline on the primary SIM, then the MG will switch automatically to the standby slot.
SIM Failover Setting
- By default, the auto SIM failover is enabled, however, it can be disabled via editing the "Auto failover to secondary SIM" option.

- If the MG only detects one SIM card, then the auto SIM failover is disabled internally.
- When Auto SIM failover is enabled, the MG will fail over to the standby SIM if it cannot establish dashboard connectivity for 5 minutes.
- If the MG fails over to the standby SIM due to a carrier outage/incorrect APN settings, then it will mark this new standby SIM card slot as active and mark the previous SIM card slot as standby. It's not possible to find out if the carrier outage on the previous primary SIM or the current standby SIM has been resolved when there is already an active ongoing data session, hence the MG will continue to treat the failed over SIM slot as active until it goes offline for more than 5 minutes.
Note - Sometimes, the MG41/51/52 may not display the APN being used on the dashboard. On boot up, the MG41/51 connects to the carrier network with a data session established using the APN provided by the carrier network. The APN provided by the network will be displayed in the subsequent firmware releases. Any APN that the MG41/51/52 uses to establish data session with the carrier network will be displayed on the dashboard and can be fetched via APIs.