
IPSK with RADIUS Authentication
Click 日本語 for Japanese
Overview
When setting up an enterprise wireless network, it is common to configure WPA2-Enterprise authentication with a centralized authentication server to provide heightened security for clients connecting to the network, while still allowing for easy and scalable management of authorized users. However, IT administrators may still encounter some drawbacks with this method of authentication. While a username and password provides extra security, users may find remembering an extra set of credentials to be cumbersome when trying to get connected, and may be better served by using a private PSK. Additionally, certain devices may not support WPA2-Enterprise authentication, and would require an additional PSK SSID to be set up to connect to the same network, increasing wireless overhead and compromising on security. Identity PSK with RADIUS authentication resolves these issues by acting as a standard WPA2 PSK SSID to clients, while authenticating clients to a central server based on their MAC address and allowing different PSKs to be set for specific clients or groups of clients.
This article will provide a walk-through of how to set up Identity PSK in Dashboard, as well as on FreeRADIUS, Cisco ISE, and Microsoft NPS.
IPSK with Radius Authentication does not support WPA3
This feature is supported only on firmware MR 26.5 and above. If using Microsoft NPS, MR 30.1 or higher is required.
This feature will not work with an SSID that is configured to tunnel traffic to a MX Concentrator.
Enabling and configuring IPSK with RADIUS authentication
Easy PSK
Note: This article does not cover how to configure the RADIUS server. This feature is meant to be used by specific customers and partners who understand how it works and how it’s configured on the AAA/RADIUS server side. It’s very similar to Cisco Easy PSK.
Easy PSK is supported in MR 32.1.3 and newer firmware.
Before MR 30.X, the only Identity PSK with RADIUS solution was based on querying the RADIUS server to look up the client’s passwords based on the client's MAC address.
The downside of this approach is that each client's MAC address must be pre-registered with the RADIUS server, which is challenging. Also, many wireless clients implement MAC randomization for privacy reasons, further complicating this approach.
One obvious way to authenticate the client would be to pass a PSK from the client to the RADIUS server. However, while both the supplicant (wireless client) and authentication server (RADIUS server) know the PSK, the PSK itself is never exchanged over the air during the 4-way EAPOL handshake between the authenticator (AP) and the supplicant (wireless client). That makes passing the PSK for authentication purposes to the RADIUS server impossible.
With MR 30.X firmware, we introduced a new authentication method based on passing EAPOL parameters exchanged between the client and the AP during the handshake to the RADIUS server.
As a reminder, the general key hierarchy is as follows:
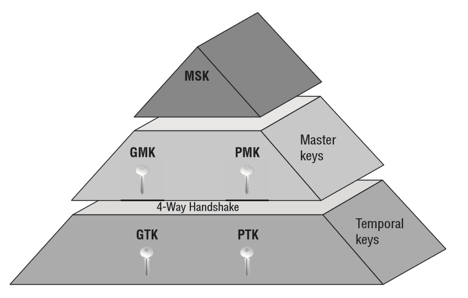
-
MSK (Master Session Key) is the first key generated from 802.1X/EAP exchange or directly from PSK.
-
PMK (Pairwise Master Key) is derived from the MSK and is used for PTK generation during the 4-way handshake.
-
PTK (Pairwise Transient Key) encrypts all unicast traffic between a client and the access point and is derived during the 4-way handshake.
-
GMK (Group Master Key) is derived from the MSK and is used for GTK generation during the 4-way handshake.
-
GTK (Group Temporal Key) is used to encrypt all broadcast and multicast traffic between an access point and multiple client devices and is derived during the 4-way handshake.
Please refer to the below diagram:

After the Open System Authentication between the client and access point is complete (messages 1-4), the AP initiates the EAPOL exchange by sending EAPOL-key message 1 that contains ANonce (message 5).
After receiving message 5, the client knows its PMK and MAC address. It also knows the MAC address of the AP because it’s associated to it and the ANonce it just received. At this point, the client can generate PTK and calculate MIC.
The client sends EAPOL-key message 2, which contains SNonce and calculated MIC (message 6) to the AP.
If the AP knew MSK/PMK, it would be able to calculate the PTK as well. However, since the AP does not know MSK/PMK, it sends a RADIUS-REQUEST message to the RADIUS server (message 7), which contains the following Meraki vendor-specific attributes listed below.
ATTRIBUTE Meraki-IPSK             5     tlv
ATTRIBUTE Meraki-IPSK-Anonce      5.1   octets
ATTRIBUTE Meraki-IPSK-EAPOL       5.2   octets
ATTRIBUTE Meraki-IPSK-BSSID       5.3   octets
ATTRIBUTE Meraki-IPSK-AP-MAC      5.4   octets
ATTRIBUTE Meraki-IPSK-SSID        5.5   string
Please use the following Meraki vendor-specific RADIUS attributes to export to your RADIUS server:
# -*- text -*-
#
# Official Meraki RADIUS dictionary file.
#
#       Version 2
#
VENDOR Meraki 29671
BEGIN-VENDOR Meraki
ATTRIBUTE Meraki-Device-Name      1 string
ATTRIBUTE Meraki-Network-Name     2 string
ATTRIBUTE Meraki-Ap-Name          3 string
ATTRIBUTE Meraki-Ap-Tags          4 string
ATTRIBUTE Meraki-IPSK             5 tlv
ATTRIBUTE Meraki-IPSK-Anonce      5.1 octets
ATTRIBUTE Meraki-IPSK-EAPOL       5.2 octets
ATTRIBUTE Meraki-IPSK-BSSID       5.3 octets
ATTRIBUTE Meraki-IPSK-AP-MAC      5.4 octets
ATTRIBUTE Meraki-IPSK-SSID        5.5 string

END-VENDOR Meraki
ATTRIBUTE Meraki-IPSK-EAPOL contains the entire EAPOL message 2, including ANonce and MIC calculated by the client. The RADIUS server uses this information to run a dictionary attack against the known number of configured iPSKs.
If the MIC match is found, the RADIUS server responds to the AP with ACCESS-ACCEPT (message 8), which contains the Tunnel-Password attribute (PSK/password).
Note: Typically, the RADIUS would take long enough to find a match based on the provided EAPOL attributes, leading to an EAPOL handshake timeout after EAPOL-key Message 2, which is expected. Once the AP receives the PMK for the client’s MAC, it will restart the EAPOL handshake and complete it this time
Note: Additional messages (e.g., CoA) can be exchanged between the AP and RADIUS server.
After receiving message 8, the AP restarts the EAPOL handshake (messages 9-12) and derives the PTK, completing the EAPOL handshake.
Configuration
-
Go to Wireless > Configure > Access control
-
Enable a desired SSID for iPSK with RADIUS and Easy PSK

- Optionally, check the WPN checkbox to allow your APs to accept udn_id in the RADIUS ACCESS ACCEPT.
MAC Based
If the MAC address and PSK used by the associating client is configured on the RADIUS server, then only that client will be able to associate to the SSID. Configuration on Dashboard is as follows:
-
From Dashboard navigate to Wireless > Configure > Access control
-
Under SSID, select the SSID from the drop-down that you want to configure.
-
Select Identity PSK with RADIUS from the Security section of the page.

-
Under Splash page, choose None (Direct access).
-
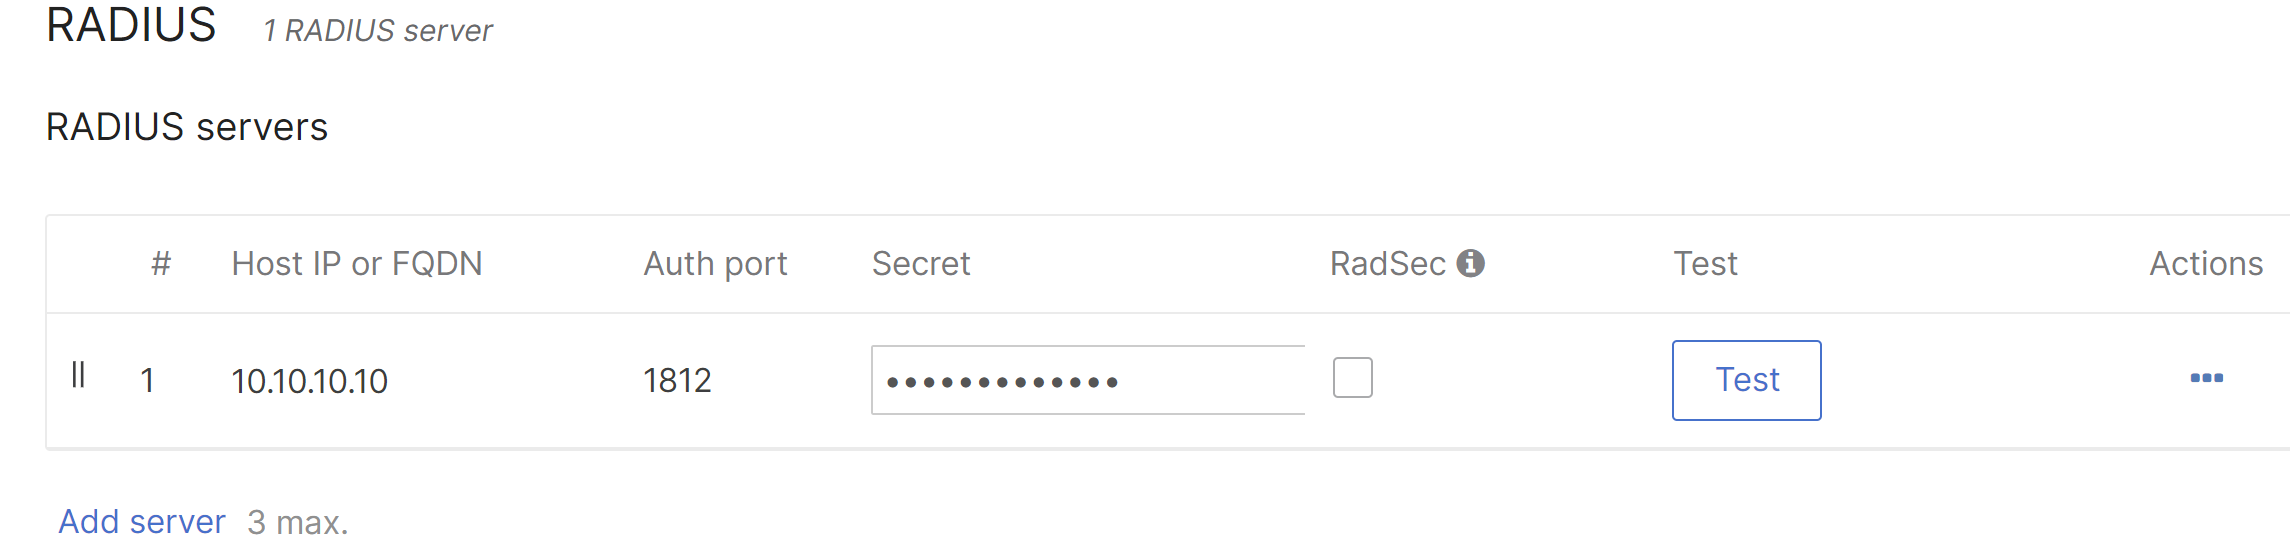
For RADIUS servers, click Add server. Enter the RADIUS server Host IP or FQDN, listening Auth port, and RADIUS shared secret to be used by your access points which are configured RADIUS clients on the server.
-
A Per device PSK SSID can bridge wireless devices onto different VLANs if a Bridge mode SSID is used. A default SSID VLAN can be set by enabling VLAN tagging under the Client IP and VLAN section. By setting the RADIUS override to Override VLAN tag, the RADIUS response can be used to override the default VLAN tag. RADIUS accept messages containing a different VLAN tag will be able to override the default VLAN for the SSID. For more information on configuring VLAN override via RADIUS, check out our VLAN Tagging article.
- Click Save.
Use of special characters in the Shared secret is not allowed with some RADIUS servers. This may cause the authentication to fail.
The RADIUS server used for authentication can vary depending on the network. The Tunnel-Password attribute is the field that is used on the RADIUS server to bind the MAC address and PSK. If the PSK matches the RADIUS server's entry for the client's MAC address, the wireless client is authenticated and associated on the wireless network. See below for configuration with FreeRadius and Cisco ISE.
Configuration of IPSK with RADIUS authentication
FreeRADIUS Configuration:
The example setup below is using FreeRADIUS version 3.0.21. Exact steps may vary depending on the version of FreeRADIUS you are using. Please consult the FreeRADIUS documentation.
-
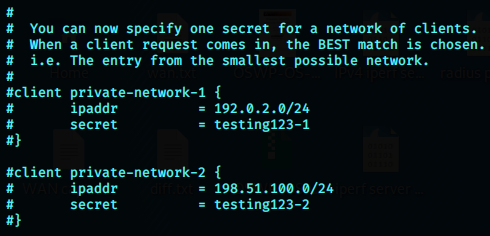
Navigate to: /etc/freeradius/3.0/

-
In the clients.conf file, configure the AP IP address or subnet and secret. This will be the same secret you entered in Dashboard under RADIUS Servers.
-
To add a MAC address and pre-shared key for a client, navigate to the users file and enter the MAC address and password in the below format. Do not use colons in the MAC address username or PSK. Ensure that you tab the Tunnel-Password to nest it under the username, otherwise FreeRADIUS may fail to start with errors.
<MAC address> Cleartext-password := <MAC address>
Tunnel-password = <PSK entered on the client device>

-
To configure a default pre-shared key to be used by clients not explicitly listed in the users file:
DEFAULT Auth-Type := Accept
Tunnel-Password = <PSK of your choice>

-
Once this configuration is saved you should be able to authenticate your client devices based on the PSK.
Cisco ISE Configuration:
The diagram below shows the general flow of traffic when using IPSK to authenticate against a Cisco ISE server.

- Client authenticates and associates to SSID (more details on this process can be found in: 802.11 Association Process Explained)
- Upon authentication/association MR sends RADIUS MAB request to ISE
- ISE processes MAB auth through rule sets
- ISE responds back with Tunnel-Password attribute (PSK)
- AP and client complete 4-way handshake
The following sections focuses on Cisco ISE 2.4. Configuration may vary based on the version of Cisco ISE.
Adding Network Devices and Assigning to a Group
-
Navigate to Administration > Network Devices.
-
Click Add to add a new network device.
-
Fill out the following fields:
Configure the IP Address field with the management IP subnet for your access points. Make sure to configure a Location so that the authentication can be matched to the correct policy set.
Create a policy set and default rule configuration
-
Navigate to Policy > Policy Sets
-
Create a new policy set with the condition Device > Location and select the location you applied to the MR Device type. Then create another condition and use Radius: Called-Station-ID ENDS_WITH {Your SSID Name}.
Note: PAP is disabled by defualt under the Default Network Access policy. PAP should be enabled by going to Policy Results > Allowed Protocols > Default Network Access and checking the box to Allow PAP ASCII. -
Navigate into that policy set by clicking the arrow to the right. Expand the Authentication section of the policy and modify the default rule to the following:
Make sure to select Internal Endpoints and If User not found: Continue. This will allow devices that are not already in ISE the ability to be processed through the authorization rules. -
Next expand the Authorization rules and select the default rule. In the default rule:
-
Deselect Deny access.
-
Click the + icon and create a new profile. This will be the default PSK.
-
For the PSK response, Meraki uses the Tunnel-Password attribute and value for the PSK transmission as it is encrypted in transit between the RADIUS server and the Network Access Device.
-
Select the default PSK authorization profile we created for the default rule and click save.
Creating Endpoint Identity Groups for PSK Management
-
Navigate to Work Centers > Guest Access > Identity Groups
-
Click Add to add a new group.
-
Name this group 'PSK_Devices'
- Create another group called 'PSK1' and nest it under 'PSK_Devices'
Creating Authorization Profiles for Each PSK with Group Policy Assignment
-
Navigate to Policy > Policy Elements > Results > Authorization > Authorization Profiles
-
Click add and create at least 1 PSK Authorization Profile. In this example, PSK1 is used and 'PSK1' is returned as the dashboard group policy to apply to the client via Filter-ID.
Creating Authorization Rules for PSK Assignment
-
Navigate to Policy > Policy Sets > {Policy set created earlier}
-
Expand the Authorization Rules.
-
Add a new rule above the default rule with Insert new row above.
-
Name this rule 'PSK1' and use the following condition configuration:
-
Next select the PSK1 Authorization Profile created for this rule and click Save.
Add Devices to the PSK1 Group
For this guide a single MAC address will be added; however, using the “Import” function, large groups of devices can be added at a time.
-
Navigate to Context Visibility > Endpoints
-
Click the + symbol above the devices list and enter the MAC address of your test client
Microsoft NPS Configuration
Note: MR 30.1 firmware and higher is required for IPSK with NPS.
IPSK with RADIUS using a Microsoft NPS server is supported when the following criteria are met:
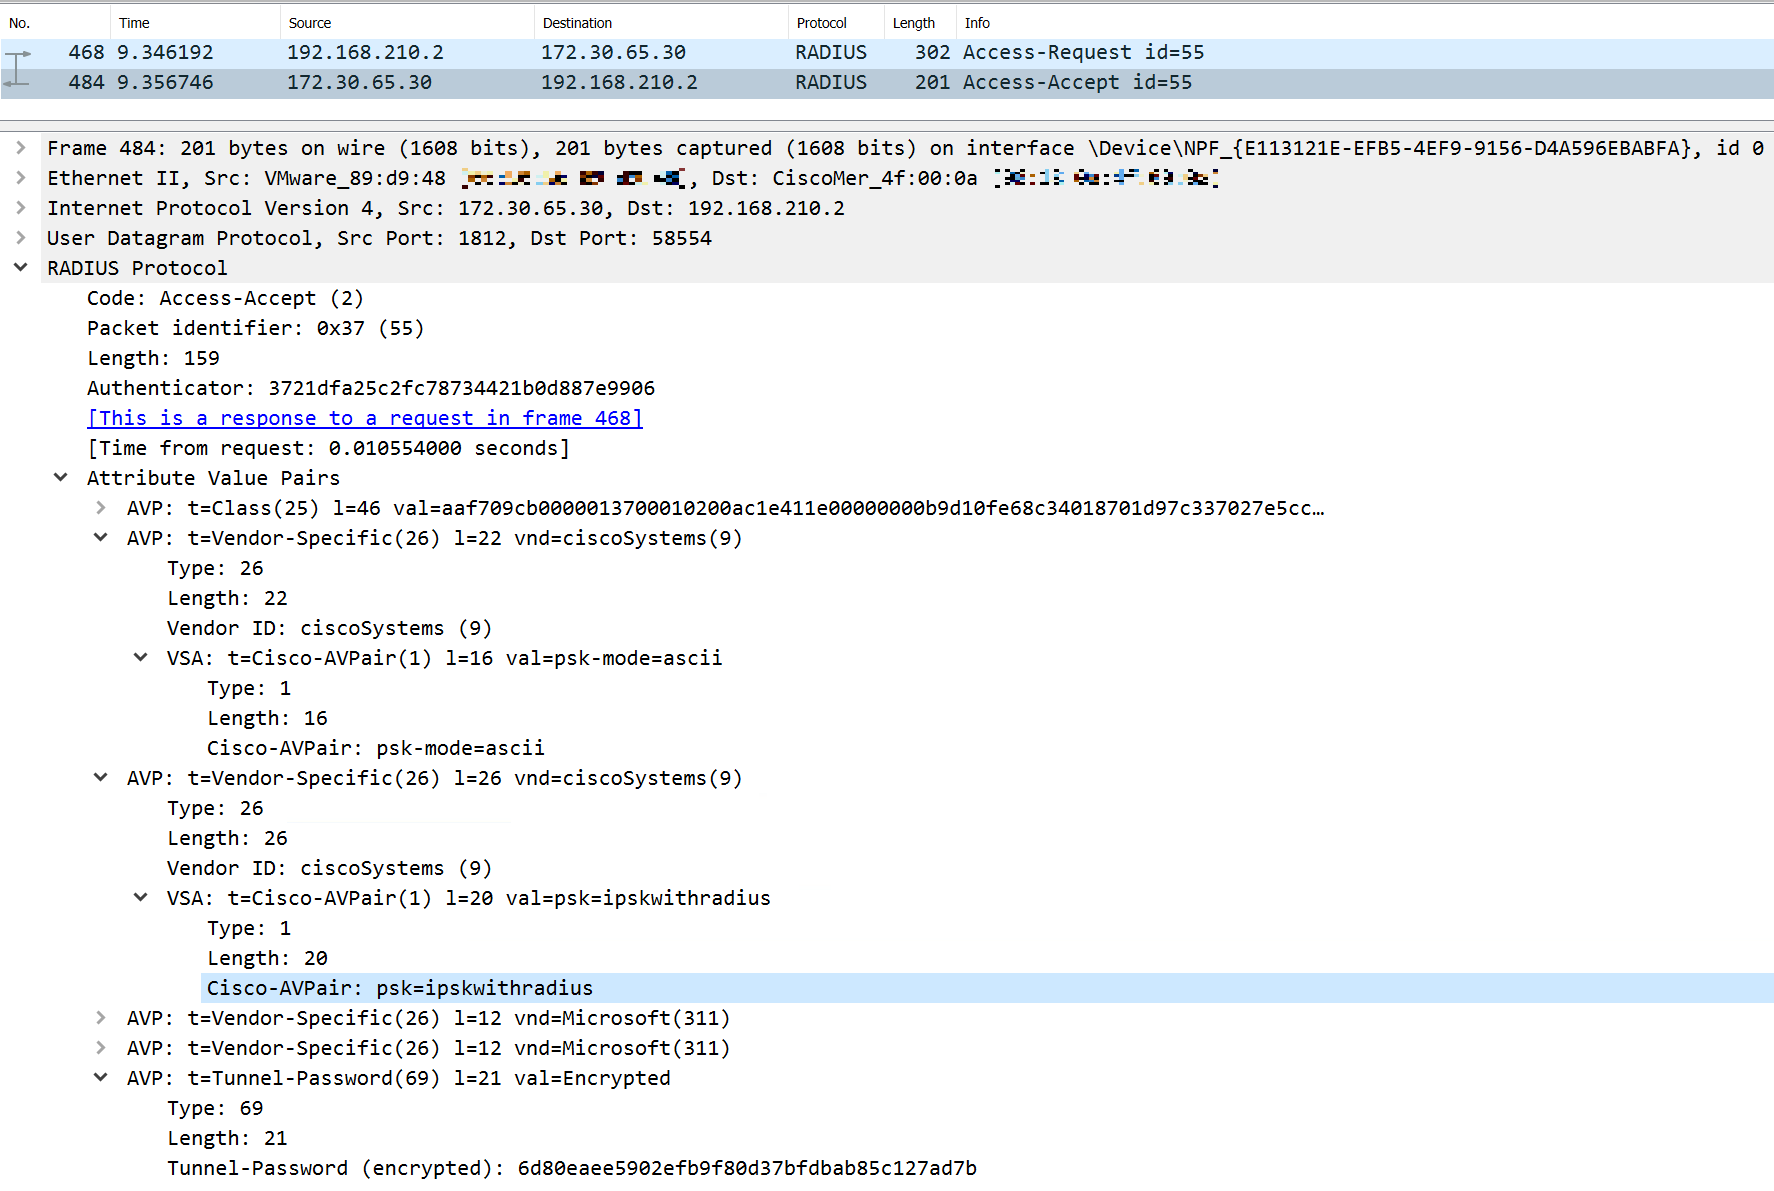
- The Tunnel-Password RADIUS standard attribute is present in the Access-Accept packet from the NPS server.
- Cisco Vendor-Specific Attributes psk and psk-mode=ascii are present in the Access-Accept from the NPS server.
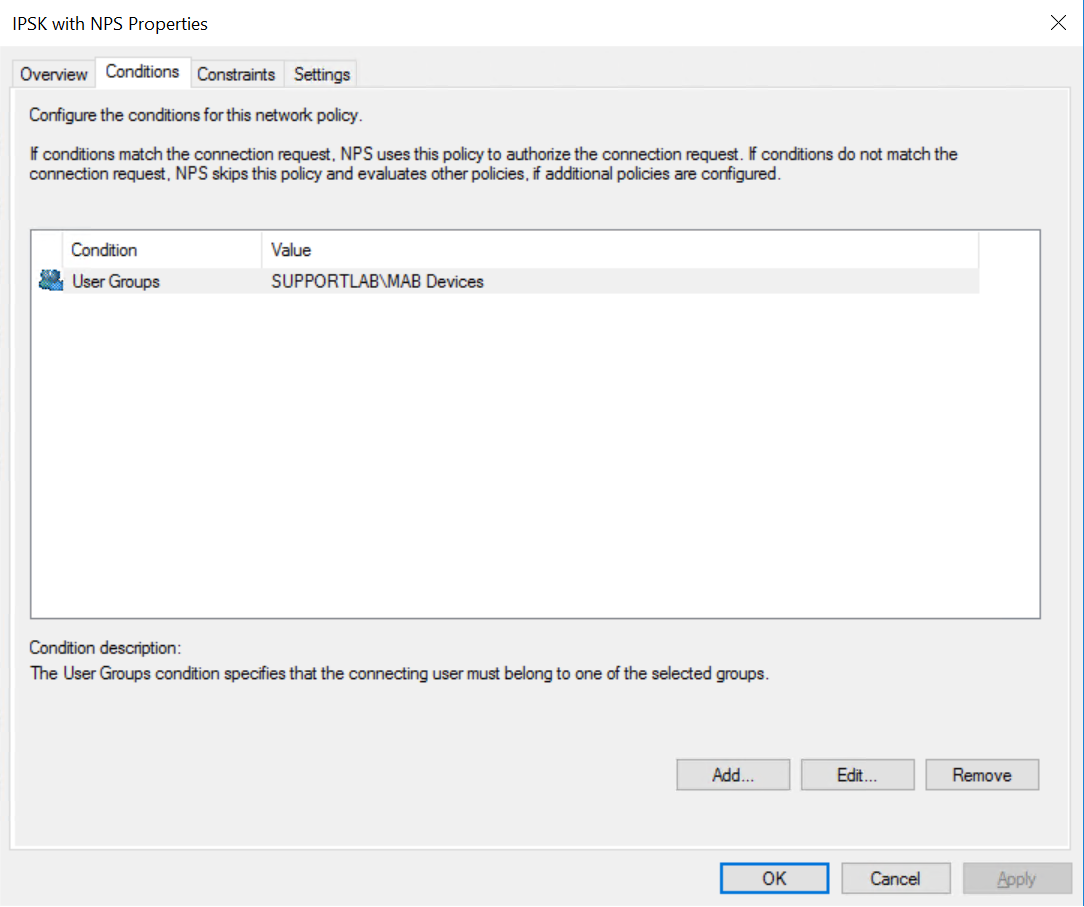
First, ensure your client MAC addresses are added to a User Group on your AD server. To configure the policy on the NPS server,
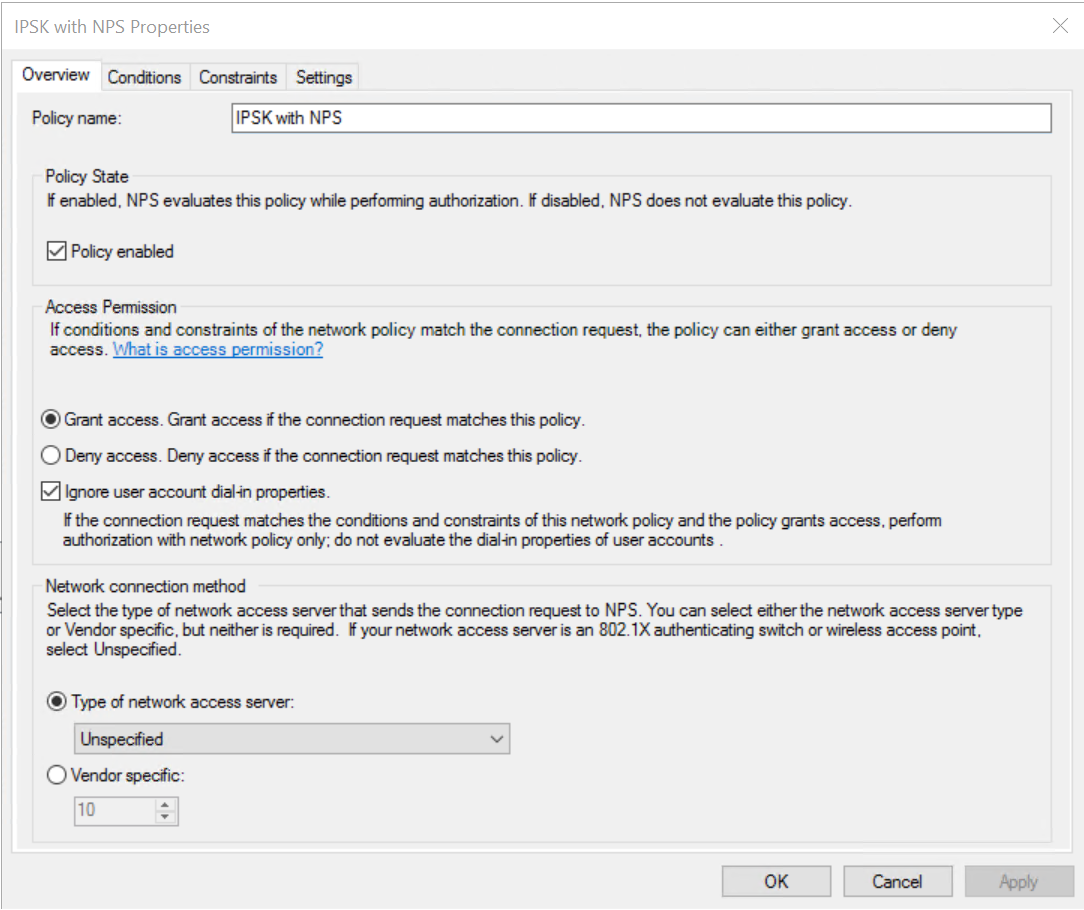
1. Open an existing policy or create a new one. The Overview tab of the properties of the policy should look like the following:
2. On the Conditions tab, choose the User Groups value for the devices you want to authenticate using IPSK on your AD server
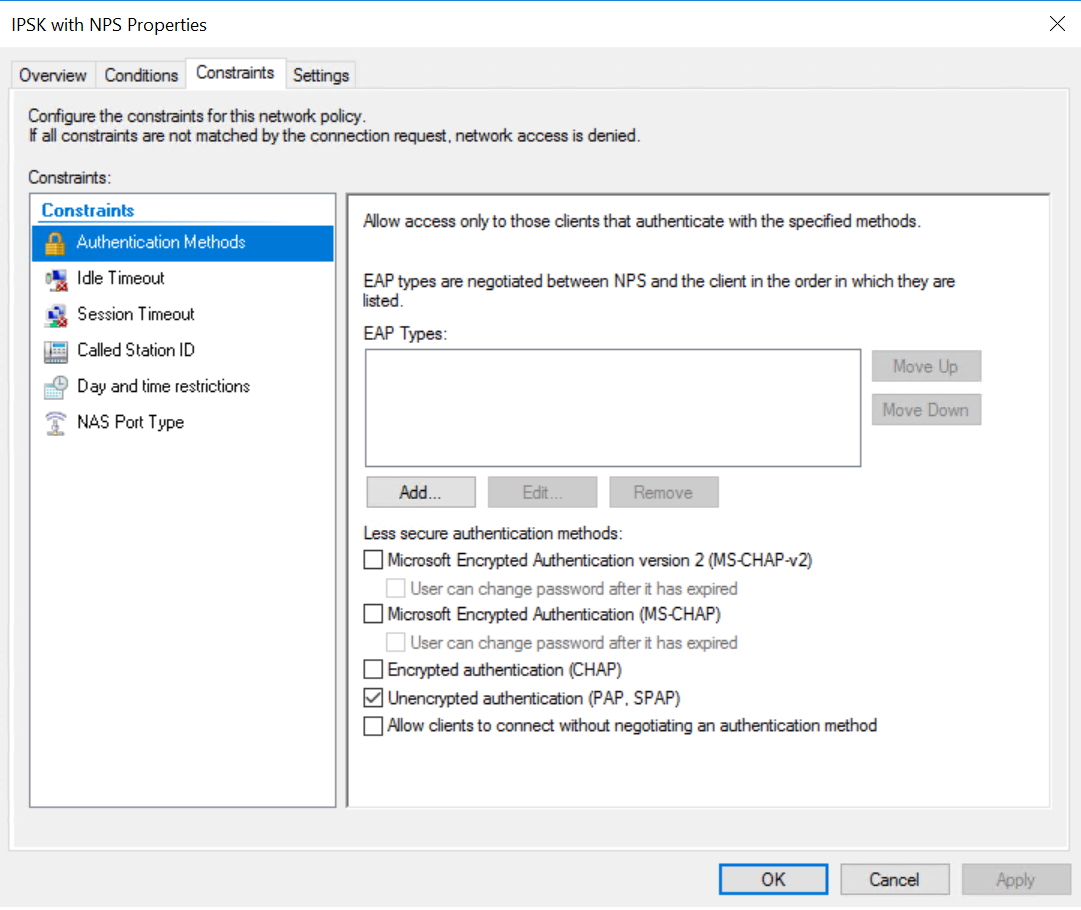
3. On the Constraints tab, uncheck all authentication methods except for PAP
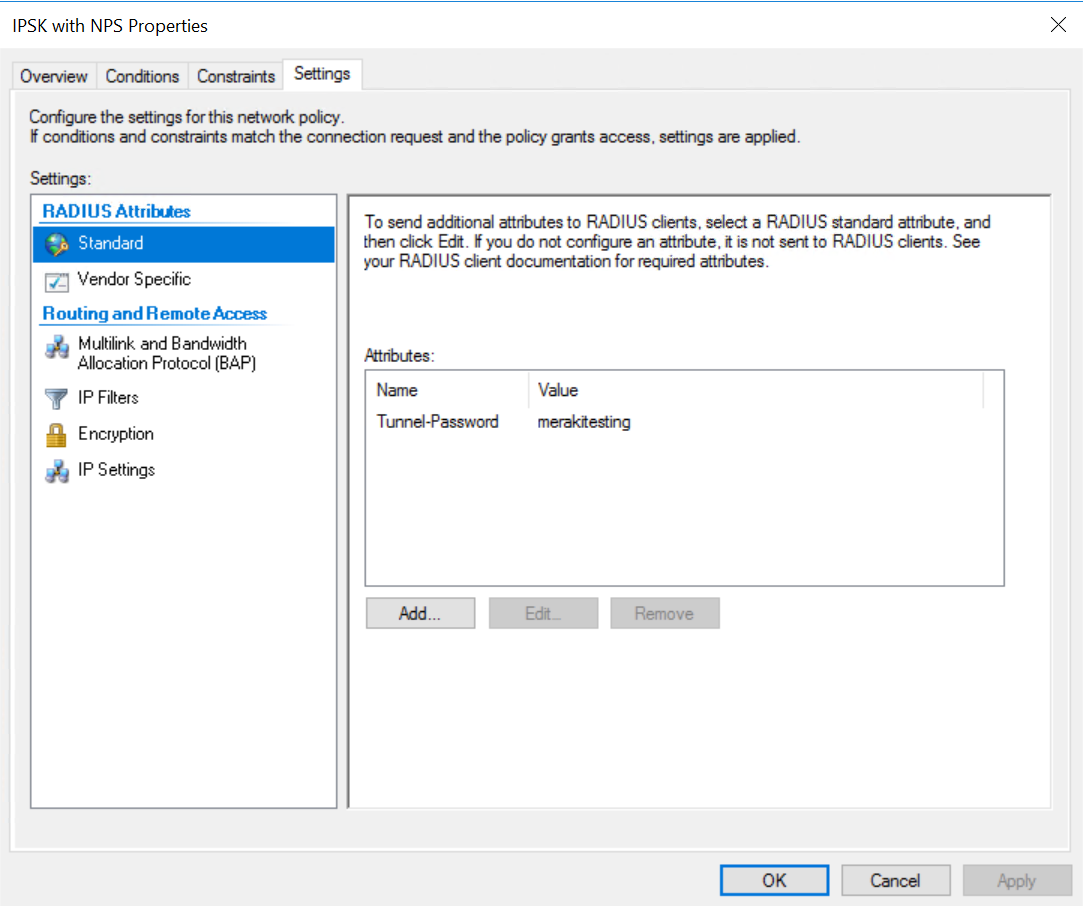
4. On the Settings tab, add a Standard RADIUS attribute of Tunnel-Password. It does not matter what the actual value is here, because the clients will not be using it. However, it MUST be included. Otherwise, the MR will reject the response from the NPS server
5. On the Vendor Specific section, add a Cisco AVP and configure both a psk and the psk-mode=ascii
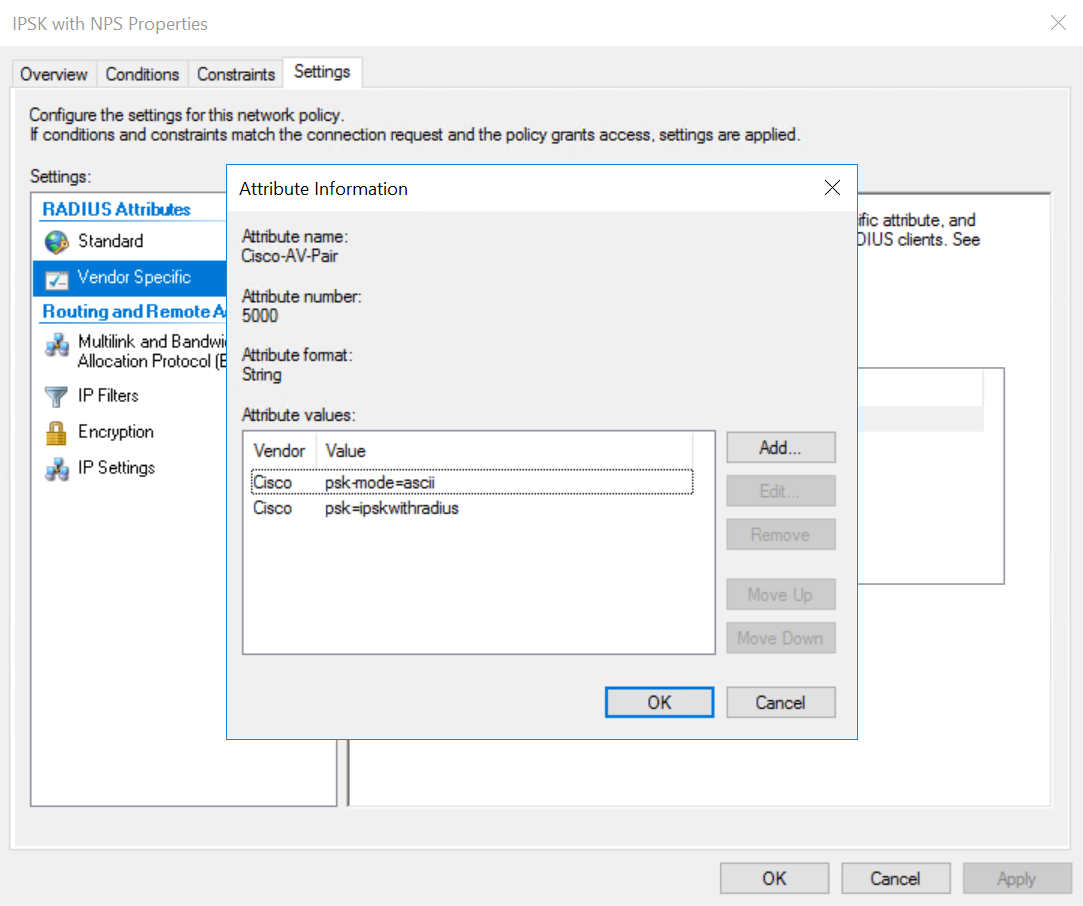
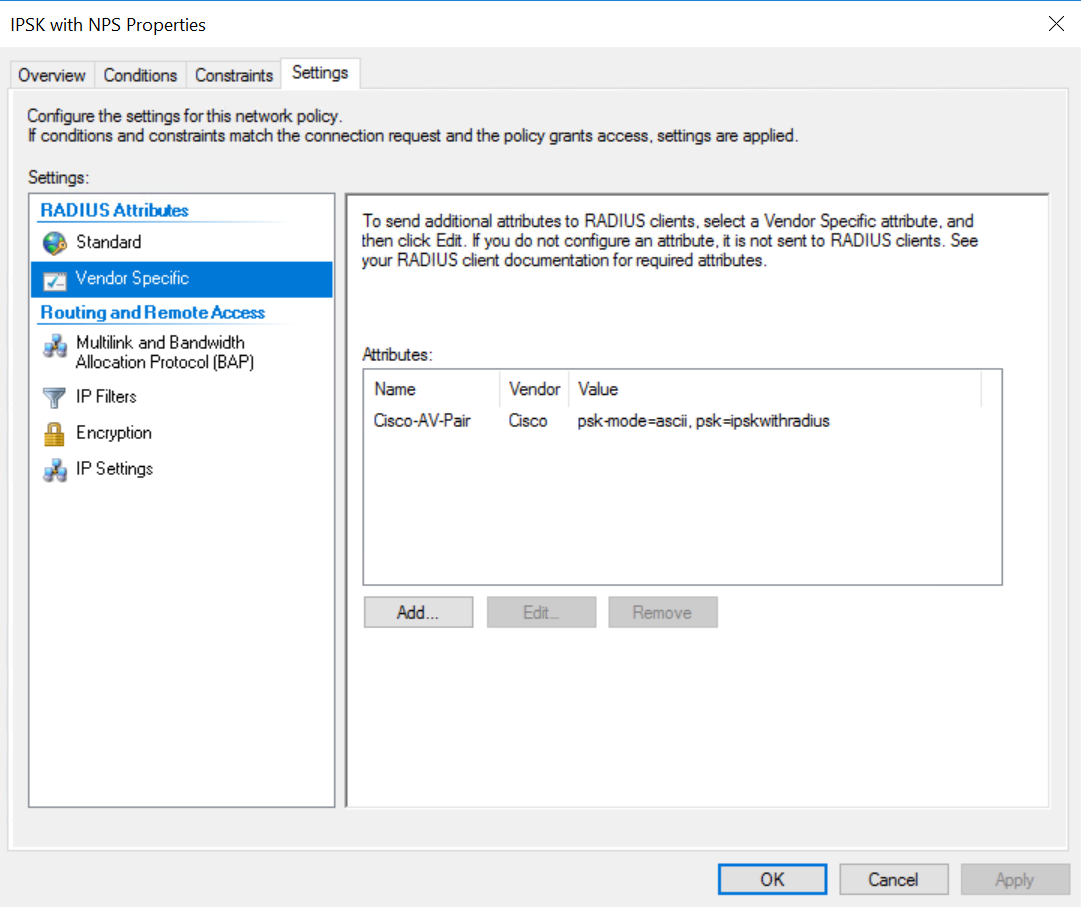
The psk value is the PSK that should be entered on the supplicant. The Access-Accept packet for a client with the above configuration looks like the following. Notice the Cisco Vendor-Specific AVPs of psk-mode and psk as well as the standard Tunnel-Password AVP. The Cisco psk AVP has the PSK in cleartext.
Applying Dashboard Group Policies
-
Navigate to Network-wide > Configure > Group Policies
-
Create a new Group Policy called 'PSK1'
Feel free to configure anything needed here including but not limited to:-
Firewall Policies
-
Traffic Shaping
-
Umbrella Group Policies
-
-
When you are finished, click Save changes.
Validating PSK and Group Policy
-
Connect to the test SSID using your test client.
-
Check the logs in Cisco ISE under Operation > RADIUS > Live Logs
-
Check Dashboard under Network-wide > Monitor > Clients and select the test client: