
How to Integrate Cisco Umbrella or Secure Access with Meraki Networks
Overview
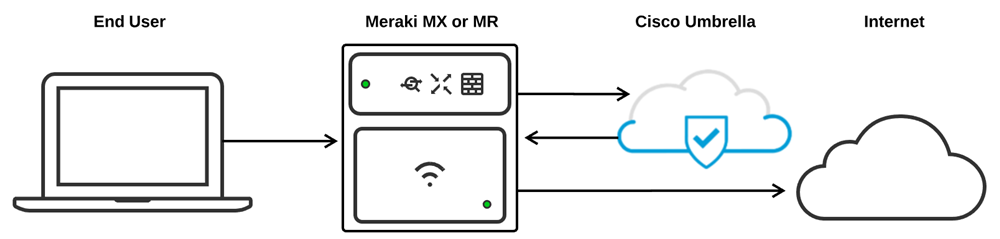
Integrating the Meraki dashboard with Cisco Umbrella or Secure Access DNS allows clients connected behind Meraki MX security appliances or MR access points to have their DNS traffic filtered through Cisco Secure Service Edge (SSE) DNS.
Administrators can apply and manage DNS-based filtering policies for multiple groups of clients by assigning a policy to a Meraki group policy or SSID. After a policy is assigned, DNS requests from clients associated with that group policy or SSID are automatically redirected to Cisco SSE DNS, where the requests are evaluated against the policy configured in the Umbrella or Secure Access dashboard.
Note: This article was originally written for Cisco Umbrella. The configuration process for Secure Access is identical unless otherwise specified.
Note: This feature is not supported for MX or Z-series devices running in passthrough mode.
Prerequisites
Firmware requirements
- MX platform requires MX firmware version 15.10 or later.
- MR platform requires MR firmware version 26.1 or later.
- MX platform connecting to Secure Access should run firmware version 19.2 or later.
Licensing requirements
MX WAN appliance
The MX WAN appliance requires one of the following licenses:
- Advanced Security license
- Z3 with an Enterprise license (as Z3 does not support Advanced Security license).
MR access point
The MR access point requires one of the following licenses:
- Manual integration: Enterprise license
- Automatic integration: Advanced license
- An existing license to use Cisco Umbrella
Step-by-step instructions
Configuring SSE DNS integration
Manual Umbrella integration is mutually exclusive with Automatic Umbrella integration on MR devices that use MR Advanced licenses. If you plan to use manual MX or MR integration, complete the following steps before claiming MR Advanced or MR Upgrade licenses or adding the organization to an Enterprise Agreement.
Linking the Meraki and Umbrella dashboards
Before you can apply Umbrella filtering policies, link the Meraki and Umbrella dashboards by using the Umbrella Network Devices API key. After the dashboards are linked, you can assign Umbrella policies to Meraki SSIDs and group policies.
The same procedure applies to Secure Access. The only difference is the API key scope.
For Secure Access DNS integration, create an API key with the following permissions:
- Admin/Organizations: Read/Write
- Deployments/Network Devices: Read/Write
- Deployments/Policies: Read/Write
If you do not use group policies, you can omit the Deployments/Policies permission.
Note: Cisco recommends running MX firmware version 19.2 or later when connecting to Secure Access.
Generate the Umbrella API key
Before linking the dashboards, generate an Umbrella API key and secret.
- In the Umbrella dashboard, go to Admin > API Keys > Legacy Keys > Umbrella Network Devices.
- Select Generate Token.
- If no keys exist:
- Select Umbrella Network Devices
- Select the blue plus sign (+) labeled Generate Token.
- If no keys exist:
- Copy both the key and the secret.
The Umbrella dashboard will only display the API secret when it is first generated. Save both the key and the secret before closing the page. Store the secret in a secure location, as you will not be able to view it again.
Generating new Token example screenshot:

- Key and secret example screenshot below:

If the Umbrella Network Devices API key and secret pair have already been generated, use the existing key and its corresponding secret. Example screenshot:

Apply the Umbrella API key to a Meraki network
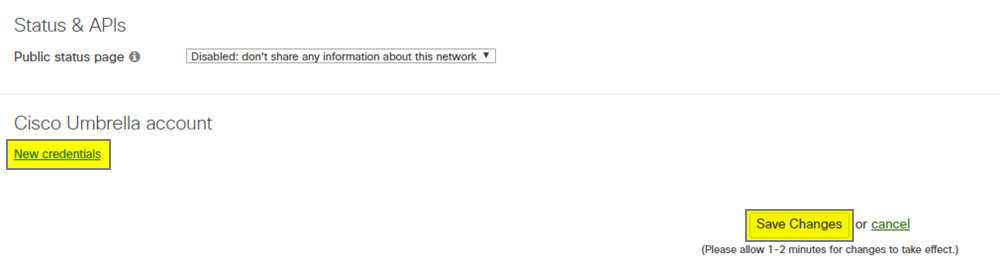
After generating the Umbrella API key and secret, add the credentials to the Meraki dashboard to link the Meraki network and the Umbrella dashboard:
- In the Meraki dashboard, go to Network-wide > Configure > General.
- Select New Credentials located under the Cisco Umbrella Account section at the bottom of the page.
- Paste the Umbrella API key and secret in the appropriate fields.
- Select Save Changes.
The Meraki and Umbrella dashboards are now linked. You can apply Umbrella policies to Meraki SSIDs or group policies within the current Meraki network.
Note: Umbrella integration links on a per-network basis. Enter the Umbrella API key and secret on every Meraki network that requires Umbrella integration. You can also link the Umbrella Network Devices API on a template parent network so that child networks bound to the template can use the same policies. Cloned Meraki networks retain the API key for easy linking.
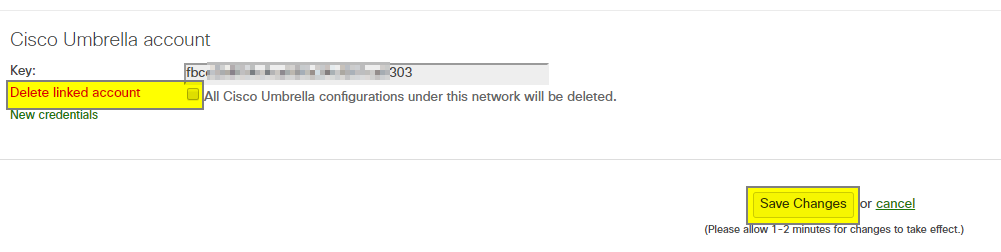
Unlink a Meraki network and Cisco Umbrella
Once the Meraki and Umbrella dashboards are linked, the active API key appears at the bottom of Network-wide > Configure > General. To unlink a Meraki network from Umbrella:
- Go to Network-wide > Configure > General.
- Check the Delete linked account box.
- Select Save Changes.
Deleting the link clears any objects in the Umbrella dashboard sourced from this network, as well as any Umbrella policies applied to SSIDs or group policies in the network
Link and apply an Umbrella policy
After the dashboards are linked, you can associate a Meraki SSID or group policy with an Umbrella policy.
When you link an SSID or group policy to Umbrella, the Meraki dashboard creates a unique device ID for that object. Umbrella associates the policy with that device ID. DNS traffic sent to Umbrella includes the device ID so that Umbrella can determine which policy to apply.
Note: You can view these objects in the Umbrella dashboard by navigating to: Deployments > Core Identities > Network Devices.
Umbrella Network Devices are automatically created when you link a Meraki SSID or group policy.
They use the following naming format: <SSID/Group_Policy_name>__<Network name>_-_wireless
Link a Meraki group policy to an Umbrella policy (MX & MR)
Create the group policy
Before you can link an Umbrella policy, create the group policy in the Meraki dashboard:
- In the Meraki dashboard, go to Network-wide > Configure > Group policies.
- Create a group policy and set it to use Custom network firewall & shaping rules.
- Save the group policy.
For more guidance on creating group policies, see the Meraki Group policies documentation.
Note: Before attempting to link the group policy with Umbrella, ensure that the group policy is completely saved on the Meraki dashboard first.
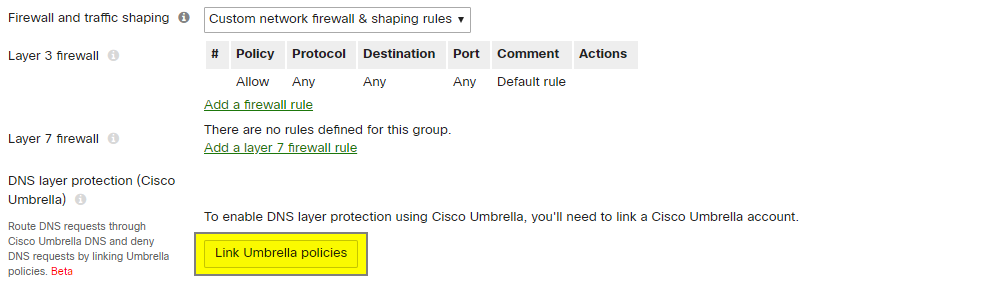
Link the Meraki group policy to Umbrella
- Go to Network-wide > Configure > Group policies.
- Select the group policy to link.
- Select Link Umbrella policies, located under the Layer 7 firewall rules.
The Meraki dashboard automatically creates the appropriate network device on the Umbrella dashboard and applies the default policy to the group policy.
Note: Group policies must use Custom network firewall & shaping rules to link an Umbrella policy.
Save new group policies before linking to Umbrella.
Apply an Umbrella policy to the group policy
When you first link a group policy to Umbrella, the default policy is automatically applied. To apply a different Umbrella policy:
- Go to the group policy details page.
- Select the appropriate Umbrella policy from the drop-down menu on the group policy details page.
- Select Save.
If the Umbrella policy does not yet exist, create it in the Umbrella dashboard first:
- In the Umbrella dashboard, go to Policies > Management > All Policies.
- Click Add in the top-right corner and complete the policy creation steps.
- Once created, apply the Umbrella policy to the appropriate Meraki group policy from the Meraki dashboard.
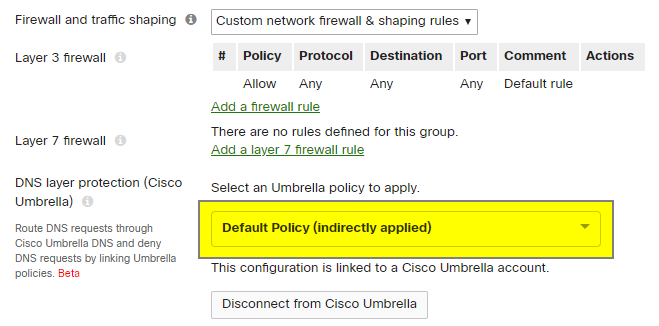
Note: The order that policies are listed in Umbrella is important. View the order by going to Policies > Policy list in the Umbrella dashboard. When a Meraki group policy is initially linked, it inherits the default Umbrella policy, which appears last in the ordered list. The Meraki dashboard displays this as Default Policy (indirectly applied) because the default Umbrella policy was not specifically selected from the Meraki dashboard.
Once a policy is assigned to a network device in the Umbrella dashboard, policies listed below the selected policy are not evaluated. The policy list is read in a top-down order, and evaluation stops at the first match for the device ID. See Policy Precedence documentation for more information.
Apply the group policy to clients
Apply the Group policy to specific clients (MX & MR)
You can assign an Umbrella-enabled group policy to individual clients through Active Directory integration or manually from the Meraki dashboard.
To manually assign a group policy:
- Navigate to: Network-wide > Monitor > Clients
- Locate the client.
- Select the check box next to the client.
- From the Policy drop-down menu, select the group policy that contains the Umbrella policy.
For more information, see the applying a group policy to a specific client documentation
Apply the group policy to a subnet (MX Only)
When MX Umbrella integration is available, an Umbrella-enabled Meraki group policy can be applied to a subnet of clients. In this configuration, any traffic that passes through the MX with a source IP contained within that subnet will be subject to Umbrella filtering for the Umbrella policy selected in the relevant Meraki group policy.
To apply a group policy to a subnet of clients:
- Go to Security & SD-WAN > Configure > Addressing & VLANs.
- Select the appropriate subnet from the Subnets list.
- In the dialog box, use the Group policy drop-down menu to select the appropriate group policy and associated Umbrella policy.
- Select Update, then Save.
For more information, see the Meraki group policy documentation.
Note: If Walled Garden is used in your MX configuration, add an Umbrella DNS domain exclusion for the required domains. Configure exclusions by going to Security & SD-WAN > Configure > Threat protection.
Link an SSID to an Umbrella policy (MR Only)
Create the SSID
The SSID must exist in the Meraki dashboard before you can link an Umbrella policy to it:
- In the Meraki dashboard, go to Wireless > Configure > SSIDs.
- Enable the SSID.
- Save the SSID completely before attempting to link Umbrella.
For more guidance on creating and configuring SSIDs, see the documentation on enabling SSIDs and client IP assignment modes for SSIDs.
Note: Ensure that the SSID is completely saved in the Meraki dashboard before attempting to link an SSID with Umbrella.
Link the SSID to Umbrella
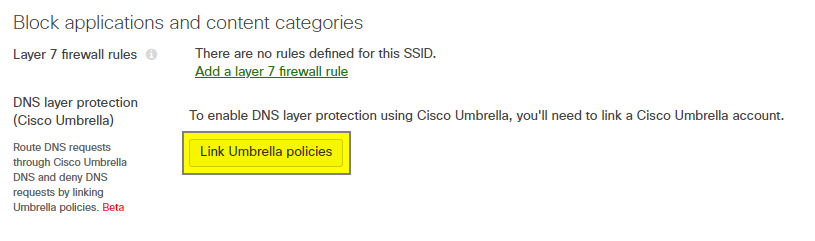
- Go to Wireless > Configure > Firewall & traffic shaping.
- Under the Block Applications and Content Categories header for the appropriate SSID, select Link Umbrella Policies.
The Meraki dashboard automatically creates the appropriate network device on the Umbrella dashboard and applies the default policy to the SSID.
Note: Umbrella integration with MR access points supports all client addressing types found under the Access Control page.
Apply an Umbrella policy to the SSID
After linking an SSID to Umbrella, the default policy is automatically applied. To apply a different Umbrella policy:
- Go to Wireless > Configure > Firewall & traffic shaping.
- Select the appropriate Umbrella policy from the drop-down menu.
- Select Save.
If the Umbrella policy does not yet exist, create it in the Umbrella dashboard first:
- In the Umbrella dashboard, go to Policies > Management > All Policies.
- Click Add in the top-right corner and complete the policy creation steps.
- Once created, apply the policy to the appropriate Meraki SSID from the Meraki dashboard.
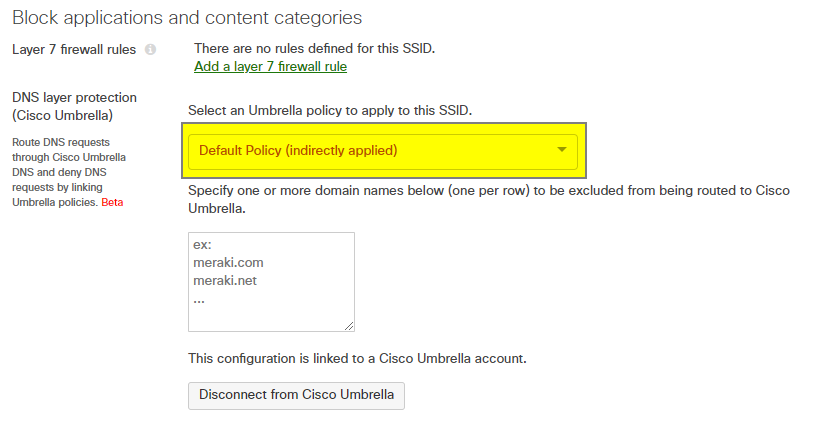
Note: The order that policies are listed in Umbrella is important. View the order by going to Policies > Policy list in the Umbrella dashboard. When a Meraki SSID is initially linked, it inherits the default Umbrella policy, which appears last in the ordered list. The Meraki dashboard displays this as Default Policy (indirectly applied) because the default Umbrella policy was not specifically selected from the Meraki dashboard.
Once a policy is assigned to a network device in the Umbrella dashboard, policies listed below the selected policy are not evaluated. The policy list is read in a top-down order, and evaluation stops at the first match for the device ID. See Policy Precedence documentation.
Remove an Umbrella policy from an SSID or a group policy
To remove an Umbrella policy from an SSID or group policy:
- Navigate to the appropriate page
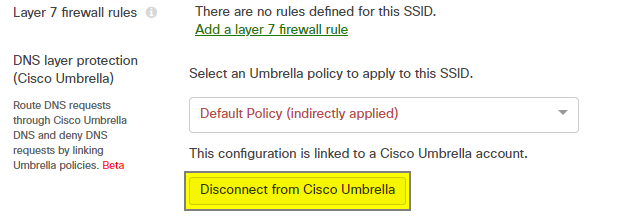
- SSIDs: Go to Wireless > Configure > Firewall & traffic shaping
- Group policies: Go to Network-wide > Group policies > Group policy details.
- Under the currently applied Umbrella policy, click Disconnect from Cisco Umbrella.
- Click Yes in the confirmation pop-up.
Disconnecting an SSID or group policy from Umbrella deletes the associated object from the Umbrella dashboard and unlinks any policies applied to that SSID or group policy in the Meraki dashboard.
DNS Exclusion
DNS requests for excluded domains are not redirected to Umbrella. Instead, the requests are forwarded to the DNS server specified by the client. Use DNS exclusion to prevent DNS requests for local resources from being redirected to Umbrella, allowing them to reach internal DNS servers and resolve correctly.
DNS Exclusion for MR Access Points
When an SSID operates in Bridge mode, you can configure DNS exclusions under the policy selection drop-down menu.
When configuring DNS exclusions on MR access points, keep the following points in mind:
- DNS exclusion is available only for SSIDs configured in Bridge mode.
- Group policies linked to Umbrella do not support separate DNS exclusions.
- Group policies inherit the DNS exclusions configured on the SSID.
For example, if the Employee SSID excludes meraki.com, clients assigned to a group policy with a different Umbrella policy still exclude meraki.com from Umbrella lookups.
MR access points automatically exclude the following domains from Umbrella redirection:
- .local
- in-addr.arpa
DNS Exclusion for MX WAN Appliances
By enabling Umbrella protection at Security & SD-WAN > Configure > Threat protection, all client devices are subject to Umbrella filtering across the entire network unless a group policy overrides the setting.
To specify domains to exclude from Umbrella routing:
- Go to Security & SD-WAN > Configure > Threat protection.
- Scroll to the Umbrella protection section.
- Enter one or more domain names (one per row) to exclude from Cisco Umbrella routing.
Note the following when configuring DNS exclusion for MX WAN appliances:
- MX supports DNS exclusion per network.
- The exclusion configuration is only visible after Umbrella protection is enabled.
- By default, MX firmware version 26.1 and later excludes local DNS names with the .local suffix and reverse DNS lookups for private IP addresses.
Adding custom domain exclusions overrides the default .local exclusion. If you add custom exclusions, explicitly include any local domains that should continue to bypass Umbrella.
Clients connected to MR access points do not follow MX Umbrella policies. Consider this behavior when designing SSID and group policy integrations
Verification
DNS Traffic Flow
The following describes the expected DNS traffic flow after successfully linking an SSID or group policy to an Umbrella filtering policy:
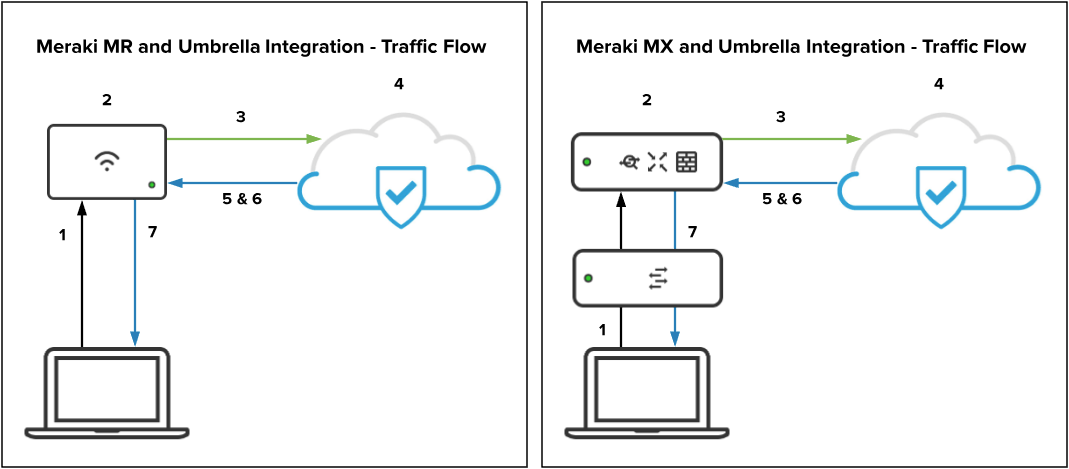
- The client sends a DNS query.
- Meraki intercepts the DNS query and attaches an identifier specifying which Umbrella policy to check the request against.
- Meraki encrypts the DNS query using DNSCrypt, source NATs the packet to the MR management IP, and redirects it to the appropriate Umbrella endpoint.
- After arriving at the Umbrella endpoint, the DNS query is decrypted and checked against the appropriate Umbrella policy based on the attached identifier.
- If the request is allowed, Umbrella returns an encrypted DNS response with the appropriate IP address.
- If the request is blocked, Umbrella returns an encrypted DNS response pointing to the Umbrella block page.
- The client receives the web page based on the applied policy.
Note: HTTPS requests do not load the Umbrella block page correctly. Instead, users see a generic "Webpage is not available" error, consistent with Meraki's content filtering behavior.
Note: Meraki sends encrypted DNS traffic to 208.67.220.220/32. Ensure that bidirectional connectivity to this address is permitted to and from UDP 443 on any upstream devices.
Note: When an MX WAN appliance has Umbrella protection enabled and a VPN (Auto VPN or Non-Meraki VPN) default route, the MX forwards DNS requests rewritten by Umbrella over the VPN default route even if the source subnet does not participate in VPN. These requests are sourced using an internal 6.x.x.x IP address.
Note: When enabling Umbrella on MR access points with an MX WAN appliance upstream, DNS-snooping-related features on the MX, such as YouTube filtering and Layer 3 Fully Qualified Domain Name (FQDN) rules, stop working because Umbrella DNS requests from an MR are encrypted. Clients connected to MR access points do not follow the MX's Umbrella policies. Consider this behavior when designing group policy and SSID integration with Umbrella policies.
Troubleshooting
General troubleshooting steps
- Ensure that the Umbrella and Meraki dashboards are properly linked via API from Network-wide > Configure > General (Section 3.1)
- Ensure that the SSID/group policy has been linked to Umbrella in the Meraki dashboard and has an Umbrella policy applied from either Network-wide > Configure > Group polices or Wireless > Configure > Firewall & traffic shaping respectively (section 3.2.1 & 3.2.2)
- Ensure that the appropriate identity exists under Deployments > Core Identities > Network Devices on the Umbrella dashboard (section 3.2)
- Ensure that the correct policy is assigned to the correct network device in the Umbrella dashboard from Policies > Policy List
- Ensure that bi-directional UDP 443 traffic is allowed to the Umbrella endpoint of 208.67.220.220/32 (section 4.1)
Best practices
-
Enable the DNS integration on both MX and MR platforms for the broadest protection
-
TCP DNS is not supported on the MX on firmware versions earlier than 19.2. If you are using an earlier version, upgrade to the latest firmware if possible.
-
If upgrading is not an option, review and consider implementing the steps below:
-
Under normal circumstances, TCP DNS requests account for ~.02% of DNS requests. If TCP DNS is a concern steps to secure this type of traffic the following steps can be taken.
-
Add an L3 Firewall Rule (Security & SD-WAN > Configure > Firewall) which blocks TCP port 53
-
Add a Content Filtering Rule (Security & SD-WAN > Configure > Content Filtering) to block DoH/DoT Traffic. This category is intended to identify and block encrypted TCP DNS traffic which will force the client back to unencrypted lookups and continued security coverage.
-
Update to Chrome 113 or newer on Windows clients.
-
A bug that impacted Windows clients caused frequent DNS queries over TCP. This has been fixed in Chrome 113 (released 5/2)
-
-
-
- See Best Practices for DNS Policies article.