
Firmware Updates on MV Smart Cameras
The Cisco Meraki platform enables centralized deployment and management of firmware upgrades for both your networking stack and your security cameras. Gone are the days of rigorously downloading firmware and installing plugins to upgrade your cameras. The Meraki MV smart cameras tackle the complex firmware narrative by leveraging the power of Meraki’s cloud-based dashboard to automate firmware updates and scheduling. This article will discuss the easy-to-use process for updating the firmware on your Meraki MV smart camera.
Meraki Firmware Overview
The cloud offers unmatched security advantages. New vulnerabilities are identified weekly, requiring swift action to address them. Meraki cloud security quickly responds to these threats, patches vulnerabilities, and provides updated firmware for customers to use immediately. Explore Meraki documentation for best practices on firmware and answers to common firmware-related frequently asked questions.
Meraki MV Firmware
If you know how firmware upgrades work for other Meraki products, you are ready to manage MV cameras. MV firmware updates function in a similar way. Updates download automatically from the dashboard and install on the cameras. Release notes for each update detail the changes and can be viewed on the Organization > Monitor > Firmware upgrades page under Release notes in Latest firmware versions. Examples of changes made in firmware updates include the following:
-
Feature updates such as integrated wireless support, temperature logging, and live stream audio functionality in select cameras
-
Increased accuracy within the person detection model to improve MV analytics
-
Improved audio syncing with the video feed
-
Bug fixes to improve functionality and user experience
Check the Current Firmware Version
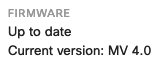
Check the current version of firmware your camera is running directly on the dashboard by navigating to Cameras > Monitor > Cameras. Next, select the camera on which you would like to check the version of the currently running firmware and go to the Network tab. Identify the current version your camera is running on, and if it is up-to-date.
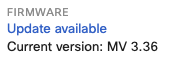
If it is not up-to-date, a clickable link will appear which will lead you to schedule your next upgrade.
Updating your Firmware
When a camera firmware upgrade is available, Meraki schedules it for the next upgrade window. To view or change your upgrade window, go to Network-wide > Configure > General. A notification banner about the scheduled upgrade will appear at the top of the Cameras page daily, starting one month before the upgrade.
Upgrades can be rescheduled to coincide with periods of limited activity, such as a weekday at 3:00 am. Reschedule the upgrade by following the link present in the above banner, or following the steps:
-
From the Meraki Dashboard, navigate to Network-wide > Configure > General
-
Scroll down to find the section titled Firmware upgrades
-
In Camera firmware, select either option available to reschedule the upgrade to the desired time, perform the upgrade now, or upgrade as originally scheduled
The camera upgrade time will vary depending on your internet connection speed and will typically range from five to fifteen minutes. This upgrade will not affect the current recording of the camera until the firmware download completes. Once the firmware downloads, the camera will reboot and will temporarily lose video storage and streaming capabilities for approximately three-five minutes.
Installing Beta Firmware
Firmware is initially released as 'Beta' for production use. Beta firmware often includes new features and bug fixes. It undergoes internal testing for regression, stability, and performance to reduce risks in production networks. However, Beta firmware may still be unstable and is not recommended as the primary build for a production network. Perform the following steps to enable devices to install Beta firmware when it becomes available:"
-
Navigate to Network-wide > Configure > General.
-
Scroll down to Firmware upgrades.
-
Select “Yes” on the Try beta firmware dropdown.
-
Save changes
When this option is enabled, the latest Beta version installs automatically as developers release updates. Once installed, future updates will only apply when the next Beta release is available. To access the latest Beta release immediately after enabling Beta, follow the steps below:
-
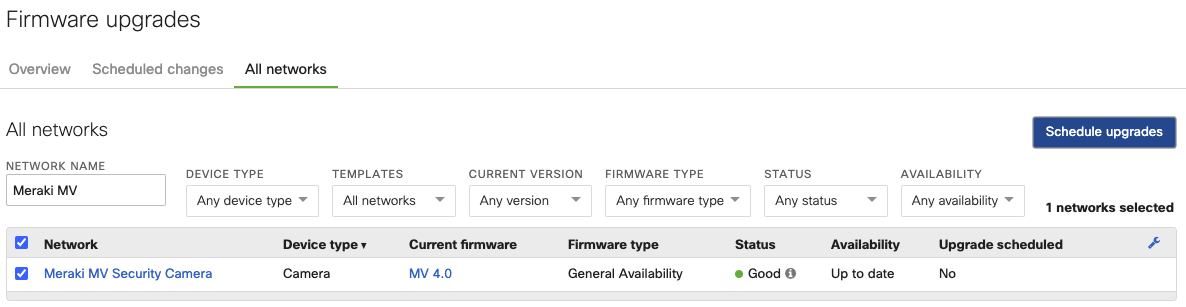
Navigate to Organization > Monitor > Firmware upgrades.
-
Go to the All networks tab.
-
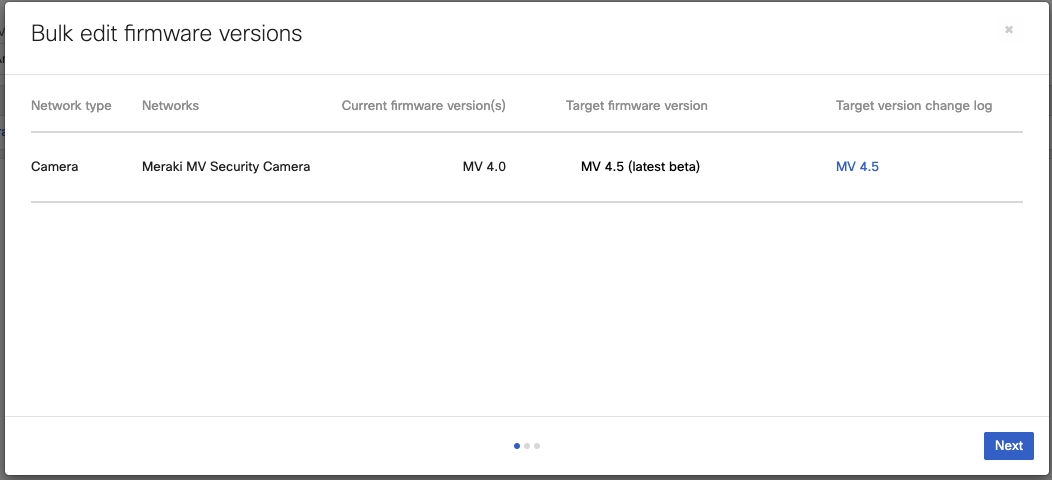
Select the checkbox of the camera(s) network you wish to install Beta and click Schedule upgrades.
Rolling Back to Older Firmware
You can roll back (downgrade) firmware to a previous version if the current version causes performance or stability issues.
-
Navigate to Organization > Monitor > Firmware upgrades.
-
From the Overview tab, view the Most recent upgrades section, and find the applicable upgrade entry.
-
Click on the applicable upgrade entry where it lists the number of networks and devices that were upgraded.
-
Click the Rollback button (the Undo button).

-
Select a reason for the rollback and enter a brief description.
-
Select Perform the upgrade now or Schedule the upgrade for, specifying a date and time for the rollback.
- Click Submit to schedule the rollback.
Firmware Upgrade History
You can check the firmware upgrade history in several ways to monitor the camera’s status and features. To review recent updates, start by checking the Firmware upgrades for the latest changes:
-
Navigate to Organization > Monitor > Firmware upgrades.
-
From the Overview tab, view the Most recent upgrades section, and find the applicable upgrade entry of interest.
Firmware upgrades are also tracked in the organization’s changelog, ideal for viewing more historical firmware changes. To view, follow the steps:
-
Navigate to Organization > Monitor > Change log.
-
Select the search bar dropdown and type “firmware” into Labels.