
MX Load Balancing and Flow Preferences
All MX security appliances feature a secondary uplink that can be used for load balancing and failover purposes. This article explains how to enable and configure a secondary uplink, load balancing between uplinks, and flow preferences for different types of traffic.
Enabling and Configuring WAN 2
Some MX models (MX75, MX84, MX85, MX95, MX105, MX250, MX400, MX450, MX600) have a dedicated secondary uplink port (WAN 2). To use these ports, a cable just needs to be connected and the IP can be configured on the MX's local status page or through the Meraki dashboard. On all other MX models, a LAN port can be configured as a secondary Internet port for use as WAN 2.
To enable and configure WAN 2 on an MX without a dedicated WAN 2 port:
- Navigate to the MX's local status page.
- Click the Configure tab at the top.
- Under Port 1, 2, or 4 (depending on the MX model), switch the Role to Internet:

- Configure the WAN port as needed:
- VLAN tagging - Assigns a VLAN tag to all traffic sent out of this port. If set to Don't use VLAN tagging, traffic will be sent untagged.
- Connection Type - Select PPPoE if needed. Otherwise, leave as Direct.
- IP assignment - If the interface will get a dynamic address from the ISP, set to DHCP. Otherwise, set to Static and configure an Address, Netmask, Gateway, and DNS servers.
Once the WAN 2 port has been configured and connected, additional options will be available in the dashboard under Security & SD-WAN > Configure > SD-WAN & Traffic shaping.
Load Balancing
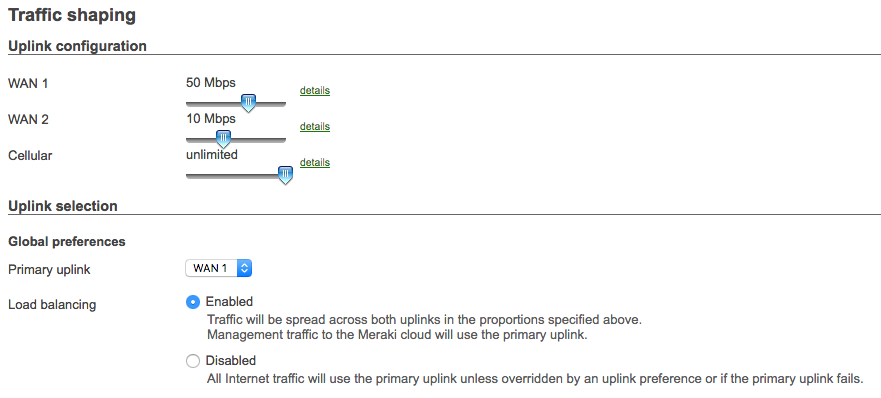
The MX can be configured to use both of its uplinks for load balancing. When load balancing is enabled under Security & SD-WAN > Configure > SD-WAN & Traffic shaping, traffic flows will be distributed between the two uplinks. The load distribution is based on the WAN 1 and WAN 2 throughput configured under Uplink configuration, such that the uplink with more throughput will distribute more flows.
In the example below, WAN 1 is configured to pass 50Mb/s, and WAN 2 is configured to pass 10Mb/s. Since the download speed ratio is 5/1, for every five flows sent over WAN 1, a single flow will be sent over WAN 2:
Speed Tests with Load Balancing Enabled
While troubleshooting network issues, it is sometimes necessary to perform network throughput tests using services on the Internet. When testing the speed of Internet uplinks using a client device on an MX configured with load balancing, the test may use only a single uplink for multiple tests. If the throughput of the uplinks differs, this behavior may produce unexpected results in Internet speed tests. The behavior is a function of the MX's load balancing algorithm.
Traffic is mapped to an Internet interface by source and destination IP address and port. Any newly initialized IP traffic matching the source and destination IP address and port of an existing mapping will be sent over the same Internet interface. This is done to preserve the connection state of certain flows that require the source and destination to remain the same for the duration of the connection. In the figure below, traffic for Host A (192.168.1.2) destined for the speed test site has been mapped to Uplink 1, and traffic for Host B (192.168.1.3) destined for the speed test site has been mapped to Uplink 2. For as long as these mappings persist, Host A's results will always match those of Uplink 1 whereas Host B's results will always match those of Uplink 2.

Each of these traffic mappings expires after 3600 seconds (1 hour) of no traffic matching the mapping. This duration is reset each time new traffic is generated that matches the mapping. With frequent communication between a pair of hosts, this can result in traffic consistently using a single uplink for communication as the mapping is continuously refreshed.
In many cases, the throughput of the uplinks connected to an MX will differ. For example, one uplink may be on a high-speed MPLS network while another is on a slower DSL connection, or an upstream issue may be causing congestion on a particular link. When testing uplink speeds using an Internet-based speed test, the best practice is to test each uplink separately by connecting only a single uplink during the test. This will avoid the interface preference issue described earlier and allow for a more accurate measurement of the uplink's throughput.
Load Balancing and SSL/TLS Connections
When a connection is established using SSL or TLS, regular checks of source port and IP address are required. If inconsistencies are found, the connection is terminated. Some load balancing scenarios can trigger this when traffic is aggregated over multiple uplinks.
The MX series link aggregation handles this by pairing a single data stream to a single uplink. In other words, once a TCP connection is established between the source and destination, the port and IP address pairing is mapped to a single uplink to prevent the stream from being distributed out another uplink which could result in the connection being terminated by the remote host.
Load Balancing with 1:1 or 1:Many NAT
Load Balancing on an MX Security Appliance is designed to round-robin connections between both WAN uplinks, thereby balancing traffic load between the two. NAT rules, meanwhile, are intended to map a certain public IP to one or more internal IPs, so traffic to/from the internal device(s) will always use that public IP.
When the two features are used in conjunction, load balancing will cause outbound traffic to go out of either interface, even if there is a NAT rule in place. This can cause issues sending traffic from an internal IP denoted in a NAT rule.
The following instructions explain how to use Uplink Preferences to ensure that 1:1 NAT or 1:Many NAT traffic uses the appropriate interface:
- Navigate to Security & SD-WAN > Configure > SD-WAN & Traffic shaping.
- Navigate to Flow preferences, then in the section labeled Internet traffic, select Add a preference.
- Configure the preference like the rule shown below. In this case, the Local IP range of 192.168.128.252/32 is the internal device referenced in a 1:1 NAT rule, and the Preferred uplink is the one using the public IP reference in the same rule.

-
Click Save changes.
Note: Additional uplink preferences will need to be configured for each NAT rule. For a 1:Many NAT rule, each internal device will need to be included in an uplink preference. To simplify the list of uplink preferences, a subnet can be specified for Local IP range instead of a single device.
Flow Preferences
By default (without load balancing), internet-bound traffic will flow out of the MX's primary uplink. The MX can also be configured to send traffic out of a specific interface based on the traffic type (policy-based routing), or based on the link quality of each uplink (performance-based routing). Flow preferences can be configured to define which uplink a given flow should use. Flow preferences will also supersede load balancing decisions.
Note: If needing to access a local management page of an upstream device located over the non-primary WAN, a flow preference can be configured to send that traffic over the non-primary WAN.
Internet Traffic
Flow preferences for internet-bound traffic can be configured to force traffic over a specific uplink based on its source and/or destination. These preferences can be used if a specific uplink should be designated for a particular type of traffic, such as traffic bound for a cloud-hosted service.
Note: ICMP traffic is not subject to traffic shaping rules. As a result, Flow Preference will have no impact on ICMP traffic.
To create a flow preference for internet traffic:
- In Dashboard, navigate to Security & SD-WAN > Configure > SD-WAN & Traffic shaping.
- Navigate to Flow preferences, and under Internet traffic, select Add a preference.
- Define the traffic that will be assigned a designated uplink:
- Protocol - TCP, UDP, or Any (where '"Any" implies that it is any of the selectable options and not any type of traffic)
- Source - Source IP, using CIDR notation.
- Src port - Source port, or "Any".
- Destination - Destination IP, using CIDR notation.
- Dst port - Destination port, or "Any".
- Preferred uplink - The uplink this traffic will be sent over.
- Click Save Changes.

VPN Traffic and Custom Performance Classes
Flow preferences for Meraki AutoVPN traffic can be configured to send traffic over a preferred uplink. These preferences can be used to ensure that high-priority VPN traffic will always traverse the optimal path.
Note: Flow preferences for VPN traffic only affect Meraki AutoVPN, not non-Meraki VPN Peers
To create a flow preference for VPN traffic:
- In Dashboard, navigate to Security & SD-WAN > Configure > SD-WAN & Traffic shaping.
- Under VPN traffic, select Add a preference.
- Under Traffic filter, define the traffic that will be assigned a preferred uplink:
- Protocol - TCP, UDP, or Any (where '"Any" implies that it is any of the selectable options and not any type of traffic)
- Source/Port - Source IP (using CIDR notation) and port.
- Destination/Port - Destination IP (using CIDR notation) and port.
- Under Policy > Preferred uplink, define how an uplink should be selected for this traffic:
- WAN 1/WAN 2 - Traffic will use this uplink until the Fail over if condition is met:
- Poor performance - Traffic will fail over to the other uplink if performance does not meet the specified Performance class. This performance class can either be set to VoIP or a custom class (see below).
- Uplink down - Traffic will fail over to the other uplink if this uplink goes down.
- Best for VoIP - Traffic will use whichever uplink is detected as optimal for quality VoIP communication.
- Load balance - If Load Balancing is enabled, traffic will be distributed between any uplinks that support the defined Performance class.
- Global preference - Traffic will use whichever uplink is set as the Primary uplink.
- WAN 1/WAN 2 - Traffic will use this uplink until the Fail over if condition is met:

Performance classes can also be created to define a minimum performance standard. If these standards are not met, traffic will be routed through the alternative uplink.
To define a custom performance class:
- In the dashboard, navigate to Security & SD-WAN > Configure > SD-WAN & Traffic shaping.
- Under Custom performance classes, select Create a new custom performance class.
- Define the minimum performance standards for this class:
- Name - A descriptive name for the class.
- Maximum latency (ms) - Maximum acceptable latency for this class, in milliseconds. May also be left blank to ignore latency.
- Maximum jitter (ms) - Maximum acceptable jitter for this class, in milliseconds. May also be left blank to ignore jitter.
- Maximum loss (%) - Maximum acceptable loss for this class, in percent of lost traffic. May also be left blank to ignore loss.
- Click Save changes.
