Dynamic DNS (DDNS)
Overview
The Cisco Meraki MX Security Appliance uses Dynamic DNS (DDNS) to update its DNS host record automatically each time its public IP address changes. This feature is useful because it allows the administrator to configure applications such as client VPN to access the MX by its hostname which is static instead of an IP address that may change over time.
Note: MX appliances bound to template networks cannot have their DDNS settings modified.
Note: DDNS hostnames are tied to the network that the MX belongs to. Moving it to a different organization or network, the hostname will change.
Note: The default naming behavior for the DDNS Hostname feature was changed due to a concern about revealing potentially sensitive information.
Moving forward, when DDNS is enabled, the hostname will use the encrypted version of the network name instead. For reference, this is the same encrypted name you can see in the URL for the page and can be seen in the image below.

This behavior will be seen on any networks that have Dynamic DNS enabled after November 2024. Networks with DDNS already enabled will not be affected by this change.
Configuration
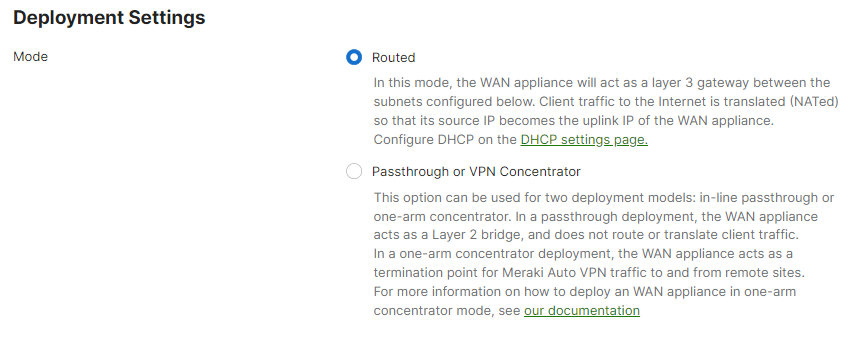
To use Dynamic DNS on your MX Security Appliance, it must first be set to Routed mode. This is done under Security & SD-WAN > Configure > Addressing & VLANs in Dashboard.
MXs in Passthrough or VPN concentrator mode do not support Dynamic DNS (DDNS) on firmware below MX 16.X
Enabling Routed Mode

Once the MX is set to Routed mode, the Dynamic DNS section will appear at the bottom of the Security & SD-WAN > Configure > Addressing & VLANs page with a link to the Security & SD-WAN > Monitor > Appliance status page.
Enabling Dynamic DNS
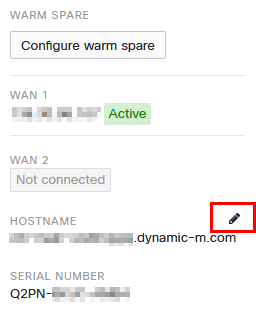
Once on the Security & SD-WAN > Monitor > Appliance status page, select the pencil icon next to Hostname, located between the WAN IP and Serial Number on the left of the page.

A dialog box will appear for configuring Dynamic DNS. Select Enabled in the dialog box and enter a public domain name if necessary, then select Update.
"mx60-bjvqggbknd.dynamic-m.com" will resolve to the public IP of the active WAN link
"mx60-bjvqggbknd-1.dynamic-m.com" will resolve to public IP of WAN 1
"mx60-bjvqggbknd-2.dynamic-m.com" will resolve to the public IP of WAN 2
After DDNS is enabled, you can confirm it is working by performing a DNS query for the MX DDNS hostname. Open a command prompt on any workstation and type "nslookup <your dynamic DNS name>." The DNS response should return the current active public IP address of the MX.
Note: The expected TTL for dynamic DNS records is typically about 10 minutes. Additionally, if the device goes offline for 5 minutes or longer, the DNS record is expected to be removed. Allow 10 minutes or more before testing to ensure accurate results.
Note: If DDNS is in use with an HA pair configured with a virtual IP (VIP) behind NAT, DDNS will resolve to the NAT-translated (public) address of the management/uplink IP, rather than the NAT-translated virtual IP.
Troubleshooting
Querying the MX DNS hostname

Testing Dynamic DNS Resolution
The following instructions describe how to find out what servers are resolving our dynamic DNS, and query them to see what IP address they are associating to the MX:
- Open cmd.exe from "C:\Windows\System32" on your laptop, and run a "nslookup"

- Set query to any and sort it for dynamic-m.com. It will list all the servers used by dynamic-m.com.

- This lists the servers serving this dynamic-m site for its host names lookup. You would be checking if you could search for the hostname from the individual servers.
nslookup [-option] [hostname] [server]
![Screenshot of the output of running nslookup [hostname] [server] command, using the server found from the previous query.](https://documentation.meraki.com/@api/deki/files/6113/Windows_CMD_nslookup_server.png?revision=2)
This would help in learning if the IP address was ever updated on the server and if the problem is the servers not responding to the requests.

