

Sensor Connect on Meraki - Deployment Guide
Introduction
Enterprise wireless networks are becoming more complex to support various devices. IoT devices, which make up over 50% of connected devices, are the fastest-growing category in the business segment. This growth is driven by powerful, low-cost sensors, better connectivity technology, cheaper computing power, and lower storage costs. As IoT devices proliferate, enterprises need a simple, standardized method to onboard, authorize, and control them on a single network. This approach will allow multiple applications to coexist and solve the IoT walled garden problem.
The IoT ecosystem is filled with proprietary solutions that hinder widespread adoption. There is a need to simplify solutions and offer deployment flexibility while supporting most of the IoT use cases.
Simplifying and standardizing the IoT device onboarding experience and providing a uniform method for controlling, managing, and consuming data from IoT devices are crucial.
Sensor Connect for IoT is a Cisco architecture for using enterprise wireless infrastructure as an IoT access layer. It gives Cisco customers and authorized applications a common way to onboard IOT devices, control those devices, and consume telemetry without deploying a separate gateway network. This architecture:
- Uses existing Meraki MR access points with integrated IoT radios instead of a parallel Bluetooth Low Energy (BLE) gateway overlay.
- Supports bidirectional Bluetooth Low Energy (BLE) use cases, including connected mode, secure pairing, GATT read/write, notifications, and telemetry subscriptions.
- Fully integrates with Cisco Spaces providing consistent outcomes, use cases and benefits of the unified stack.
- Gives multiple partner applications a standards-oriented integration model while keeping each application scoped to its authorized devices and data.
- Aligns the Meraki and Catalyst Sensor Connect ecosystem around common concepts, APIs, data formats, and partner development patterns.
- Ensures seamless Bluetooth Low Energy (BLE) device mobility across different access points.
- Serves as the foundation for all new IoT development and bug fixes, ensuring consistency, scalability, and long-term sustainability.
Use Cases
Sensor Connect is best suited for applications that need device identify, control, pairing, Bluetooth GATT operations or streaming of Bluetooth data. While passive observation of an advertisement is still supported by the existing Meraki dashboard, additional use cases such as granular advertisement data or high frequency updates of BLE scan data are available through sensor connect.
Sensor Connect is also compatible with Cisco Spaces to extend the same set of use cases and outcomes for all Cloud-Managed customers that were previously available for only On-Prem managed customers via Cisco Spaces.
Some examples of typical use cases are:
| Use Case | What Sensor Connect Enables |
|---|---|
| Full Cisco Spaces Integration | Leverage all BLE use cases with Cisco Spaces such as asset tracking with Cisco Asset Tags and 3rd party BLE/UWB tags, Indoor Navigation, Staff Duress, Hand Hygiene compliance, Environmental Monitoring and more. |
| Asset and staff safety | Subscribe to BLE advertisements or GATT notifications from tags and badges, with telemetry routed to an MQTT consumer for downstream dashboards. |
| Retail and logistics | Manage BLE tags or product sensors across AP coverage areas while abstracting AP selection and BLE device mobility. |
| Smart building and hospitality | Interact with BLE locks, room sensors, controls, and guest-experience devices through a common network API layer. |
| Remote patient monitoring | Onboard wearable BLE devices, establish connected BLE sessions, read GATT characteristics, and stream health-related telemetry to the partner application. |
| Partner IoT coexistence | Allow multiple authorized applications to use the wireless IoT infrastructure with device-specific onboarding, control, and telemetry boundaries. |
Architecture
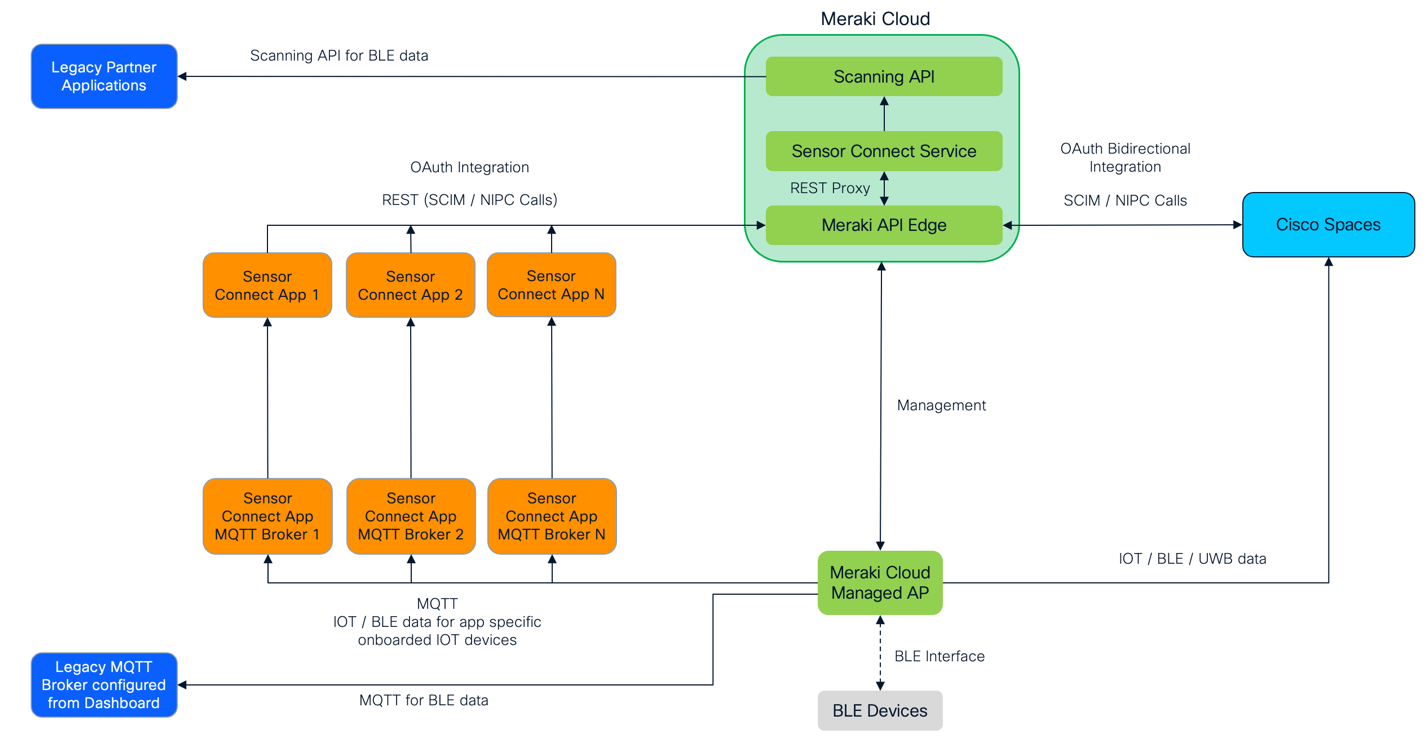
Sensor Connect architecture focuses on key concepts that form the pillars of the solution. Those are: Using SCIM for onboarding IOT devices, NIPC for control and device telemetry that is consumed via MQTT (for external applications) and GRPC (for Cisco Spaces).
| Component | Purpose and Typical Consumer |
|---|---|
| SCIM for Onboarding | Used by Cisco Spaces or external applications to introduce and manage devices in the network using a device-oriented SCIM model. |
| NIPC for Control | Used by Cisco Spaces or external applications to connect, disconnect, pair, discover services, read or write characteristics and register to receive telemetry topics. |
| MQTT or GRPC for Device Telemetry | Device advertisements, GATT notifications and connection events are streamed to subscribed receivers via MQTT (for external applications) and GRPC (for Cisco Spaces) |
Note that each Sensor Connect application creates its own independent, application specific MQTT broker to receive streaming telemetry data from onboarded IOT Devices, which is separate from the traditional MQTT broker configuration that is available from the Meraki Dashboard from Networks -> Wireless -> IOT Radio Settings page. Access Points can support different MQTT brokers and GRPC endpoints in parallel.
The architecture diagram below helps clarify this further
For Cisco Spaces:
Cisco Spaces leverages existing Meraki and Cisco Spaces OAuth integration to control interfaces and receives telemetry via a channel established between Access Points and Spaces.
If Cisco Spaces was already authorized before enabling Sensor Connect, make sure to disconnect and reconnect to grant additional scopes for the new functionality.
For Sensor Connect Partner Applications:
The partner application integrates with Meraki using OAuth 2.0 and calls IoT Gateway REST APIs on api.meraki.com. The Meraki API layer proxies supported Sensor Connect requests to the Sensor Connect service, which selects an appropriate AP, coordinates with the APs, and manages device and topic state. Telemetry can then flow from the MR AP to the partner’s MQTT broker. All the telemetry payloads are encoded in cbor format.
For Existing Partner or Customer Applications:
Once Sensor Connect is enabled on the AP, existing Scanning API functionality continues to carry Bluetooth Low Energy (BLE) data with the existing behaviors and limitations for all customers. Applications currently consuming Scanning API can continue to do so even after Sensor Connect is enabled. Customers who have configured APs to publish MQTT data to their own MQTT broker via Dashboard configuration can continue that approach with CW Advantage or MR Advanced licensed networks.
Hardware and Firmware Requirements
Firmware
Use MR32.2.4 or higher, or latest Cisco recommended firmware version.
Hardware
The following Meraki Cloud Managed AP platform supports Sensor Connect architecture.
| MR36 | MR46 | MR56 | MR46E |
| MR76 | MR86 | MR44 | MR36H |
| MR57 | MR28 | MR78 | CW9166 |
| CW9164 | CW9162 | CW9166D1 | CW9163E |
| CW9171 | CW9172 | CW9174 | CW9176 |
| CW9176D1 | CW9178 | CW9179F | CW9177 |
License Requirements
CW Advantage or MR Advanced is required for full Sensor Connect API functionality, including SCIM device onboarding, NIPC BLE connections, GATT read/write, and event subscriptions.
Customers with CW Essentials or MR Enterprise wouldn’t be able to use the SCIM and NIPC APIs, but would still be able to continue receiving Bluetooth Low Energy (BLE) scanning data heard via the Access Points using the Meraki Dashboard Scanning API.
Coexistence
Sensor Connect is not compatible with other IOT technologies at the same time. For a given network that already has ESL, Zigbee or MT sensors, enabling Sensor Connect will not take effect. Please make sure you are enabling Sensor Connect on a network that does not already use any MT or ESL or Door Lock Integrations.
Deploying Sensor Connect
Sensor Connect is currently in beta and requires a minimum firmware of MR32.2.4. To opt-in, please navigate to Organization>Configure>Early Access and enable the following toggles:
- Early API Access
- Sensor Connect
- Navigate to Networks -> Wireless -> IOT Radio Settings
- Select Sensor Connect to be On

Sensor Connect is mutually exclusive with other IOT settings. If a given network already has MT, ESL or Zigbee used, then turning on Sensor Connect will not take effect.
- Optionally, customers can keep filtering of random private mac addresses as On or Off. Cisco recommends keeping this setting as On to reduce noise from irrelevant Bluetooth Low Energy (BLE) traffic.
Connecting Cisco Spaces
For connecting Cisco Spaces Sensor Connect for Bidirectional Bluetooth Low Energy (BLE) management and control, Spaces customers require at least one of the following Spaces licenses:
Cisco Spaces Smart Operations
Cisco Spaces Advantage (aka Cisco Spaces Act)
Cisco Spaces Unlimited
Cisco Spaces Premier
- Turn on Cisco Spaces and Meraki Bidirectional Integration as explained here.
- Navigate to Cisco Spaces -> IOT Services -> Manage -> Meraki network selection
- Activate Scanning of BLE from IOT Services
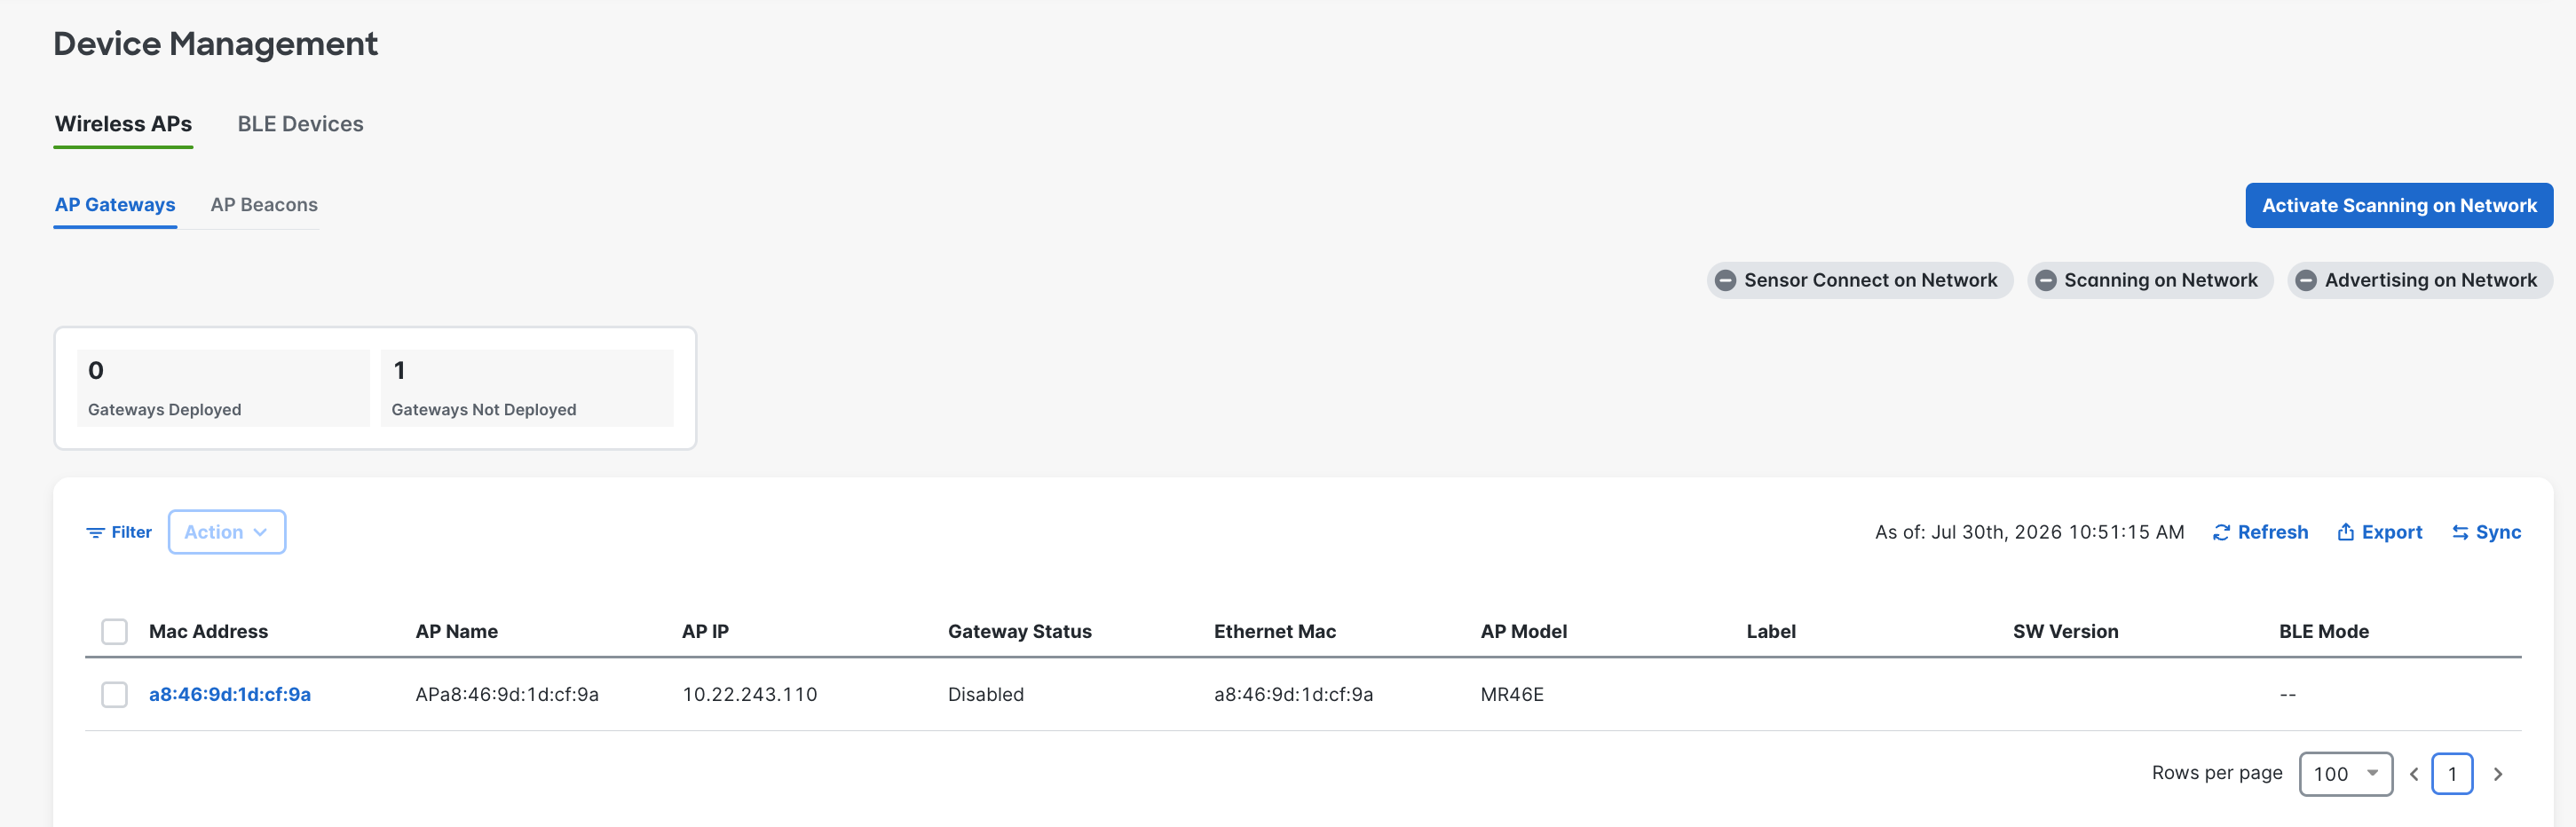
- Activate Beaconing of BLE from IOT Services (if needed)


For Cisco Spaces customers and partners, there is no additional ‘onboarding’ of mac addresses that is needed. By default, turning on Bluetooth Low Energy (BLE) scanning will allow all mac addresses to be sent to Spaces, unless they are explicitly filtered out using Spaces Dashboard.
To filter out specific mac addresses from being sent to Cisco Spaces, customers should navigate to Cisco Spaces -> IOT Services -> Settings -> Device Filtering where they can choose to allow receiving public, random static, random private Mac addresses.

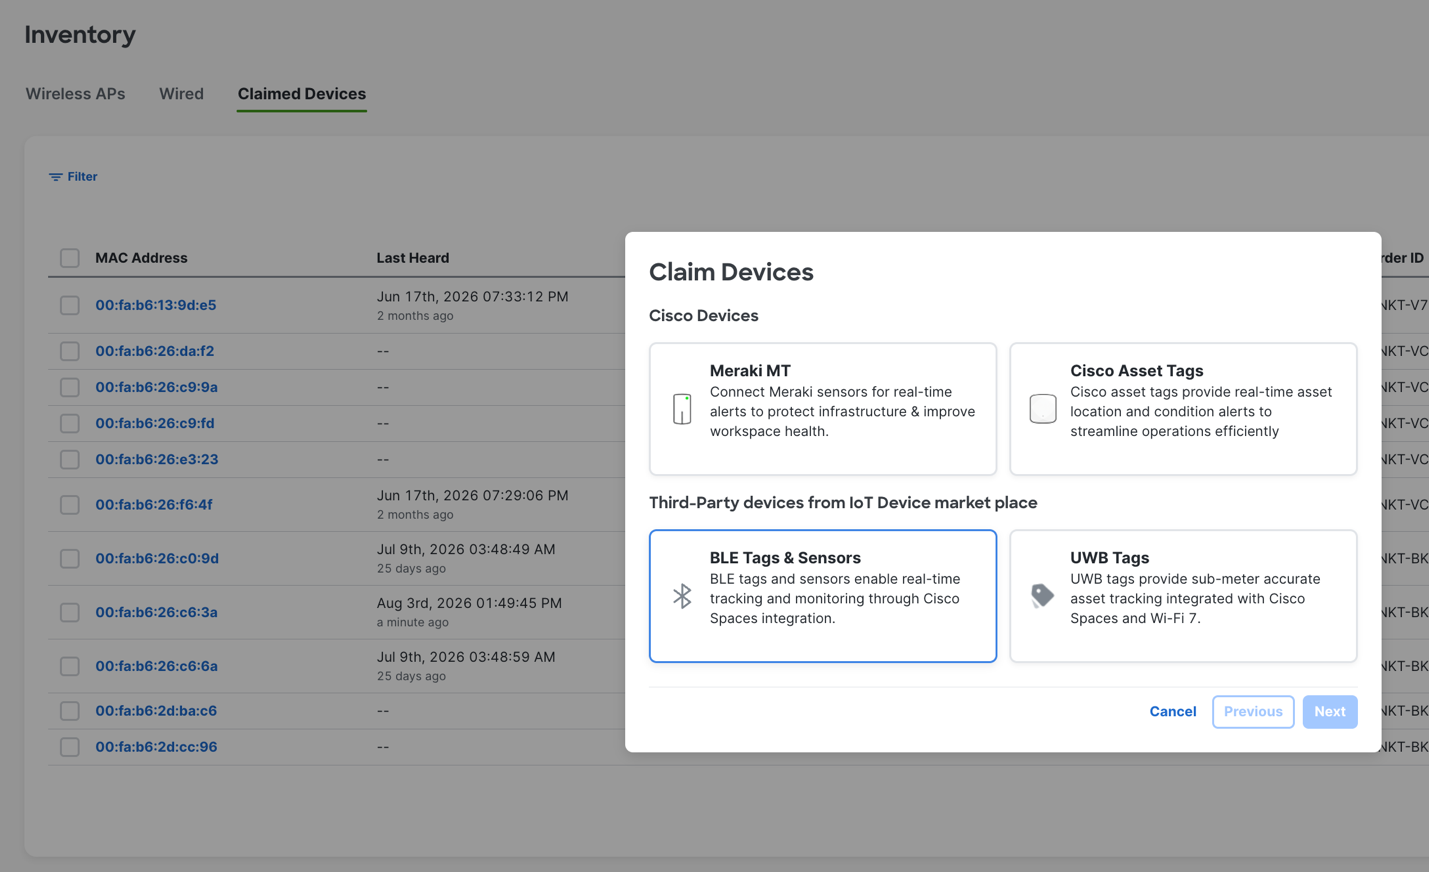
In terms of being able to push configurations to specifically onboarded BLE devices, customers need to claim those devices that are part of the IOT Device Marketplace. To claim such a BLE device in Spaces, customers should navigate to Cisco Spaces -> IOT Services -> Inventory -> Claimed Devices -> Claim Devices
For more details of how to Setup Cisco Spaces, please refer to the Cisco Spaces Runbooks.
Common Troubleshooting Scenarios
This section covers some troubleshooting scenarios.
Sensor Connect is enabled but data is not visible in Cisco Spaces.
If using Cisco Spaces, please make sure Bidirectional OAuth is activated and turned on. Navigate to Organization -> Integrations to confirm Cisco Spaces is active.
If Cisco Spaces was already authorized before enabling Sensor Connect, make sure to disconnect and reconnect to grant additional scopes for the new functionality.
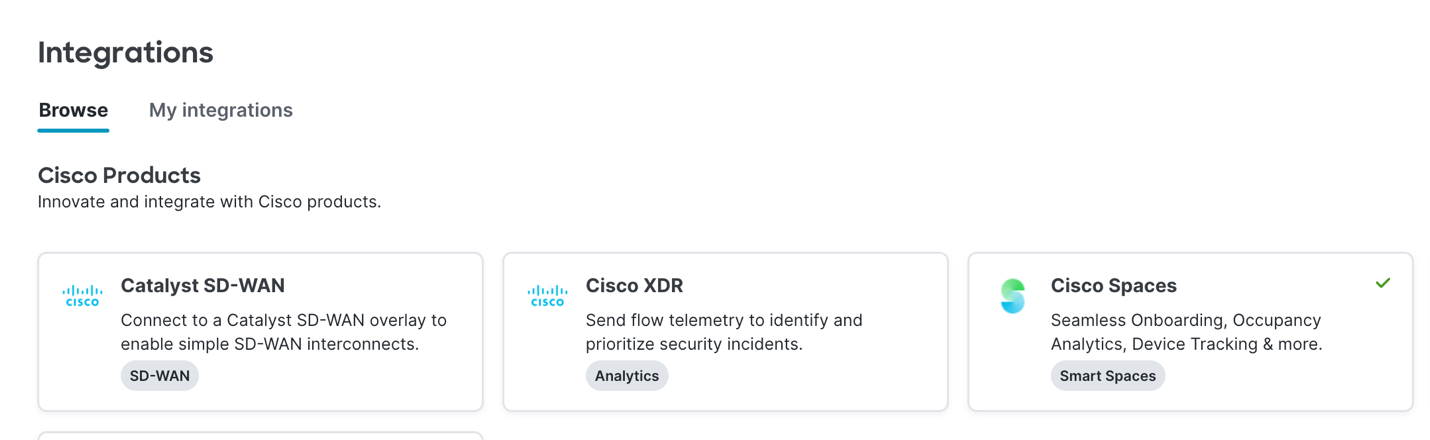
You can also validate this from Cisco Spaces dashboard. Navigate to Cisco Spaces Dashboard -> Setup -> Wireless Networks -> Connect via Meraki Integration -> Sync Status

Additionally, confirm that the correct outbound port 443 is open in the firewall for AP traffic to be sent to Cisco Spaces.
Cisco Spaces IP addresses:
US Setup (dnaspaces.io / ciscospaces.io)
Primary IP Address : 52.20.144.155, 34.231.154.95
Disaster Recovery : 54.176.92.81, 54.183.58.225
EU Setup (dnaspaces.eu / ciscospaces.eu)
Primary IP Address : 63.33.127.190, 63.33.175.64
Disaster Recovery : 3.122.15.26, 3.122.15.7
SG Setup (ciscospaces.sg)
Primary IP Address : 13.228.159.49, 54.179.105.241
Disaster Recovery : 13.214.251.223, 54.255.57.46
Make sure you are activating Sensor Connect in a network that does not have existing MT claimed, ESL or Zigbee configurations active.
Sensor Connect is enabled but data is not visible in external MQTT brokers.
If using a sensor connect application’s external MQTT server, please validate if Bluetooth Low Energy (BLE) devices are correctly onboarded using Sensor Connect APIs.
If you still do not see data, you can run wired capture from the dashboard to ensure traffic is being sent.
Make sure you are activating Sensor Connect in a network that does not have existing MT claimed, ESL or Zigbee configurations active.