
How to Configure Cisco SecureX Sign-On Integration
Cisco SecureX reached end of support on July 31, 2024. This feature is no longer available in the dashboard. You can configure SAML Single Sign-On for dashboard as an alternative. Refer to Configuring SAML Single Sign-on for dashboard.
This document remains available as a reference only for customers who implemented it before the end-of-support date. Read more about the SecureX end-of-sale and end-of-life here.
Overview
Cisco SecureX Sign-On is an authentication method that lets you log in to the dashboard from the SecureX Sign-On page. It allows you to access Cisco security products with the same set of credentials from any device. Once you sign in with your username and password, your SecureX Sign-On home page displays all your Cisco products as apps in one customizable dashboard.
SecureX Sign-On uses Security Assertion Markup Language (SAML), an XML-based open standard for exchanging authentication and authorization data between an identity provider (IdP) and a service provider (SP). SecureX Sign-On makes managing credentials for Cisco security products easier. In addition, it enables Duo 2-factor-authentication by default.
Step-by-step instructions
Enable SecureX Sign-On
-
Navigate to Organization > Settings.
-
Under the Authentication section, select the SecureX Sign-On checkbox.

Once enabled, every time you create a new dashboard user under Organization > Administrators, you see an option to choose whether that user uses SecureX Sign-On to log in to the dashboard.
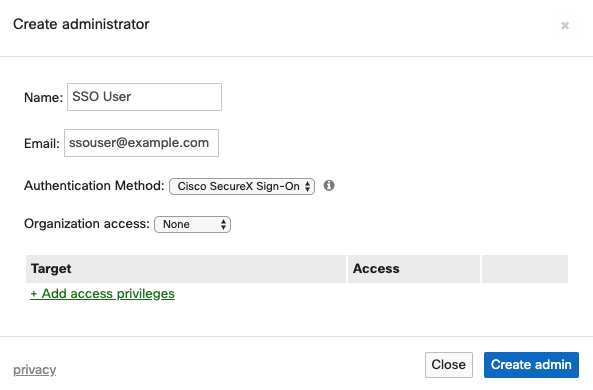
Cisco Meraki cannot migrate existing users to SecureX Sign-On. The option to allow SecureX Sign-On login appears only when creating a new user.
The email address for the new administrator cannot match an existing dashboard administrator or Meraki Authentication user's email address.
On the dashboard login page, enter your email address. If the email has SecureX Sign-On enabled, the system redirects you to sign-on.security.cisco.com.
Access multiple organizations
SecureX lets administrators access multiple dashboard organizations using the same email address. If a user who already has access to at least one organization is added to an additional organization, the user account status shows as Unverified in the latter organization.

On the next successful login, the new user is prompted to accept permissions into the new organization.

- Selecting Yes changes the new user account status to Ok and grants access to the organization.
- Selecting No at this prompt deletes the unverified user from the organization.
Sign in if you already have a SecureX Sign-On account
Enter your username. Your security image displays automatically if you previously completed a successful sign-in on the web browser you're using. This feature requires browser cookies.
If you have successfully signed in on the current web browser before and have not cleared cookies, do not enter your password if your security image does not display when you enter your username. If your security image does not appear, close the web browser and confirm that you're using the correct web address to sign in. Then open a new web browser window, type the web address manually, and enter your username. If your security image is still not displayed, contact your product support team.
-
Enter your password.
-
Select Sign In. If you see the Sign in failed! error message, your username and password do not match those specified for your profile, or you do not have access permission. Contact your product support team.
-
At the Duo MFA prompt, push a notification to your registered device and tap approve to authenticate.
-
Welcome to your SecureX Sign-On dashboard.
Sign up if you do not have a SecureX Sign-On account
-
Select Sign Up.
-
Complete the form and select Register.
-
Find the Activate Account email from SecureX Sign-On and select Activate Account.
-
Set up MFA by configuring Duo Security. Two-factor authentication (a type of MFA) enhances the security of your account by using a secondary device to verify your identity. This prevents anyone but you from accessing your account, even if they know your password.
-
Choose a device and follow the prompts to register it. For more information, refer to Duo Guide to MFA and Device Enrollment. If you already have the Duo app on your device, you receive an activation code for this account. Duo supports multiple accounts on one device.
-
For additional security, register at least two different devices. Select +Add another device and follow the prompts to register another device. For more information, refer to Duo Guide to MFA and Device Management.
-
Once your device is paired with your account, select Finish. Optionally, existing users of Google Authenticator for MFA can add it here as a backup factor by selecting Setup Google Authenticator and following the prompts.
-
Choose a "forgot password" question and its answer.
-
Add a phone number for resetting your password or unlocking your account using SMS. SecureX Sign-On can send you a text message with a recovery code. This is useful when you don't have access to your email account.
-
Choose a security image.
-
Select Create my account.
-
On the SecureX Sign-On dashboard, select the Meraki tile to launch that app, no passwords needed.
Alternatively, if you have SecureX Sign-On enabled for a user on the dashboard and the user has a SecureX Sign-On account, navigate to sign-on.security.cisco.com and log in using your credentials. A Meraki app tile is available on the SecureX Sign-On dashboard. You can also search for it in the Launch App field.
Verification
After signing in, your SecureX Sign-On home page displays all your Cisco products as apps in one customizable dashboard, and the Meraki tile is available to launch without entering a password.