
Configuring SAML Single Sign-on for Dashboard
Click 日本語 for Japanese
SAML (Security Assertion Markup Language) can be used with the Cisco Meraki Dashboard to provide external authentication of users and a means of SSO (Single Sign-On). This article will provide an overview of how SAML works with Dashboard, configuration instructions in Dashboard, and information required to configure SAML with external platforms.
Learn more with these free online training courses on the Meraki Learning Hub:
SAML Overview
When using SAML, there are three key elements:
- User - The client that is attempting to log-in to a service provider (Dashboard).
- Identity Provider (IdP) - The authority on a user's identity. It knows the user's username, password, and any groups/attributes. Typically a portal where the user logs in.
- Service Provider (SP) - The application the user wishes to use. In this case, Dashboard.
When using SAML with Dashboard, the user must first authenticate with the IdP. This is referred to as IdP-initiated SAML. After the user has successfully authenticated and been directed to Dashboard, they will be granted access if they have a valid role and the IdP is correctly configured.
SAML Login Types
Meraki offers two main SAML login types. IdP-Initiated SAML and SP-Initiated SAML. The login method that works best for your organization depends on the user experience your admins prefer, and the IdP standards of your business.
Both login types can be used simultaneously, and are not mutually exclusive.
However, if you'd like to use SP-Initiated SAML (required for mobile app SSO), it requires some additional configurations, which can be found in the guide, SP Initiated SAML/SSO Configuration Guide.
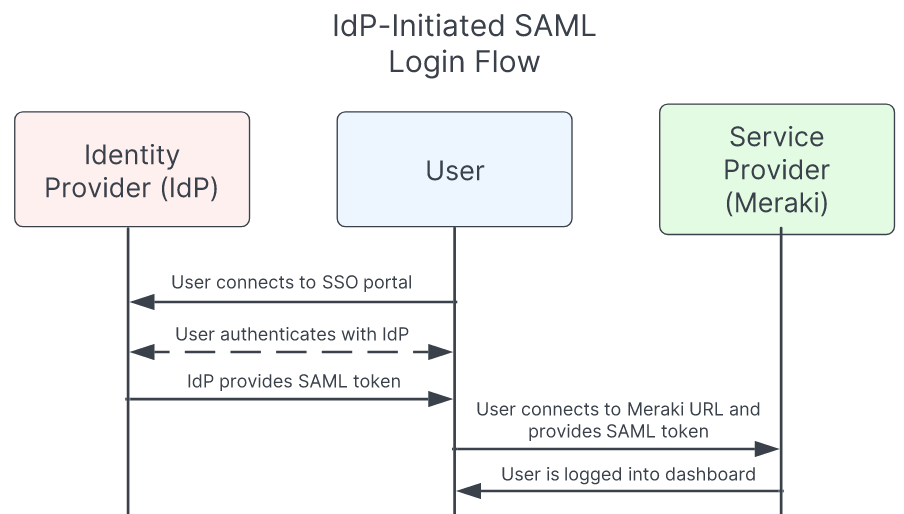
IdP-Initiated SAML
IdP-Initiated SAML is best if you have a login portal your users are used to accessing for authentication to their apps and services.
The rest of this article covers the base configuration required for any type of SAML, including IdP-Initiated SAML.
IdP-Initiated SAML User Flow
- Start in a login portal (e.g. Okta, Duo, ADFS, OneLogin, etc.)
- Select the service you would like to access (e.g. Meraki dashboard)
- Redirect into the Meraki dashboard
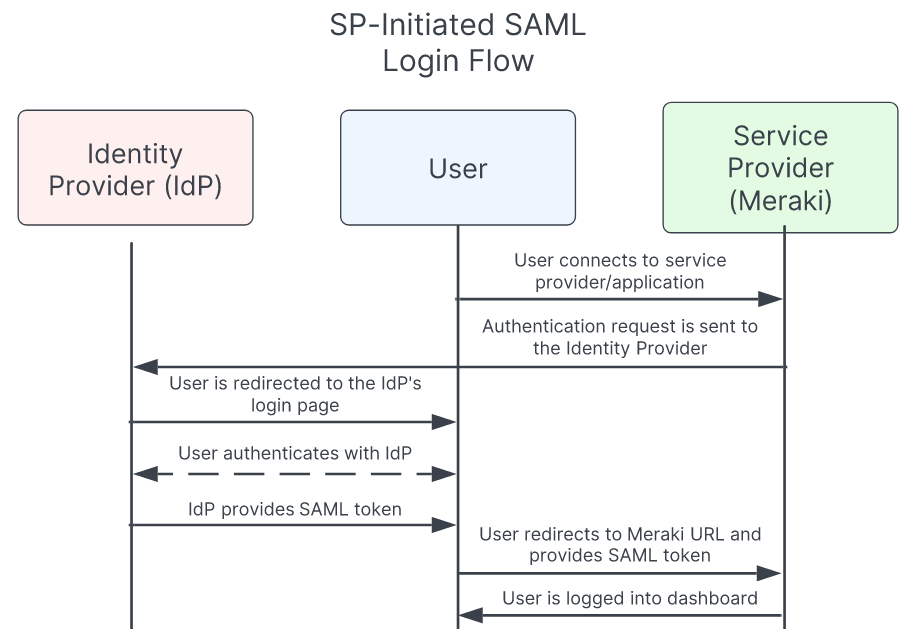
SP-Initiated SAML
SP-Initiated SAML is best if you don't have a login/auth portal, you prefer to have your users begin their login via the Meraki dashboard, or you want to use SSO in the Meraki mobile app.
The rest of this article covers the base configuration required for any type of SAML. SP-Initiated SAML is fully cross-compatible with IdP-Initiated SAML (both can be used at once). However, if you'd like to use SP-Initiated SAML (required for mobile app SSO), it requires some additional configurations, which can be found in the guide, SP Initiated SAML/SSO Configuration Guide.
SP-Initiated SAML User Flow
- Start in the dashboard/mobile app
- Specify your login domain
- Redirect to your IdP (e.g. Okta, Duo, ADFS, OneLogin, etc.)
- Redirect back to the Meraki dashboard
Dashboard Configuration
There are two steps necessary to set up SAML SSO in Dashboard:
- Enable SAML SSO for the Organization
- Create SAML Roles in Dashboard
Enable SAML SSO for the Organization
- On the Organization > Settings page, navigate to the Authentication section.
Note: If this section does not appear, open a case with Cisco Meraki support to have it enabled.
- Change SAML SSO to "SAML SSO enabled".

- Provide the X.509 cert SHA1 fingerprint, which will be 20 pairs of hex characters separated by colons (:). This will come from the X.509 certificate on the IdP.
- If opening the .crt file in Windows, go to Details > Thumbprint to view the fingerprint. Simply copy this and replace the spaces with colons.
Windows:

Dashboard:

- If opening the .crt file in Windows, go to Details > Thumbprint to view the fingerprint. Simply copy this and replace the spaces with colons.
- (Optional) Provide a SLO logout URL. This is where users will be directed when they logout of Dashboard.
- Generally, this is a URL on the IdP that logs the users out of the IdP and other services.
- This can also simply direct users to a homepage or other portal after logging out of Dashboard.
- Click Save changes.
Please Note: As long as the fingerprint matches the cert and is a X.509 SHA1 fingerprint the certificate itself can be SHA1 or SHA256.
Create SAML Roles in Dashboard
The Organization > Administrators page will now have a SAML administrator roles section. This section is used to assign permissions to user groups in Dashboard. When SAML users log-in, they will be granted whatever permissions have been assigned to the 'role' attribute included in the SAML token provided by the IdP.
To create a new role, click Add SAML role. Assignment of permission to these roles is identical to that of normal users. The article on managing administrators can be followed for assigning permissions to roles. Once complete, click Create admin and then Save changes.
Do not use semi-colons ";" in role names. In SAML assertions, semi-colons are used to delineate items passed as a list of objects, e.g. 'role' attribute equals "RoleA;RoleB;RoleC". The Meraki Dashboard backend will parse and extract these role names to attempt to match to, starting with the beginning of the list ('RoleA', in the above example.) A role name in Dashboard with a semi-colon will therefore never be matched.
When SAML assertion is failing, kindly check for spelling mistakes or leading white spaces in the defined roles which are the most common mistakes


In order to convert an existing non-SAML Meraki admin account to a SAML account, it will require the Meraki admin account to be deleted from dashboard and then re-introduced as a SAML account (via the SAML platform being used).
Configuring the Identity Provider
IdP configuration instructions will vary depending on the vendor, please refer to your IdP vendor-specific documentation for details.
The following articles outline configuration instructions for three common IdPs:
- Configuring SAML SSO with ADFS
- Configuring SAML SSO with OneLogin
- Configuring SAML SSO with Azure AD
IdP Attribute Information
Certain attributes are required by most IdPs. The following list outlines these attributes, and where to find that information in Dashboard:
Entity ID
For IdP-initiated Dashboard SSO, this is https://dashboard.meraki.com
For SP-initiated SSO, a dynamic issuer / entity ID is used for each Meraki Dashboard organization that has the SP SAML feature enabled. E.g. if the configured subdomain is 'example' then the unique issuer / entitiy ID that would need to be configured with the IdP would be: 'https://example.sso.meraki.com' . For more information on SP-Initiated SAML, see the "Defining a unique subdomain" section of the article, SP-Initiated SAML SSO Configuration Guide.
Assertion Consumer Service (ACS) URL
This is provided as the Consumer URL on the Organization > Settings page under SAML Configuration. It will be unique for each organization. You will see two URLs provided. The first will direct a user to the Meraki dashboard. The second one labelled "Consumer URL (Vision)" will direct to the new Meraki Vision portal for camera viewing. This is the only change required if a user needs to be directed to the Meraki Vision portal instead of the Meraki dashboard. More about Meraki Vision here.
Username attribute
A username attribute must be passed in the SAML token/assertion, specifically 'https://dashboard.meraki.com/saml/attributes/username'. This includes the name the user will be identified as in Dashboard. Mapping this to an e-mail address is generally recommended.
This attribute cannot match an existing Dashboard administrator or Meraki Authentication user's email address configured on any Dashboard Organization.
Appending any arbitrary string such as '/SSO' to an email address can be used to ensure that SAML users have unique usernames that do not conflict with existing Dashboard administrator or Meraki Authentication accounts.
Role attribute
A role attribute must be passed in the SAML token/assertion, specifically 'https://dashboard.meraki.com/saml/attributes/role'. This must match one of the Roles defined on the Organization > Administrators page.
Note: Dashboard will only accept one role attribute. If multiple roles or group memberships are provided, the first attribute matched will be used. If 'MemberOf' and 'role' attributes are both specified, 'MemberOf' will be prioritized.
Additional IdP Information
The following additional notes apply to IdP compatibility and features:
- Limited Single Logout (SLO) is available. Dashboard will use the SLO URL to redirect users after they logout of Dashboard, and then can be used to link into SLO with the IdP if supported, but Dashboard does not support receiving SAML LogoutRequests from the IdP.
- Only SAML 2.0 is supported.
- While IdP platforms may have a variety of other fields, in most cases they can be left blank or at default settings. Only the above information is critical for Dashboard compatibility.
SAML SSO for MSPs
SAML does support the use of multiple organizations. Similarly to traditional logins, it needs to determine that the user is identical across the affected organizations. Thus, for this to occur, the following must be identical across the designed organizations:
- X.509 cert fingerprint for the organization (case sensitive)
- SAML administrator role (as only one role attribute can be used in the token)
- The permissions granted can be different in each Organization, but the role name must be identical
When this occurs, the user will be directed to the MSP portal and receive the desired permissions in each organization. The Consumer URL for any of the MSP organizations can be used, as they will all direct the user to the MSP portal.
Note: When modifying which organizations SAML users will have access to, it may be necessary to logout of both the IdP and Dashboard, as well as completely closing the browser.
Troubleshooting
If errors are presented when attempting to log in with SAML SSO, log in as a traditional administrator and review the SAML login history. This is located on the Organization > Administrators page, directly under the SAML administrator roles title. This includes a history of attempted SAML logins, any errors encountered, and what username/role was provided in the assertion.
For additional information on resolving possible error messages, please refer to the article on SAML Login History Error Messages.
Overlap between SAML and Manual User Emails
To create a user (including Client VPN and Splash users) using an email address already claimed by a SAML user, disable SAML to purge the SAML user list. Expect a delay of at least 5-10 minutes before the email address can be used again after the SAML user list is purged. SAML can be re-enabled once the user has been created.
Note: that SAML configuration and logs (change logs, SAML logs) are retained and will not be lost. This will, however, break SAML admins that are logged in at the time.
Receiving e-mails or alerts with SAML SSO
Due to the ability to provide any unique value in the SAML user field, administrators logged in via SAML SSO are not able to receive emails or alerts from Meraki, as there is no guarantee that a valid e-mail address was provided for the administrator. This pertains to all e-mails, including those such as configured e-mail alerts and license warning e-mails. If the majority of administrators for your organization log in via SAML SSO, and receiving e-mails or alerts from Meraki is necessary, it is recommended to create a non-SAML SSO administrator on your organization that can receive these emails.
SAML Admins and the Dashboard API
SAML admins cannot use the Dashboard API.
Contacting Support with SAML SSO
Administrators with a SAML role can be configured to have full or limited access of the organization, as outlined in our Managing Dashboard Administrators documentation. Please note that Cisco Meraki Support may need to verify a SAML administrator's support passcode, as is done with traditional administrators.
Note: When opening a case using SAML credentials, please include a contact email support can use or it may be difficult for support to respond in a timely manner.
If an administrator with a SAML role is configured to have full control over the organization, they will be able to adjust and delete other administrators on the account. There must be at least one non-SAML Dashboard org admin remaining on the account, so a SAML admin will not be able to delete or demote the last remaining Dashboard org admin.