
How to Configure and Manage Two-Factor Authentication
Click 日本語 for Japanese
Overview
This article explains how to set up, manage, and recover Two-Factor Authentication (TFA) for Meraki Dashboard access and Client VPN authentication.
TFA is also called 2FA, two-step verification, or multi-factor authentication (MFA). It adds an extra layer of security to user verification. It uses a security identifier in addition to a username and password.
The identifier stays separate from the original login method. Examples include phone apps or keyfobs.
When TFA is not enabled, the user sees a banner. It states: "Two-factor Authentication is not currently enabled on your Meraki Dashboard account. For an extra layer of security, we recommend enabling it at your earliest convenience." Selecting the [x] button does not permanently remove the banner.
Duo Mobile on an iOS or Android device provides two-factor authentication regardless of SMS service. It also lets users back up Duo-protected accounts. Recovery is possible to the same device or to a new device.
Prerequisites
-
A valid Meraki Dashboard username and password.
-
A smartphone (iOS or Android) for the Duo Mobile app, when using app-based 2FA.
-
A third-party two-factor authentication solution for Client VPN. Client VPN does not natively support two-factor authentication.
-
Organization admin access with Full permissions, for organization-wide enforcement.
Dashboard organizations should always have at least two organization admins with full permissions. This is best practice if one account is locked out. It also helps if access to that account's email address is lost.
Step-by-step instructions
Set up Duo Mobile in Dashboard
-
Open your smartphone's mobile app store. Download the Duo Mobile app.

-
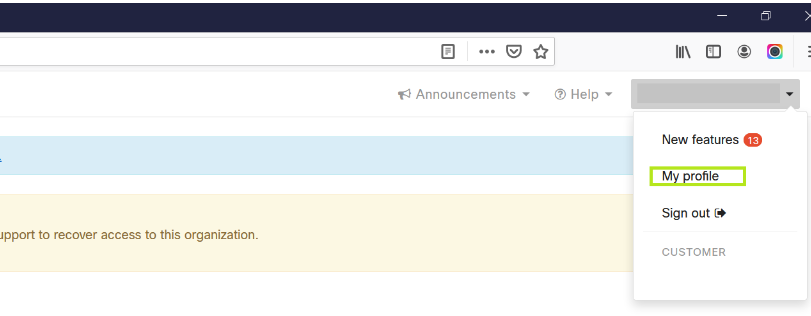
Log in to Dashboard. Navigate to the My Profile page on the top right.
-
Scroll to the section labeled Two-factor authentication.
-
Select Set up two-factor authentication.
-
On the next page, under Set up app, follow the listed steps. This adds your Dashboard account to Duo Mobile as a token.
-
Enter the current, active token into the Code field under Verify your device on Dashboard. The token changes every 30 seconds.
| On the Phone | On Dashboard |
 |
 |
-
After verification, select Continue. Then select OK to turn on two-factor authentication.
The Dashboard account logs out once you select OK. At the next login, Dashboard prompts you for the active verification code from the authenticator. Enable Duo Restore (iOS, Android). This allows easy account recovery to the same device or a new device. To change the authenticator app after setup, first disable two-factor authentication. Then start the configuration again.
Manage one-time backup codes
After you set up two-factor authentication, note the eight backup codes provided. These codes serve only as a last-resort recovery method. Use them if your primary method is temporarily unavailable, for example, due to a lost or damaged device.
To find your backup codes:
-
Log in to the dashboard with a valid username and password.
-
Locate the My Profile option on the top right corner of the screen.
-
Select My Profile.
-
Scroll down to the Two-factor authentication section. Find your One-time codes (a numbered list, one through eight).
You can use each code only once. Select Generate a new set of one-time codes at any time to refresh the eight codes. Any unused codes from the previous set become void at that time.
Avoid using backup codes for regular sign-ins. Keep your primary method active and accessible. Store the codes securely for emergencies. Rely on your main method whenever possible.
Use two-factor authentication with Client VPN
Cisco Meraki Client VPN includes several methods for authenticating users. Authentication happens before users join the network. For an additional level of security, Client VPN also supports third-party two-factor authentication solutions. These require users to complete a second authorization step.
Client VPN does not natively support two-factor authentication. A third-party solution is required. Consult your two-factor authentication solution's documentation for additional information and troubleshooting.
You can incorporate two-factor authentication in one of two ways:
-
As part of the authentication. Users enter a username and password as normal. They must also provide additional information required by the third-party solution. For example, they append a key to the password.
-
As a push notification. An agent on a RADIUS server holds an accept message. The user selects an 'accept' button or equivalent to proceed. By default on the Meraki platform, the RADIUS session times out after a short period. This may be too short for some solutions. Contact Meraki Support to extend this timeframe.
Both methods are compliant under the PCI DSS 3.0 standard as two-factor security for remote access.
Client VPN does not support xauth. Two-factor authentication solutions that use xauth are not supported.
Disable two-factor authentication
-
Log in to the dashboard with a valid username and password.
-
Locate the My Profile option on the top right corner of the screen.
-
Select My Profile.
-
Scroll down to the Two-factor authentication section.
-
Select Turn off two-factor authentication.
-
Verify your password to finalize the process.
-
Optionally, select Remove next to your previously established phone number(s). This stops it from being saved for future configuration.
The organization-wide security configuration Force users to set up and use two-factor authentication overrides an individual's ability to disable TFA. Disabling this configuration does not disable TFA for any users. Re-enabling it forces everyone in the organization to follow the policy. This includes new administrators and existing administrators who temporarily disabled their individual TFA.
You may lose access to the original or current phone number. If so, Meraki Support may assist. First follow the account recovery steps in the Troubleshooting section.
Verification
-
Log out, then log back in. Dashboard prompts you for the active verification code from your authenticator. The correct code confirms TFA is active.
-
For backup codes, confirm the Two-factor authentication section displays your eight one-time codes (numbered one through eight).
-
For Client VPN, a successful second authorization step confirms two-factor authentication works. This is a key appended to the password or an accepted push notification.
Troubleshooting
Recover access to a TFA-protected account
Meraki provides one-time codes to use in place of a TFA code. These are available for MFA and Duo Mobile. Treat one-time codes and Duo Restore as the primary recovery steps. They temporarily bypass two-factor authentication to regain access.
Enable Duo Restore (iOS, Android). This allows easy account recovery to the same device or a new device.
If those solutions are not possible, Meraki Support can disable the account's TFA configuration. TFA is an important security mechanism. Meraki Support will not disable it without first positively identifying the account owner.
2FA removal requests cannot be resolved via Support phone lines. Open a Meraki Support case from the Meraki Support Home page. Use the No dashboard Access? option.
The organization-wide security configuration Force users to set up and use two-factor authentication overrides Meraki Support's ability to disable TFA. To complete the process, disable this configuration from every organization the account is associated with. Disabling it does not disable TFA for any users. It only lets Meraki Support manually disable TFA for the locked-out account.
Verify account ownership for recovery
Method 1
Use this method if a second organization administrator with full access does exist.
-
Open a support case from the Cisco Meraki Support website. Using the email address of the account TFA is to be disabled on. Include the full name of the organization the account resides in.
-
Respond to the automated case creation email to confirm the TFA reset request.
-
A second organization administrator must comment on the case through Dashboard to approve the disable. Email or phone approval is not acceptable. Approval must come as a case comment.
Cisco Meraki US Government Region Administrators must and comment with approval via a government case and reference the commercial case # created in the previous step.
An organization administrator with Full access may grant this. A SAML administrator with Full access may also grant it. Approval by network administrators or read-only administrators is not accepted.
Method 2
Use this method if a second organization administrator with full access does not exist or is unavailable.
-
Open a case from the Cisco Meraki Support website. Use the email address of the account TFA is to be disabled on. Include the full name of the organization the account resides in.
-
The Support Operations Specialist requests information about the organization's specifics to verify ownership.
-
After verification, a DocuSign email is sent to the organization administrator. Fill it out, sign it digitally, and update the case once completed.
For more on handling 2FA unlock requests, refer to the documentation on Support Policies and Exceptions.