
Cisco Secure Connect - Cloud Firewall Policy
Overview
Secure Connect’s Cloud Firewall provides firewall services without the need to deploy, maintain and upgrade physical or virtual appliances at a site. The cloud firewall supports visibility and control of internet and SaaS traffic, branch to branch traffic and Remote users to internet, SaaS or branch traffic. Secure Connect logs all network activity and blocks unwanted traffic using IP, port, protocol or Applications (public and private) rule criteria.
The firewall policies describe the active configuration of the Cloud Firewall and Intrusion Prevention System (IPS). An admin can create a firewall policy with any number of rules to control access to private applications and networks, and internet applications and sites. Within a policy, users can enable IPS to detect or block potential Internet threats, such as malware, viruses, or unauthorized access attempts, in real-time. IPS service does not inspect traffic matched by the private rules. Firewall policy rules are evaluated from top to bottom, allowing users to arrange them in order they should be evaluated.
Users can configure various communication protocols in a firewall policy rule. The Cloud Firewall filters and controls traffic sent over TCP, UDP and ICMP. The Cloud Firewall does not support the Session Initiation Protocol (SIP).
Prerequisites
To enforce firewall rules from Branch to Internet traffic or Branch to Branch traffic
- Connect a Meraki site to Secure Connect OR Connect Non-Meraki site to Secure Connect [Click here for more information]
- Create Private Applications [Click here for more information]
To enforce firewall rules from Remote users to Internet or Branch traffic
Cloud Firewall in the Secure Connect Dashboard
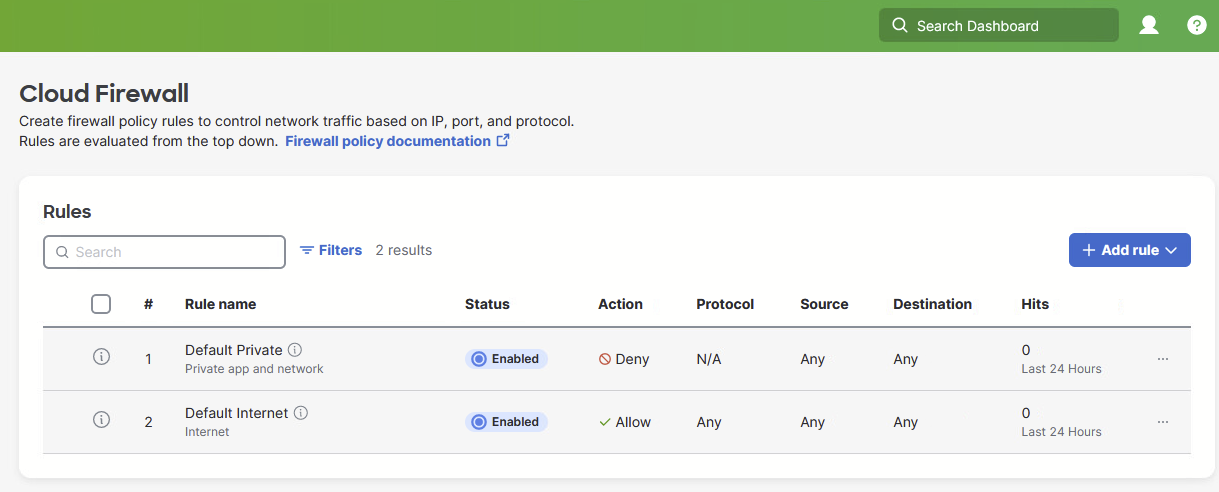
Navigate to the Secure Connect > Cloud Firewall page within the Meraki dashboard. For the very first time, this page will show two default rules that cloud Firewall enforces.
- Default rule for Internet traffic - This rule will allow all internet bound traffic
- Default rule for Private Application and Network - This rule will block all Branch to Branch or Remote VPN Access to Branch traffic.

Meraki Cloud Firewall page is optimized for Secure Connect and should be used for all configurations and maintenance of firewall rules. It is not recommended to use Umbrella Firewall Policy dashboard.
Types of Firewall Rules
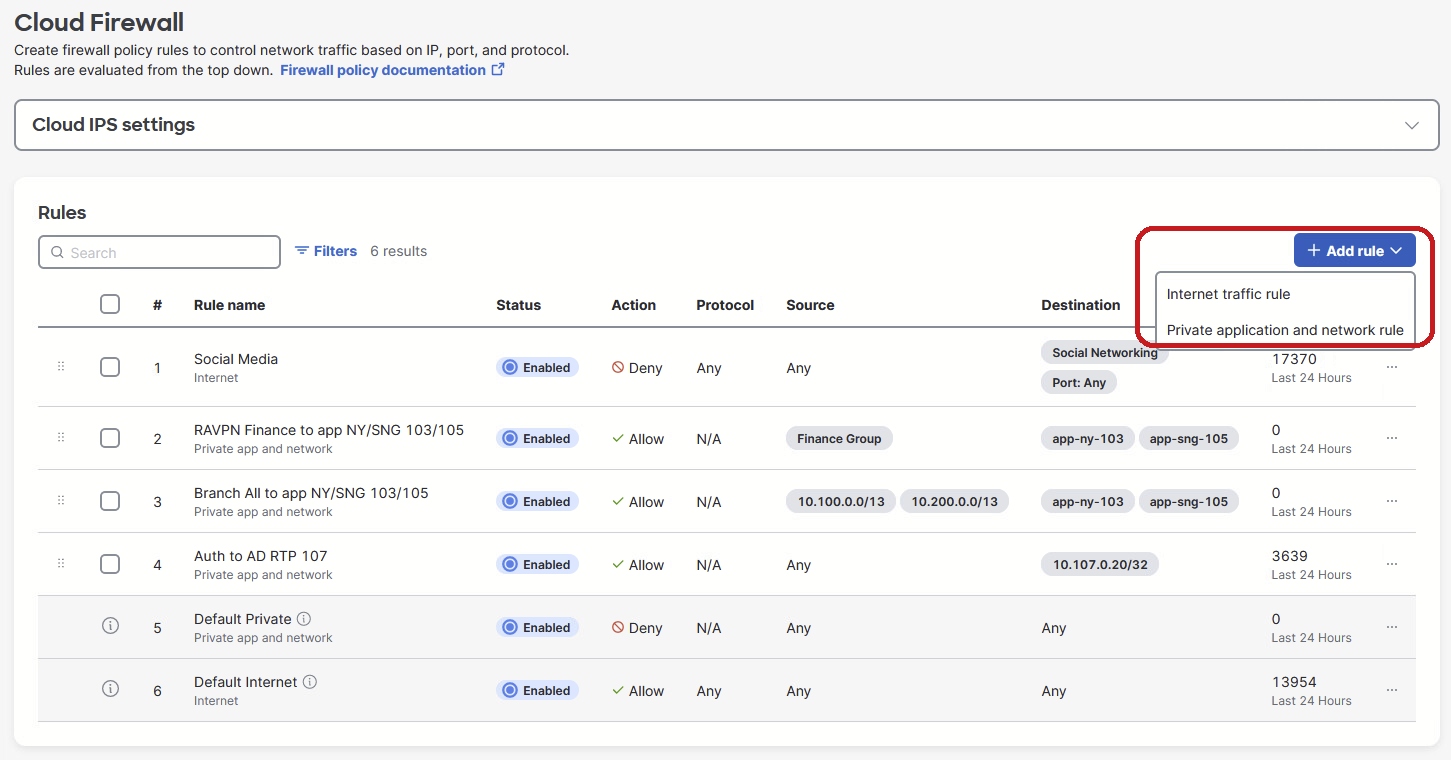
The Secure Connect Cloud Firewall provides two types of Firewall rules as shown below.
- Internet rule
- Private application and network
Creating Internet Traffic Rule
From the top left corner of the page, click on +Add Rule and select Internet Traffic rule option. This will open a rule creation page where the 4 step process will be outlined as shown below.
Rule description - Provide Name, Priority and Optionally add description to the rule.

Rule Intent - Define Rule Intent with the criterias listed below:
- Action: Allow or Deny
- Protocol: Any, TCP, UDP or ICMP
- Sources: This can be a Subnet (CIDR) or individual IP address, Username or User group, Tunnel.
- Source ports: Port number or a range (By default if not defined, it will consider “Any”)
- Destinations: This can be a Subnet (CIDR) or individual IP address or Public Application Categories or specific Apps from categories.
- Destination ports: Port number or a range (By default if not defined, it will consider “Any”)

Rule Schedule
Here users can define their rule enforcement start and end date as well as time. Optionally logging can be enabled or disabled. The hit count interval is available for configuration. If the interval is selected for a specific time, it will reset and start monitoring the hit count again after the specified time has elapsed.
If you disable the logging, the hit counter will also be disabled.

Lastly select the rule status i.e. Enable or Disable upon defining it.

The newly added rule now shows up in the Rules list.

Identity Criteria
When using Internet traffic rule, the following source criteria can be used:
- Users or Groups of your Remote Workers tunneled into the fabric using Secure Client RAVPN
- Subnet(s) representing end points or resources attached to Branches tunneled into the fabric using MX SD-WAN Auto-VPN
- Tunnels orgid objects can be selected in Internet rules as source criteria.
- Remote VPN Access orgid:(#) object include all RAVPN subnets.
- Branch Access orgid:(#) object replaces SIGraki branch tunnel IDs with a single object for all branches branch attached to Secure Connect.
Note: Active Directory user groups are not supported to be used as an source identity.
The following destination criteria can be used:
- Public applications, i.e., Social Networking
- Subnet representing public subnets on the Internet, i.e., 208.67.220.220/32.
When multiple source/destination types are selected (ex: user group and subnet) the sources/destiantions are processed as ‘AND’.
When multiple values are entered for any single source or destination type (ex. 208.67.220.220/32, 208.67.222.222/32), these individual values will be processed as 'OR' with each other.
See an example policy in the Additional Resources section.
Creating a Private Application and Network rule
From the top left corner of the page, click on +Add Rule and select Private Application and Network rule option. This will open a rule creation page where the 4 step process will be outlined as shown below.
Rule description - Provide Name, Priority and Optionally add description to the rule.

Rule Intent - Define Rule Intent with the criteria listed below:
- Action: Allow or Deny
- Sources: This can be a Subnet (CIDR) or individual IP address, Username or User group, Tunnel.
- Destinations: This can be Subnet (CIDR) or Individual IP address or private application defined within the Secure Connect > Application page.
For specific ports and protocols, users will need to define them as an Application within the Secure Connect page and select them as a destination on the Firewall rule in order to block or allow them.

Rule Schedule
Here users can define their rule enforcement start and end date as well as time. Optionally logging can be enabled or disabled. The hit count interval is available for configuration. If the interval is selected for a specific time, it will reset and start monitoring the hit count again after the specified time has elapsed.
If you disable the logging, the hit counter will also be disabled.

Lastly select the rule status i.e. Enable or Disable before you click on Save and Exit.

After creating all the Firewall rules, the list view will be visible to the users as shown below.

Filtering and Bulk actions
Users have a way to filter the rules as per the options show in the image below.

Along with that, bulk action can be performed by selecting multiple rules at the same time.

Identity Criteria
When using Private app and network rule, the following source criteria can be used:
-
Users or Groups of your Remote Workers tunneled into the fabric using Secure Client RAVPN
-
Subnet representing end points attached to Branches tunneled into the fabric using MX SD-WAN Auto-VPN, i.e., 10.100.0.0/24
- Tunnels orgid objects can be selected in Private app and network rule as source criteria.
- Remote VPN Access orgid:(#) object includes all RAVPN IP pool subnets.
- Branch Access orgid:(#) object replaces SIGraki branch tunnel IDs with a single object for all branches attached to Secure Connect.
The following destination criteria can be used:
-
Pre-defined private resources or applications enabled for Network and VPN access, created under Secure Connect > Resources and Applications > Private
-
Subnet representing endpoints attached to individual Branches tunneled into the fabric using MX SD-WAN Auto-VPN, i.e., 10.200.0.0/24
If IP subnets and Applications are configured together in destination field, IP subnets are ignored and match is made only against Applications
When multiple source types are selected (ex: user group and subnet) the sources are processed as ‘AND’.
When multiple values are entered for any single source or destination type (ex. 208.67.220.220/32, 208.67.222.222/32), these individual values will be processed as 'OR' with each other.
See an example policy in the Additional Resources section.
Firewall Rule Processing
You can add above described identities and define actions, ports, protocols, and applications in a cloud firewall rule.
Secure connect evaluates each firewall rule, starting with the highest ranked rule. When an identity and destination match a rule, Secure Connect applies the action defined in the rule.
For example, if an identity requests a web application on port 80 or 443, Secure Connect first checks for a matching firewall rule. If Secure Connect finds a matching firewall rule, the cloud firewall applies the action defined in the rule.
For web application requests, Secure Connect applies this sequence of checks.
1. Secure Connect first matches a firewall rule to an identity and destination.
2. If the matching rule defines a Block action, the Secure Connect cloud firewall blocks the request.
3. If the matching rule defines an Allow action, the Secure Connect cloud firewall forwards the request to the secure web gateway (SWG). The secure web gateway applies the security settings defined in the Web policy.
Managing Rules
There are additional capabilities available on the Cloud Firewall page as listed below.
- Users can drag and drop rules to change the priority order by simply using the grab handle available before the checkbox.
- Additional actions on a per rule basis are available as shown in the image below

Edit option allows the user to update rule attributes.

Duplicate option allows the user to copy the rule into newly named rule and modify it accordingly.

Reset rule count allows for clearing of the hit counter on per-rule basis.
Get latest hits option updates the rule count according to the latest available data.
Lastly, each rule can be quickly switched between Allow/Deny action and Enable/Disable status.
Removing User Groups and Policy
When preparing to remove a user or user group from 3rd party IDP, modify, disable or delete any policy rules which only apply to that user's or group identity. After rules have been updated or deleted, the user may be removed from third party IDP.
If rules are not updated prior to user removal from third party IDP the field which specified the removed user will revert to acting as ANY and may match to more traffic than initially intended.
Configure IPS settings for Firewall Policy
Secure Connect provides a set of default Intrusion Prevention System (IPS) settings that when enabled in a firewall policy control how Secure Connect detects or blocks traffic in your network. In addition to the default signature lists, you can add a custom IPS setting for your organization and enable the custom signature list in your firewall policy. To manage a custom signature list, see Manage IPS.
Configure IPS Settings
To configure IPS settings, navigate to Secure Connect > Cloud Firewall page and click on the Cloud IPS settings drop down. When it's not configured, it will show as an image below.
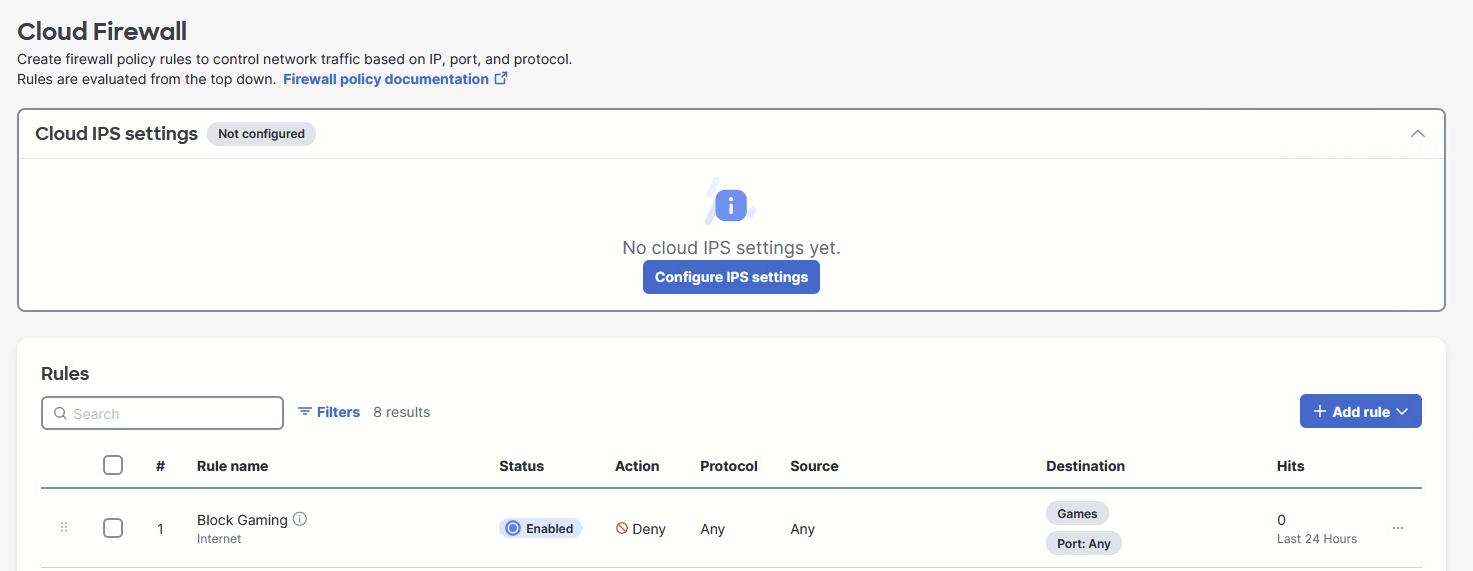
Click on the “Configure IPS settings” button that will open up a configuration page as shown below.

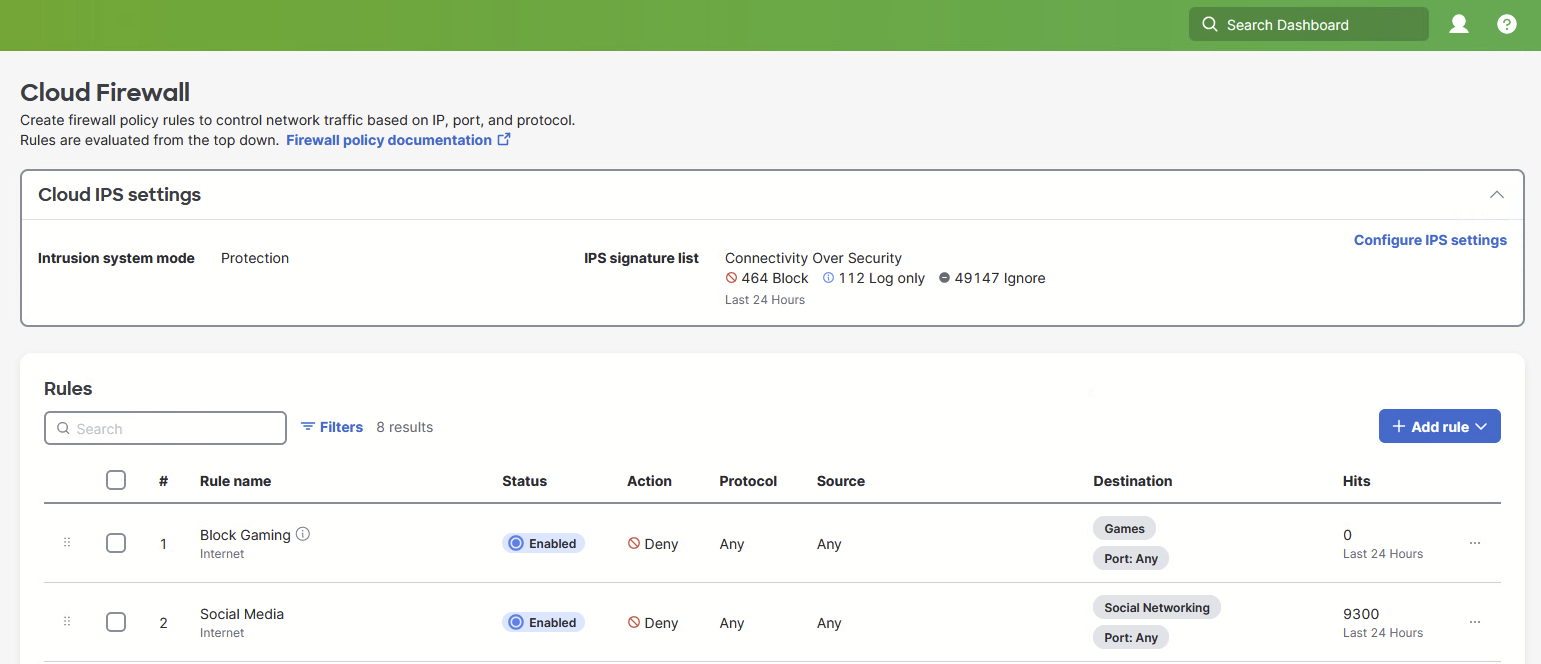
In this page, choose either Detection or Protection.
Detection: Detects threats or attacks in your network that match the signatures in the IPS setting. With detection mode enabled, Secure Connect detects matching traffic patterns but does not block destinations. You can test the IPS settings on your network without affecting the traffic. Secure Connect logs the events as Allowed (Would Block) under IPS Signatures in the Activity Search report.
Protection: Protect your network from known threats or attacks. With protection mode enabled, Secure Connect blocks destinations that match the signatures defined in the IPS setting.
IPS Signature list - Select the desired signature list. If a user has created a custom list, they will show up for selection as well.

Once ready, click the “Save” button to complete the configuration.
Additional resources
Review Firewall Logs in Reports
Recommended Use of Objects in the Rules
General guidance:
Different source objects within the same rule are proccessed with 'AND' operator. In below example matching will be made for machine that has ip address 10.107.0.103 and is behind MX device, that is trying to reach 8.8.8.8 OR 20.27.177.133 on port 22,80 or 443.

Do not mix applications and IP subnet destination criteria in a same rule.
