
Configuring RADIUS Authentication with a Sign-On Splash Page
The Cisco Meraki MR access points and MX WAN appliances allow a splash page to be configured, requiring users to interact with this captive portal before being granted network access. One configuration option for this splash page is to allow authentication with an existing RADIUS server on the network, so users must enter their domain credentials to get through the splash page.
This article outlines the Dashboard and RADIUS configuration steps to use a RADIUS server with a sign-on Splash Page.
Supported RADIUS Attributes
When a sign-on splash page is configured with RADIUS server, authentication is performed using PAP. The following attributes are present in the access-request messages sent from the dashboard to the RADIUS server.
Note: Please refer to RFC 2865 for details on these attributes; additional notes for certain attributes are included below.
- User-Name
- User-Password
- Called-Station-ID: Contains (1) the MAC address of the Meraki access point (all caps, octets separated by hyphens) and (2) the SSID on which the wireless device is connecting. These two fields are separated by a colon. Example: "AA-BB-CC-DD-EE-FF:SSID_NAME"
- Calling-Station-ID: Contains the MAC address of the wireless device (all caps, octets separated by hyphens). Example: "AA-BB-CC-DD-EE-FF"
- Acct-Session-ID
- Framed-IP-Address
- NAS-Identifier
- NAS-IP-Address
- NAS-Port-Id
- NAS-Port-Type
- Service-Type
The following attributes are honored by Cisco Meraki when received in an Access-Accept or Access-Reject message from the RADIUS server to the dashboard:
- Session-Timeout: This is the maximum time in seconds that the given user's session will last. After that time, the user will need to log in (authenticate) again using their username and password. Only used in Access-Accept packets.
- Idle-Timeout: This is the idle timeout in seconds. If the user does not transfer any data on the network for this amount of time, the user's session will end and they will need to log in (authenticate) again using their username and password. Only used in Access-Accept packets. This attribute is ignored if RADIUS accounting is not enabled on the network.
- Maximum-Data-Rate-Upstream/Maximum-Data-Rate-Downstream: These are used to impose bandwidth limits and are only used in Access-Accept packets. The values are the maximum rate in bits/second. See RFC 4679: vendor-specific (set vendor-Id 3561). If these values are not present, the dashboard will use the bandwidth limits that the user set on the dashboard traffic-shaping page as a default. If these values are set to 0, the dashboard will set the bandwidth limit to unlimited.
Note: Maxiumum-Data-Rate-Upstream and Downstream must be specified in separate RADIUS vendor-specific attributes. If both values are specified in a single attribute, the dashboard will not honor them.
- Filter-ID: This attribute can be used to convey a group policy that should be applied to a wireless user or device. The attribute type should match that which is configured under Network-wide > Configure tab > Group policies in the Cisco Meraki Cloud Controller. The attribute value should match the name of a policy group configured on that page.
- Reply-Message: This is a message for the user that will be displayed in-line on the splash page. It is allowed in Access-Accept and Access-Reject messages, but will only be shown to the user in the case of Access-Reject messages.
Note: Matching the Filter-ID RADIUS attribute with a group policy for sign-on splash is currently only for the MR access points and is in beta; please contact support to have it enabled for your networks.
Dashboard Configuration
The following instructions explain how to configure an SSID with a splash page using a local RADIUS server:
- In the dashboard, navigate to Wireless > Configure > Access control.
- Select the desired SSID from the drop-down menu.
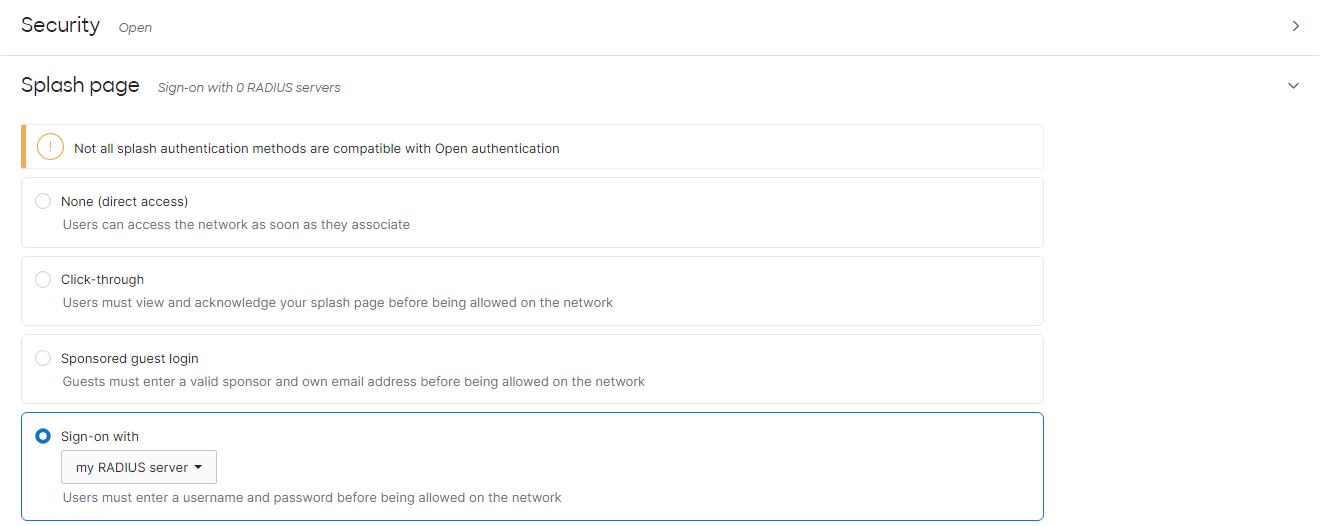
- Under Security, select Open (no encryption).
- Under Splash page, select Sign-on with and choose my RADIUS server from the drop-down menu:
- (optional) In the Advanced splash settings subsection, for Captive portal strength, choose Block all access until sign-on is complete.
- (optional) In the Advanced splash settings subsection, set Walled Garden to Disabled.
- Under RADIUS, click Add server.
- Enter the following information and click Done:
- Host IP or FQDN - Public IP address or Fully Qualified Domain Name of the RADIUS server.
- Auth Port - UDP port that the RADIUS server listens on for access requests, typically 1812.
- Secret - RADIUS client shared secret (if a RADIUS server has not been configured yet, select a shared secret here and make note for later).
Note: RADIUS access request messages for a splash page will be sourced from the dashboard, not from the local Meraki devices. As such, the RADIUS server's private LAN IP address cannot be specified here.
Note: RADSec is not supported for splash authentication
- Click Save. Make sure to take note of the Source IP ranges listed under Help > Firewall info and make adjustments to network firewalls if necessary.

The external splash integration must use the login_url provided by Meraki in the splash request parameters. This URL must be used exactly as provided and must not be modified.
If hostname-based filtering is configured, ensure the hostname in the login_url is allowed. The hostname may vary between requests, so do not restrict to a fixed pattern. Allow *.network-auth.com or the equivalent domain for your region.
RADIUS requests originate from the Meraki cloud (Dashboard). Do not restrict RADIUS traffic to a single source IP; allow the Dashboard IP ranges as listed above.
Testing RADIUS from the Dashboard
Dashboard has a built-in RADIUS test utility, to ensure that all access points (at least those broadcasting the SSID using RADIUS) can contact the RADIUS server:
- Navigate to Wireless > Configure > Access control.
- Under RADIUS > RADIUS servers, click the Test button for the desired server.
- Enter the credentials of a user account in the Username and Password fields.
- Click Begin test.
- The window will show progress of testing from each access point (AP) in the network, and then present a summary of the results at the end.
Access points passed: Access points that were online and able to successfully authenticate using the credentials provided.
Access points failed: Access points that were online but unable to authenticate using the credentials provided. Ensure the server is reachable from the access points; the access points are added as clients on the RADIUS server.
Access points unreachable: Access points that were not online and thus could not be tested.
The Test button does not exist for MX or Z-series networks.
RADIUS Configuration
While any RADIUS server can be used, the following configuration requirements are necessary for use with a sign-on splash page:
- RADIUS must be configured to allow PAP (unencrypted authentication) as the authentication method when you are using the sign-on splash page feature with a customer-hosted RADIUS server.
-
With PAP, user credentials are sent in plain text. However, in a Meraki network, user credentials are encrypted in an SSL tunnel when sent from the client's web browser to the Meraki cloud.
-
The Meraki cloud acting as the RADIUS client sends the username and password along with other connection specific data in a RADIUS access request to the RADIUS server you specified in the dashboard. For security, the Meraki cloud encrypts the password using the RADIUS shared secret and an XOR function. This ensures the user's password is never transmitted in plain text.
Note: Communication between the client and the dashboard is done through the splash page, which is encrypted using SSL.
- The dashboard's IP addresses must be configured on the server as RADIUS clients/authenticators with a shared secret. These IP addresses can be gathered in the dashboard from Help > Firewall info. Do not restrict RADIUS traffic to a single source IP.
Please refer to your RADIUS server vendor's documentation for configuration specifics.
Example RADIUS Server Configuration (Windows NPS + AD)
The following example outlines how to configure an existing Windows 2008 server, running Network Policy Server (NPS) alongside Active Directory (AD):
- Add the dashboard as a RADIUS client.
- Configure a RADIUS Network Policy.
Adding the Dashboard as a RADIUS Client in NPS
Since access request messages for a sign-on splash page are sourced from the dashboard, NPS must be configured to allow incoming requests from the dashboard's IP addresses:
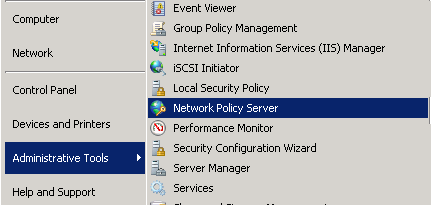
- From the desktop of your Windows 2008 server, click Start > Administrative Tools.
- Click on Network Policy Server when it appears in the list.

- In the Network Policy Server console, navigate to NPS > RADIUS clients and Servers > RADIUS clients.
- Right-click RADIUS clients and select New RADIUS client.

- Fill out the fields in the New RADIUS Client window.
- Friendly name: Unique identifier for this client.
- IP address: The IP ranges used by the dashboard (gathered in step 9 of the dashboard configuration)
- Shared secret: Secret configured in the RADIUS server value in the dashboard (used in step 8 of the dashboard configuration). This needs to be the same for each RADIUS client you add.
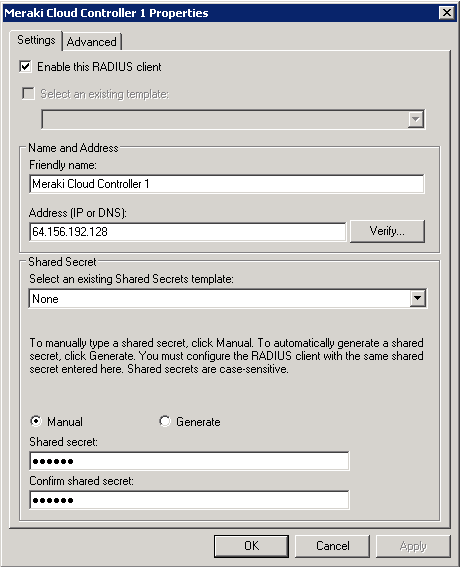
- Click OK.
- Repeat these steps for each of the dashboard's IP addresses, as specified on the Help > Firewall info page in the dashboard:

Configure a RADIUS Network Policy in NPS
The following instructions explain how to configure a network policy in NPS
- From the Network Policy Server console, navigate to NPS > Policies > Network Policies.
- Right-click Network Policies and select New.
- On the Specify Network Policy Name and Connection Type create a Policy name and verify Unspecified is selected in the "Type of network access server:" drop-down.
- Click Next.
- On Specify Conditions, click Add and append Windows Group > Domain Users group from the Windows Active Directory domain, then click OK.
- Click OK, Review the conditions, then click Next.
- On Specify Access Permission select Access granted and click Next.
- On Configure Authentication Methods make sure Unencrypted authentication (PAP, SPAP) is the only method checked and click Next.
- Click No when the Connection Request Policy help pop-up appears.
- Click Next on Configure Constraints.
- On Configure Settings, find the section Network Access Protection, then select NAP Enforcement.
- For Auto Remediation uncheck the box Enable auto remediation on client computers and click Next.
- On Completing New Network Policy, click Finish.
- Prioritize the policy by right-clicking the policy you created and selecting Move up, placing the policy above any existing deny policies.
- Review the policy values in the right side of the console:

Note: NAP was deprecated in Windows Server 2012 R2 and removed from Windows Server 2016. This NPS server configuration is an example only. If you need additional support, make sure you consult with your Microsoft Specialist and check Microsoft's current official documentation on Network Policy Server (NPS).
Error: The Meraki cloud is having difficulty connecting to your RADIUS server
When sign-on splash-page is used with a RADIUS server, the dashboard must be able to communicate with the RADIUS server. The dashboard, which acts as the RADIUS client, sends authentication requests (RADIUS access requests) to the public IP address of the configured RADIUS server.
The source IP addresses used by the dashboard may change over time. As a precaution, the dashboard periodically tests the configured RADIUS server to verify accessibility. Specifically, the dashboard sends an Access-Request message with "meraki-ping" as the username and "ping-test" as the password. If the RADIUS server replies with an Access-Accept or Access-Reject, the dashboard knows the server is reachable.
In the event that the dashboard does not receive a response after six attempts (one every 20 seconds), it will assume the RADIUS server is unreachable and an email will be sent to the dashboard administrator.
If you received this email, please verify the following:
- If the RADIUS server is protected by a firewall, ensure that the dashboard is able to access the server through the firewall using the IP addresses and port number specified in the email. A current list of IP addresses and the port number can be found in the dashboard on the Help > Firewall info page.
- The dashboard's IPs must be configured as RADIUS clients on the RADIUS server using the same shared secret configured in the dashboard.
- Ensure there are no additional restrictions on the RADIUS server that would prevent it from responding to the dashboard as the test Access-Request will not contain all attributes (such as Calling-Station-ID), see below for an example message.

RADIUS Accounting with a Sign-On Splash Page
RADIUS accounting can be used with RADIUS authenticated splash pages to provide information regarding when a client was authorized through the splash page and later had that authorization cleared/expired. These messages are sent from the dashboard to the customer's configured RADIUS server.
Note: RADIUS accounting is not currently available on splash pages for security appliances or teleworker gateways.
Accounting Overview
When RADIUS accounting is enabled, RADIUS "start" accounting messages will be sent whenever a client is authorized through the splash page. These start messages are sent from the dashboard, typically from the same IP address as used for the authentication Access-Request message. A "stop" accounting message is generated when the client's splash authorization is manually cleared or expires based on the splash frequency.
The screenshot below shows a Wireshark packet capture of an example RADIUS "start" message sent by the dashboard (using an IP address of 74.50.53.101) to a RADIUS server. When the RADIUS message is expanded, there are many parameters that show the information contained within the "start" message. Some data has been obfuscated for security reasons.

The screenshot below shows a Wireshark packet capture of a RADIUS accounting "stop" message sent by the dashboard because the splash frequency time of 30 minutes was reached. This means the client has to log in again through the splash page to continue using the network.

Configuration
The following instructions outline how to enable RADIUS accounting for a sign-on splash page:
- In the dashboard, navigate to Wireless > Configure > Access control.
- Select the SSID currently configured to use RADIUS with a sign-on splash page.
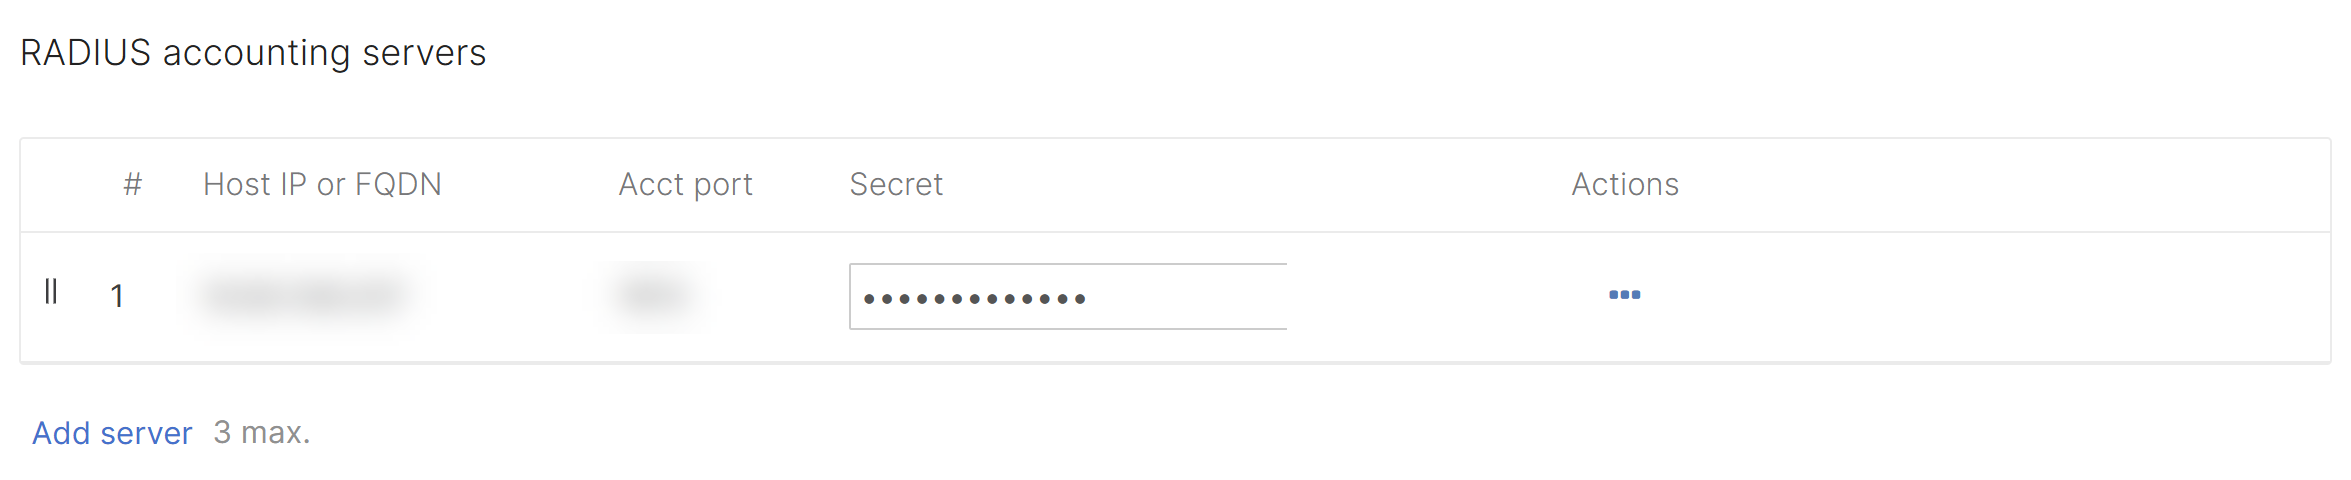
- Under RADIUS > RADIUS accounting servers, click Add server, provide the following details, click Done and Save:
- Host IP or FQDN - Public IP address or Fully Qualified Domain Name of the RADIUS accounting server
- Auth Port - UDP port that the RADIUS server listens on for accounting messages, typically 1813
- Secret - RADIUS client shared secret
Note: If this option is not available, please contact Cisco Meraki Support to have RADIUS accounting enabled.
Note: RADIUS accounting messages for a splash page will be sourced from the Dashboard, not from the local Meraki devices. As such, the RADIUS server's private LAN IP address cannot be specified here.
Data-Carrier Detect (DCD)
When enabling RADIUS accounting on a sign-on splash page with my RADIUS server, the option Enable data-carrier detect becomes available. If "data-carrier detect" is enabled, sessions will be revoked and accounted for whenever a client disassociates from a network. To allow clients to reassociate to the network without reauthorization, do not enable "data-carrier detect." See also RFC 2866 Section 5.10.
Additional Resources
For more information on RADIUS and splash pages, please refer to the following documentation: