
Trusted Access for Secure Wireless Connectivity - Setup Guide
Overview
Meraki Trusted Access is a simple and secure way to join phones, tablets, and laptops to Meraki MR wireless networks using certificate-based 802.1x authentication without enrolling the device into an MDM platform like Meraki Systems Manager. Trusted Access eliminates the management overhead associated with building and maintaining an on-premise 802.1x EAP-TLS solution for wireless access with distributed Certificate Authority (CA) and RADIUS server environments.
Trusted Access is currently supported on the following operating systems:
- iOS/iPadOS 11+
- macOS 10.13+
- Android 10+ (beta using Hotspot 2.0/Passpoint)
- Windows 10+ (beta app)
Follow this guide to setup Trusted Access in a Meraki network.
Trusted Access Configuration Overview and Process Flow
Meraki MR network administrators create Trusted Access profiles in the Meraki Dashboard to define access to the wireless network. End users can then log into the Meraki Self-Service Portal using their available authentication credentials to download a configuration profile to their devices to join the SSID.
See the following diagram for a complete admin and user configuration process flow description.

Trusted Access Config
- SM Network enables authentication with AD or Meraki Auth.
- SM Network enables Self-Service portal access for new users.
- MR configures a Meraki Auth SSID as a Trusted Access SSID.
- MR generate a Trusted Access config for the SSID to be downloaded on client devices and sets a scope of which SM users receive this config.
- All users who should be able to use Trusted Access are given Trusted Access permissions via SM. All users that should be able to use the Self-Service portal are given SSP access via SM.
SSP access via SM
- Client uses unique link to access SM self-service portal.
- Client enters credentials configured for an SM network clients user.
- Self service portal validates with SM that user is configured for Trusted Access.
- (optional) SM network authenticates user credentials with active directory server.
- (optional) AD server validates user authentication.
- SM network authenticates users credentials. with Meraki Cloud Authentication users list.
- Meraki Auth validates user authentication.
- SM network sends validation for user auth and sends Trusted Access config to SSP.
- SSP delivers trusted access EAP-TLS cert with SSID Information to client.
- Client attempts to connect to Trusted Access SSID on MR.
- SSID requests
- client cert
- Client delivers cert
11. MR authenticates user credentials in cert against Meraki Cloud Authentication users list.
12. Meraki Auth validates user authentication.
13. MR acknowledges cert and user credentials and provides access to SSID.
Requirements
-
A network with a Meraki MR wireless access point.
-
A network with SM licenses in the same org as the MR. One SM license will be consumed for each Trusted Access device.
Step 1: Enable Authentication, SSP, and Trusted Access
- In the Meraki dashboard, navigate to Systems Manager > Configure > General

- Navigate to the User authentication settings section. Select your preferred end-user authentication method from the drop-down list provided. To learn more about user authentication options check out SM Enrollment Authentication.
The Windows Trusted Access app does not currently support OAuth2 authentication methods (Azure AD, Google, and OpenID)

- Navigate to the Self Service Portal settings section. Change the Self Service Portal option to Enable SSP for this network.
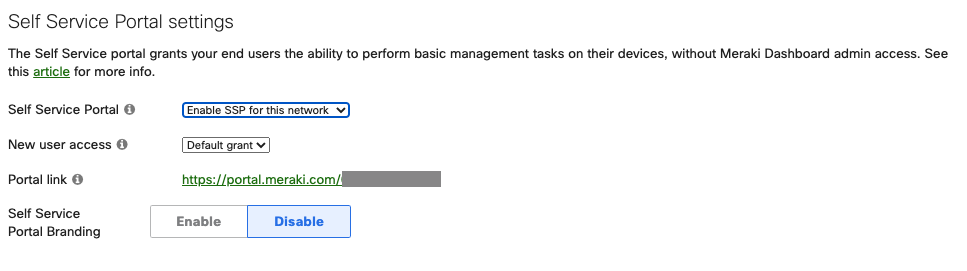
- If you would like to allow all newly created users to automatically have access to the Self Service Portal, change the New User Access mode to Default Grant.
- Take note of the Portal Link URL for your network. End users will need to visit this URL to set up and manage their Trusted Access devices.
- Navigate to the Trusted Access settings section.

- If you would like to allow all newly created users to automatically be enabled with rights to use Trusted Access, change the New User Access mode to Default grant.
- Set a Default device limit to limit the number of devices a user may register with Trusted Access. The max limit is 10 devices.
This is the expected behavior of the Windows operating system. When a wireless network is configured through a predefined networking profile, it is the profile name that shows up in the list of available wireless networks, and not the SSID. If this is the desire to have the the Trusted Access SSID to show up in the list of available networks after installing the Trusted Access profile, then the Trusted Access profile name set in Dashboard needs to be the same as the SSID.
The Trusted Access usage permission and device limit can be manually overwritten on a per-user basis in the Systems Manager > Owners page for an individual user.
9. In the bottom right corner of the page, click Save to confirm your changes.

Step 2: Provision Owner Access
Next, you will have to provide access to owners (users) on your network to use Trusted Access. This can be done in a couple of ways.
Check out this Knowledgebase article for more information about Owners, including how to create new owners.
To provide access to existing owners in your Systems Manager network:
- Navigate to Systems Manager > Configure > Owners

- Click on the owner's name to open the edit modal.
- Under the SSP Options section, enable the Self Service Portal and Trusted Access settings
- The owner will automatically inherit its Trusted Access device limit as configured in Step 1-6. You may change the device limit as needed.

- Click Apply changes to close the modal and save the owner configuration.
To provide access to multiple existing owners in your Systems Manager network in bulk:
- Navigate to Systems Manager > Configure > Owners
- Select the owners you would like to configure by enabling the checkmark in the first field.
- Click the Edit button. From the menu, enable the Self Service Portal and Trusted Access options. Set a max device count, and click Apply options

Step 3: Create and Configure a Trusted Access SSID
- In your MR wireless network dashboard, navigate to Wireless > Configure > SSIDs.

- Choose an SSID to be used for Trusted Access. Click edit settings to take you to the SSID's Access control page.

- Under the Security section, select Enterprise with Meraki Cloud Authentication on the Access Control page. This is the required form of authentication for Trusted Access when configuring the SSID. This setting will only affect the SSID being edited, systems manager authentication (such as Azure) can remain in use for enrollment authentication or the self service portal (enroll.meraki.com, portal.meraki.com).
- Click the Add config button under SM Trusted Access to open the configuration modal.

- Set the Name of the configuration profile. This name will be visible to end users when configuring Trusted Access on their devices.
- Choose the Systems Manager network you want users to use to register their devices when using this configuration.
- Select an Access period type.
Static configurations require a start and end date. An end user may download a static configuration anytime, but access to the wireless network will be limited to the period between the defined dates.

Dynamic configurations require a defined period. End users may download a dynamic configuration to access the wireless network for the time specified in the access period. The period begins when the Trusted Acc s profile is downloaded and activated on the device.

- Choose a scope of tags to determine which users should have access to this configuration. For more information on how to use tags effectively, check out Using Tags in Systems Manager.
- Click Add to close the configuration modal. Your new configuration will appear in the Trusted Access configurations list, as seen in the example below:

- Navigate to the Splash page section and ensure it is set to None (direct access):

- In the bottom right corner of the page, click Save to confirm your changes.

To use Trusted Access with Android Passpoint (beta), you must enable Hotspot 2.0 on the SSID.
- In the Meraki Dashboard, navigate to Wireless > Configure > Hotspot 2.0

- Select the SSID from the dropdown menu
- Enter an Operator name and Venue name
- Change the Venue Type to Unspecified
- Change the Network type to Private network
- Enter radius.meraki.com in the Domain list

- Click Save Changes
End users will have a corresponding profile to install for Wi-Fi access (from portal.meraki.com) for each Trusted Access SSID created on a MR network. This can lead to multiple profiles for users to download for access (one for each SSID). Administrators deploying the same SSID name across various MR networks and wishing to simplify the end user's experience may consider the option of a MR Wireless template. A Wireless network template allows a single profile for users to install for Wi-Fi access while still being able to authenticate into every SSID.