SM Enrollment Authentication
Overview
To provide a layer of authentication for devices to enroll in a Systems Manager (SM) network, Enrollment Authentication can be used. Meraki Owners can be used for authentication, as well as third party authentication options, such as Active Directory (AD), Azure AD, Sign In with Google, Okta OpenID Connect, or SAML. This article will cover how to implement each potential option.
Authentication can be applied to both enroll.meraki.com (enrollment portal) and portal.meraki.com (self-service portal). The configuration for authentication can be found on the Systems Manager > Configure > General page.
There are multiple methods that can be used for performing device enrollment authentication:
- Managed: Use Meraki hosted accounts: Use Meraki user/owner accounts managed in the Owners page. This is a good option for smaller deployments that do not require integrating with a larger third-party directory system.
- Active Directory: Use your own Active Directory Server: Authenticate against an Active Directory Server not located in the cloud
- AD via MX Security Appliance: Authentication requests are proxied through an MX security appliance configured for AD integration.
- AD via SM Agent: Authentication requests are proxied through a Windows PC/Server or macOS client with the SM Agent installed.
- Azure AD: Authenticate users against an Azure AD instance (Microsoft Entra ID).
- Google: Sign in with Google: Authenticate against Google's native Oauth endpoint for use in conjunction with G Suite
- Microsoft: Authenticate with Microsoft Azure Active Directory: Authenticate against Microsoft's Azure Cloud-Hosted Active Directory Solution
- OpenID Connect: Use your own OpenID Connect server: Authenticate against any 3rd-party device or service that supports the OpenID Standard
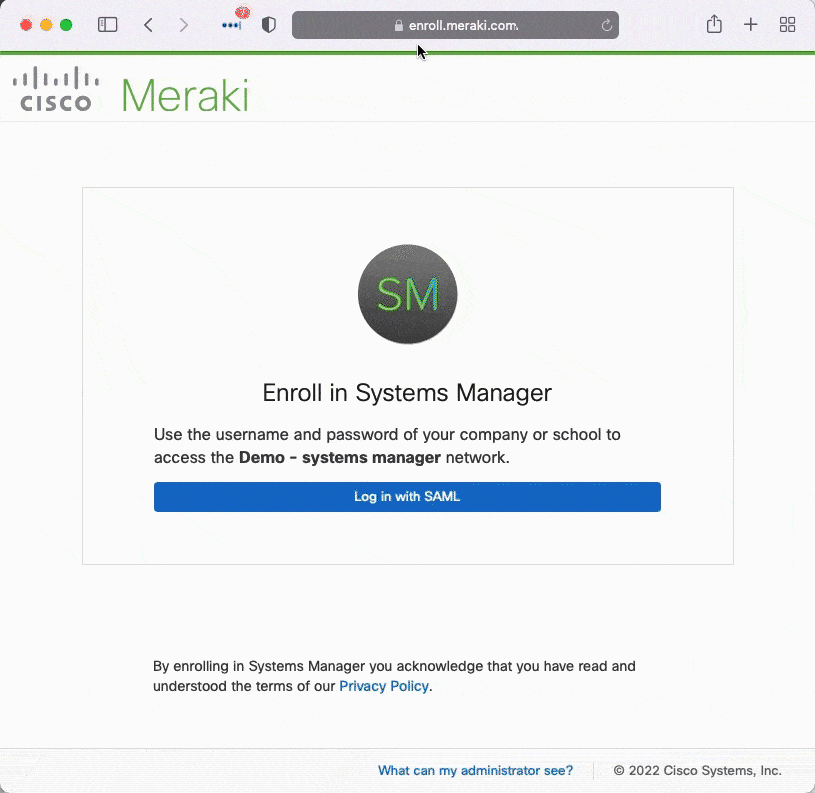
- SAML: Use an IdP such as OneLogin, Azure, Okta. Optionally add Duo 2FA prompts to authentication attempts.
For additional security, you may want to enable enrollment auto-quarantine to manually approve devices before they can receive your Systems Manager profiles and apps.
If enrollment authentication settings change, iOS and macOS devices enrolling through ADE (formerly DEP) may encounter enrollment issues. Resolve ADE enrollment issues by creating a new ADE payload ensuring the "Use network's user authentication" value is set correctly.
If you are using a Google Account Bind in conjunction with Android For Work (configured on the Organization > Configure > MDM page), Google authentication is not available as it is already being used as part of the Android For Work (AFW) enrollment process, and any selection made here would be for use in conjunction with this mechanism.
SM Enrollment Authentication per OS Type
| System | Meraki Managed Account | Active Directory via SM Agent | Active Directory via MX | Azure Active Directory | Google Sign-In | SAML |
|---|---|---|---|---|---|---|
| Apple Profile |
X |
|
|
|
X* |
X |
| Apple Agent |
X |
X |
X |
X |
X* |
X |
| Windows Profile |
X |
X |
||||
| Windows Agent |
X |
X |
X |
|
X |
|
| Chrome OS |
X |
X |
||||
| Android |
X |
X |
X |
Apple ADE (formerly DEP) enrollment does not support Google authentication, and will fall back to Meraki Authentication credentials.
Enrollment and Self Service Portals
User authentication settings can be shared for device enrollments, and Self-Service Portal. User Authentication is required for the self service portal, and can optionally be enabled for device enrollments into Systems Manager as well. The type of authentication is set in the End User authentication settings. To enforce user authentication upon device enrollments with this authentication type, enable the Authentication under Enrollment settings.

For each option, begin by navigating to Systems manager > Configure > General > User authentication settings. Then, refer to the appropriate section below to complete the configuration.
Managed Authentication with Meraki Users/Owners
This option utilizes the list of users/owners on the Configure > Owners page in a Systems Manager network. This is best for smaller deployments or cases where a list of owners is already actively maintained. See the Owners article for more info.
- Set Authentication settings to "Managed: User Meraki hosted accounts".
- Set Enrollment settings authentication to be enabled (so user authentication can be enforced for device enrollments).
- Click Save Changes.
In order to change/add/delete users, use the Configure > Owners page.
Meraki Users need to use the email address of their user as their username when authenticating.
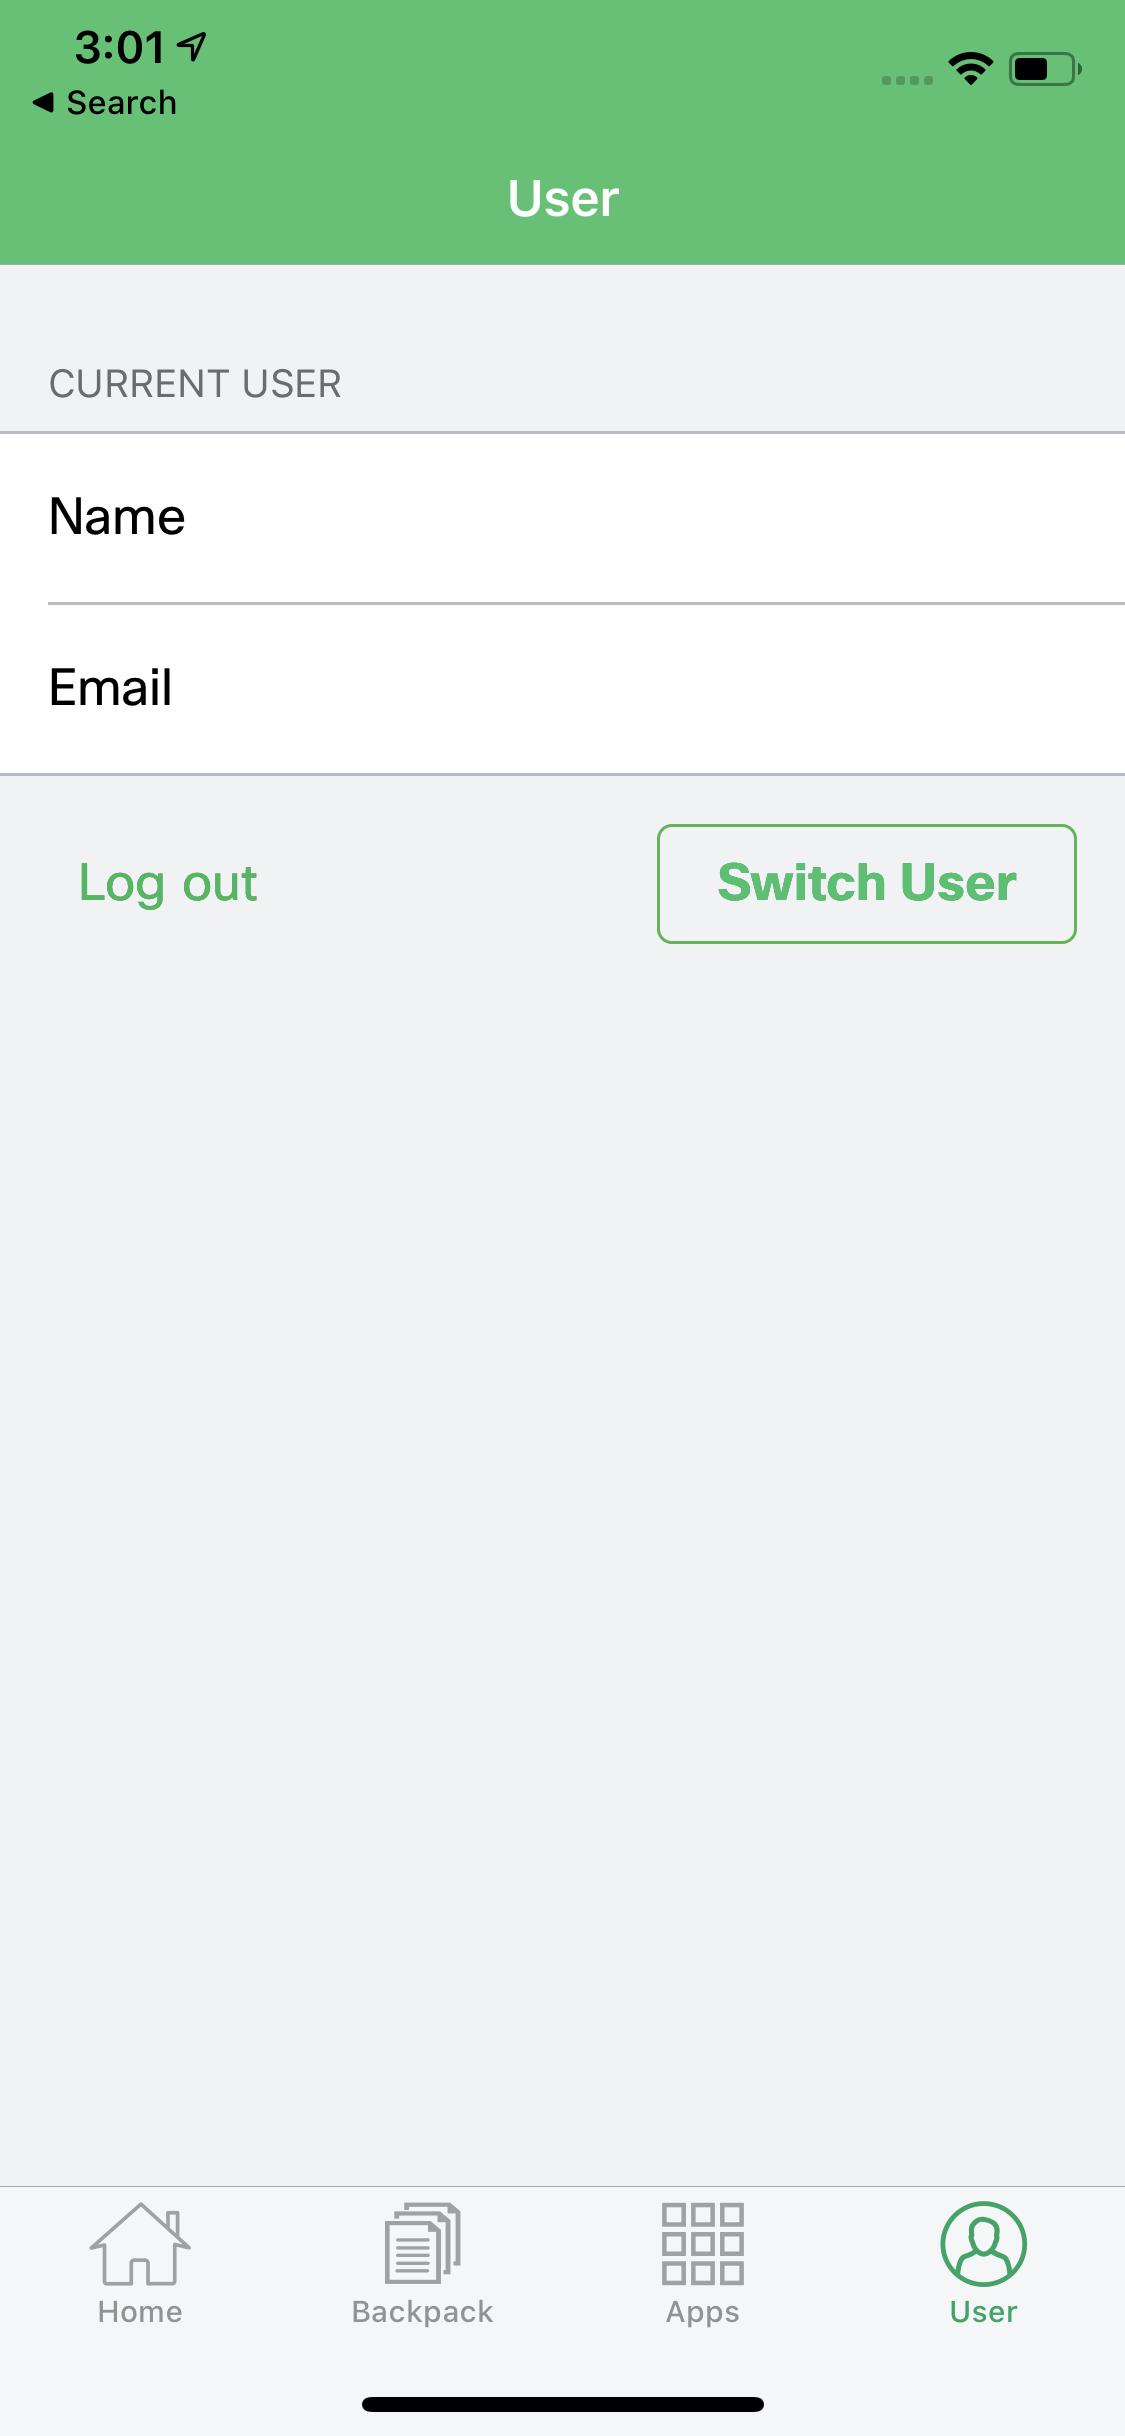
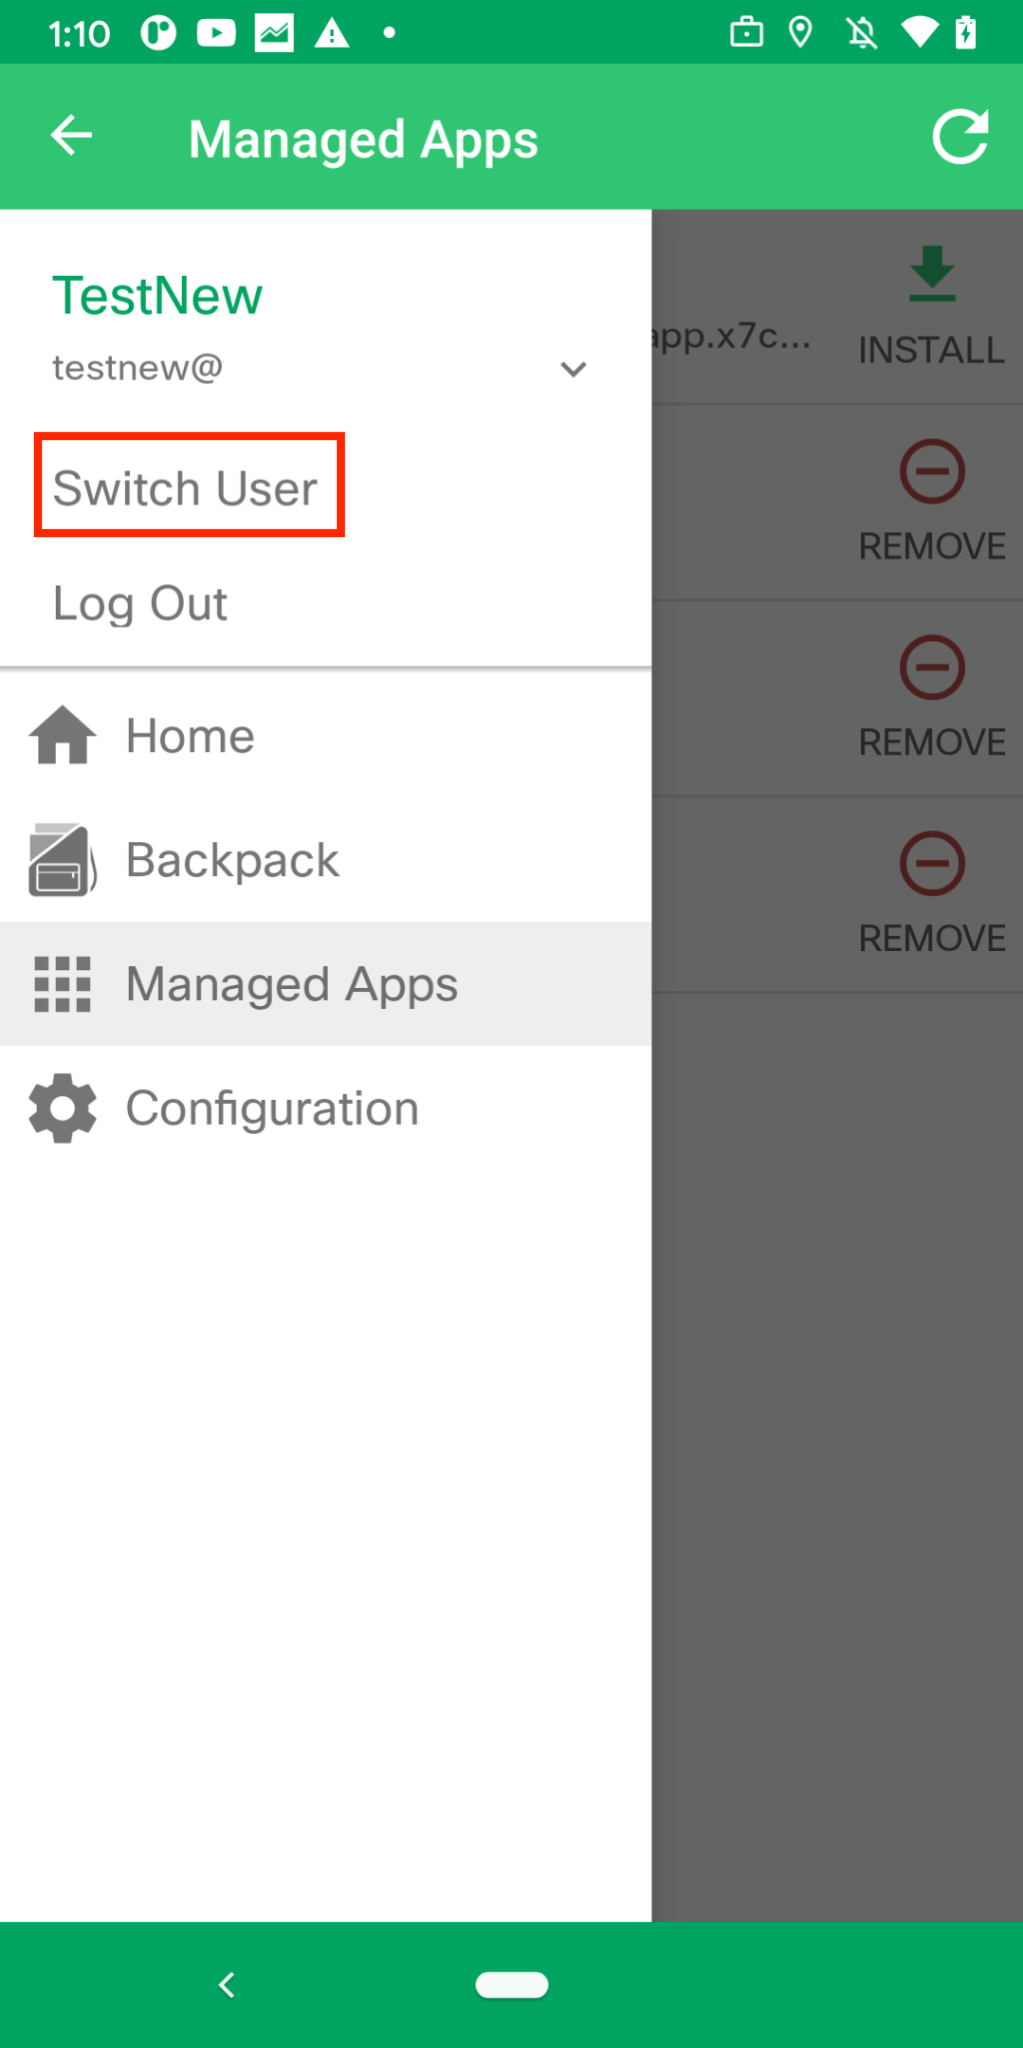
Enabling Multi-user authentication feature allows all the email addresses in the Owners list to be able to authenticate on the same device. The screenshot below shows that after enabling this feature, the option to "Switch User" becomes available on the end devices. This feature is only available on iOS and Android devices.
iOS SM app:
Android SM app:
Active Directory Integration
AD integration allows you to use your existing directory service as a line of defense, limiting who can enroll into your Systems Manager network, but also allows you to use your existing AD groups as user tags to scope profiles and apps. For more information on AD user tags, see the Owners article, and Tags article.
You can link your Cisco Meraki MX security appliance for directory services, or enroll your Windows machine hosting the server into Systems Manager to configure AD authentication. Note that these options will not be available to configure unless you have an MX in your Dashboard organization, or a Windows machine enrolled into your SM network, respectively.
Active Directory via MX Appliance
With this option, any enrollment authentication requests will be proxied through an MX security appliance that is configured for AD integration. This works well when an MX in this configuration is already deployed, or one is available where AD authentication can be enabled.
All communication between an MX security appliance and an Active Directory server will be encrypted using TLS. If AD integration has not yet been configured on the MX, please refer to steps 1-4 of the knowledge base article on configuring Active Directory for Group Policy.
To configure Active Directory via MX appliance:
- Set Authentication settings to "Active Directory".
- Set AD gateway type to "Meraki".
- Select the desired MX appliance as the Gateway network.
- Click Save Changes.
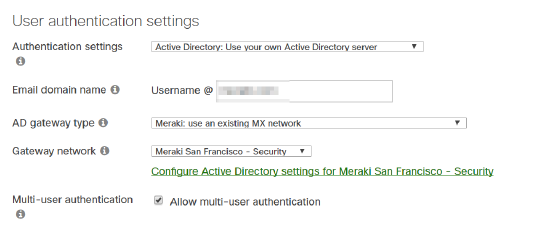
Users attempting to enroll devices will now be required to authenticate using their Active Directory username and password. The username should be specified as the user's Active Directory name, not including the domain name (e.g. "testuser," not "domain/testuser")
Users *may* in some AD configurations be able to successfully authenticate using the domain/testuser or testuser@domain.tld formats, but doing so may result in some features not functioning as expected.
Active Directory via SM Agent
With this option, any enrollment authentication requests will be proxied to an Active Directory server through a Windows device with the Systems Manager agent installed. This Windows device can be a user desktop, or an AD server. However, it must be enrolled in the Systems Manager network, have the SM agent installed (Systems Manager > Manage > Add Devices > Windows), and not have any firewall settings preventing it from communicating with the AD server.
The option to select "SM agent" will be grayed out until a Mac or Windows machine capable of communicating with your AD server is enrolled into Systems Manager.
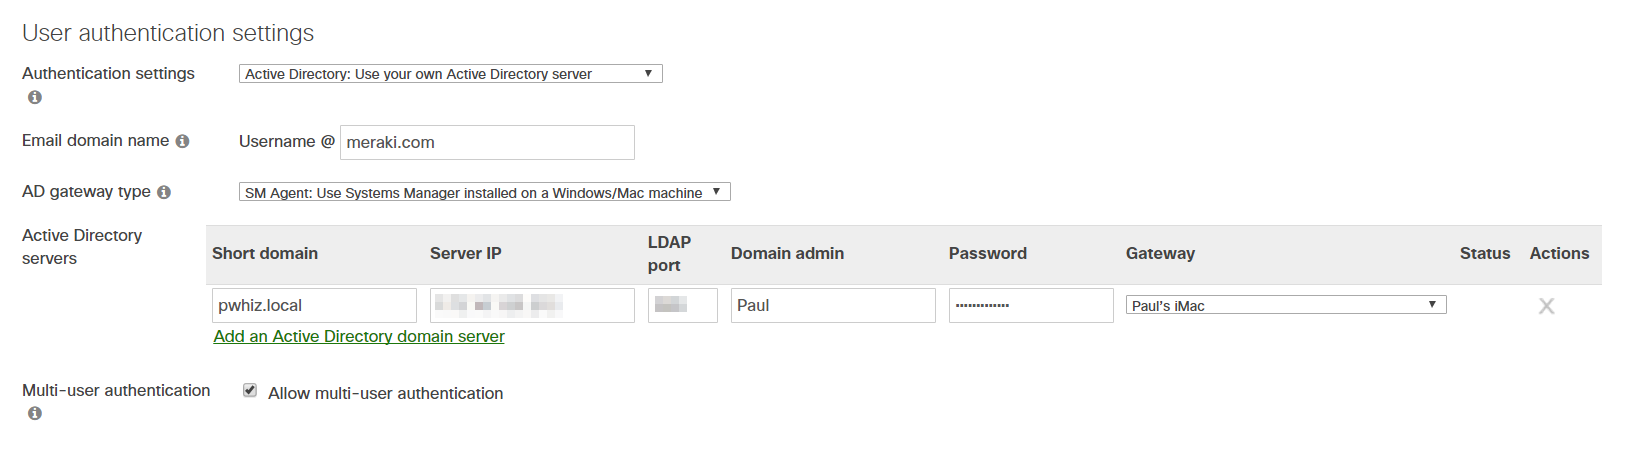
To configure Active Directory via SM agent:
- Set Authentication settings to "Active Directory".
- Set AD gateway type to "SM agent".
- Specify the following information regarding the AD server:
Short domain: The domain users will be authenticated against.
Server IP: The IP address of the AD server to use.
LDAP port: Port on the AD server that will be listening for LDAP requests. Default is 3268.
Domain admin/Password: Username and password of an administrator for this domain. - Select one or more Gateway machines. These are the devices that the enrollment authentication requests will be proxied through. They must have reachability to the AD server provided above.
- Click Save Changes.
If issues are encountered, ensure that the AD server used has the Global Catalog role enabled. Particularly if multiple domains are configured.
Communication between the Gateway machines and the AD server is not encrypted. Therefore, it is strongly recommended that only the AD server being queried be used as a Gateway machine, in order to keep communication local and encrypted.
Sign in with Google
Oauth against Google is as easy as filling in the allowed Google domain in the specified field. Note that Apple ADE (formerly DEP) enrollment does not support Google authentication, and will fall back to Meraki Authentication credentials.
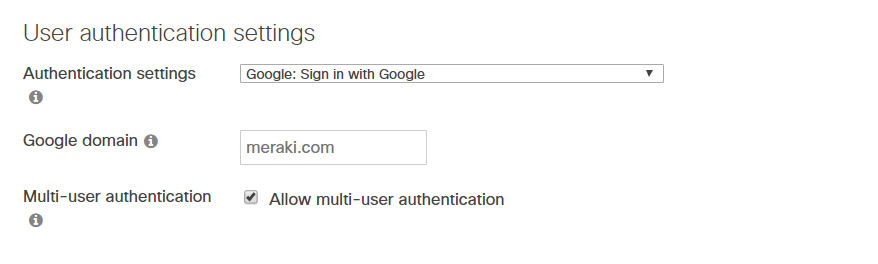
If you have Android For Work bound under Organization > MDM to a Google Domain, Google Authentication will autopopulate to this domain, and this field will not editable as seen in the screenshot above
Azure Active Directory Sign-In (Microsoft Entra ID)
As of July of 2025, the previous "Systems Manager > General > End User authentication settings" have been migrated to the "Organization > Users" page automatically.

Add IDP to Organization Users Page
Azure Active Directory / Microsoft Entra ID IdP configurations are made on the "Organization > Users" page. Begin by creating a new IdP with the "+ Create IdP" button. Follow all steps on the Microsoft Entra ID configuration documentation. Once complete, use the steps below for additional configuration to allow the enterprise application to support sign in.
Add API Permissions
Add the additional permission "Azure Service Management > user_impersonation to the "App registrations > API permissions" configuration page:

This is done by using the "Add permission" button, selecting "Azure Service Management", and selecting the permission "user_impersonation":


Add Redirect URIs
Add the following redirect URI values to the "App registration > Authentication" page:
- merakismoauth://com.meraki.pcc.unmanaged
- merakismoauth://com.meraki.pcc
- https://portal.meraki.com
- https://portal.meraki.com/loginsuccess
- https://mp.meraki.com/ssp/login
- https://mp.meraki.com/ssp/loginsuccess
- https://m.meraki.com
- https://enroll.meraki.com/loginsuccess
On the "App registration > Authentication" page, select the "Add a platform" button. Select "Mobile and desktop applications", enter the first value, and then click the "configure" button. Click the "Add URI" button to add the remaining URIs listed above:


Allow Implicit and Hybrid Flows
Edit the manifest file to allow implicit and hybrid authentication flows. On the "App registration > Manifest" page, modify the values for the following two keys from "false" to "true".
- enableIdTokenIssuance
- enableAccessTokenIssuance
Once completed, save the manifest file.

When the setup is complete the Microsoft Graph app manifest should have the following sections configured as below:
...
    "publicClient": {
        "redirectUris": [
            "merakismoauth://com.meraki.pcc.unmanaged",
            "merakismoauth://com.meraki.pcc",
            "https://portal.meraki.com",
            "https://portal.meraki.com/loginsuccess",
            "https://mp.meraki.com/ssp/login",
            "https://mp.meraki.com/ssp/loginsuccess",
            "https://m.meraki.com",
            "https://enroll.meraki.com/loginsuccess"
        ]
...
    "web": {
        "homePageUrl": null,
        "logoutUrl": null,
        "redirectUris": [],
        "implicitGrantSettings": {
            "enableAccessTokenIssuance": true,
            "enableIdTokenIssuance": true
        },
...
Okta OpenID Connect
The OpenID Connect option allows you to point Dashboard/your users at your custom Oauth/OpenID endpoint. Fill the information from your endpoint into the appropriate fields.
In Okta/OpenID Connect portal, create a new app integration. Set the sign-on method to OIDC - OpenID Connect and then set application type to Native app like so:
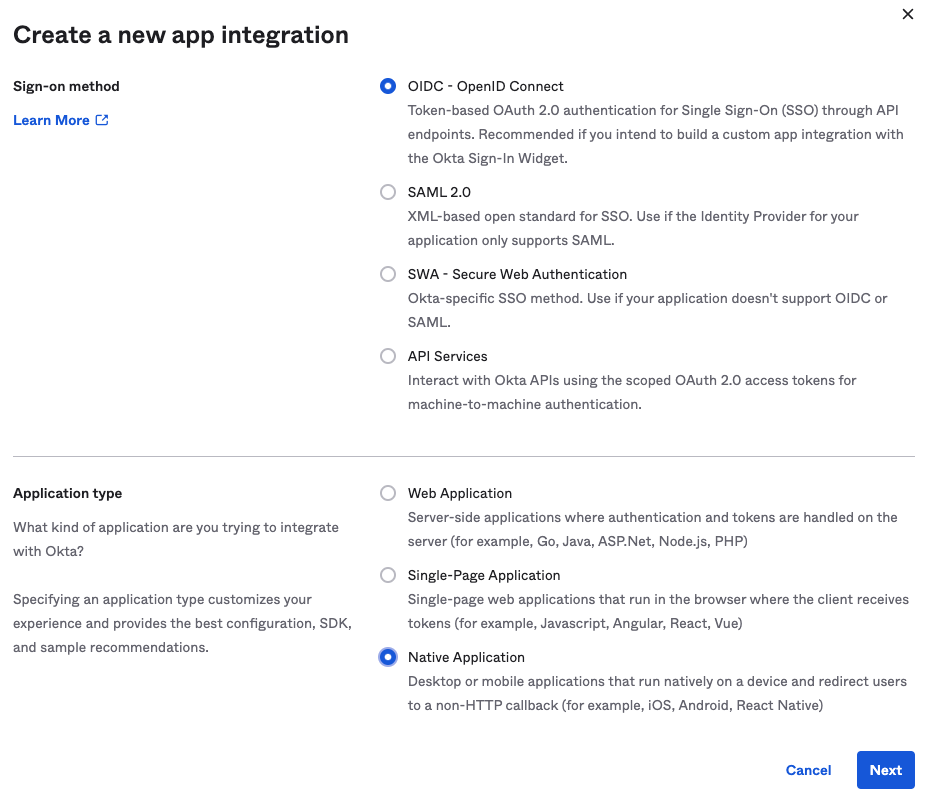
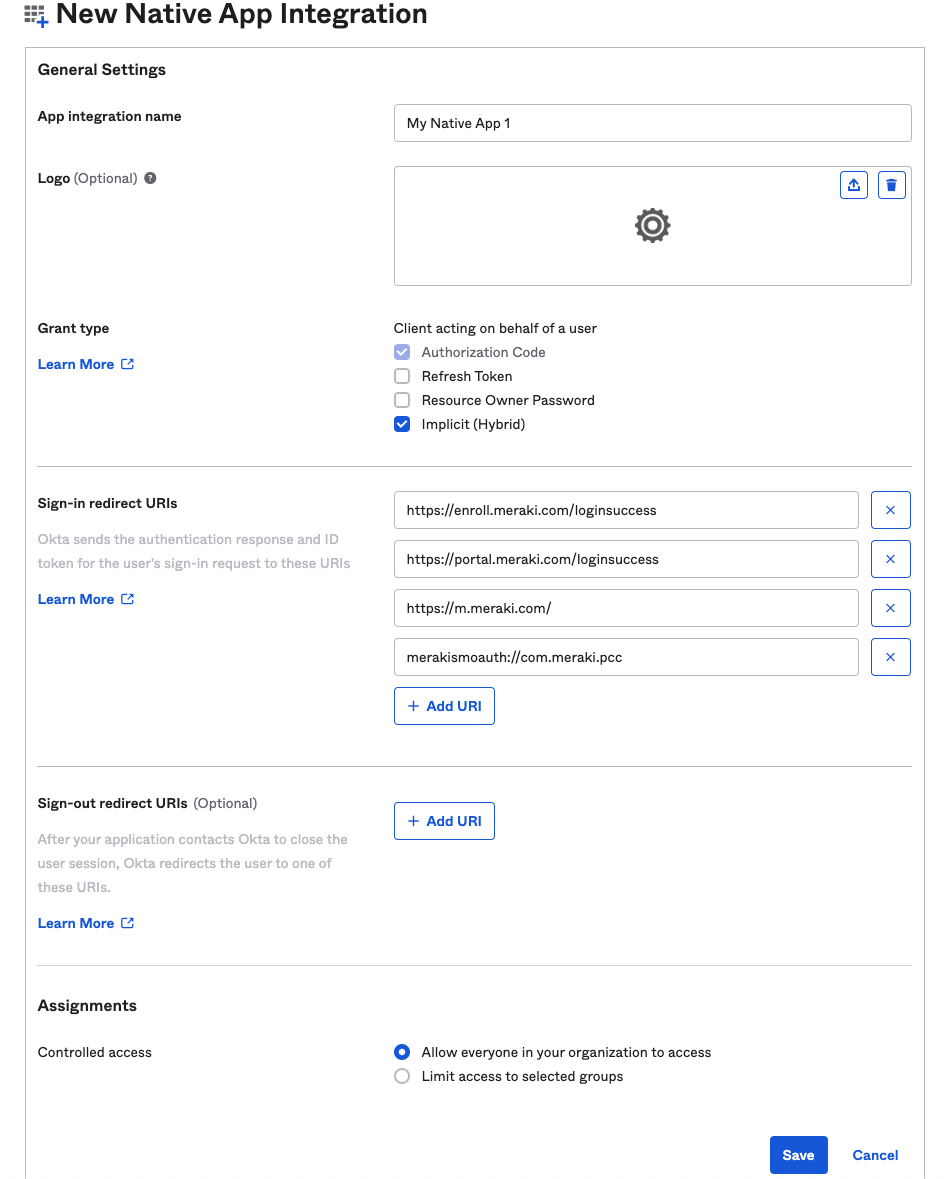
Next, name the app integration, and be sure to set grant type to Implicit (Hybrid)
Add the following sign-in redirect URIs for authentication redirect requests:
- https://enroll.meraki.com/loginsuccess
- https://portal.meraki.com/loginsuccess
- https://m.meraki.com
- merakismoauth://com.meraki.pcc
- https://mp.meraki.com/ssp/login
- https://mp.meraki.com/ssp/loginsuccess
When you are finished, save the OpenID Connect app integration and then add the integration's values from OpenID Connect into Dashboard in Systems Manager > Configure > General > User authentication settings.
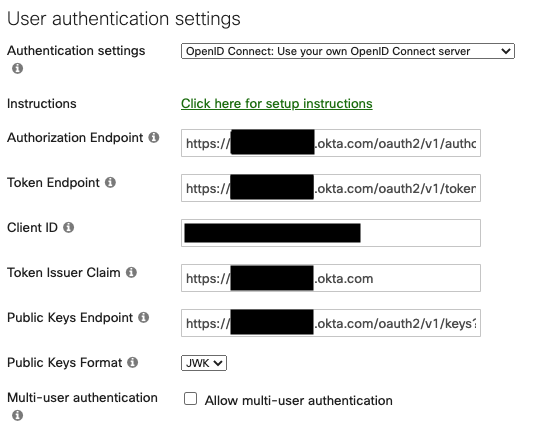
The token endpoints should return the public key(s) used to sign ID tokens. Here are sample response formats Systems Manager expects:
PEM Format
JWK Format
Additional documentation can be found on Okta's website here.
SAML
SAML is supported on a wide range of identity provider (IdP)s, including Azure, Okta, and OneLogin. For these steps, we will share screenshots from OneLogin and Azure, however the same steps can be applied to others.
Note: The implementation for SAML in Systems Manager functions very similar to the SAML integration for administrator logins to Dashboard. So if you are already familiar with those setup steps, the steps to setup SAML in Systems Manager are very similar.
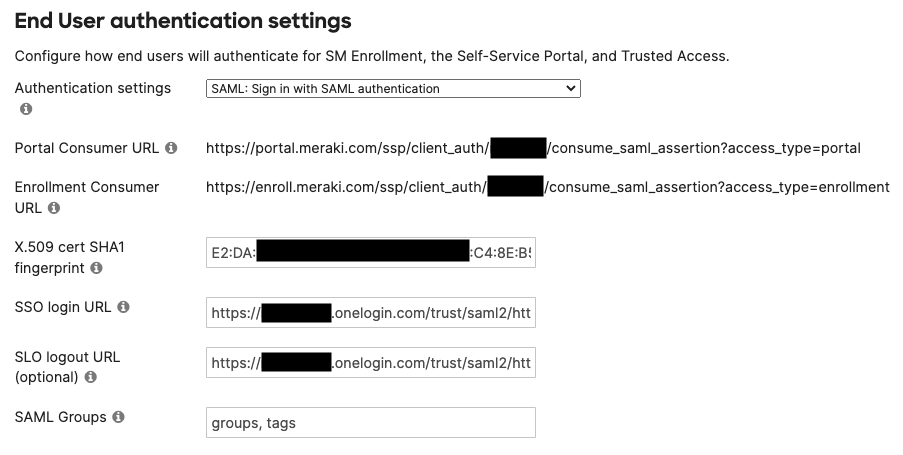
SAML X.509 Cert SHA1 Fingerprint
Find this in the IdP's portal after creating a Application, usually found within the SSO options in IdP portals. Must be a colon delimited hex string.
Example: 12:34:56:78:9a:bc:de:fg:hi:jk:lm:n0:pq:rs:tu
SSO login URL
Find this in the IdP's portal after creating a Application, usually found within the SSO options in IdP portals.
SLO logout URL
Find this in the IdP's portal after creating a Application, usually found within the SSO options in IdP portals.
SAML Assertion AttributeStatement mapping for Meraki Owners
For SM SAML auth to property add the username (email), userid (username), and groups (SM Owner tags) to the SAML assertion response statement (saml:AttributeStatement) from the IdP. Here is an example of what the AttributeStatement should look like this:
  <saml:AttributeStatement>
   <saml:Attribute Name="username">
    <saml:AttributeValue>user@cisco.com</saml:AttributeValue>
   </saml:Attribute>
   <saml:Attribute Name="userid">
    <saml:AttributeValue>username_here</saml:AttributeValue>
   </saml:Attribute>
   <saml:Attribute Name="groups">
    <saml:AttributeValue>custom-owner-tag1,custom-owner-tag2,multiples-separated-by-commas</saml:AttributeValue>
   </saml:Attribute>
  </saml:AttributeStatement>
Map username from the SAML Assertion to the email addresses of the end user's identity. This key is required.
Map userid from the SAML Assertion to the name of the end user's identity. This key is optional.
Map groups to optionally pull in the groups from SAML and create the same groups as SM Owner Tags/Groups. This is useful to scope apps/profiles using this tag in SM. For groups, make sure the groups are define on the IdP's side and they are included in the SAML assertion response. Input the group name(s) as the "SAML Groups" field. 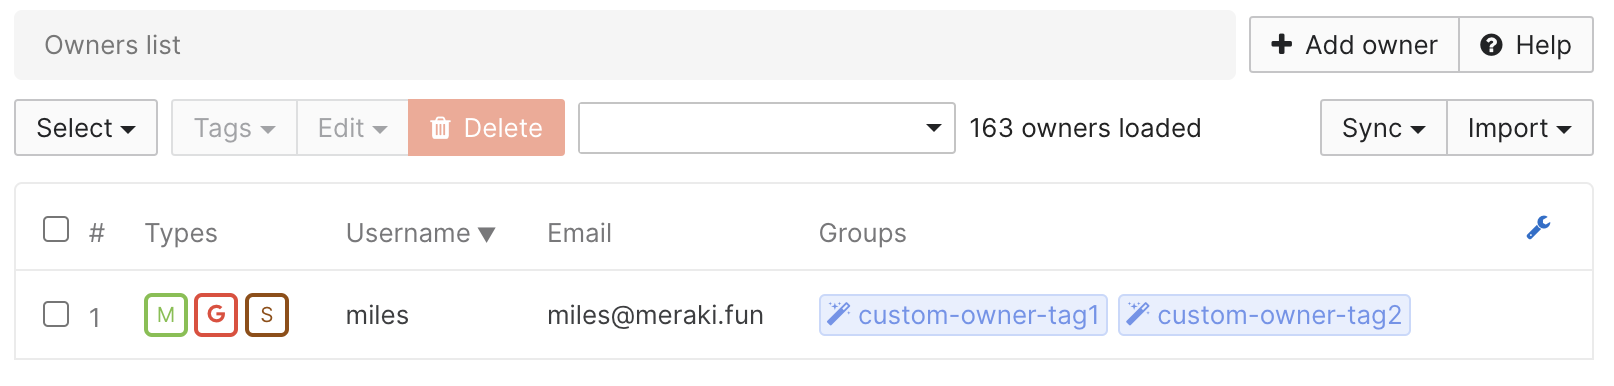
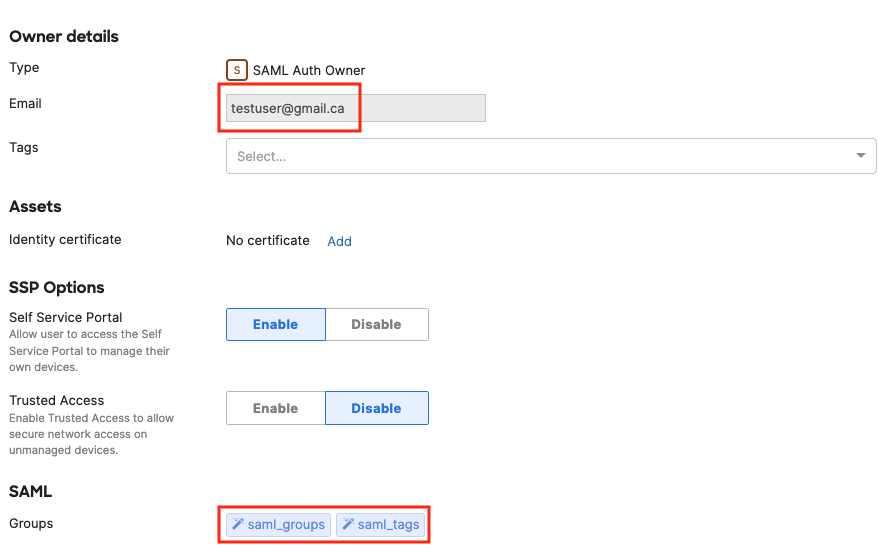
SAML is just one type of Owner authentication. In the example here, the Owner is a Meraki, Google, and SAML type. It is possible to have the same Owner sourced from multiple syncing platforms together.
OneLogin as IdP

On this page, the OneLogin SAML 2.0 Endpoint (HTTP) is what you will enter for Dashboard's SSO login URL, and the OneLogin SLO Endpoint (HTTP) is what you will enter for Dashboard's SLO logout URL. In OneLogin click View Details on the X.509 Certificate. This will show the fingerprint of the certificate as a colon delimited hex string. This fingerprint is what you will enter for X.509 cert SHA1 fingerprint on dashboard.
For SAML Groups in OneLogin: Under the side menu, select Parameters.


If they don’t already exist, add “Username” and map it to the and “groups”, and make sure both fields are included in the SAML assertion response. Configure theses same fields in Systems Manager to sync them in as Owner tags.
The “Username” field is used for authentication purposes. It populates the “Email” field for each owner in the Owners page on Dashboard. And then the additional groups (such as "saml_groups" and "saml_tags" in the example below) can sync as group tags into SM.
Azure as IdP
Full steps to setup Azure as a SAML app for Systems Manager can be found here: https://docs.microsoft.com/en-us/pow...tings-azure-ad
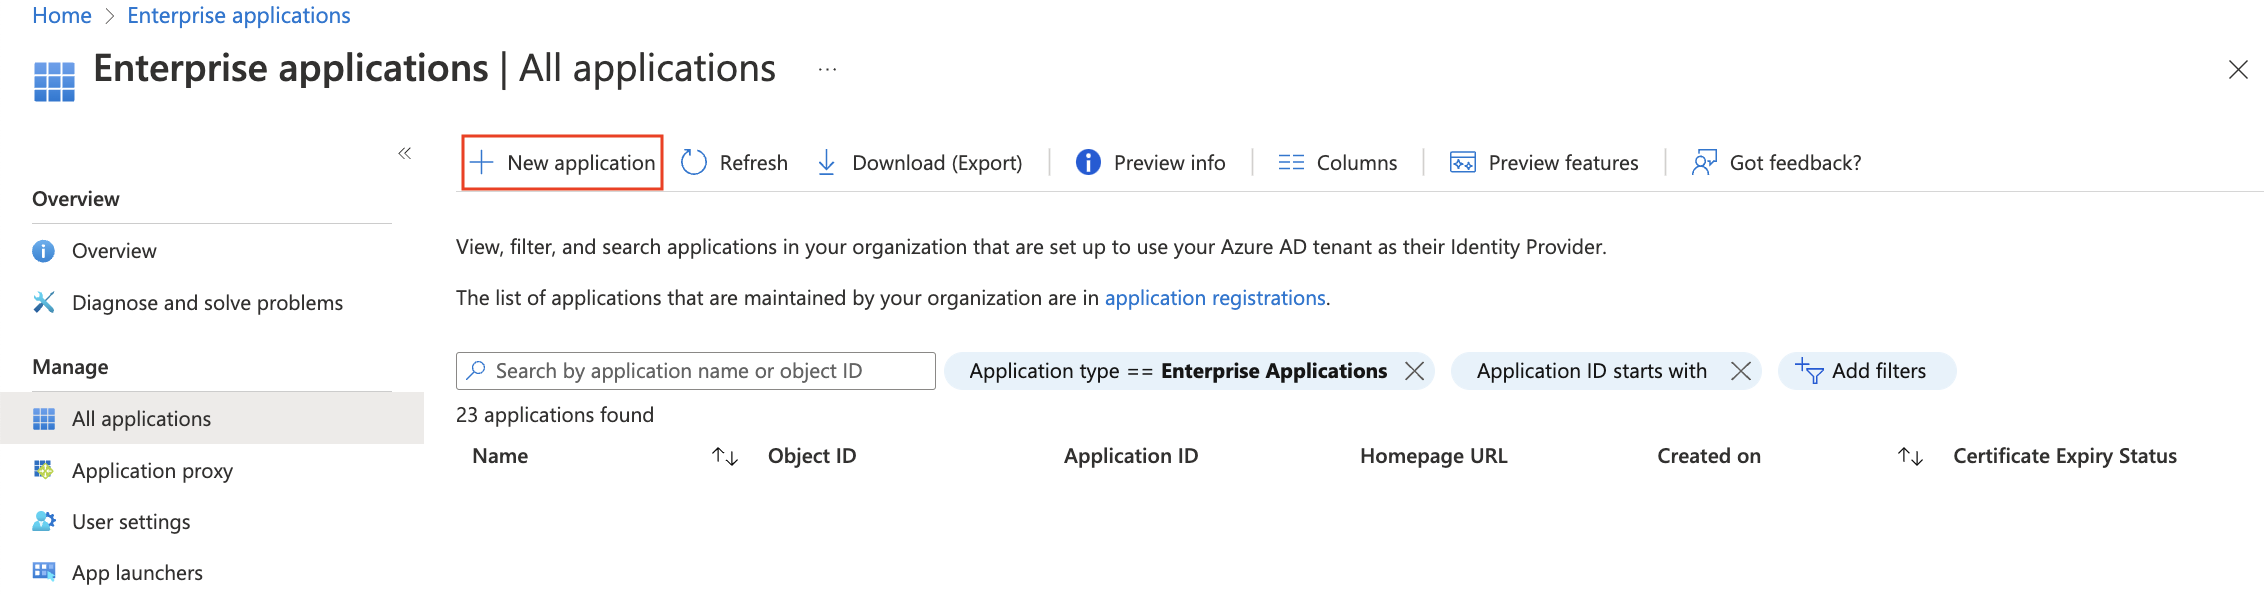
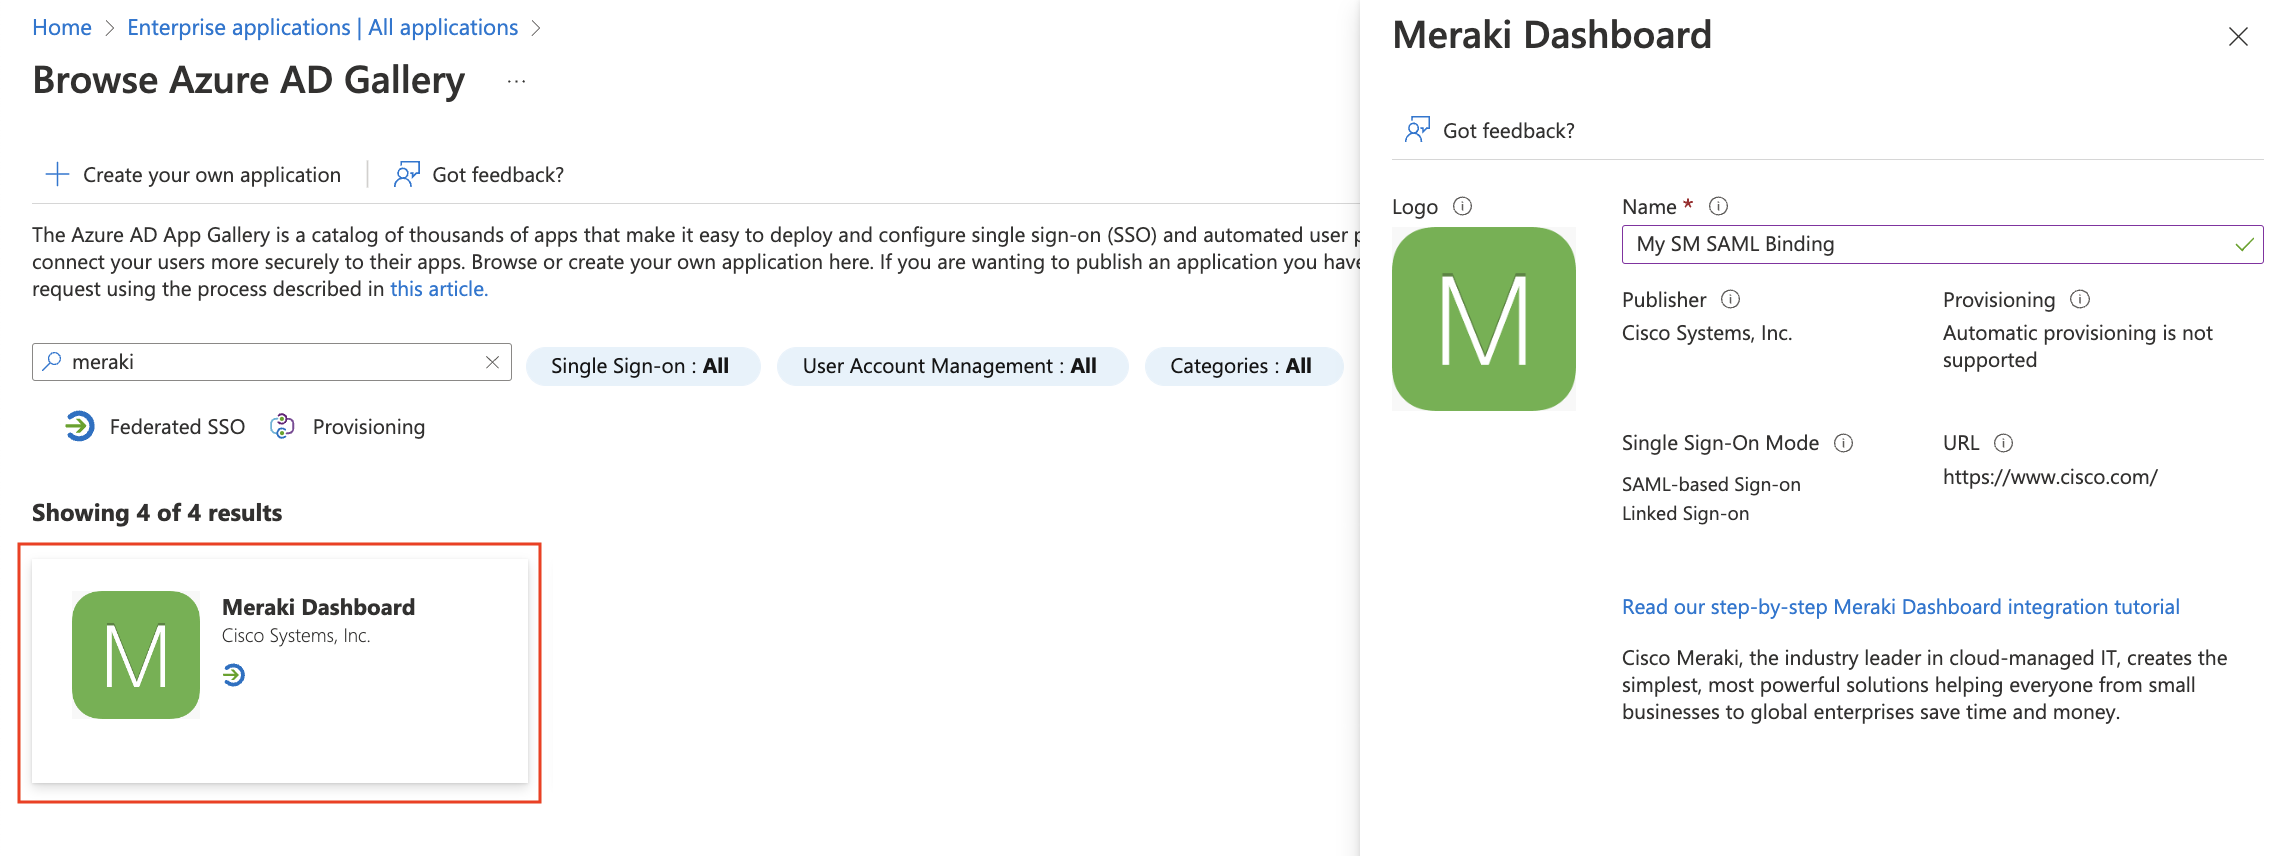
In your portal.azure.com account, add a new enterprise application.
Search for "Meraki" and add a Meraki Dashboard SAML app integration. Give it a name, such as "My SM SAML Binding" in the example below.
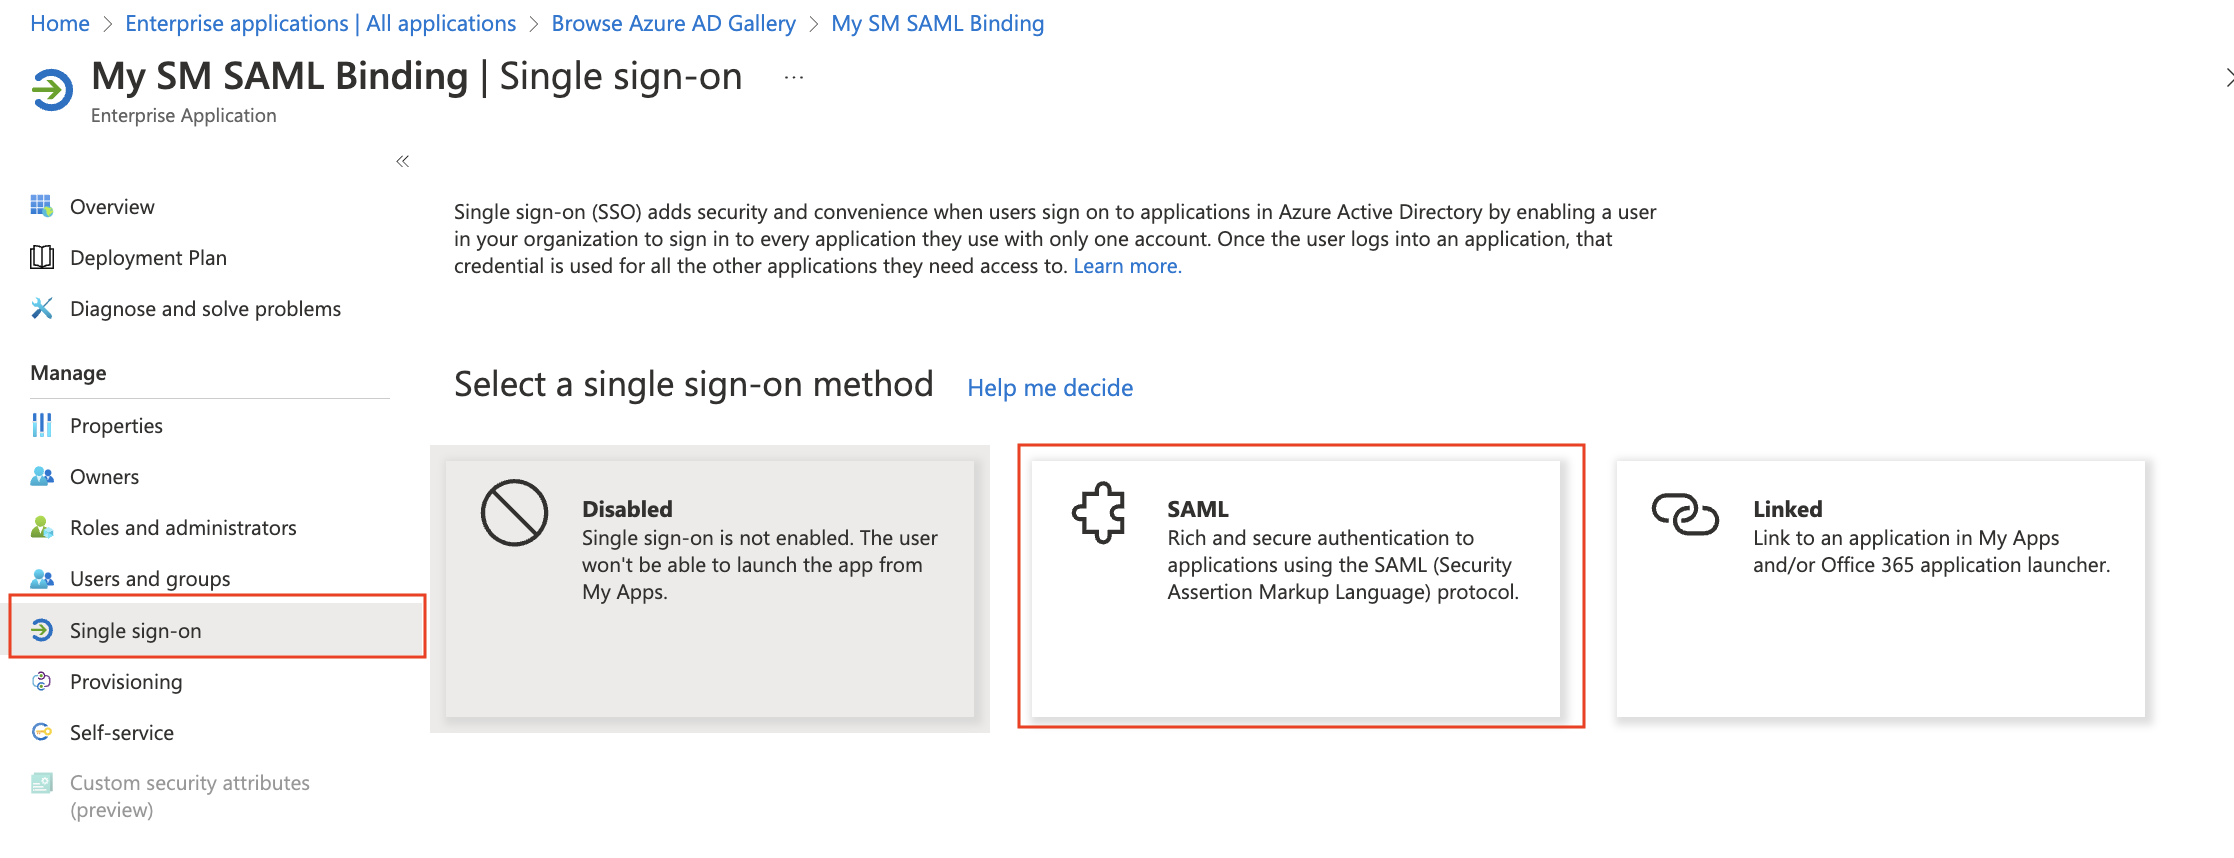
Click on Single Sign On in the sidebar, and then enable SAML.
Inside the SAML Certification section, click on Add a certificate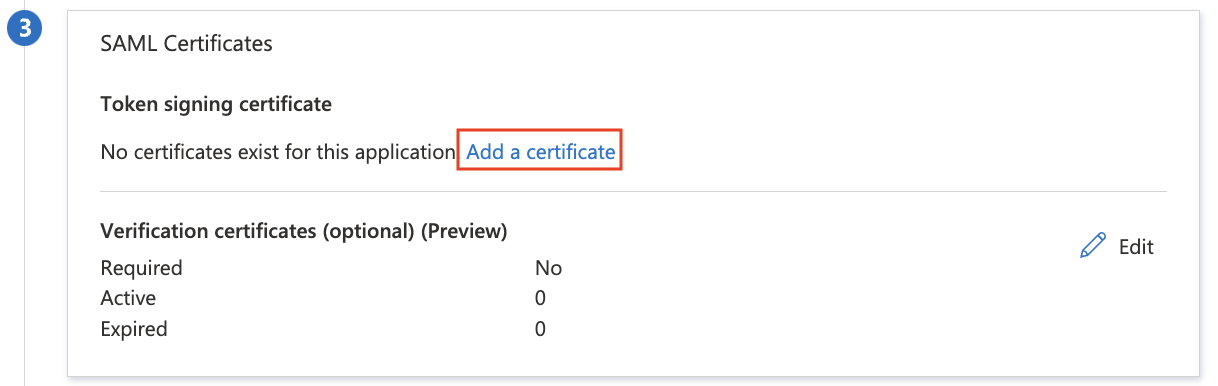
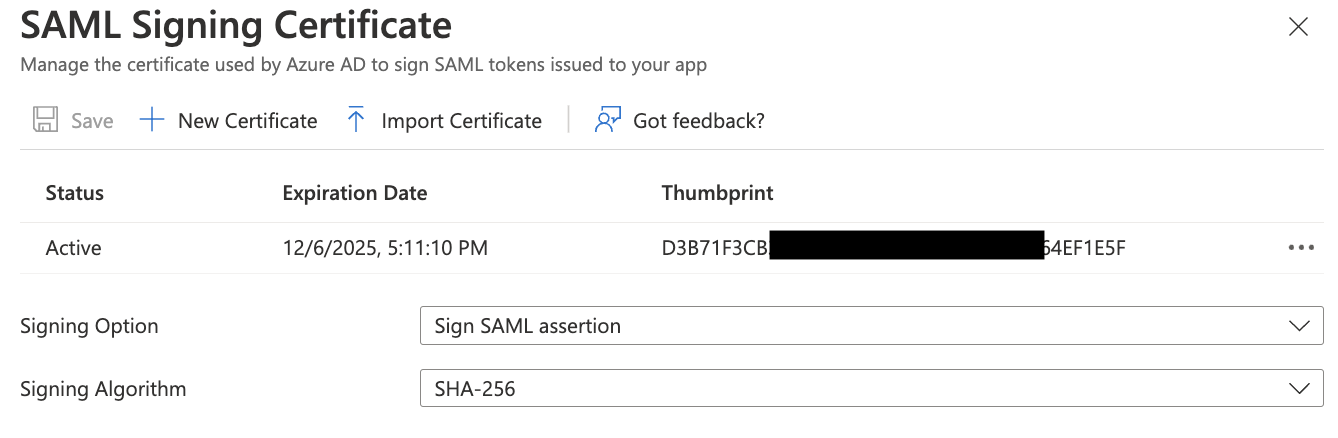
Use the following options:
Signing option: Sign SAML assertion
Signing Algorithm: SHA-256
Save it as a new certificate, and confirm it is Active.
Copy the newly generated SAML certificate's Thumbprint. Hold onto this value, we will need to add this to Meraki Dashboard. You may be required to reload the Azure portal website for this thumbprint to show for newly generated certificates.
Azure calls the Fingerprint the "Thumbprint". Also, this thumbprint is not formatted correct for SM. Must be a colon delimited hex string. Add ":" between the characters in Azure's thumbprint to convert to the desired formatting for SM. Example: 123456789abcdefghijklmn0pqrstuv convert into 12:34:56:78:9a:bc:de:fg:hi:jk:lm:n0:pq:rs:tu
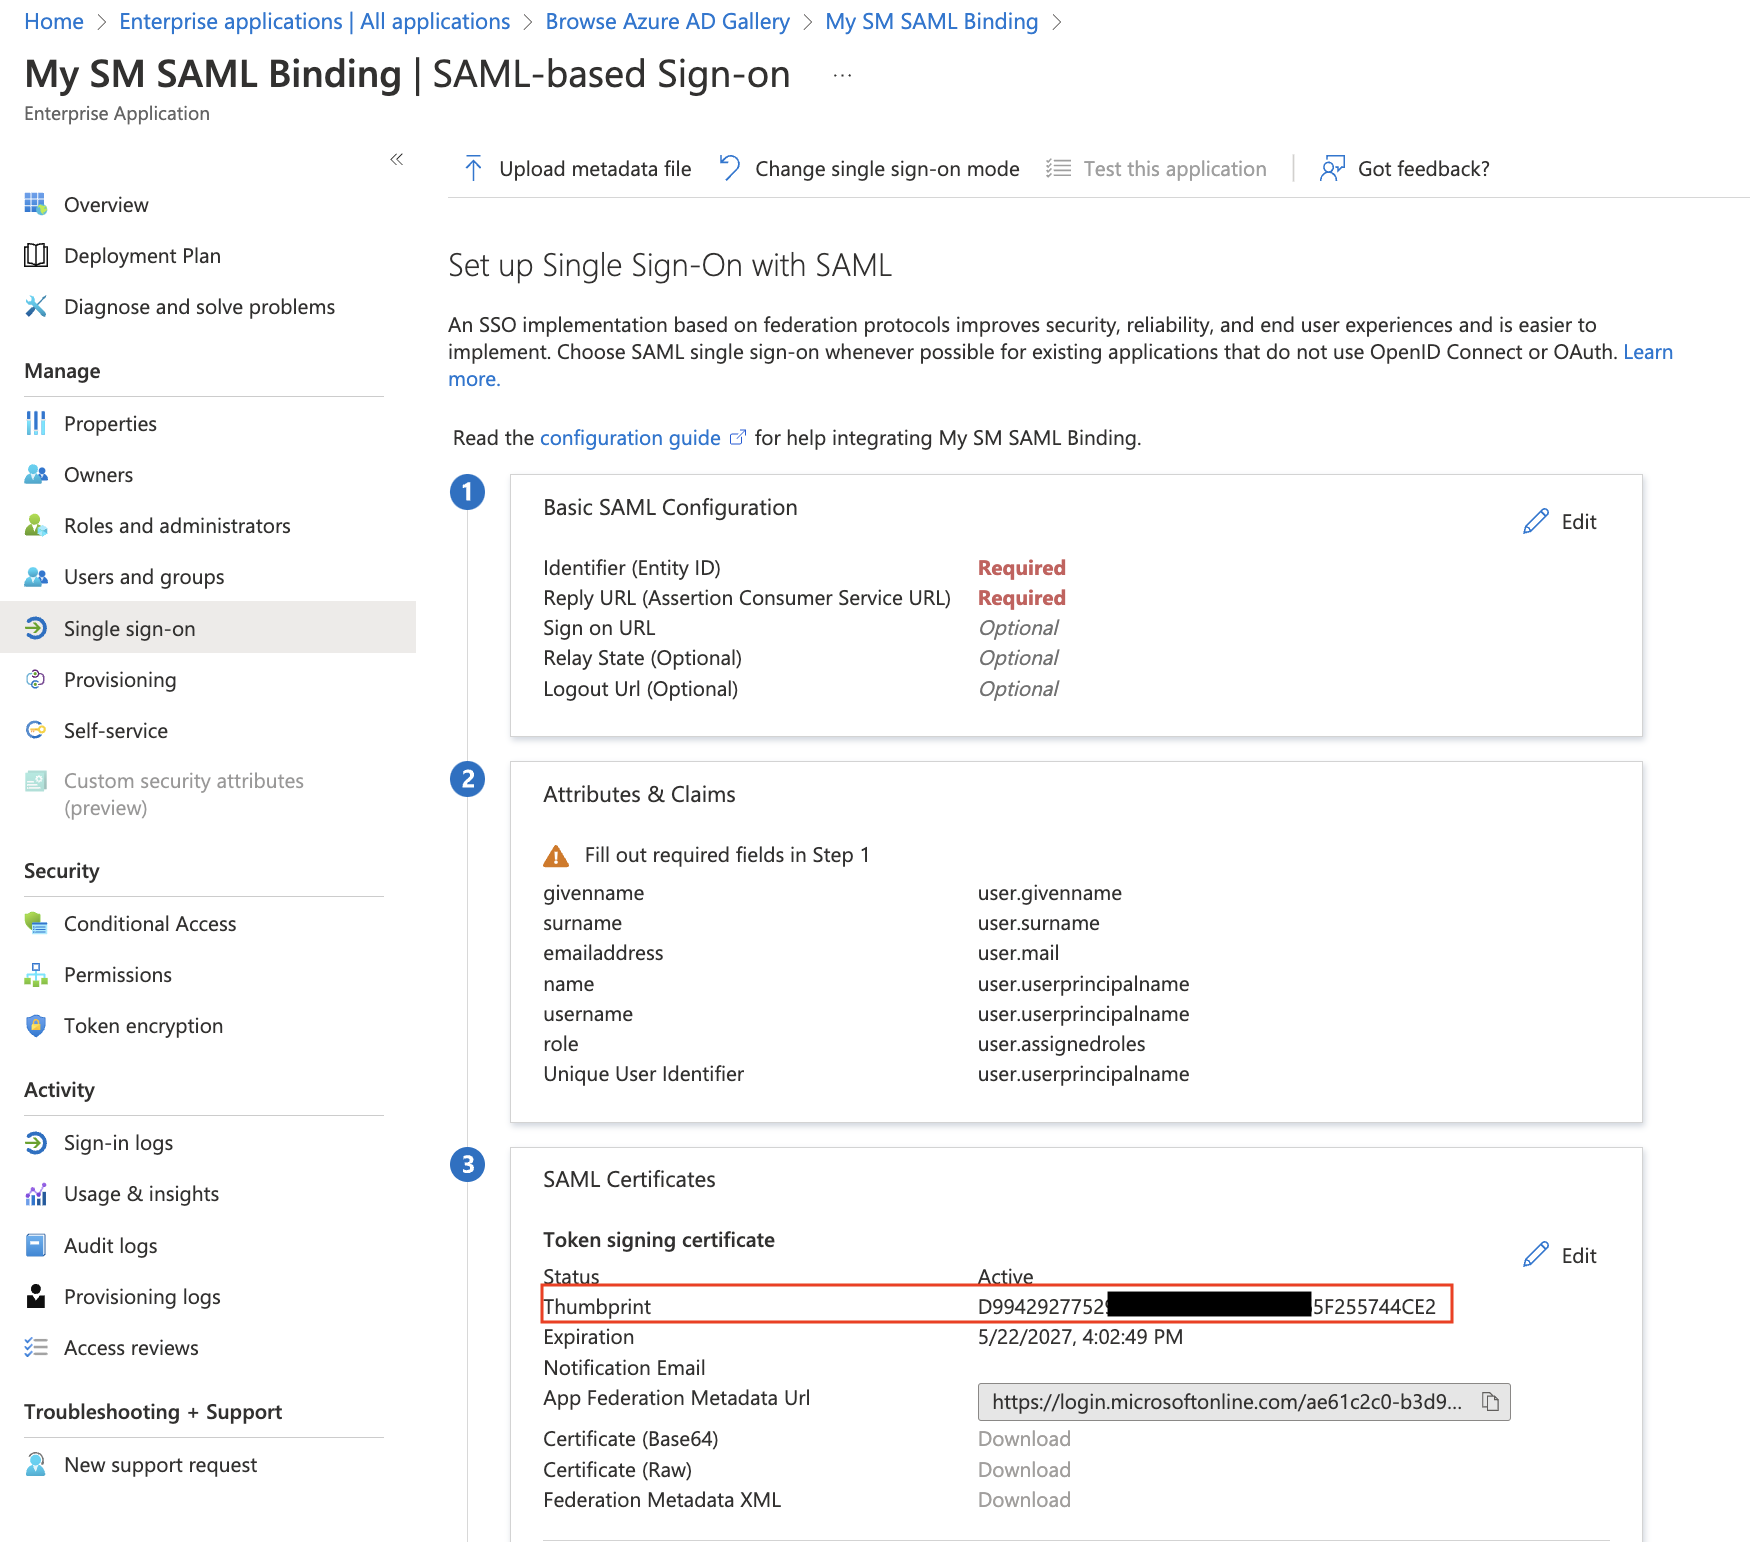
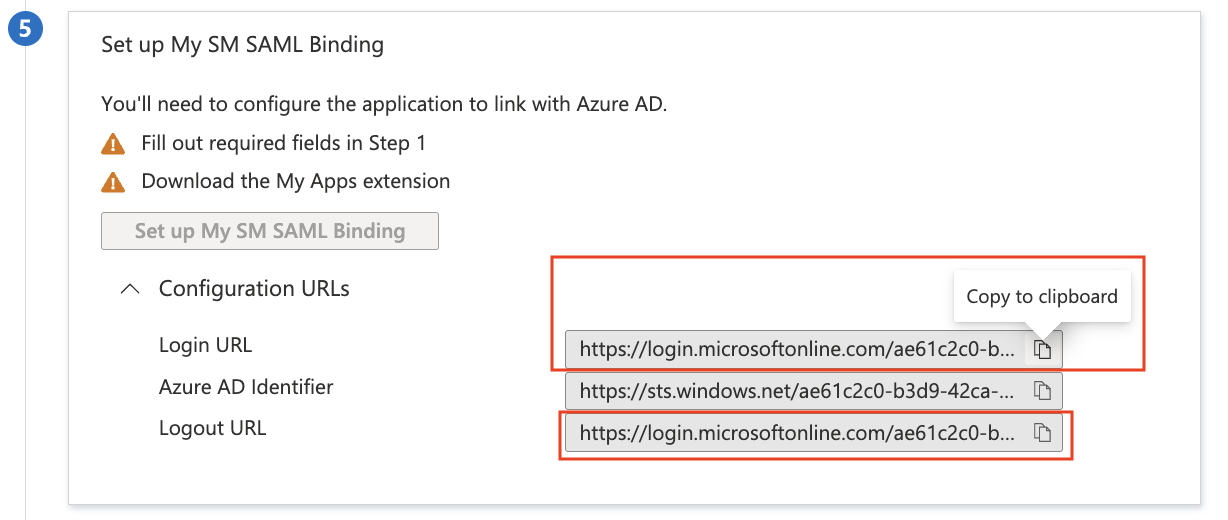
Copy the Login URL and Logout URLs. We need to add these to Meraki Dashboard, along with the fingerprint.
Add the Thumbprint as a colon delimited hex string into the SM > Configure > General > End User authentication settings, along with the Login URL and Logout URL (from above).

And then save Meraki Dashboard the page with these values. This will allow Dashboard to generate the Enrollment Consumer URL (and Portal Consumer URL if Meraki Self Service Portal is enabled):
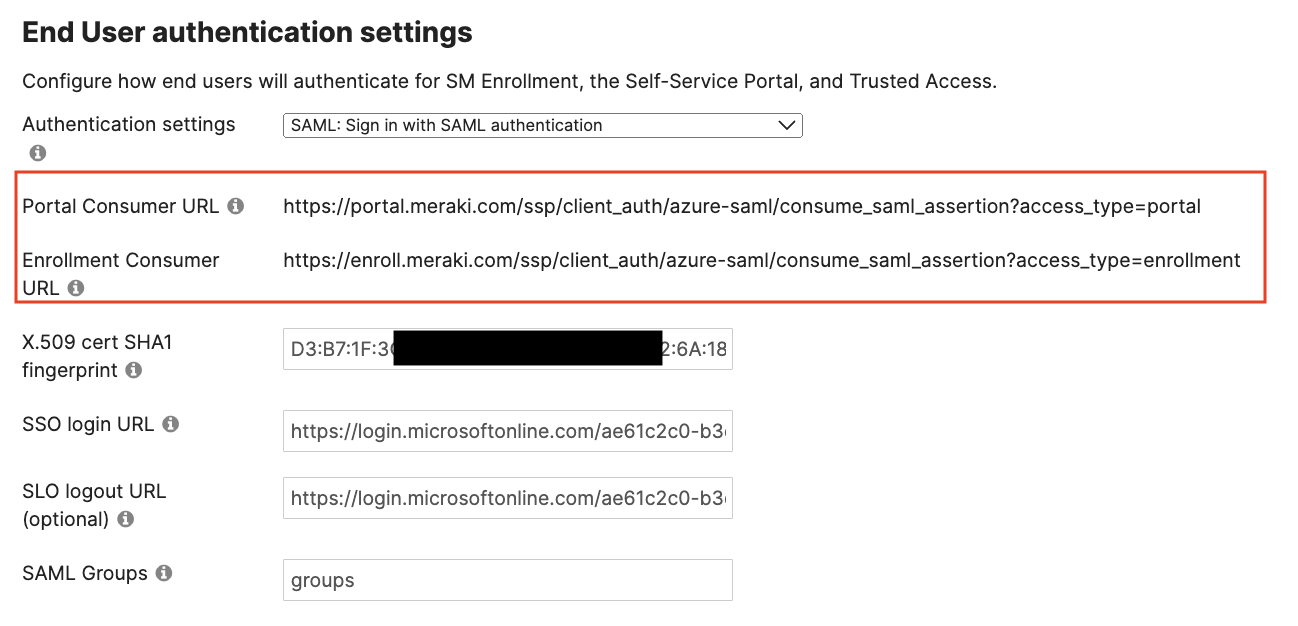
This Enrollment Consumer URL and Portal Consumer URLs we now ready to add into the Azure portal for this app integration. Copy these URLs.
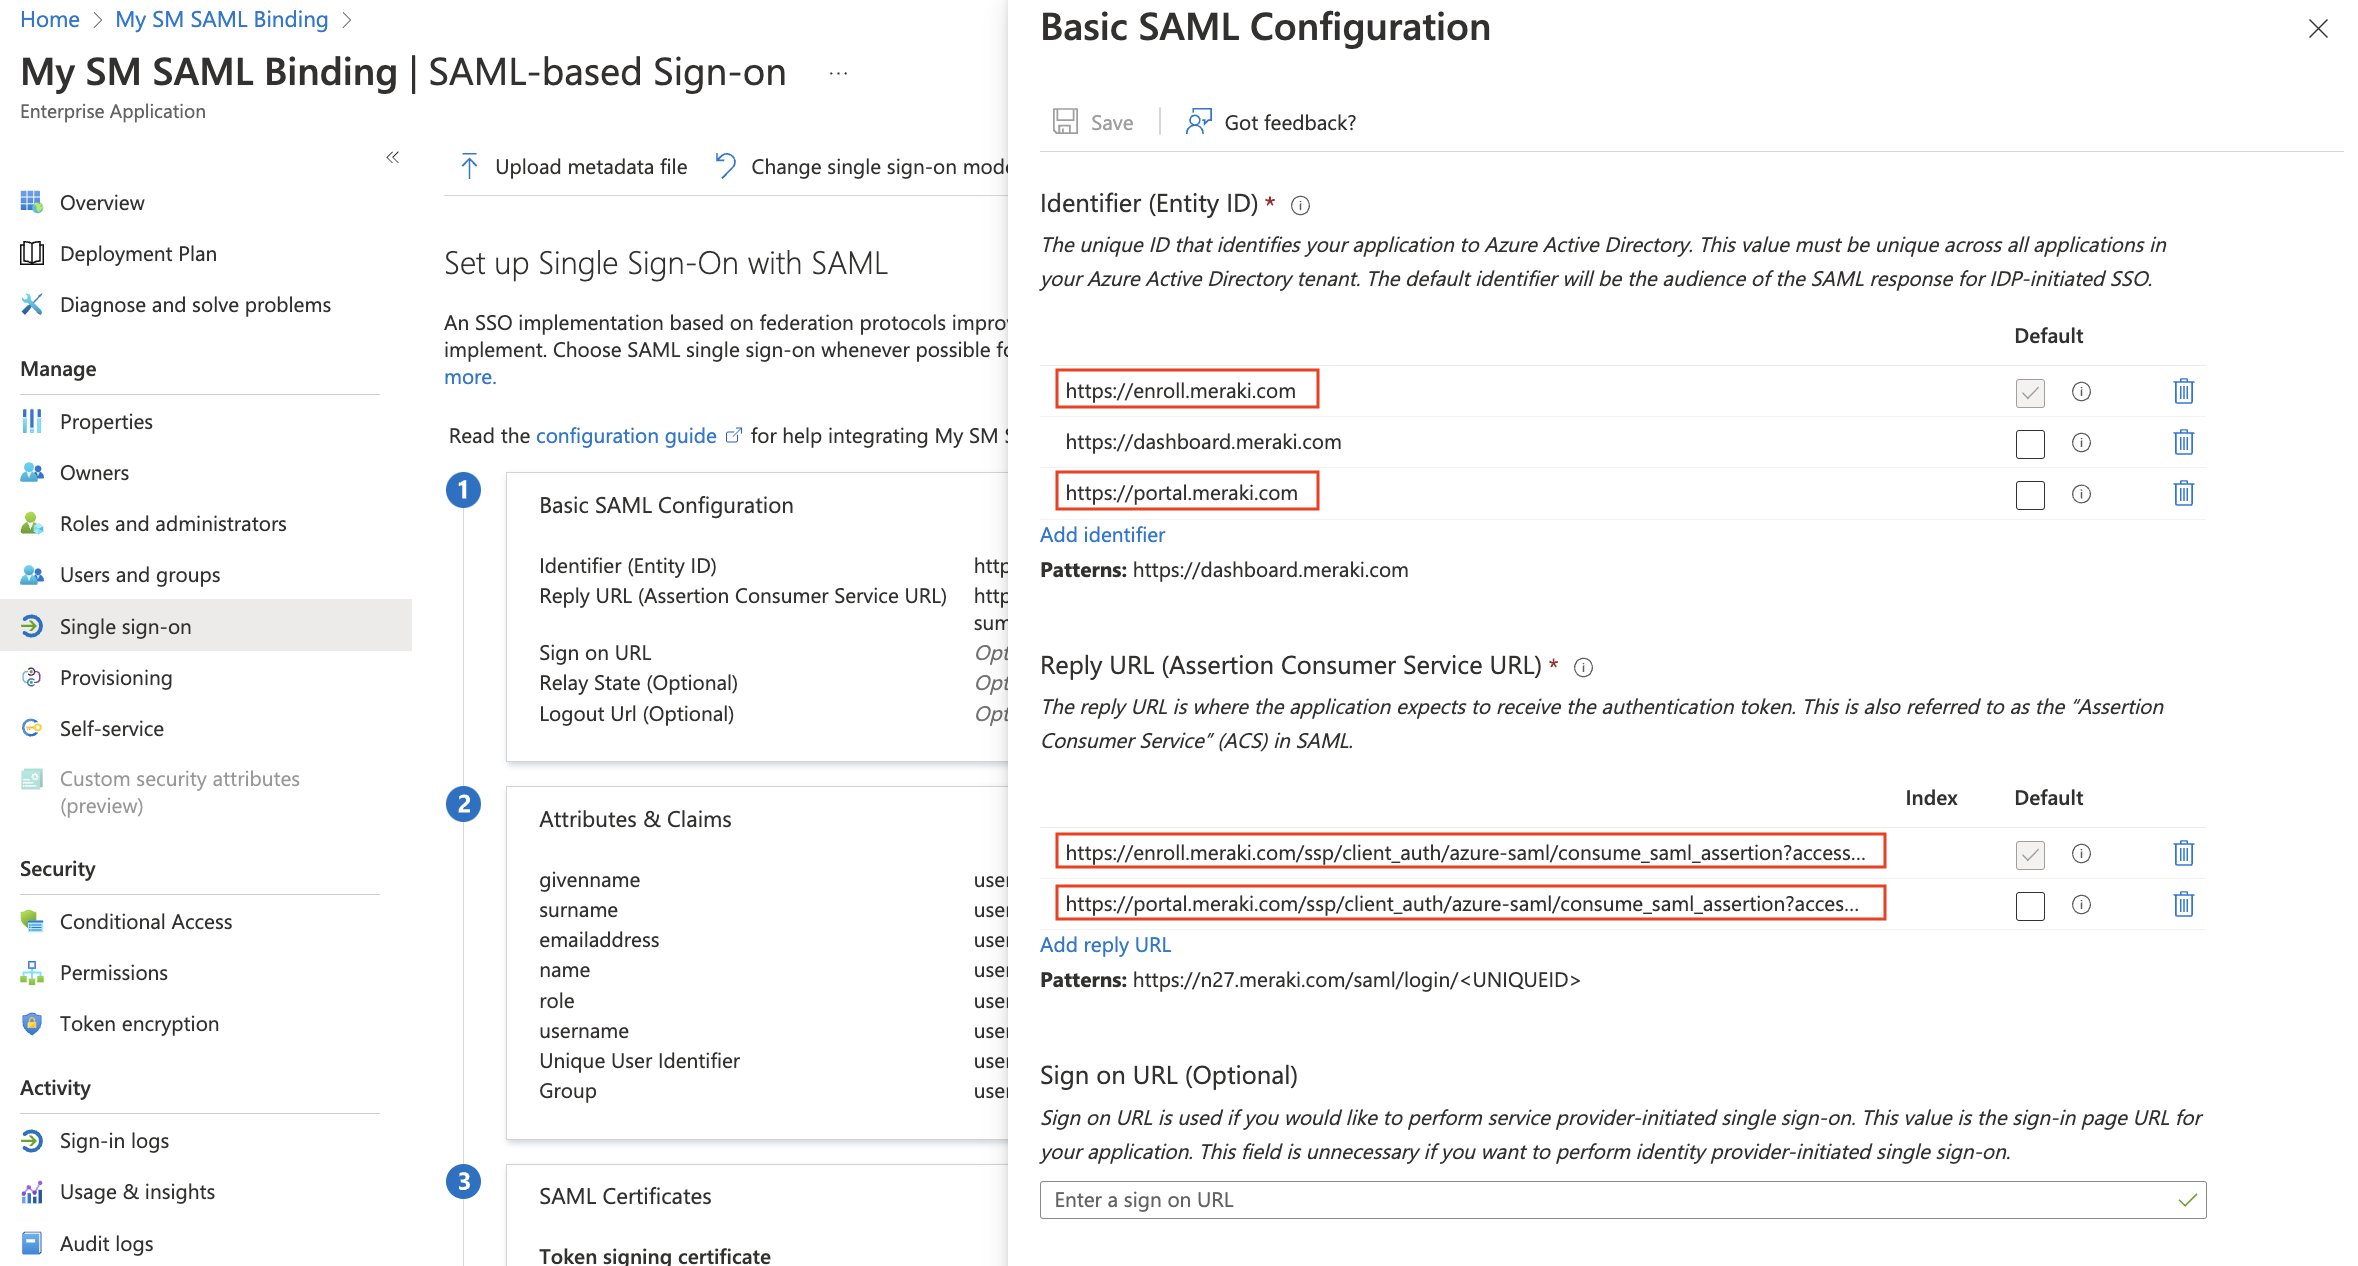
Click Edit under the Basic SAML Configuration section.

Add enroll.meraki.com (and portal.meraki.com for Self Service Portal) as Identifiers, along with the existing dashboard.meraki.com.
Paste in the Reply URLs from the previously generated Enrollment Consumer URL and Portal Consumer URL.
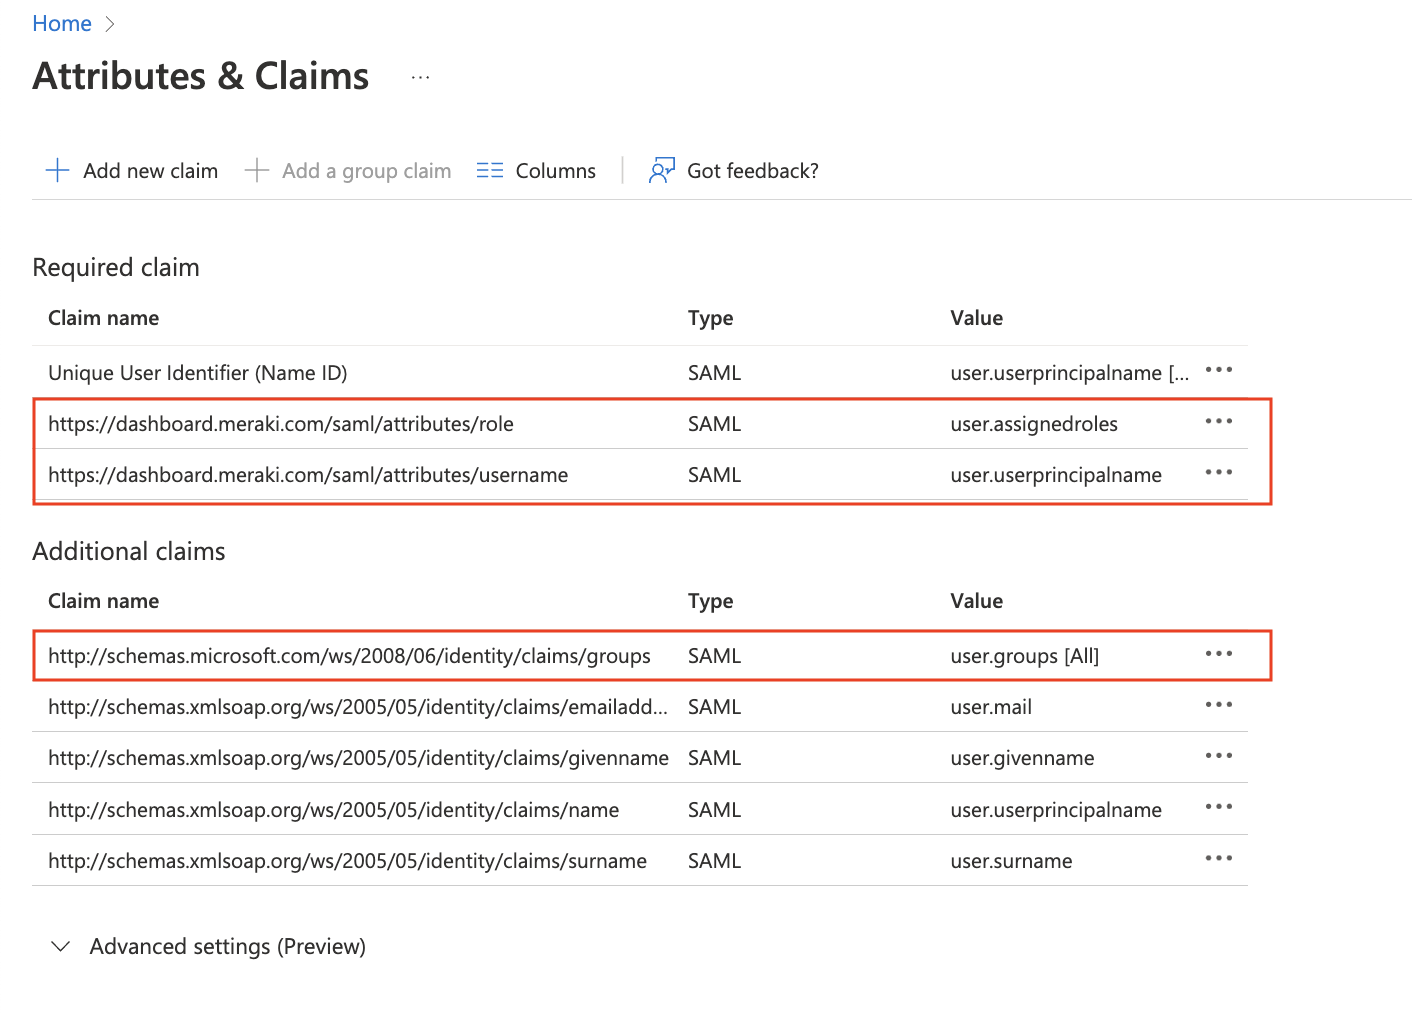
Next let's make sure the Attributes are configured so Meraki Dashboard read them properly. Click on Attibutes & Claims and Add the following required claim and group claim:
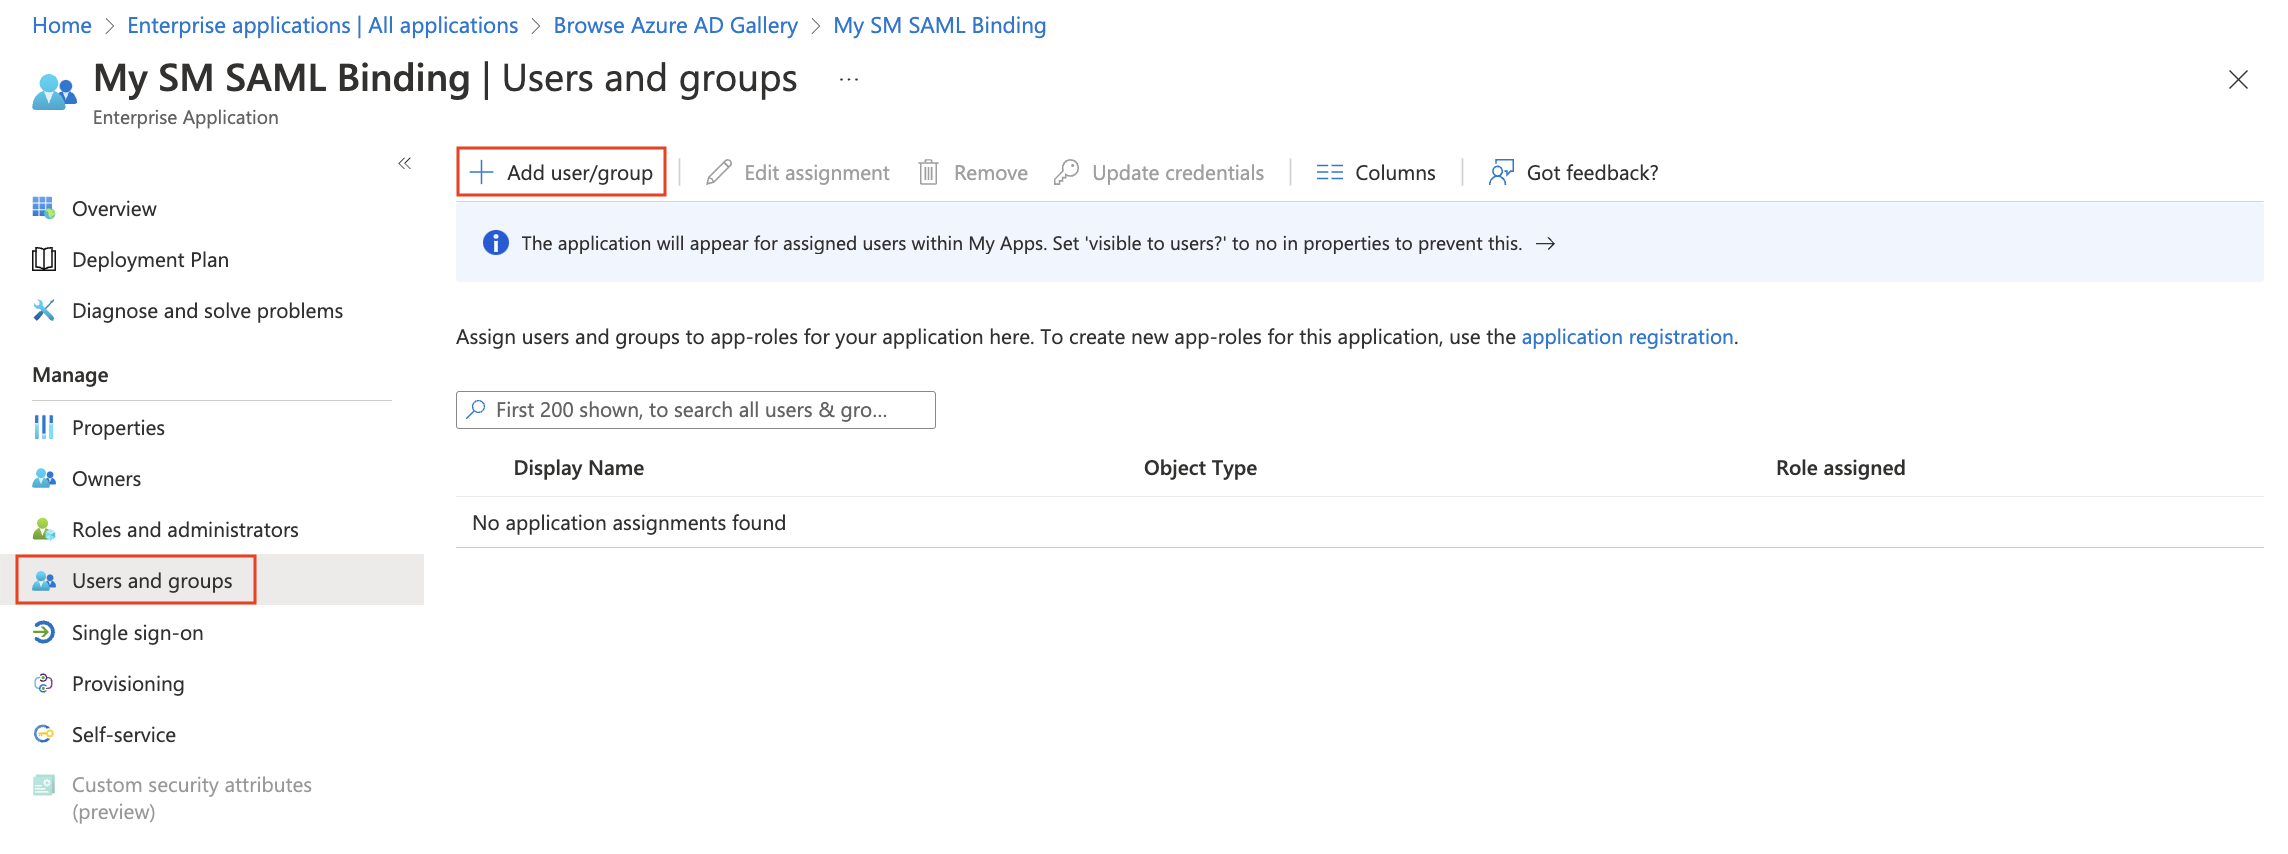
Finally, go to Users and groups and make sure to click on Add user/group to add access for end user's in your Azure account to be able to use this new application.
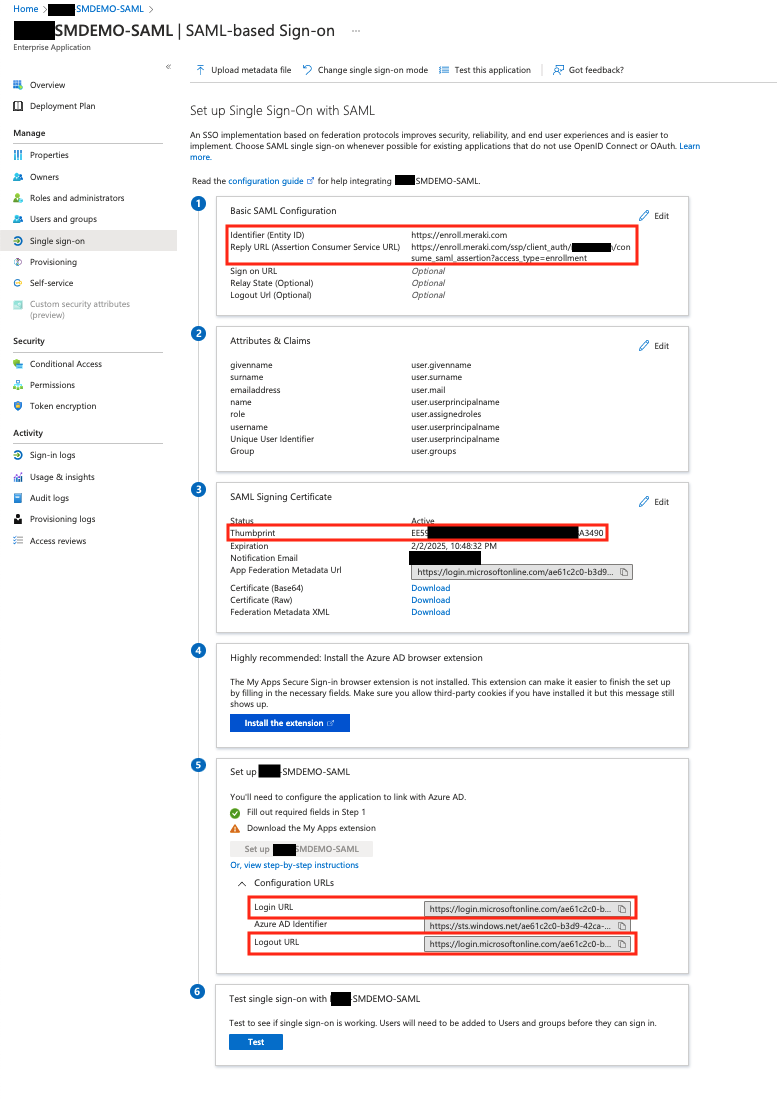
The final configuration in Azure portal will look like the following (red fields are the ones relevant to SM):
Click on Test and you are able to test enrollment.meraki.com and portal.meraki.com with SAML authentication. These can also be tested by going directly to the enrollment.meraki.com and portal.meraki.com sites for your network. Congratulations! You are all finished binding SAML via Azure to Meraki SM.
Duo Two Factor Authentication (2FA)
When using SAML authentication, administrators can optionally enable a 2FA prompt via Duo. So for example, OneLogin can be the IdP for SAML and send the MFA prompt via Duo for Systems Manager enrollment and portal authentication attempts.
OneLogin + Duo 2FA prompt setup steps can be found here.
Okta + Duo 2FA prompt setup steps can be found here.
End users will need to authenticate with the SAML IdP and then accept the Duo 2FA prompt on their phone to pass through authentication.
Duo 2FA end user workflow for Self Service Portal:
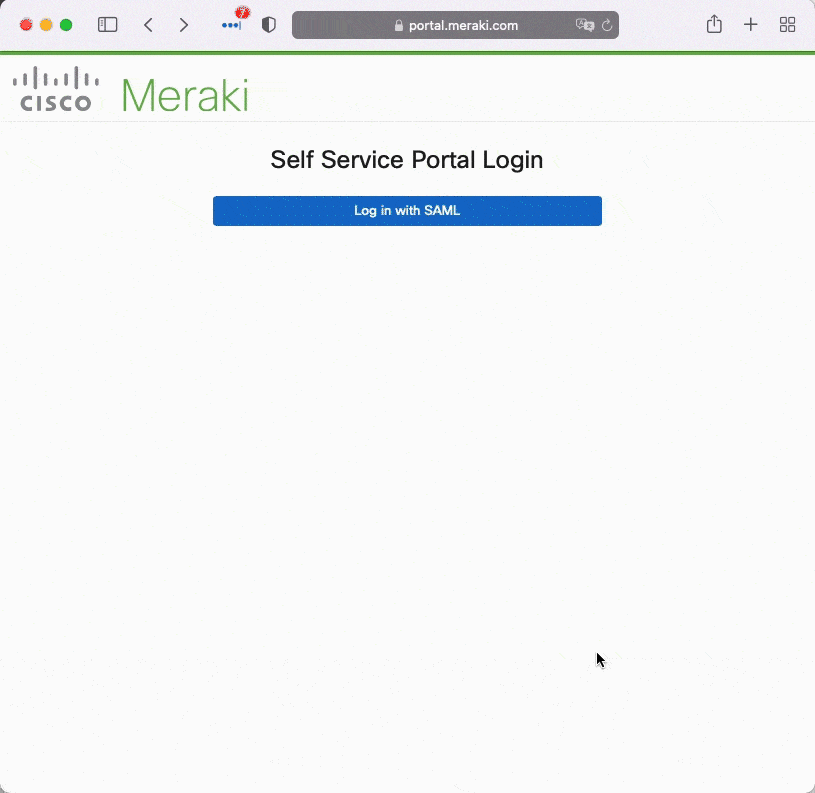
Example end user workflow signing into portal.meraki.com with OneLogin as the SAML IdP and using Duo for 2FA prompts.
Duo 2FA end user workflow for Enrollment Portal:
Example end user workflow signing into enroll.meraki.com with OneLogin as the SAML IdP and using Duo for 2FA prompts.