
Meraki Data Privacy and Protection Features
Click 日本語 for Japanese
Cisco Meraki is committed to protecting the data that our customers entrust to our cloud-hosted service. We have made all of our privacy features available globally.
The General Data Protection Regulation (GDPR) introduced specific requirements that apply to companies established in the EU, or located anywhere in the world when processing personal data in connection with offering their goods or services to persons in the EU. Meraki has made improvements to its cloud-hosted service for organizations hosted in the Meraki EU cloud service as well as the rest of our serviced regions.
Our EU Data Privacy statement can be found on our privacy page.
Requesting Network User Consent
Meraki splash pages allow you to create a custom consent message, enabling administrators to notify end users that their data may be collected if they connect to the network. This custom splash page message can also be used to refer users to tools they may use to opt out of certain data collection services. The custom Consent Message is treated as HTML. Thus, any formatting and spacing will be lost when presented on the splash page. Any special formatting will need to be done in HTML.
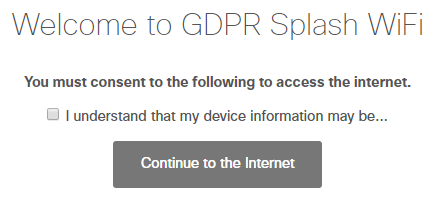
It is the administrator's responsibility to provide notice to, and obtain any necessary consents from, your network users regarding collection, processing, and storage of their data. Be sure to review applicable law for consent requirements in your location if you rely on consent to collect and process personal data.
To create a custom consent message:
- In the dashboard, navigate to Wireless/Security & SD-WAN > Configure > Splash page
- Select the desired SSID/VLAN from the SSID/VLAN drop-down menu at the top of the page
- In the Customize your consent message region of the page, select "On"
- Enter your custom message, which users must consent to in order to use your network
- Choose "Save changes" at the bottom of the page
Note that this Custom Consent Message is not compatible with/will not be displayed with the Fluid Theme, and must be used with the Modern theme.
Additionally, 'Cisco Identity Services Engine (ISE) Authentication,' 'Endpoint management enrollment,' and 'Sign-on with Facebook Wifi' are not supported with this Custom Consent Message because Meraki does not render the splash page for those splash-types. For the listed options, the splash pages are rendered through a 3rd party service.
Organization Data Storage
Data Storage Region Selection
When creating an organization, you are required to select a region where your organization will be hosted on Meraki's servers. Please take special consideration when selecting this option to ensure that your choice of data storage region complies with your country's legal requirements for data storage, and that it satisfies your organization's needs, given that the region may affect performance with dashboard latency, relative to your actual location.
Additionally, if a region is selected that does not match your browser's detected IP address during organization creation, you will be presented with a warning notification.

If you are presented with this notification, please ensure that you are sure of your selection, in order to best serve your network.
EU region organizations have some special data hosting considerations which should be noted. Learn more about EU region hosting in our EU Cloud Configuration Guide.
Verifying Data Storage Region
The region your organization is hosted on can be viewed at any time in the dashboard in the bottom-middle of every page.
Features Disabled by Default for EU Organizations
Certain features are required by EU regulations to be turned off by default, if they are not directly instrumental to the performance or outcome of the product. These features are not necessary for the networking/primary purposes of the product to function.
The following features are disabled by default for organizations stored on EU servers:
- Location Analytics
- Client Tracking
- Location Heat Map
These features can be enabled under the Privacy > Privacy by default section in your organization's settings (Organization > Configure > Settings).
Note that if you are providing network service to end users in an EU region and have these features turned on, it is not required, but may be worth mentioning if using a Custom Consent Message as described above.
API Endpoints
In order to enable network administrators to comply with and satisfy data protection/data privacy requests, Meraki has built out several API endpoints to help facilitate privacy requests. More information on how to use the Meraki dashboard API can be found in our Dashboard API article. There are three types of API endpoints relevant to customer data privacy and GDPR compliance.
- Data Deletion
- Customers can delete dashboard data, either for themselves, or in response to requests from users of their networks.
- Restriction on Processing
- In Meraki’s dashboard, data can be identified, hidden, and removed upon a verified request to restrict processing.
- Data Access and Portability
- To honor customers’ requests to export their information, Meraki has built functionality to enable accessibility and export of dashboard data.
The API endpoints available are all documented in our API documentation, and can be found in the PII, SM and Client sections. Additional documentation and examples these endpoints can be found in our Postman collection.
Data Deletion
Using the user provided PII key (MAC, iPv6, IMEI, email or username), to get the relevant networks and associated PII keys on each of those networks, use:
GET /organizations/[id]/piiKeys
If information for the provided PII key is found, use the following endpoint to delete information related to the PII key.
POST /networks/[id]/pii/requests
The datasets by applicable to each type are: mac (usage, events, traffic), email (users, loginAttempts), username (users, loginAttempts), bluetoothMac (client, connectivity), smDeviceId (device), smUserId (user). To delete all applicable data for a specific piece of PII, select all datasets.
Restriction on Processing
Using the user provided PII key (MAC, iPv6, IMEI, email or username), to get the relevant networks and associated PII keys on each of those networks, use:
GET /organizations/[id]/piiKeys
If information for the provided PII key is found, use one or both of the following endpoints to restrict processing.
POST /networks/[id]/pii/requests
POST /organizations/{id}/pii/requests
To lift the restriction, use one or both of the following endpoints:
DELETE /networks/[networkId]/pii/requests/[id]
Data Access and Portability Requests
Using the user provided PII key (MAC, iPv6, IMEI, email or username), use the GET /organizations/:id/piiKeys?mac=:endUserMac to get the relevant networks and associated PII keys on each of those networks. If information for the provided PII key is found, use one or all of the following endpoints to collect the end-user data.
GET /networks/[id]/clients/[mac]/
GET /networks/[id]/clients/[mac]/events
GET /networks/[id]/clients/[mac]/usageHistory
GET /networks/[id]/clients/[mac]/trafficHistory
GET /networks/[id]/clients/[mac]/securityEvents
GET /networks/[id]/merakiAuthUsers/[email_or_username]
GET /networks/[id]/splashLoginAttempts
GET /networks/[id]/bluetoothClients/[bluetoothMac]
For Systems Manager
GET /networks/[id]/sm/users
GET /networks/[id]/sm/user/[id]/deviceProfiles
GET /networks/[id]/sm/user/[id]/softwares
GET /networks/[id]/sm/[id]/deviceProfiles
GET /networks/[id]/sm/[id]/softwares
GET /networks/[id]/sm/[id]/networkAdapters
GET /networks/[id]/sm/[id]/wlanLists
GET /networks/[id]/sm/[id]/securityCenters
GET /networks/[id]/sm/[id]/restrictions
GET /networks/[id]/sm/[id]/certs
GET /networks/[id]/sm/[id]/cellularUsageHistory
GET /networks/[id]/sm/[id]/performanceHistory
GET /networks/[id]/sm/[id]/desktopLogs
GET /networks/[id]/sm/[id]/deviceCommandLogs
GET /networks/[id]/sm/[id]/connectivity
Checking Data Protection Request Status
The status of any requests for data deletion or restricting processing can be viewed in the Meraki dashboard from Help > Data protection requests.
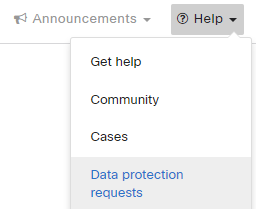
This page displays a list of all protection requests, their scope, type status, and other relevant information.

MV Camera Data Privacy Features
Several data privacy features were built specifically for Meraki's MV cameras to satisfy data privacy requests.
Note that these MV data privacy features are currently only available for organizations in the EU region.
Video Clips
If you have export privileges, you can share video clips using the Export feature. Each export requires at least 1 Mbps of upload bandwidth. This requirement does not apply when viewing historical footage on the dashboard.
Export Video
-
Navigate to a camera's video page or a video wall. For fisheye cameras, zoom and pan to a specific dewarped view to export that view. To view the fisheye camera in dewarped, refer to this article for more information.
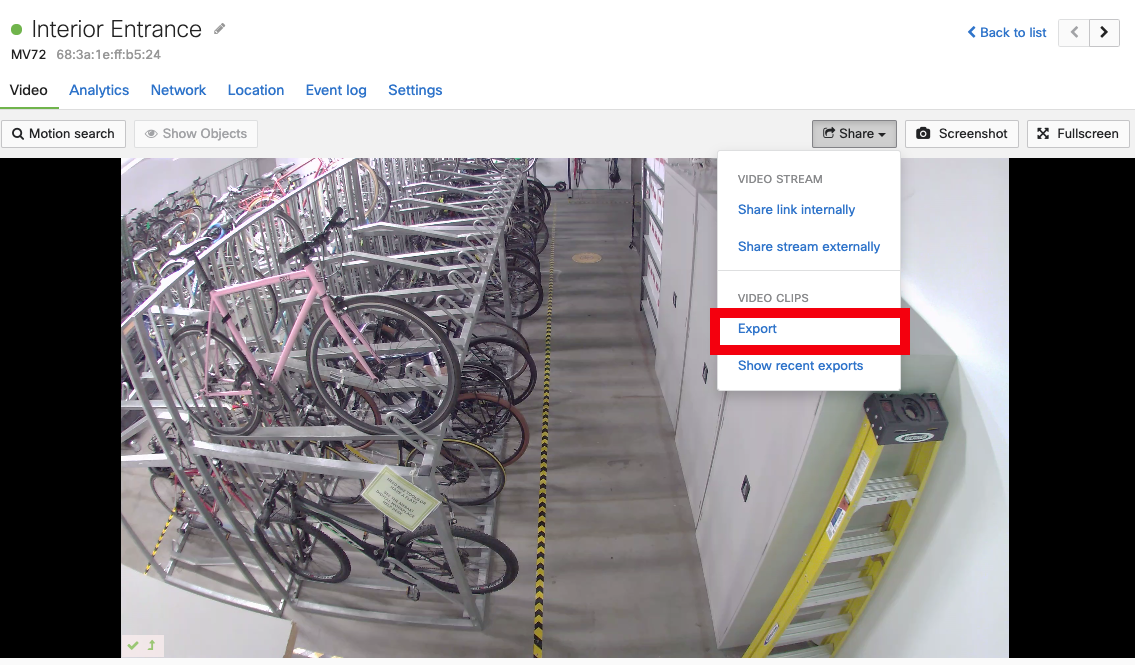
-
Select Share > Export.
For the fisheye camera, you can export in both the warped (circular) and dewarped views.
-
When exporting from a video wall with multiple cameras, use the drop-down menu to select the camera for the export.

Dewarped video tiles are not supported. Only full-frame exports are available from the video wall. To export dewarped fisheye footage, go to the single camera page, adjust the field of view, and export the footage.
-
Select the start and end time and date for the export. You can schedule the export at a convenient time. Scheduling exports after hours can minimize bandwidth impact on critical business applications.

-
Alternatively, use the timeline slider to chose the export duration.

-
-
Click Export to start the export.
-
You can monitor the status of your exports by navigating to Share > Show recent exports. Click on each item to download the export, copy link to clipboard, delete the export, or calculate the checksum. You can also view all exports within your network from the Exports page.

The current minimum time allowed for a single export is 5 seconds and maximum time allowed for a single export is 12 hours. Video exports are trimmed to the requested size with no buffer. If an invalid time range is selected, the export will automatically default back to 30 seconds to provide a valid export. The 'Download Now' link for an export can be used for one hour, from the time of page load. Refreshing the dashboard page generates a new download link. The 'Copy link to clipboard' button, generates a 7 day link, to download the export.
Exports Checksum
You can verify the integrity of a video clip by saving a copy of the original export's calculated SHA-256 checksum provided on the dashboard and referring to it every time you need to compare a copy to the original. A SHA-256 checksum is a 256-bit or 32-byte hash serves as the file's "signature", and can be calculated over and over again to the same result. However, once the file is changed in any way, this value becomes different. It is generated using the SHA-256 secure hash algorithm. The algorithm is a one-way function, it cannot be decrypted back.
- Click on the export under Recent Exports and select Calculate Checksum to view the video checksum.
- The 256-bit checksum will be printed underneath. Take a screenshot or copy-paste to save this in a safe place.

- To verify a copy of an exported video, calculate its checksum and compare it to the dashboard's checksum. A match confirms the video is identical; a mismatch indicates corruption or tampering.
- To calculate the SHA-256 of a downloaded file, you can use a terminal. We provide the instructions for Windows, Mac or Linux below.
- Windows Power Shell
- Get-FileHash -Algorithm SHA256 .\Filename.mp4
- Linux
- sha256 .\Filename.mp4
- Mac OS Terminal
- shasum -a 256 .\Filename.mp4
- Windows Power Shell
- To calculate the SHA-256 of a downloaded file, you can use a terminal. We provide the instructions for Windows, Mac or Linux below.
Exports Page
You can also view all exports within your network from the Exports page. Additionally, combine exports into a single file from this page.
Exports Retention Period
Exports are stored in the Meraki cloud for one year by default. If a maximum retention time is set on a node, the export will follow that duration.
A firewall must allow outgoing connections on specific ports to certain IP addresses for MV export functionality to connect to the Cisco Meraki cloud. The most current list of outbound ports and IP addresses for your particular organization can be found here.
Mark Video/Pause Processing
Organizations in EMEA can use the pause and delete options for GDPR purposes.
Set aside or mark videos for review using the Share menu on the Camera Status Page or Video Wall.
Mark and pause video by selecting the arrow next to Share > Pause processing for GDPR. Use the slider to choose a time section to pause. After selecting a section, click Pause Processing at the top-right of the video screen. The paused section will be added to the Paused Clips list.
Paused clips are hidden from the stream and remain unprocessed until Unpaused. They are stored without being overwritten and can be up to 24 hours long.
Paused video clips are stored locally and use the camera's internal storage. Storing large amounts of paused clips may impact video retention times, as the storage they occupy cannot be overwritten or reused while paused.
Delete Video
Organizations in EMEA can use the pause and delete options for GDPR purposes.
- To permanently delete a video, go to the Share menu on the Camera Status Page or Video Wall.
- Select the arrow next to Share and choose Delete. Use the slider to select the time range for deletion. The maximum time range for a single request is 24 hours. Requests exceeding 24 hours will not be processed.
- After selecting the time range, click Delete Video at the top-right of the video screen. The selected video section will be permanently deleted and removed from the timeline slider.
Deleted video is permanently lost and cannot be recovered. Meraki cameras store all videos on local storage, and Meraki does not maintain backups of camera video.