Meraki Switching Firmware Upgrades
Click 日本語 for Japanese
Overview
While MS switches generally follow the Dashboard-wide firmware upgrades procedures, there are some firmware upgrade features that are specific to MS switches. MS Staged upgrades are explained here.
For general firmware upgrades information, refer to the Managing Firmware Upgrades.
Learn more with these free online training courses on the Meraki Learning Hub:
Staged Upgrades
Staged Upgrades allows administrators to divide a network of switches into smaller groups which can have firmware upgraded at separate times.
With Staged upgrades, administrators can schedule, defer, and rollback firmware upgrades in stages, allowing for more flexibility the upgrade process.
| Platform Support | Minimum Firmware Required |
|---|---|
| All MS switches - Supported | N/A |
| Monitor-mode Catalyst switches - see note below | N/A |
Use Case
The use cases for staged upgrades are typically one of two situations:
- The network has too many switches to upgrade in a single maintenance window
- More frequent maintenance windows are available for some devices than others. For instance, it may be reasonable to upgrade access-layer switches that connect end-user devices each night, but the data center switching that supports critical e-commerce services can only be upgraded once a month.
Staged Upgrades are not supported for networks assigned to a configuration template. In addition, Staged Upgrades are available only when a single switch network is selected for an upgrade.
Automated/Bulk firmware upgrades scheduled by Meraki will not follow the Staged Upgrade process by default. Once these upgrades have been scheduled, you can convert them to Staged Upgrade by going to Organization > Monitor > Firmware upgrade > Scheduled changes
Terms
| Staged Upgrade Group | A group of switches that will be upgraded at the same time, which can also be referred to as a "stage" |
| Default Staged Upgrade Group | An upgrade group that includes any switches that have not been assigned to any other group. |
| Staged Upgrade Sequence | The sequence is a list of all of the groups in a network in the order that they will be upgraded. |
| Staged Upgrade | A scheduled firmware upgrade using Staged Upgrades. A staged upgrade includes the time and dates for each group to be upgraded. |
| Network Upgrade | The non-staged, firmware upgrade feature used to upgrade all of the devices in a Dashboard network at the same time. |
Scheduling a Firmware Upgrade
Scheduling a staged upgrade begins in the same way as scheduling a typical network upgrade. The entire process of managing groups and the sequence are included in a wizard-type walkthrough accessed from the Organization > Firmware Upgrades Page.
Navigate to the Organization > Firmware Upgrades menu, and select the "Schedule Upgrades" tab:
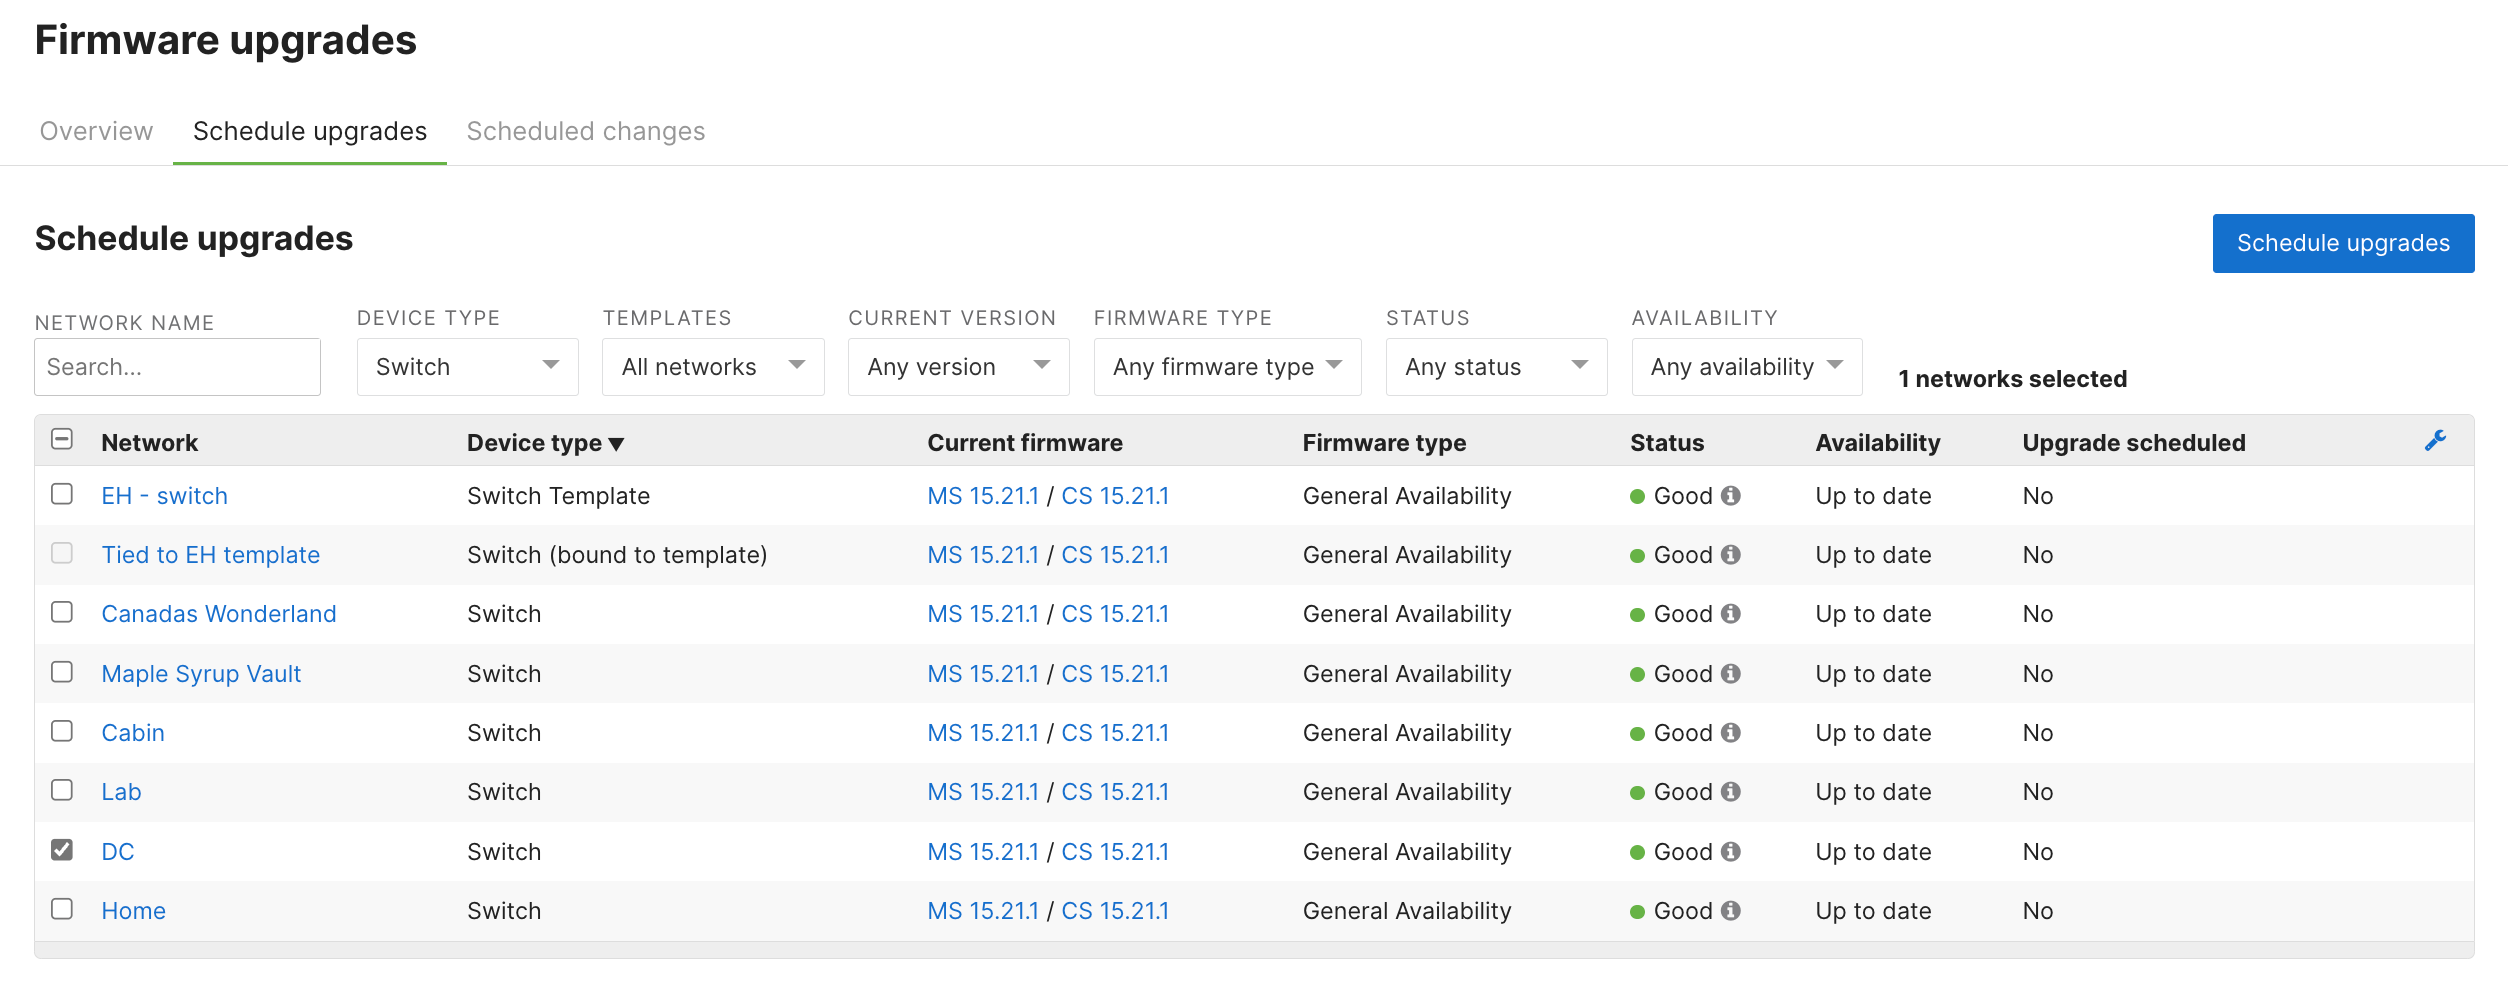
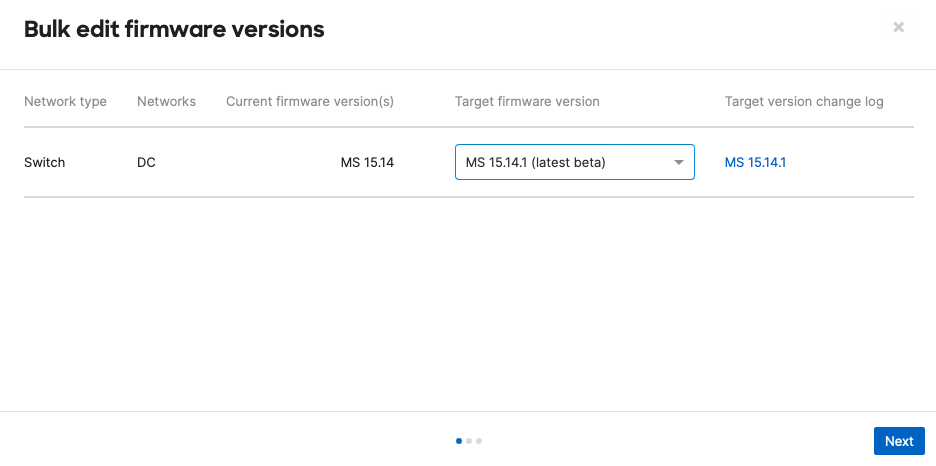
Select the switch network to schedule a staged upgrade for, and click the blue "Schedule upgrades" button. On the next page, choose the appropriate target firmware version to upgrade to, review the change log if required, and click "Next":
Choose only a single switch network to schedule a staged upgrade. If more than one network is selected then the Staged Upgrades option will not be available.
Firmware downgrades can be scheduled in the same manner by selecting a previous firmware version from the available options in the "Target firmware version"
Choose "Schedule staged upgrade", and click "Next":
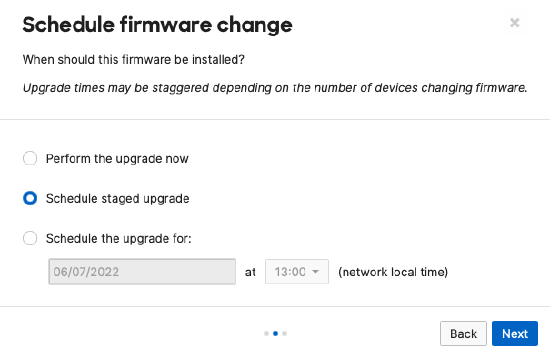
Review the summary, and click "Schedule change for 1 network" in order to proceed to configure the groups, sequence, and schedule:

If the firmware is scheduled less than 24 hours in advance, the download will start at the time of upgrade, not immediately.
Clicking "Schedule change for 1 network" will automatically redirect to the Staged Upgrade wizard. This allows you to configure Staged Upgrade Groups and the Upgrade Sequence before proceeding to schedule the Staged Upgrade Event.
The following sections detail those steps further.
Note: You can convert the normally scheduled firmware upgrade to Staged Upgrade and get redirected to the Staged Upgrade wizard manually by going to Organization > Monitor > Firmware upgrade > Scheduled changes.
Configuring Staged Upgrade Groups
If you've already configured your groups, you can click "Next" to configure the Staged Upgrade Sequence.
By default, there is a single "Default Group" defined for the network, and all switches that are a part of the network belong to this group. On this page, you can create new groups and assign switches to them as needed.
You can also create and modify staged upgrade groups without scheduling a firmware upgrade by navigating to Switch > Staged Upgrades, and choosing the "Groups" tab.
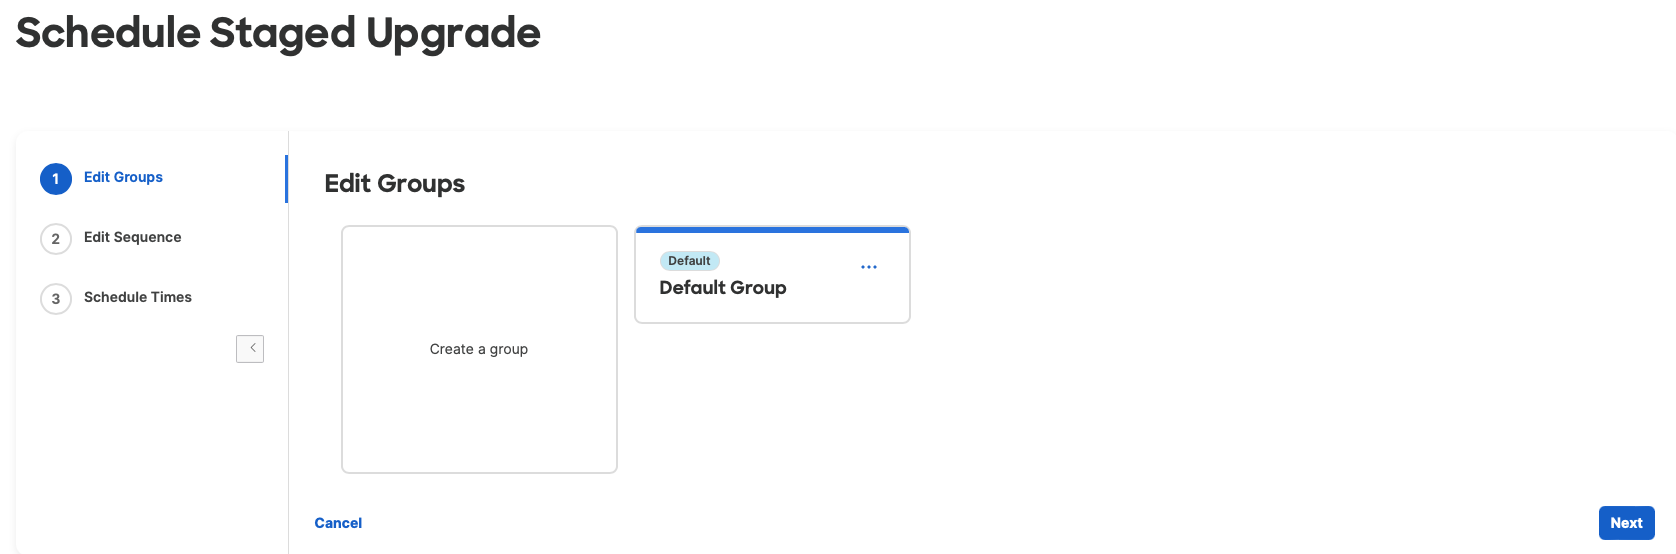
- To create a new group, click on the "Create a group" tile.
- To modify or delete an existing group, click on the three dots (...) for the group tile and choose the appropriate option.
On the group create/edit view, give the group a name (and optionally a description), and add or remove the appropriate switches to the group as needed. When you're finished, click the "Update" or "Create" button as appropriate to return to the groups screen.

Switch Stacks
Switch stacks are treated as a single device when it comes to upgrades. That is, every switch in a particular switch stack must belong to the same upgrade group. Therefore, you assign the stack to the group rather than each switch.
Switch stacks can be expanded in the group member list to see details about the switches that belong to that stack.
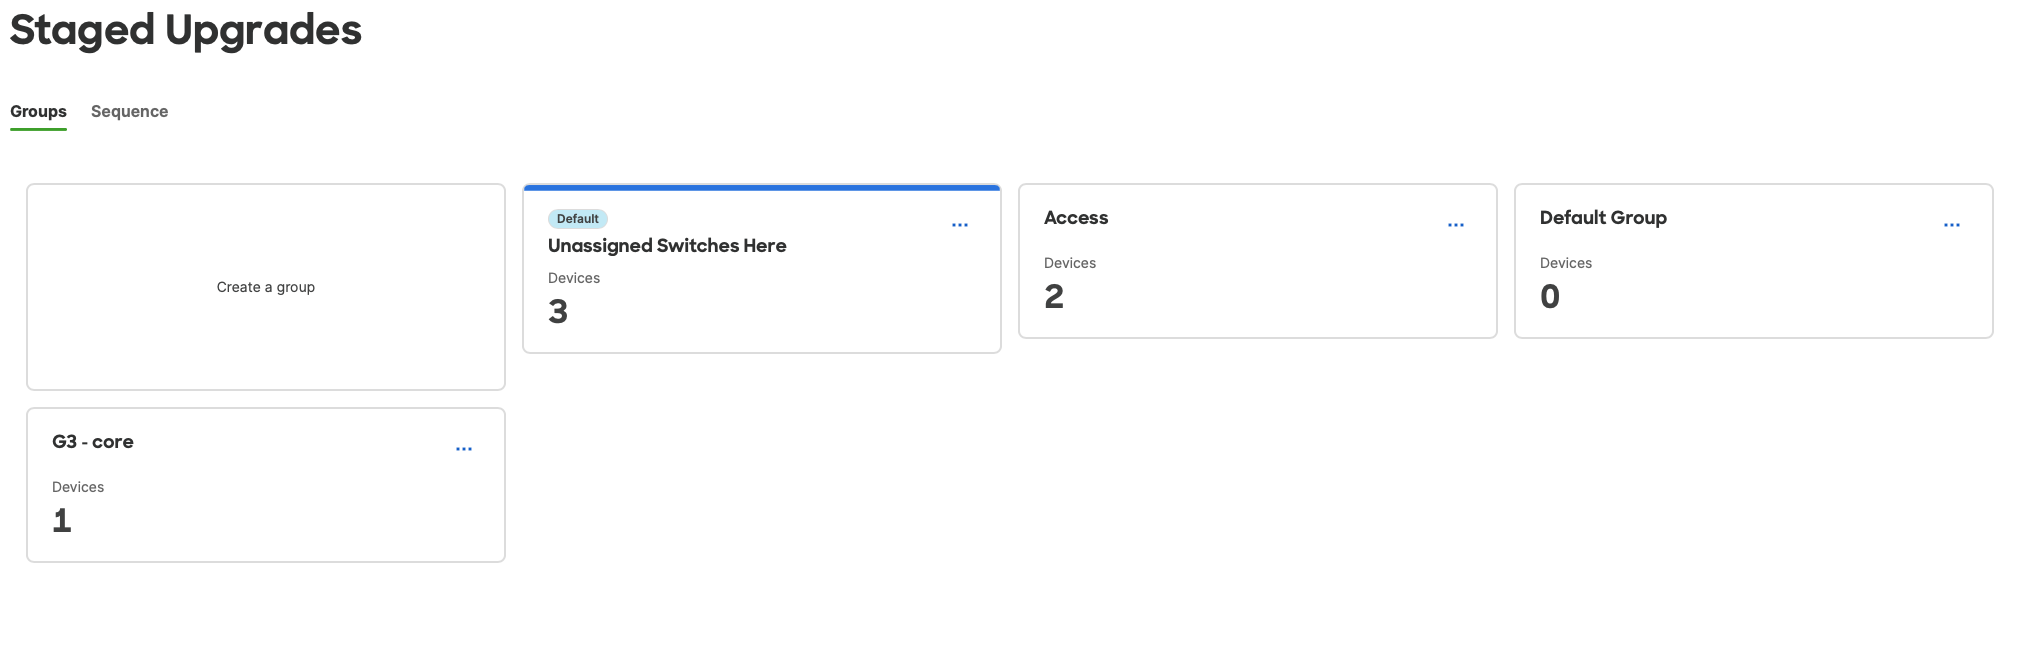
The Default Group
One upgrade group must always exist in a network and that group will contain any switches that an administrator has not otherwise assigned to a group. You can edit the default group in the same manner as any other group, and you can also assign a different group as the default group. Another way of thinking about this is that all of the switches in the network must belong to a group.
Switches that have a firmware image locked by Meraki support are still included in an upgrade group, but will be skipped when that group is scheduled to upgrade. The upgrade is still considered complete if any switches are skipped.
Similarly, any monitor-mode Catalyst switches in the network must be in an upgrade group but staged upgrades will skip the monitor-mode switches when those groups upgrade.
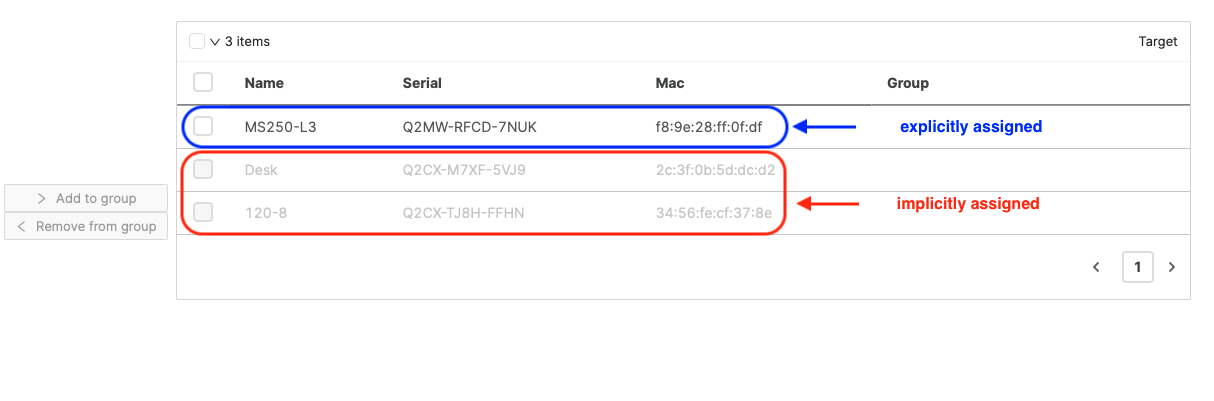
When an administrator assigns a switch to any group (default group or other), that switch is explicitly assigned. When explicitly assigned, a switch will remain assigned to that group unless an administrator assigns it to a different group or deletes the group that the switch is currently assigned to.
For any switches that have not been explicitly assigned to a group, they are implicitly assigned to the default group, whichever group that is. In the groups tab, the default group is marked with a Default tag and has a blue highlight on the card.
A default group named "Default Group" is created by ... well by default; but the name is separate from actually being the default group. In the screenshot below, the default group is named "Unassigned Switches Here" and the original default group named "Default group" remains.
If you change the default group assignment, it is recommended to rename or delete the original "Default Group" to avoid confusion.
Switches (or switch stacks) that are implicitly assigned to the default group are grayed out in the member list, while switches that are explicitly assigned use regular text:
Implicit and Explicit Group Assignment Examples
- If you assign a switch to any group, it is explicitly assigned and remains in that group unless:
- You explicitly assign the switch to a different group
- You delete the group which implicitly re-assigns the switches in that group to the current default group
- If you have not assigned a switch to a group, it is implicitly assigned to the current default group unless:
- You change which group is marked as default which reassigns that switch to the new default group
- You explicitly assign the switch to a group.
- If a new switch is added to the network, it is assigned to the current default group
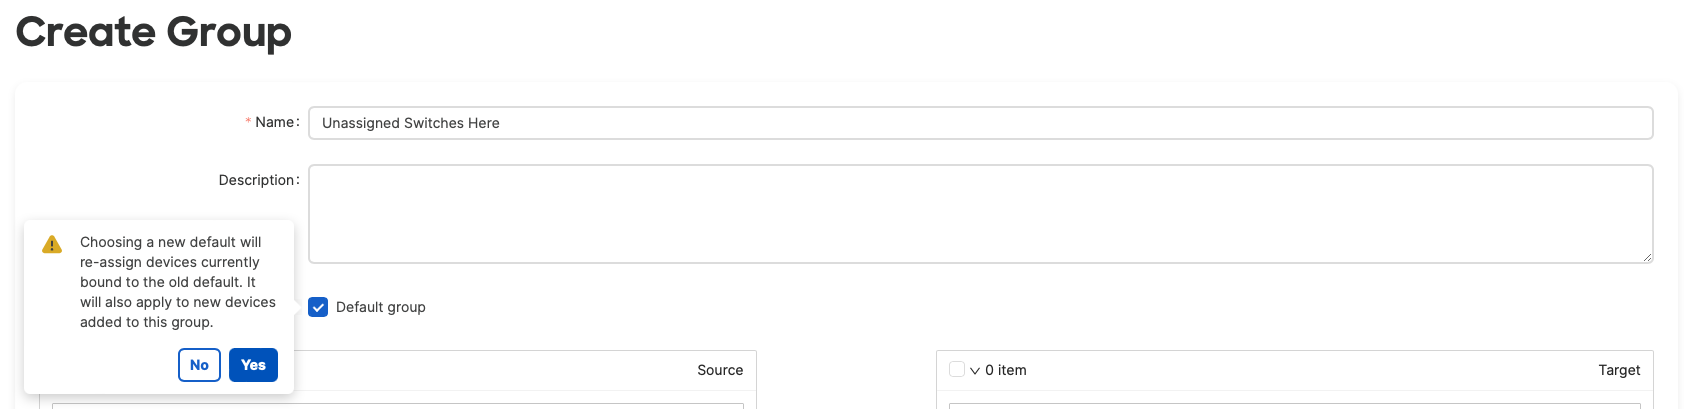
To change which group is marked as default, edit the group you want to make default. Click the "Default group" box, review the alert message, and click the "Update" button to save:
Configuring the Staged Upgrade Sequence
Once you've finished configuring Upgrade Groups, click the "Next" button to configure the Sequence. Drag each group into the desired order and click "Next" when finished:
You can also modify the staged upgrade sequence without scheduling a firmware upgrade by navigating to Switch > Staged Upgrades, and choosing the "Sequence" tab.
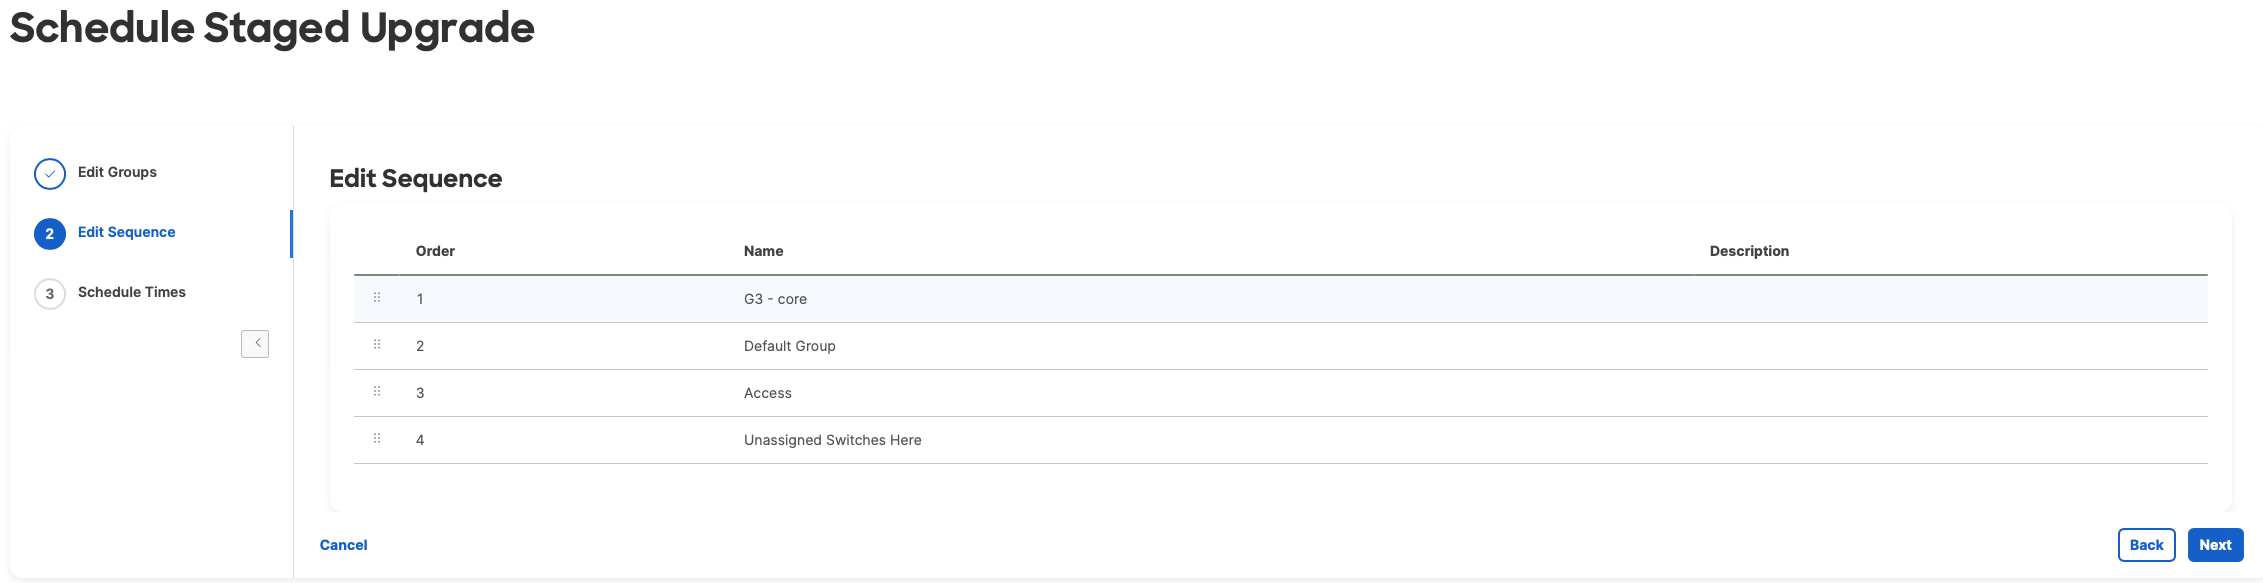
All Staged Upgrade Groups must be included in the Staged Upgrade Sequence. This includes any empty upgrade groups. We recommend deleting any empty groups from the network to remove them from the Staged Upgrade Sequence.
Scheduling the Staged Upgrade
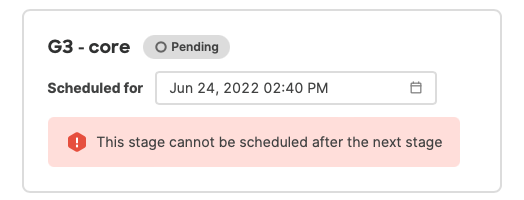
Assign a time for each staged upgrade group to perform the firmware upgrade by choosing a time and date in the "Scheduled for" field:

Start times must be scheduled in the same order as the sequence (you cannot schedule a group for a start time earlier than another group which is higher up in the sequence.
Each staged upgrade group will always start the firmware upgrade at its scheduled time whether the previous staged group completed firmware upgrade or not.
When times have been entered for each group, click "Next" to review the upgrade configuration and proceed to schedule the upgrade:
During the initial release, there is no review screen. Clicking "Next" on the Scheduling page will immediately schedule the upgrade.
Monitoring Staged Upgrades
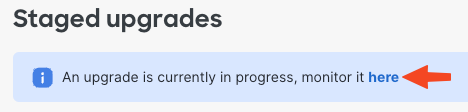
Once the upgrade is scheduled, Dashboard will load the monitoring page. Here you can monitor the upgrade status of each group as well as reschedule, rollback or cancel, and defer the staged upgrade.
You can monitor Staged Upgrades by navigating to Organization > Firmware upgrades > Scheduled changes or Switching > Staged Upgrades and clicking the link in the notice at the top of the page
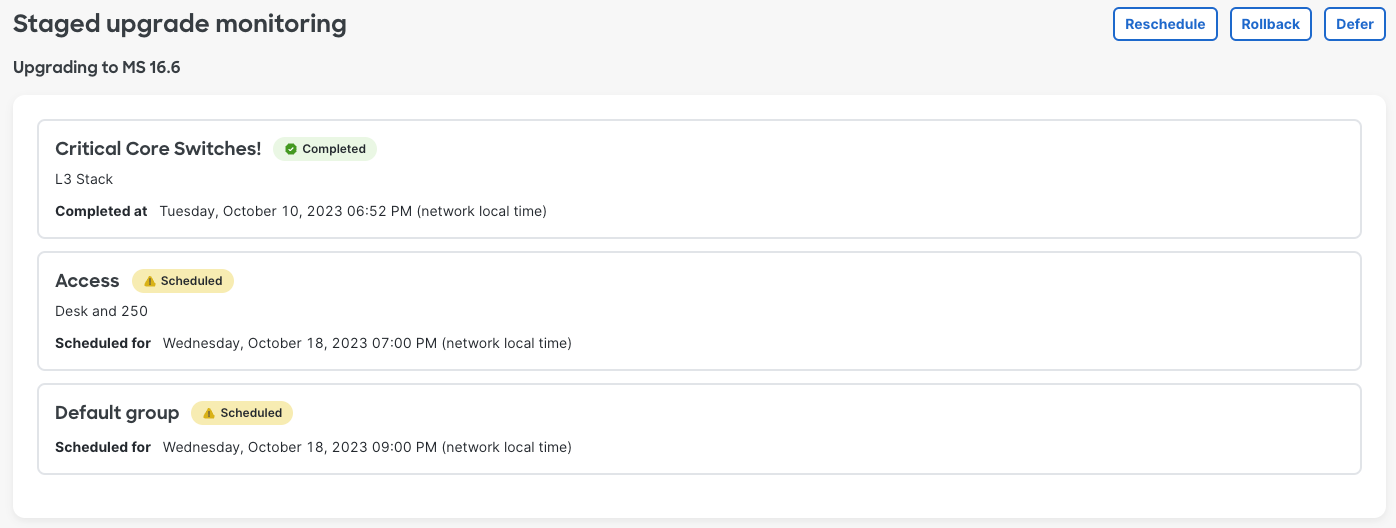
As each group starts their upgrade stage, the status will update to reflect the group upgrade status:
- Scheduled: The staged upgrade group has not yet started the upgrade
- Started: This status is triggered once the scheduled start time for the upgrade group in question has arrived
- Completed: This status is triggered either 30 minutes after the upgrade stage starts, or once all of the switches in the upgrade group have reconnected to Dashboard running the configured firmware version; whichever happens first.
Dashboard is currently unable perform upgrades for monitor-mode Catalyst switches, so for upgrade groups that include any number of monitor-mode Catalyst switches, the upgrade group will not be marked complete until the 30 minute timeout passes.
We recommend grouping all monitor-mode Catalyst switches into a separate upgrade group in order to be able to accurately monitor the upgrade status for any other groups.
Managing Staged Upgrades
There are three options to manage scheduled staged upgrades:
- Reschedule - This option allows you to change the scheduled times for any groups that have not yet started the upgrade. Staged Upgrade Groups that have already started or complete an upgrade cannot be rescheduled.
- Rollback / Cancel - This option allows you to abort an upgrade. For groups have already started or completed, a scheduled time must be entered to rollback to the pre-upgrade firmware. For groups that are scheduled but that have not started, the upgrade is cancelled.
- Defer: This option will reschedule any groups that have not started by adding 1 week to the currently configured time for that upgrade group.
Note that firmware upgrades in general can be scheduled at most 1 month ahead of the current time. Therefore the maximum amount of time any upgrade group can be deferred is one month away from when the defer option is used. This can result in multiple upgrade groups being scheduled for the same time (one month from the current time) when adding 1 week would exceed the 1 month limit.
It is always advised to carefully review the scheduled times to ensure they meet the requirements of the situation.
API
Staged upgrades can be created and managed via the Meraki API as well as Dashboard. For information regarding the API endpoints and usage, consult the Dashboard API documentation by navigating to the Help > API Docs menu in Dashboard, and search for "Staged Upgrade" in the API V1 documentation.
Firmware Upgrade Status
This section covers firmware upgrade visibility through the dashboard for two switch portfolios:
Click the links above to navigate directly to each section.
Firmware Upgrade Visibility for Cloud-Managed IOS XE Switches
Before upgrading from CS -> IOS XE, review Upgrade or Migration Checklist guide for key requirements.
With Meraki Dashboard, you can now monitor the detailed firmware upgrade status of your cloud-managed IOS XE switches (MS390s and Catalyst 9000 series) directly from the dashboard.
This is available for the following upgrade paths:
- From CS17 firmware to IOS XE
-
Between IOS XE versions
This feature is supported only for switches operating in Configuration Source: Cloud mode. It does not apply to MS-to-MS or CS-to-CS upgrade paths.
You can view upgrade progress in the following places:
-
Switch List page – under the Upgrade Status column
-
Switch Details page – in the Firmware section (left pane) or above the port diagram
It is available for switches that meet either of the following criteria:
-
Scheduled for a firmware upgrade through the dashboard or API.
-
Networks included in Meraki scheduled Automatic Firmware Upgrades.
Manual refresh is required to view the upgrade status updates. The statuses do not auto-refresh.
This feature is not available for rollbacks or downgrades at this time.
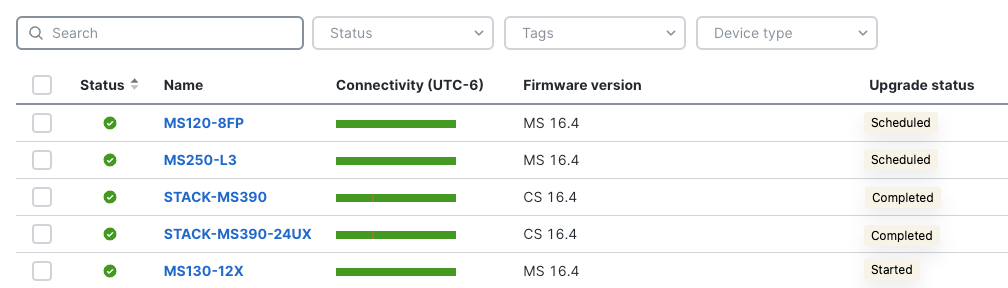
Viewing Upgrade Status Column on the Switch List Page

To view the upgrade status of your switches, make sure that the Upgrade Status column is visible on the Switch List table.
If the column is not visible, enable it by clicking the gear icon in the top-right corner of the Switch List table.
In the menu, make sure the Upgrade status option is checked.
 .
.
Upgrade Stages
During an upgrade, switches will report their status through distinct stages as described below:
-
Upgrade Scheduled - Upgrade is planned for the specified time.
-
Upgrade Complete - Upgrade finished successfully.
-
Upgrade Retry Scheduled - Attempt failed; retries may occur automatically. Dashboard automatically schedules a retry attempt.
-
Upgrade Failed - Attempt failed; retries may occur automatically.
-
Upgrade Cancelled – Upgrade cancelled by the user.
-
Download Started / Complete - Firmware image is being downloaded or finished downloading.
-
Install Started - Image is being installed.
During the "Install Started" stage, the switch will temporarily go offline as it reboots with the new firmware image.
-
Verification Started - New firmware image has been installed and switches are now verifying stable connectivity with the dashboard.
To ensure a successful firmware upgrade, do not reboot or unplug switches during the install and verification stages.
-
Idle - No upgrade activity.
-
Skipped - Indicates that the switch will not upgrade as the selected target image is not applicable or supported for the device.
Viewing Upgrade Status on the Switch Details page
Make sure to enable the new modern switch details pages by clicking “View New Version” in the top-right corner to see this enhancement.


To monitor the upgrade status of a switch, follow these steps:
-
Navigate to the Switch Details page:
-
Go to Switching > Switches.
-
Select the desired switch to open its details page.
-
-
When a switch is undergoing an upgrade or has an upgrade scheduled, the Upgrade Progress view will appear automatically above the port diagram visual.
-
The progress bar provides a visual representation of the upgrade lifecycle.
-
You can collapse or expand the Upgrade Progress view based on your preference.
-
The view can be manually dismissed by clicking the X button. Alternatively, it will automatically disappear 48 hours after the upgrade reaches its final state - Upgrade Complete, Upgrade Failed, or Upgrade Canceled.
Understanding Upgrade Failure and Retry Behavior
An upgrade failure can occur during any of the following stages of the firmware upgrade process:
-
Download: Switch fails to download the image from the cloud.
-
Installation: Image fails to install on the device.
-
Verification: Switch is unable to maintain a stable connection with the dashboard during the 30-minute window.
On the Switch List page, these are summarized as a single status, Upgrade Failed. However, on the Switch details page, you can review which specific stage the failure occurred at.
If an upgrade fails, the system automatically retries several times before marking it as failed. The retry pattern depends on the type of upgrade.
-
CS -> IOS XE Transition (Example: CS17 -> IOS XE 17.15 or 17.18)
-
When upgrading between CS -> IOS XE, the systems performs 5 retry attempts every 2 hours after each failure. After the first five failed attempts, the system will retry the firmware upgrade every 24 hours indefinitely. Please reach out to support for further assistance in this case.
-
-
IOS XE -> IOS XE Upgrade (Example: IOS XE 17.15 -> IOS XE 17.18)
-
When upgrading between IOS XE versions, the system performs 6 retry attempts in total.
-
Retry attempts are progressively increased:
-
1 hour after the first failure
-
Then, 2 hours later, 4 hours later, 8 hours later, 16 hours later
-
Final attempt after 16 hours
-
After the final attempt, the upgrade process stops automatically and will show as ‘Upgrade Failed’.
-
-
What You Should Do
If an upgrade fails repeatedly or gets stuck:
-
Review any pre-upgrade warnings before scheduling again.
-
Confirm the switch has stable connectivity to the Meraki Cloud.
-
Check for any alerts.
-
Ensure ICMP pings to required addresses are not blocked.
-
Verify correct Layer 3 configurations. See this documentation for more details.
-
If the issue persists, contact Meraki Support.
Before upgrading from CS -> IOS XE, review Upgrade or Migration Checklist guide for key requirements.
Firmware Predownload for IOS XE to IOS XE Upgrade Path
With this feature, switches automatically download the new firmware image up to 24 hours before the scheduled upgrade, when upgrading between IOS XE versions (17.15 and above). This ensures the image is ready on the device when the upgrade begins, significantly shortening the maintenance window.
The predownload timing is managed by the system and cannot be customized or scheduled by users. If the scheduled upgrade time is less than 24 hours away, the download will start immediately.
The predownload feature is not supported when upgrading from a CS version to IOS XE or between CS versions.
Firmware predownload works with both staged and all-at-once network upgrades.
When upgrading IOS XE, firmware upgrade status will display “Download started” and “Download complete” up to 24 hours prior to the scheduled upgrade time.
Upgrade event logs are only generated when upgrading between IOS XE versions (For example: IOS XE 17.15 to 17.18). You can find these logs under Network-wide -> Event Log. To view them, make sure to apply a filter for Catalyst switches. Look for event type “INSTALL”.
API
The same API endpoint used to retrieve firmware upgrade status can be used to get new upgrade statuses. This applies to – CS to IOS XE as well as IOS XE to IOS XE upgrades.
GET /organizations/{organizationId}/firmware/upgrades/byDevice
Key Changes In Behavior During Firmware Upgrades (CS -> IOS XE)
When upgrading switches to IOS XE firmware, the system performs a verification period to ensure the device maintains stable connectivity to the cloud dashboard for a time period before it is marked fully operational after the upgrade. Interrupting the device or applying configuration changes during this period can cause upgrade failures. To prevent this, the dashboard will temporarily pause configuration pushes to the device while the verification completes. This period lasts for about 30-minutes.
You can continue to make configuration changes during this time; however, they will not be applied to the device until upgrade verification is finished. The dashboard will clearly indicate when configuration pushes are paused:
-
A banner will appear in the Switch List and Switch Details pages, warning that the upgrade is in progress and that reboots or unplugging the switches should be avoided.

Banner on the Switches (Switch list) page.

Banner on the Switch details page
-
A “Configuration paused” status will be displayed under Configuration Status for devices in the "Install Started" or "Verification Started" upgrade state.

-
Once verification completes and the device reaches a final state, configuration pushes resume automatically, no manual action is required.
This behavior improves upgrade reliability and helps ensure devices complete firmware installation safely, reducing the risk of upgrade failures.
Firmware Upgrade Visibility for Meraki Switches
Firmware upgrade status provides visual feedback on the firmware upgrade progress for switches to help reassure admins that firmware upgrades are progressing as expected. Update status flags will appear automatically in the firmware section of the switch details page and in the Upgrade Status column of the flex table on the Monitor > Switches page any time an upgrade is scheduled or in progress.
| Platform Support | Minimum Firmware Required |
|---|---|
| All MS switches | N/A |
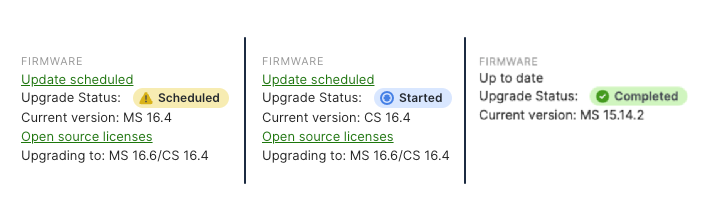
On the switch details page for an individual switch, the firmware section indicates the upgrade status for that particular switch:
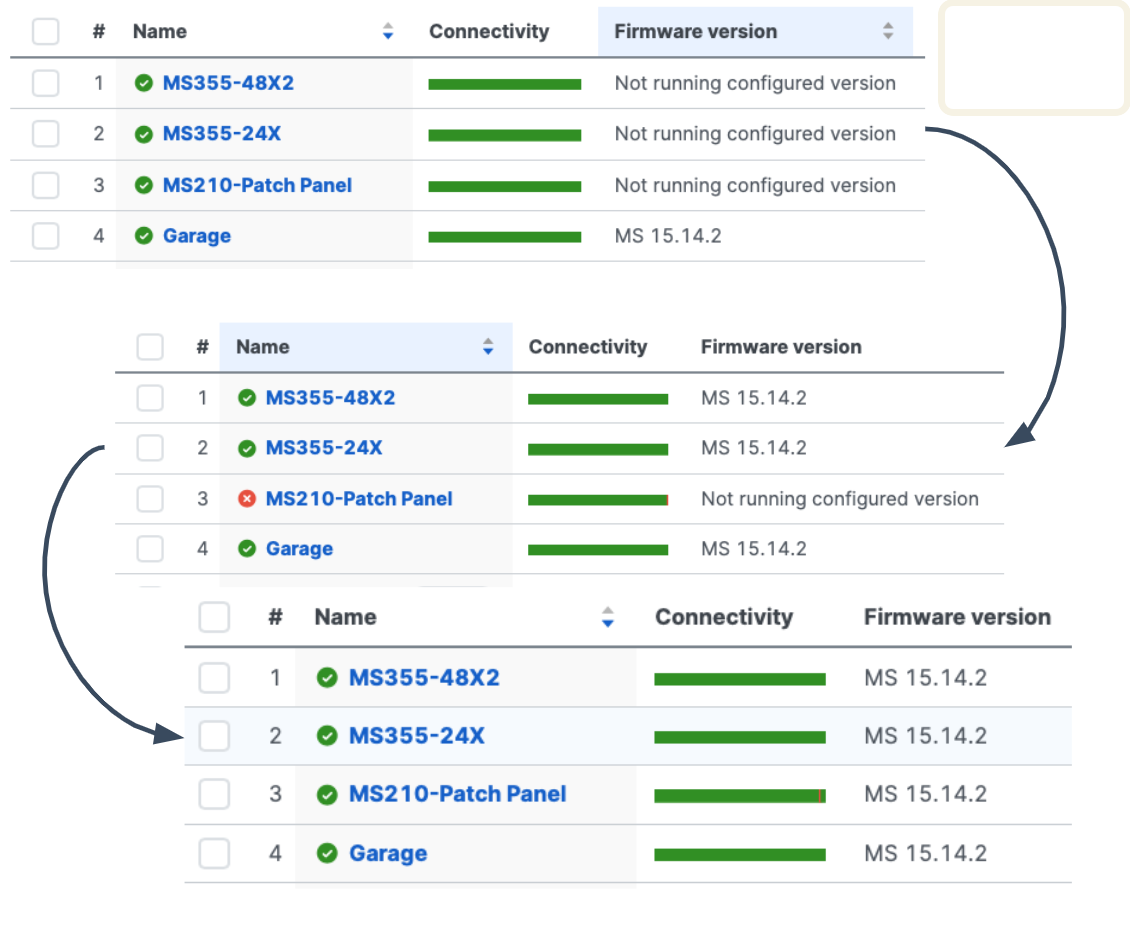
On the Monitor > Switches page, you can enable the Upgrade status column for the flex table to see the upgrade status for multiple switches in the network at the same time:
The statuses match the upgrade group statuses used in staged upgrades:
- Scheduled: Indicates that a firmware upgrade that includes this switch has been scheduled to take place, but that the scheduled time has not yet arrived.
- Started: Indicates that the scheduled time has arrived and that the switch will begin the upgrade.
- Completed: After the upgrade starts, the completed flag appears when the first of the following two situations occurs:
- The switch appears back online in Dashboard running the upgraded version of firmware.
- 30 minutes has passed since the scheduled upgrade time.
- Canceled: Appears only if the switch belongs to a staged upgrade group whose upgrade stage has been canceled as part of a rollback. It remains until the staged upgrade rollback is complete.
- Skipped: Indicates that the switch has a firmware version locked by Meraki support and will not be upgraded.
Understand that "completed" is not the same as an upgrade being successful. The completed status indicates that the upgrade job has executed, and in most cases all of the switches in that job will be back online running the upgraded firmware before 30 minutes passes. Regardless, the job does eventually need to be marked complete.
If any individual switch is unable to successfully complete the firmware upgrade, Dashboard will indicate the discrepancy in the firmware version on the switch details page as well as the switch list (refer to the next section).
Dashboard is currently unable to monitor the upgrade status of monitor-mode Catalyst switches, and upgrades on those switches are not attempted, so the upgrade group will be marked complete after the 30 minute timeout passes.
We recommend grouping all monitor-mode Catalyst switches into a separate upgrade group in order to be able to accurately monitor the upgrade status for any other groups.
Switches running MS firmware wait up to 20 minutes after downloading firmware before rebooting to install the new version, in order to ensure any switches downstream that are also downloading firmware have enough time to complete the download.
Firmware version column
The firmware version column on the switch list page will also reflect the firmware version status during the upgrade: