
MV2 Wireless Onboarding
Overview
The MV2 is a Meraki Flex Camera from the second-generation MV smart camera family. It features a USB-C port for power and can be easily connected to a wireless network using the Meraki Mobile App and the wireless onboarding steps outlined in the documentation.
Wireless Onboarding only works MV2 and is not supported for any other Meraki Generation 2 cameras.
Installation and Connectivity
For detailed information around installing the camera, please refer to the install guide. MV2 only has a USB-C port, hence it should be used with one of the two accessories:
|
Accessory SKU |
MA-PWR-USB-XX |
MA-PWR-ETH |
|---|---|---|
|
What is it? |
Region-specific AC Power adapter with 3m (10ft) USB-C cable included |
Ethernet to USB-C Dongle with 1m USB-C cable included |
|
Max Power |
10W (5V,2A) |
12.95W (802.3af) |
|
Data Connectivity |
Wireless Connectivity |
Wired connectivity |
Wireless onboarding is only supported for MV2 which use the AC Power Adapter and NOT the ethernet to USB-C dongle.
Supported mobile devices and OS
Onboarding MV2 with the mobile app is supported on most iOS and Android mobile devices.
-
iOS: Any device that supports iOS version 11 or higher.
-
Android: This is supported on Android devices from Samsung, Google Pixel and OnePlus on Android 10 or higher
Supported Meraki Mobile App version
Update your Meraki Mobile App to version 4.12.0 or higher. The Meraki App version can be verified under Settings > About within the app
Wireless Profiles
Wireless configuration for all cameras is managed in Meraki Dashboard with Wireless Profiles. These can be either setup on Dashboard before onboarding your MV2 or in the app during the onboarding flow
LED Status
Your MV2 is equipped with a LED light on the front of the unit to convey information about system functionality and performance:
 |
Rainbow - MV is initializing or looking for upstream network connectivity. Flashing Green - MV is formatting its storage and/or upgrading its firmware. Flashing Blue - MV is attempting to connect to a nearby access point. Solid Green - MV is online with an active wired connection. Solid Blue - MV is online with an active wireless connection. Solid Purple - MV is recording audio. Solid Amber - MV cannot connect to Dashboard or encountered an error. Blinking White - Camera is ready to be wireless onboarded through the Meraki Mobile App. Solid White - Camera being configured from the app. |
Onboard one camera at-a-time
During onboarding, the Meraki Mobile App talks directly to your camera to send wireless configuration over an encrypted connection. This only supports a one-to-one communication between the camera and the app.
How does Wireless Onboarding work?
Camera out-of-the-box
The camera is powered on using an AC Power adapter and boots up similar to other MV’s going through Amber, Blinking Blue and Rainbow LED’s. As the camera is ready to be “onboarded” , it settles on a blinking white LED
The camera stays in broadcasting state for 10 minutes and will reboot and re-initiate if the onboarding is not completed. We recommend rebooting the camera before beginning to onboard.
If the LED on the camera is not blinking white:
-
Please make sure this camera is using the AC Power Adapter and not the USB-C to Ethernet Dongle
-
Please make sure you wait up to 30s after camera boot.
-
If the camera does not show blinking white LED at all, factory reset the camera]
-
If the issue persists , please open a support case.
Select the camera to onboard
On the Mobile App, select the camera to onboard from the list of devices. From the menu, select Tools > Configure Wirelessly and follow the prompts in the app.
Set the right App permissions/settings
The Meraki Mobile app will check for the following permissions to ensure Wireless Onboarding to work smoothly:
|
Permission/Setting to enable |
iOS |
Android |
|---|---|---|
|
Location |
Required to connect to a nearby wireless network |
Required to connect to a nearby wireless network |
|
WiFi |
The App connects to camera on a WiFi network |
The App connects to camera on a WiFi network |
|
Power-saving mode |
N/A |
Power Saving mode sometimes interfere with connecting to a network |
|
Local Network permission |
Permission to send Wireless configuration from the app to the camera |
N/A |
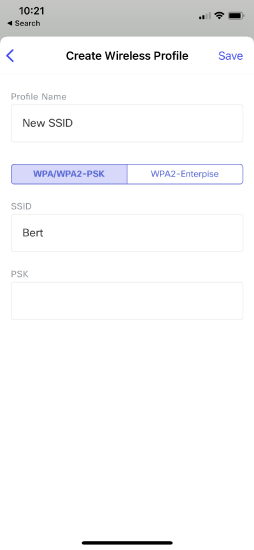
Use Wireless Profiles
Just as on Dashboard, wireless configuration is saved as Wireless Profiles. Select one of the wireless profiles by tapping on it.
|
Existing Wireless Profile |
New Wireless Profile |
|---|---|
|
|
|

Connect to the camera
After the profiles are selected, the mobile device connects to the camera. There is a prompt within the app. Select Join to proceed.
 |
 |
Once the mobile device associates to the camera and gets an IP address, the LED on the camera turns to solid white. If the app fails to associate with the camera, the following error shows up.
 |
 |
Receive Additional Feedback
If the previous attempt to onboard the camera failed, the screen displays a notification about the error encountered. After reviewing the error, select 'Continue' to proceed.

Receive Confirmation
Once the process is complete, the camera will connect to the Dashboard and be ready for viewing.

After completing the wireless onboarding, keep the camera powered on and connected for 30 minutes to allow it to upgrade its firmware.
Factory Resetting the camera
To factory reset the camera, keep the camera plugged in and press the reset button at the base of the camera for 8 seconds with a paper-clip.
